background image

DELETING RECORDS

23

22

RECALLING RECORDS

Recalling Records in Memory

1. 

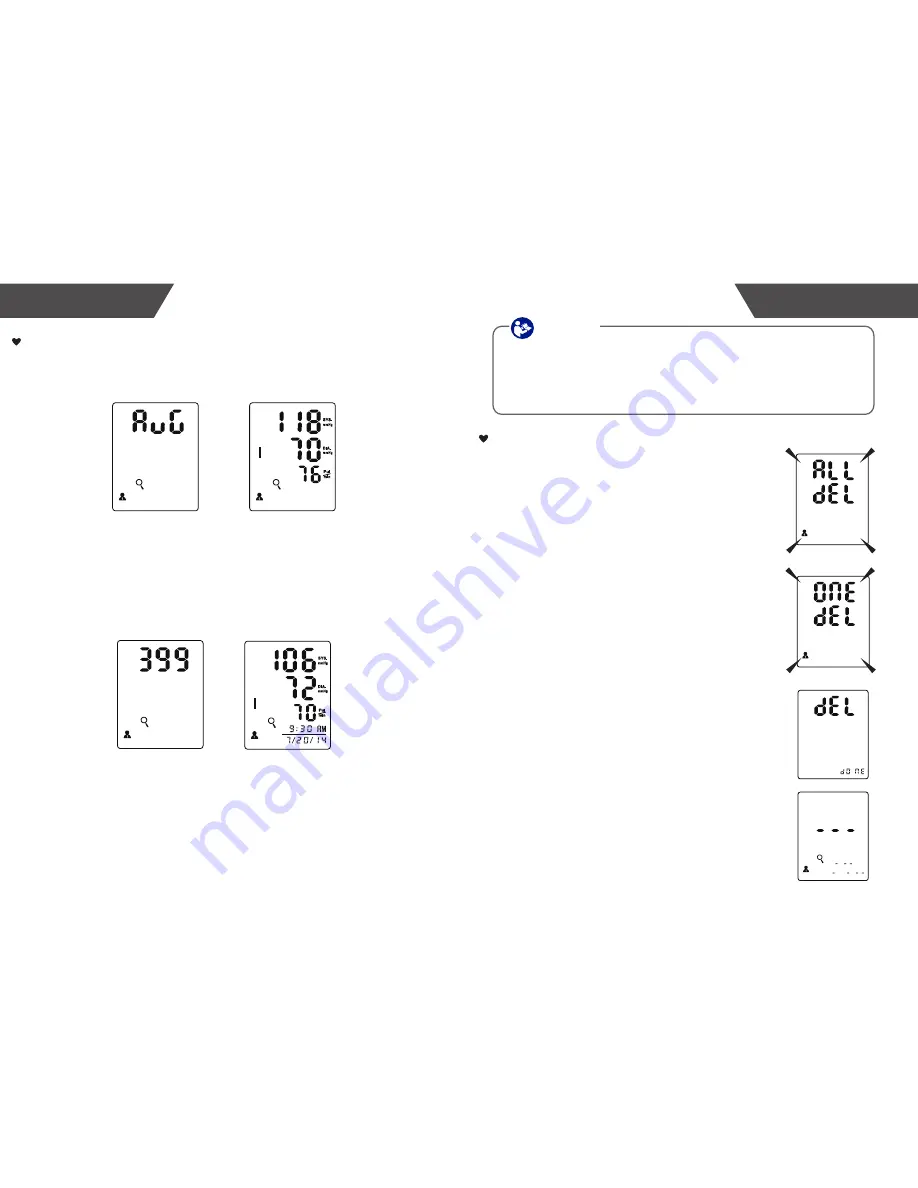
When the monitor is off, press “MEM” button to access the memory. The 

LCD will display the average value of the most recent readings first. 

2. 

Press “MEM/UP” button or “SET/DOWN” button to scroll up or down 

through the records. Press the "MEM" button to sort the records from the 

most recent to the oldest. Press the "SET" button to sort the records from 

the oldest to the most recent. Alternatively, press and hold the "SET" 

button to skip through the memory in increments of 10, as in M01, M11, 

M21, M31, etc. Press and hold “SET” button to review the records as 

M01, M11, M21, M31..., etc.

3.  

To view another user’s records, first ensure that the device is in memory 

mode. With the device in memory mode, press the START/STOP button 

to turn it off. Then press the START/STOP button again to turn it on. The 

user icon will blink on the LCD. Press the “MEM” button to select the 

desired user ID, then press “SET” to confirm. The device will turn off. 

Pressing the “MEM” button next will activate the device in memory mode 

for the selected user ID.

CAUTION

Delete the Records

This device features enhanced memory to store up to 399 records 

for 3 different users. The most recent reading is by default shown 

first, following by the next most recent reading. Once the memory 

is full, i.e. upon taking the 400th measurement, this device will 

automatically delete the 1st record from memory. 

1. 

To delete a single or all records from memory for 

a given user, first ensure the device is in memory 

mode for the intended user. The press and hold 

the “MEM” button for 3 seconds. The device will 

then display “ALL DEL” in the center of the 

screen, and the user number on the bottom left of 

the screen. Press “SET” to delete all records.

2. 

Alternatively, press “MEM” again and the device 

will display “ONE DEL” in the center of the 

screen, and the user number on the bottom left of 

the screen. Press “SET” to delete the single 

record. 

Note, to exit out of delete mode without deleting any 

records, press the START/STOP button before 

pressing "SET" to confirm any delete commands. 

3. 

The device will display "DEL DONE" on the 

screen to confirm the deletion command was 

completed. 

4. 

If the device has no records in memory, the LCD 

will display dashes on the screen as shown at 

right when pressing "MEM" to enter memory 

mode. 

Содержание CardioTech BP6T

Страница 1: ...onitor Thank you for purchasing this Ozeri Blood Pressure Monitor Please read this manual thoroughly before first use and keep this manual handy for future reference 6755 Mira Mesa Blvd Suite 123 239...

Страница 2: ...Button Descriptions Charging Your Device Programming the Unit Operating Instructions Applying the Cuff and Positioning Measuring Your Blood Pressure About Blood Circulation and Pressure Irregular Hea...

Страница 3: ...cian for specific information about your blood pressure Self diagnosis and treatment using measured results may be dangerous Follow the instructions of your physician or licensed healthcare provider C...

Страница 4: ...the information in the instruction manual and any other literature in the box before operating the unit Dispose of the device components and optional accessories according to applicable local regulati...

Страница 5: ...environment 6 Use the bathroom before taking measurement 7 Avoid excessive talking and hand movement 8 Wait at least 20 min after taking bath or shower 9 Wait 2 3 minutes before retaking your blood pr...

Страница 6: ...tor Irregular Heartbeat Detector Heartbeat Heartbeat detection during the measurement Grade Blood pressure classifications according to the American Heart Association User 1 User 2 User 3 Start measur...

Страница 7: ...5 days 3 Store the blood pressure monitor in a cool and dry place and avoid storing near a heat source as it may cause the battery to explode 4 Only use the included AC Adapter to charge the unit You...

Страница 8: ...the MINUTE 6 Repeat Step 3 and 4 to confirm MONTH DAY and YEAR 7 Repeat Step 3 and 4 to confirm the UNIT Correct Measurement Position In order to get an accurate reading sit upright in a chair and res...

Страница 9: ...measurement for the selected user Measurement begins at 0 Initial LCD Display START STOP Inflation and measurement begin automatically Final measurement displayed on screen and saved into memory 3 Pre...

Страница 10: ...od returns to heart Higher pressure Contraction of the heart muscle Pressure increased on arteries Blood outflow Diastolic Blood Pressure Systolic Blood Pressure An irregular heartbeat is defined as a...

Страница 11: ...art conditions can only be properly diagnosed by a doctor through a medical examination If an irregular rhythm is detected more than twice during measurement the irregular heartbeat symbol with three...

Страница 12: ...r the selected user ID CAUTION Delete the Records This device features enhanced memory to store up to 399 records for 3 different users The most recent reading is by default shown first following by t...

Страница 13: ...d then measure again E 10 or E 11 The monitor detected motion while measuring Movement can affect the measurement Relax for a moment and then measure again Eexx A calibration error occurred Relax and...

Страница 14: ...N 1041 2008 EN 62304 2006 AC 2008 USA EU Power supply Display mode Digital LCD V A 46 5 x 36 5mm Measurement mode Oscillographic testing mode Measurement range Accuracy Normal working condition Storag...

Страница 15: ...parts found to be defective due to a manufacturer s defect This warranty extends only to personal use and does not extend to any product that has been used for commercial use or use which is not inten...

Страница 16: ...gives you specific legal rights You may also have other rights which vary from state to state T H I S W A R R A N T Y D O E S N O T A P P L Y T O T H E FOLLOWING Damage due to accident misuse abuse a...

Отзывы: