


Clara
15
Version 2.0 rev 24 Mar 2015
SECTION 3: INSTALLATION
3.1 s
afety
C
onsideRations
•
Prior to commencing installation, please refer to the Safety and Warning Information at the preface of the
manual and the Specifications in
to ensure all requirements have been met.
•
As part of the safety features of the product the Clara must be powered from an SELV (safety extra low voltage)
source. In the case of the standard supplied power supply (PS-12) this unit provides an SELV output and is
designed to have a protective earth connected via the earth pin on the mains plug of the unit. It is important to
ensure that this is connected to the buildings protective earth system.
•
The equipment should be positioned so that the mains supply plug/cord can be easily accessed for
disconnection.
3.2 m
ounting
i
nstRuCtions
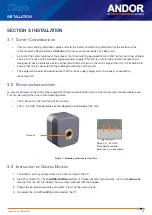
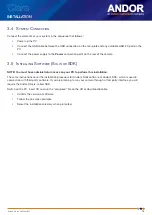
To prevent damage to the Clara, other equipment and/or personnel the camera must be securely mounted before use.
This can be using either one of the following points:
•
The C-Mount on the front face of the camera
•
The ¼ -20 UNC threaded holes on the Baseplate (underside of the unit)
Figure 7: Mounting Locations for the Clara
3.3 i
nstalling
tHe
C
ameRa
d
RiveRs
1. Terminate & exit any programmes which are running on the PC.
2. Insert the Andor CD. The
InstallShield Wizard
starts. If it does not start automatically, run the file
setup.exe
directly from the CD then follow the on-screen prompts that then appear.
3. Follow the on-screen prompts and select “Clara” as the camera type.
4. Complete the InstallShieldWizard and restart the PC.
INSTALLATION
C-mount
Above: ¼
-20 UNC
Threaded Mounting
Holes (x3) - on baseplate


