background image

5.Panel Operation 


26 

Note: The following output modulation waveform uses CH1 as an example. If you 
need to set CH2, please refer to CH1 operation

AM (Amplitude Modulation) 

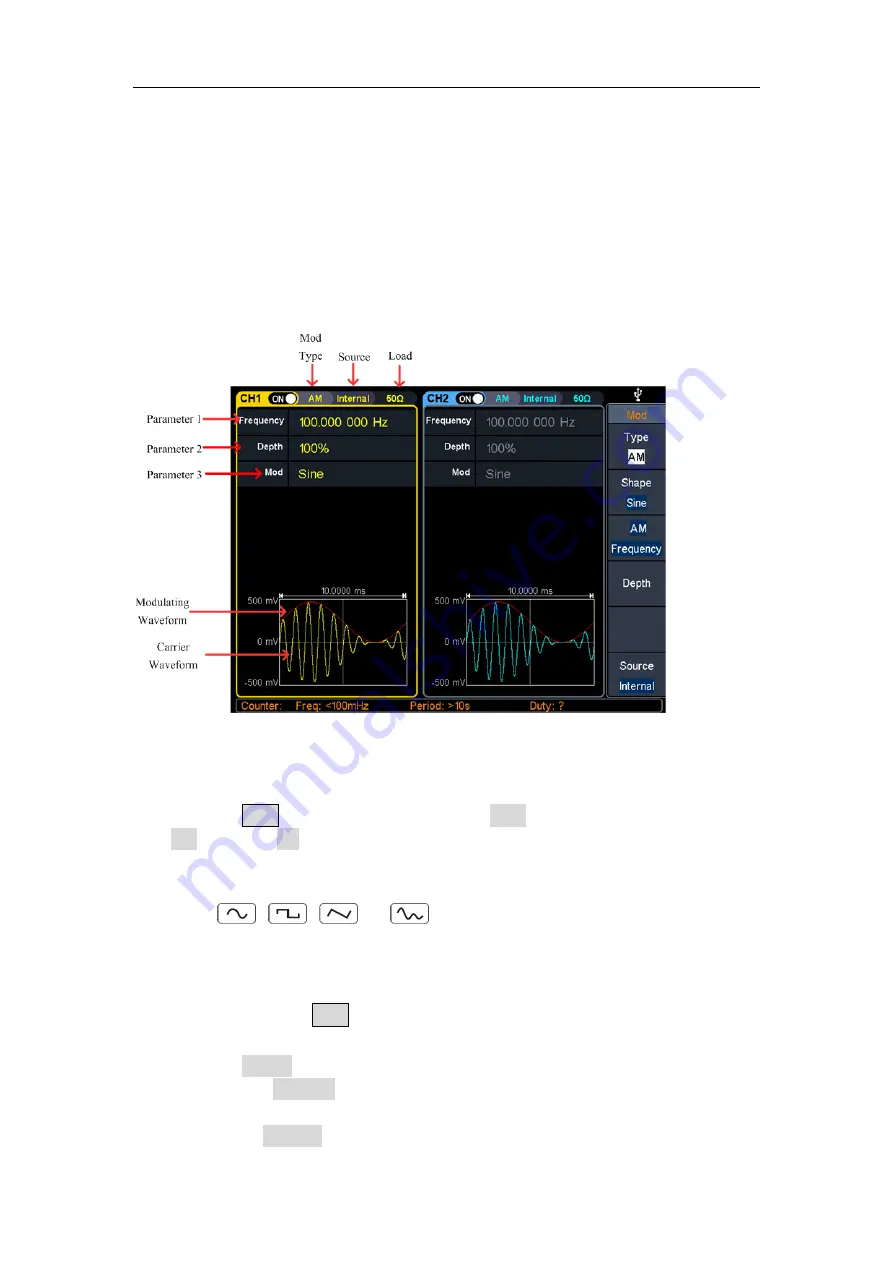
The modulated waveform consists of the carrier wave and the modulating wave. For 
AM, the amplitude of the carrier wave varies with the instantaneous voltage of the 
modulating wave. The AM user interface is shown below. 


Figure 5-11: AM user interface 

How to set the parameters of AM 

(1)


Press the 

Mod

 function key, then press the 

Type

 softkey, turn the 

knob

 to select 

AM

, press the 

OK

 softkey. 

(2)


Select carrier wave shape

:   

The  carrier  wave  can  be 

Sine

Square

Ramp

,  or 

Arbitrary

  wave  (except  DC). 

Press 

, or 

  to select a desired carrier wave shap.   

(3)


Set carrier wave parameters

:   

Press 

the wave shap key

 of the selected carrier wave  to display the waveform 

and  parameters  of  the  carrier  wave.  You  can  change  the  parameters  of  the 
carrier wave. Press 

Mod

 to return to the modulation mode interface. 

(4)


Select modulating wave source

:   

Press the 

Source

 softkey to select the modulating wave source.   

If  you  select 

External

,  use  the 

Mod/FSK/Trig

  connector  at  the  rear  panel  to 

input the external modulating signal, the AM setting is completed.   
If you select 

Internal

, continue with the following steps. 

Содержание XDG2030

Страница 1: ...XDG2030 Dual Channel Arbitrary Waveform Generator User Manual www owon com ...

Страница 2: ...eplace all materials published The information in this manual was correct at the time of printing However LILLIPUT will continue to improve products and reserves the rights to change specification at any time without notice is the registered trademark of the LILLIPUT Company Fujian LILLIPUT Optoelectronics Technology Co Ltd No 19 Heming Road Lantian Industrial Zone Zhangzhou 363005 P R China Tel 8...

Страница 3: ...hase is also required This warranty shall not apply to any defect failure or damage caused by improper use or improper or inadequate maintenance and care OWON shall not be obligated to furnish service under this warranty a to repair damage resulting from attempts by personnel other than OWON representatives to install repair or service the product b to repair damage resulting from improper use or ...

Страница 4: ...e Wave 10 Set the frequency period 10 Set the amplitude 11 Set the offset 11 Set the high level 11 Set the low level 12 Set the start phase 12 Output Square Wave 12 Output Ramp Wave 13 Set the symmetry 13 Output Pulse Wave 14 Set the pulse width duty cycle 15 Set the rising falling time 17 Output Noise Wave 17 Output Arbitrary Wave 17 Select build in wave including DC 18 Output Harmonic Wave 23 Ha...

Страница 5: ...Shift Keying 40 OSK Oscillation Shift Keying 41 SUM Sum Modulation 42 Generate Sweep Sweep 44 Generate Burst Burst 45 Set N Cycle Burst 46 Set Gated Burst 47 Counter 49 Utility Function Setting 49 Display Settings 50 Brightness Control 50 Screen Saver 50 Separator 50 Date 50 Contrast 51 CH1 2 Settings 51 Sync 51 Load 52 I O Setup 52 USB Device Type 52 Network Setting 53 System Settings 53 Language...

Страница 6: ...64 Using LAN Port 64 Connect Directly 64 Connect through a Router 65 7 Troubleshooting 67 8 Specification 68 Waveforms 68 Frequency Characteristics 68 Amplitude Characteristics 68 Signal Characteristics 69 Modulation Characteristics 70 Sweep Characteristics 72 Burst Characteristics 73 Counter Specifications 73 Input Output Characteristics 73 General Specifications 74 9 Appendix 76 Appendix A Acces...

Страница 7: ...or shock hazard check all ratings and markers on the instrument Refer to the user s manual for more information about ratings before connecting the instrument Do not exceed any of ratings defined in the following section Do not operate without covers Do not operate the instrument with covers or panels removed Use Proper Fuse Use only the specified type and rating fuse for this instrument Avoid exp...

Страница 8: ... in damage to this product or other property Terms on the Product The following terms may appear on this product Danger It indicates an injury or hazard may immediately happen Warning It indicates an injury or hazard may be accessible potentially Caution It indicates a potential damage to the instrument or other property might occur Safety Symbols Symbols on the Product The following symbol may ap...

Страница 9: ...eck whether there is any loss of accessories with reference to this description If it is found that there is any accessory lost or damaged please get in touch with the distributor of OWON responsible for this service or the OWON s local offices 3 Check the Complete Instrument If it is found that there is damage to the appearance of the instrument or the instrument can not work normally or fails in...

Страница 10: ... sine square ramp pulse or arbitrary burst 4 Knob Change the currently selected value also used to select the character in the soft keyboard when the file location or file name is entered When inserting a USB flash drive press the knob to save the current display screen to the folder of the USB flash drive in BMP image format 5 Direction key Move the cursor of the selected parameter 6 Operation ke...

Страница 11: ...at matches the current configuration of CH2 10 CH2 Out Output CH2 signal 11 button Display the inter channel menu You can copy the parameters of one channel to the other synchronize the frequency or amplitude and align the phase of two channel signals 12 CH1 Out Output CH1 signal 13 CH1 Sync When Utility CH1 2 Set CH1 Sync turned on this terminal outputs a synchronization message that matches the ...

Страница 12: ...AC input connector AC input connector 4 Fuse Container The place to install the fuse 5 Foot Stool Tilt the signal generator for easy operation 6 COM interface optional This interface can be used to connect with PC 7 LAN interface The network port which can be used to connect with PC 8 USB Device interface Used to connect a USB type B controller Can be connected with PC the signal generator can be ...

Страница 13: ...p frequency and outputting the burst the signal accessed here can be used as an external source Note If one channel turns on AM FM PM PWM or OSK and the other channel turns on ASK FSK PSK sweep or burst and both channels are set to external trigger then the channel that sets the trigger source can be accessed to external trigger the other channel automatically cancels the external trigger because ...

Страница 14: ...onnected through the LAN interface 6 Lights up the indicator when connected to the USB Host via the USB DEVICE interface 7 When the instrument detects the USB flash drive it lights up the indicator 8 Current menu name 9 Current waveform or mode setting menu 10 Counter brief information showing frequency value period value and duty cycle 11 Display current waveform 12 Start phase 13 Offset low leve...

Страница 15: ...litude of both channels are synchronized when you change the parameter of either channel the parameter of the other channel is set to the same value 1 Press on the front panel to display the inter channel menu 2 Press CH2 To_CH1 to copy parameters of CH2 to CH1 3 Press CH1 To_CH2 to copy parameters of CH1 to CH2 4 Press FreqSync to toggle between On and Off At on status the frequency of the two ch...

Страница 16: ...nu includes Frequency Period Amplitude High Level Offset Low Level and Start Phase The menu can be operated by the menu selection button on the right Figure 5 1 Sine wave user interface Set the frequency period Press CH1 all currently selected CH1 menu items are highlighted Press the Frequency Period softkey the selected menu item is highlighted in white and a cursor will display on the correspond...

Страница 17: ...ed if not press the Amplitude High sofkey to switch to Amplitude In Parameter 2 of Figure 5 1 a blinking cursor appears in the parameter value of amplitude Turn the knob to change the value directly or use the numeric keypad to input the desired value and choose the unit Set the offset Press the Offset Low softkey to confirm whether the Offset menu item is highlighted if not press the Offset Low s...

Страница 18: ...hase menu item is highlighted In Parameter 4 of Figure 5 1 a blinking cursor appears in the parameter value of start phase Turn the knob to change the value directly or use the numeric keypad to input the desired value and choose the unit Output Square Wave Press the screen displays the user interface of the square wave The Square waveform parameters can be set by operating the Square setting menu...

Страница 19: ...tart Phase and Symmetry To set the Frequency Period Amplitude High Level Offset Low Level Start Phase please refer to Output Sine Wave on page 10 Figure 5 4 Ramp wave user interface Set the symmetry Press the Symmetry softkey the Symmetry menu item is highlighted In Parameter 5 of Figure 5 4 a blinking cursor appears in the parameter value of symmetry Turn the knob to change the value directly or ...

Страница 20: ...s the user interface of the pulse wave The Pulse waveform parameters can be set by operating the Pulse setting menu on the right The pulse wave menu includes Frequency Period Amplitude High Level Offset Low Level Start Phase Pulse Width Duty Cycle and Rising Time Falling Time To set the Frequency Period Amplitude High Level Offset Low Level Start Phase please refer to Output Sine Wave on page 10 ...

Страница 21: ...sen menu item is highlighted Press the Width DutyCyc softkey to switch between Pulse Width and Duty Cycle In Parameter 5 of Figure 5 6 a blinking cursor appears in the parameter value Turn the knob to change the value directly or use the numeric keypad to input the desired value and choose the unit Figure 5 7 Set the pulse width ...

Страница 22: ... pulse period Pulse Duty Cycle The pulse width is defined as the time interval from the 50 threshold of the amplitude of the rising edge of the pulse to the 50 threshold of the amplitude of the next falling edge as shown in the following figure The settable range of pulse width is limited by the minimum pulse width and pulse period Pulse width minimum pulse width Pulse width pulse period minimum p...

Страница 23: ...h the generator output is white noise Press the screen displays the user interface of the noise wave The Noise waveform parameters can be set by operating the Noise setting menu on the right The noise wave has no frequency and periodic parameters The noise wave menu includes Amplitude High Level Offset Low Level To set the Amplitude High Level Offset Low Level please refer to Output Sine Wave on p...

Страница 24: ... of waveforms built in the generator the number of waveform points is 8192 points and the highest upper limit frequency is 15MHz To select a built in waveform the steps are as follows 1 Press the Arb wave button then press the Built in softkey to enter the built in wave menu 2 Press Common Medical treatment Standard Maths softkeys to select the built in wave type Press NextPage softkey to enter th...

Страница 25: ...tion oscillation curve GaussPulse Gauss pulse NegRamp Negative ramp NPulse Negative pluse PPulse Positive pluse SineTra Sine Tra wave SineVer Sine Ver wave StairDn Stair downward StairUD Stair upward downward StairUp Stair upward Trapezia Trapezia Medical treatment Heart Heart Cardiac Cardiac LFPulse Low frequency pulse electrotherapy waveform Tens1 Neuroelectric stimulation therapy waveform 1 Ten...

Страница 26: ... I Bessel function Bessely Type II Bessel function Cauchy Cauchy distribution X 3 Cubic function Erf Error function Erfc Remnant error function ErfcInv Anti complement error function ErfInv Inverse error function Dirichlet Dirichlet function ExpFall Exponential decline function ExpRise Exponential rise function Laguerre Four Laguerre polynomials Laplace Laplace distribution Legend Five Legendre po...

Страница 27: ...t ACos Inverse cosine function ACosH Inverse hyperbolic cosine function ACot Anti cotangent function ACotCon Inverse cotangent function ACotPro Raised inverse cotangent function ACotH Inverse hyperbolic cotangent function ACotHCon Inverse hyperbolic cotangent function ACotHPro Raised inverse hyperbolic cotangent function Acsc Anti cosecting function ACscCon Concave inverse cosecting function ACscP...

Страница 28: ...ow Engineering Window Butterworth Butterworth filter Combin Combined function CPulse C Pulse signal CWPulse CW pulse signal RoundHalf Half round wave BandLimited Band limited signal BlaseiWave Blasting vibration time vibration speed curve Chebyshev1 Type I Chebyshev filter Chebyshev2 Type II Chebyshev filter DampedOsc Damped oscillation time displacement curve DualTone Dual audio signal Gamma Gamm...

Страница 29: ...Parameter 1 Parameter 2 Parameter 3 Parameter 5 Setting menu of Harmonic signal Current signal Load Output switch Parameter 6 Parameter 7 Parameter 8 Figure 5 10 Harmonic wave user interface Harmonic wave function overview According to Fourier transform theory time domain waveform is the superposition of a series of sine waveforms expressed by the following equation f t A1sin 2 f1t 1 A2 sin 2 f2t ...

Страница 30: ...nd even harmonics Odd harmonic Press the Type softkey and switch to Odd the generator would output the fundamental wave and odd harmonics Sequential harmonic Press the Type softkey and switch to Sequential the generator would output the fundamental wave and each harmonic in sequence Custom Press the Type softkey and switch to Custom you can customize the orders of ouptput harmonics The highest ord...

Страница 31: ...ng menu press the NextPage softkey to enter the next page 1 Select the sequence number of the harmonic Press the SN softkey the SN menu item is highlighted In Parameter 6 of Figure 5 10 a blinking cursor appears in the parameter value of SN Turn the knob to change the value directly or use the numeric keypad to input the desired value 2 Set the phase for the selected SN Press the Phase softkey the...

Страница 32: ...b to select AM press the OK softkey 2 Select carrier wave shape The carrier wave can be Sine Square Ramp or Arbitrary wave except DC Press or to select a desired carrier wave shap 3 Set carrier wave parameters Press the wave shap key of the selected carrier wave to display the waveform and parameters of the carrier wave You can change the parameters of the carrier wave Press Mod to return to the m...

Страница 33: ... specified value For an external source the depth of AM is controlled by the voltage level of the signal connected to the Mod FSK Trig connector at the rear panel 1 V corresponds to the currently set depth 100 DSB AM Double Sideband AM The generator supports two kinds of amplitude modulation normal AM and Double Sideband AM In normal AM the modulated waveform contains carrier components As the car...

Страница 34: ... modulating wave source If you select External use the Mod FSK Trig connector at the rear panel to input the external modulating signal the DSB AM setting is completed If you select Internal continue with the following steps 5 Select modulating wave shape Press the Shape softkey then press the Sine Square or Ramp softkey to select the modulating wave 6 Set modulating wave frequency Press the AM Fr...

Страница 35: ...the parameters of the carrier wave Press Mod to return to the modulation mode interface 4 Select modulating wave source Press the Source softkey to select the modulating wave source If you select External use the Mod FSK Trig connector at the rear panel to input the external modulating signal then skip ahead to step 7 If you select Internal continue with the following steps 5 Select modulating wav...

Страница 36: ...e varies with the instantaneous voltage of the modulating wave The PM user interface is shown below Figure 5 14 PM user interface How to set the parameters of PM 1 Press the Mod function key then press the Type softkey turn the knob to select PM press the OK softkey 2 Select carrier wave shape The carrier wave can be Sine Square Ramp or Arbitrary wave except DC Press or to select a desired carrier...

Страница 37: ...quency softkey to set the modulating wave frequency The range is 2 mHz 1 MHz for internal source only 7 Set phase deviation Phase deviation is the deviation of the modulating wave phase relative to the carrier wave phase Press the Deviation softkey to set the PM phase deviation The range of phase deviation is from 0 to 180 PWM Pulse Width Modulation The modulated waveform consists of the carrier w...

Страница 38: ...Select modulating wave shape Press the Shape softkey then press the Sine Square Ramp Noise or Arb softkey to select the modulating wave 6 Set modulating wave frequency Press the PWM Frequency softkey to set the modulating wave frequency The range is 2 mHz 1 MHz for internal source only 7 Set duty cycle deviation Duty cycle deviation is the deviation in of the modulating wave duty cycle relative to...

Страница 39: ...to select Internal or External as the modulating wave source 5 If you select Internal the modulating wave is set as a Square with 50 duty cycle Press the ASK Rate softkey to set the ASK rate The rate at which the output amplitude shifts between the carrier amplitude and the modulating amplitude is determined by ASK rate for internal source only The range is 2 mHz 1 MHz If you select External use t...

Страница 40: ...panel The FSK user interface is shown below Figure 5 17 FSK user interface How to set the parameters of FSK 1 Press the Mod function key then press the Type softkey turn the knob to select FSK press the OK softkey 2 Select carrier wave shape The carrier wave can be Sine Square Ramp or Arbitrary wave except DC Press or to select a desired carrier wave shap 3 Set carrier wave parameters Press the wa...

Страница 41: ...e generator would output the carrier frequency when the external input signal is logic low level and output the hop frequency when the external input signal is logic high level The situation is the opposite when the slope is set to Negative 6 Set hop frequency Press the Hop Frequency softkey to set the hop frequency The carrier wave frequency shifts to the hop frequency with the specified FSK rate...

Страница 42: ...e carrier phase and the modulating phase is determined by PSK rate for internal source only The range is 2 mHz 1 MHz If you select External use the Mod FSK Trig connector at the rear panel to input the external modulating signal Press the Slope softkey to switch between Positive and Negative polarity of the modulating wave to control the output phase Set the slope to Positive the generator would o...

Страница 43: ...e to display the waveform and parameters of the carrier wave You can change the parameters of the carrier wave Press Mod to return to the modulation mode interface 4 Modulating wave source 3FSK uses internal modulation source and the modulating wave is set as a Square with 50 duty cycle 5 Set 3FSK rate Press the FSK Rate softkey to set the 3FSK rate The rate at which the output frequency shifts be...

Страница 44: ...e Type softkey turn the knob to select 4FSK press the OK softkey 2 Select carrier wave shape The carrier wave can be Sine Square Ramp or Arbitrary wave except DC Press or to select a desired carrier wave shap 3 Set carrier wave parameters Press the wave shap key of the selected carrier wave to display the waveform and parameters of the carrier wave You can change the parameters of the carrier wave...

Страница 45: ...o the modulating phase with the specified BPSK rate and then returns to the original phase The BPSK user interface is shown below Figure 5 21 BPSK user interface How to set the parameters of BPSK 1 Press the Mod function key then press the Type softkey turn the knob to select BPSK press the OK softkey 2 Select carrier wave shape The carrier wave can be Sine Square Ramp or Arbitrary wave except DC ...

Страница 46: ... Shift Keying Quadrature Phase Shift Keying modulation is a modulation technique that shifts the output signal phase among four preset phases the carrier phase and three modulating phases The shift frequency QPSK rate is determined by the internal signal level of the instrument The QPSK user interface is shown below Modulating wave Carrier wave Parameter 1 Parameter 2 Parameter 3 Load Mod Type Sou...

Страница 47: ...ses Press the Phase1 Phase2 and Phase3 softkey to set the modulating phases respectively The range is 0 to 360 OSK Oscillation Shift Keying Oscillation Shift Keying modulation is a modulation technique that the generator to output a sine signal with intermittent oscillation The start oscillation and stop oscillation of the internal crystal oscillator are controlled by the internal signal level of ...

Страница 48: ...et OSK rate Press the OSK Rate softkey to set the OSK rate The intermittence time and oscillate time of the output signal is determined by OSK rate for internal source The range is 2 mHz 1 MHz 6 Set oscillate time Oscillate time is the oscillation period of internal crystal oscillator The settable range of the oscillate period is related to the OSK rate currently selected Press the Osc Time softke...

Страница 49: ...modulation mode interface 4 Select modulating wave source Press the Source softkey to select the modulating wave source If you select External use the Mod FSK Trig connector at the rear panel to input the external modulating signal the SUM setting is completed If you select Internal continue with the following steps 5 Select modulating wave shape Press the Shape softkey then press the Sine Square ...

Страница 50: ...ple when selecting a sine wave press to display the sweep waveform and parameters and change the parameters For details please refer to Output Sine Wave on page 10 Press or Sweep to return to the sweep mode interface 3 Press the Sweep Time softkey to set the sweep time the time span of the sweep for which the frequency changes from the start frequency to stop frequency The range is from 1ms to 500...

Страница 51: ...d input the desired frequencies For different instrument models and different waveforms the setting ranges of frequency are different For detailed information please refer to Sweep characteristics in Specification on page 68 6 Press the Trigger softkey to select the trigger source Internal means using the internal trigger source External means using the Mod FSK Trig connector at the rear panel to ...

Страница 52: ...t waveform with specified number of cycles after receiving trigger signal Figure 5 26 N Cycle burst user interface 1 When the output signal is Sine Square Ramp Pulse or Arbitrary wave except DC press the front panel Burst function key to enter the burst mode the backlight of the key lights up 2 Press or to select the bust waveform For example when selecting a sine wave press to display the burst w...

Страница 53: ...e internal external or manual The generator will generate a burst output when a trigger signal is received and then wait for the next trigger Press the Trigger to select the source Internal means using the internal trigger source The generator can only output N cycle burst and the burst frequency is determined by the burst period Burst period is only available when Cycles and Internal trigger is h...

Страница 54: ... Note Before configuring the waveform parameters you must first select the channel you want to configure Press CH1 or CH2 to select the corresponding channel and the corresponding channel area in the user interface will light up 3 Press the N_Cycle Gated softkey to hightlight Gated 4 Press the Polarity softkey to set the gated polarity as Positive or Negative The generator outputs burst waveform o...

Страница 55: ...mproving measurement accuracy When measuring low frequency signals with a frequency less than 1 kHz turn on high frequency rejection to filter out high frequency noise interference turn off high frequency rejection when measuring high frequency signals with frequencies greater than 1 kHz Press the Trigger Level softkey Turn the knob to change the current cursor position value press the arrow keys ...

Страница 56: ...key press the Display softkey 2 Press the ScrSaver softkey to select On or Off 3 At On status you can set the screen saver time Turn the knob to adjust the value on the current cursor use the direction key to move cursor left or right or use the numeric keypad to enter the parameter and then select Minute as unit The screen saver time range is 1 to 999 minutes Separator The user can set the separa...

Страница 57: ...ignals of various waveforms For sine square ramp and pulse waves the sync signal is a square wave with a 50 duty cycle When the waveform output is positive the sync signal is TTL high with respect to the 0V voltage or DC offset value When the waveform output is negative the sync signal is TTL low relative to the 0V voltage or DC offset value For arbitrary waveform the sync signal is a square wave ...

Страница 58: ...r test This function is used to match the displayed voltage with the expected one The step to set the CH1 or CH2 load value is as follows 1 Press the Utility function key press the CH1 2 Set softkey 2 Press the CH1Load or CH2Load softkey press it again to select High Z or ohm represents a value the default is 50Ω 3 To change the load value after selecting ohm turn the knob to adjust the value on t...

Страница 59: ...keys to enter the desired gateway The gateway format is nnn nnn nnn nnn where nnn ranges from 0 to 255 It is recommended that your aquire an available gateway from your network administrator Press the Subnet mask softkey to select Subnet mask Use the numeric keypad and direction keys to enter the desired subnet mask The subnet mask format is nnn nnn nnn nnn where nnn ranges from 0 to 255 It is rec...

Страница 60: ...ce is required this function is switched to external At this time the clock output is turned off forcibly Clock Output 1 Press the front panel Utility function key press the System softkey 2 Press the CLK Output softkey to toggle between On and Off Note When the clock source output is turned on the clock source must be switched to internal and the counter function stops after the clock output is t...

Страница 61: ...emplate softkey to select Blank Sine wave Square wave Ramp wave and Noise Press the Arb Template softkey to select a buit in waveform as template 3 Edit the wave points Press Edit Points to enter the wave points menu Select Points input the number of point to be edited Select Voltage input the voltage of the point Repeat this step to set all the points Press Write to enter the file system interfac...

Страница 62: ...he main interface will show USBDEVICE and INTER Otherwise the main interface will show INTER only The internal memory can store 32 arbitrary waveform data Press the front panel Store function key to enter the file system Save the current arbitrary wave 1 Press the Arbitrary Wave button to enter the Arbitrary Wave menu and configure the waveform parameters 2 Press the front panel Store function key...

Страница 63: ...Successful Description The file size is displayed on the right side of the file If 0B is displayed the file is empty To recall the waveform file in the USB storage device turn the knob to select USBDEVICE in the memory selection interface Press the Arb file softkey and the instrument will list the directories of the folders and files in the USB storage device Turn the knob to select a folder or fi...

Страница 64: ...R and press the Set File softkey Turn the knob to select a Setup file and press the Save softkey The file size is displayed on the right side of the Setup file If 0B is displayed it means the file is empty Note Press the Secure softkey and then press the OK softkey to clear all the settings in the internal memory To recall a setup select the desired setup and press the CallOut softkey Preset Setti...

Страница 65: ...ime 1 953125 us Pulse Falling Time 1 953125 us Build in Wave X 2 Harmonic Wave Type Even Harmonic Wave Order 2 Harmonic Wave SN 2 Harmonic Wave Amplitude 1 Vpp Harmonic Wave Phase 0 Modulation Waveform Factory Setting Modulation type AM AM Modulating Waveform Sine AM Frequency 100 Hz Modulation Depth 100 Modulation Source Internal FM Modulating Waveform Sine FM Frequency 100 Hz Frequency Deviation...

Страница 66: ...lating Amplitude 1 Vpp Modulation Source Internal PSK PSK Rate 100 Hz PSK Phase Deviation 0 Modulation Source Internal FSK FSK Rate 100 Hz Hop Frequency 100 Hz Modulation Source Internal 3FSK FSK Rate 100 Hz Hop Frequency 1 100 Hz Hop Frequency 2 100 Hz 4FSK FSK Rate 100 Hz Hop Frequency 1 100 Hz Hop Frequency 2 100 Hz Hop Frequency 3 100 Hz BPSK Bit Rate 100 Hz BPSK Phase Deviation 180 Data Sourc...

Страница 67: ...ive Burst Factory Setting Burst Period 1 s Burst Mode N_Cycle Number of Cycles 1 Trigger Source Internal Slope Positive Gated Polarity Positive Counter Factory Setting Coupling AC Sensitivity Low High Frequency Reject On Trigger Level 0 V Edit Factory Setting Number of Waveform Points 1000 Interpolation Off Basic Template Blank Save recall instrument settings Factory Setting Reset Settings Factory...

Страница 68: ...ency Sync Off Amplitude Sync Off Restore to the user setting 1 To save the current system setting as a user defined setting refer to Save recall Instrument Settings on page 58 2 Press the front panel Preset function key to enter the preset menu 3 Press the ResetSet softkey to select User 4 Press the User softkey to select the desired user setup file Setup0 to Setup15 Note Before selecting any of S...

Страница 69: ...m setting as a user defined setting refer to Save recall Instrument Settings on page 58 Press the User softkey to select the desired user setup file Setup0 to Setup15 Note Before selecting any of Setup0 to Setup15 make sure that valid setting file is stored in the corresponding storage location Factory When powered restore the generator to factory default settings The factory default settings are ...

Страница 70: ... the Waveform Editor communication software is located such as C Program Files x86 DS_Wave Waveform Editor USBDRV 4 Host computer communication port setting Open the Waveform Editor software click Communications in the menu bar select Ports Settings in the setting dialog box select the communication port as USB After the connection is successful the connection status prompt in the lower right corn...

Страница 71: ...cable The computer is also connected to the router 2 Set the network parameters of the computer Since the signal generator does not support automatic IP address acquisition you need to specify the IP yourself The default gateway and subnet mask settings must match the settings of the router For example the IP address is set to 192 168 1 71 the subnet mask is set to 255 255 255 0 and the default ga...

Страница 72: ...and port to the IP and port in the PC software port settings in step 3 The gateway settings need to be the same as the gateway settings of the router After the shutdown and restart if the data can be obtained normally in the PC software the connection is successful For the specific operation method of Waveform Editor software please press F1 to view the built in help documentation ...

Страница 73: ...iver Restart the instrument after completing the above inspections If the problem still exists please contact OWON for our service 2 The measured value of the output signal amplitude does not match the displayed value Check whether the actual load value of the signal is consistent with the load value set in the instrument Please refer to Load on page 52 If you encounter other problems please try t...

Страница 74: ...bits Channel 2 Standard Waveforms Sine wave square wave ramp wave pulse wave noise harmonic Arbitrary Waveforms Sinc exponential rise exponential decline electrocardiogram Gaussian semi positive Lorentz dual audio DC voltage totaling more than 150 kinds Frequency Characteristics Frequency Characteristics Frequency resolution to 1 μHz Sine wave 1 μHz 30 MHz Square wave 1 μHz 15 MHz Pulse wave 1 μHz...

Страница 75: ...t will be automatically turned off when overloaded Signal Characteristics Signal Characteristics Sine Harmonic distortion Typical 0dBm DC to 1MHz 65dBc 1MHz to 10MHz 60dBc 10MHz to 30MHz 55dBc Total harmonic distortion 0 05 10 Hz to 20 kHz 1 Vpp Non harmonic distortion Typical 0dBm 10MHz 70dBc 10MHz 70dBc 6dB sound interval Phase noise Typical 0dBm 10kHz offset 10MHz 110dBc Hz Square Rise fall tim...

Страница 76: ...eristics Modulation Characteristics Modulation Type AM DSB AM FM PM ASK FSK PSK BPSK QPSK 3FSK 4FSK OSK PWM SUM AM Carrier Sine wave square wave ramp wave arbitrary wave except DC Modulated signal source Internal or external Internal modulation waveform Sine wave square wave ramp wave white noise arbitrary waveform Internal amplitude modulation frequency 2 mHz to 1 MHz Depth 0 to 120 DSB AM Carrie...

Страница 77: ...ternal modulation waveform Sine square ramp white noise and arbitrary waveforms except DC Internal phase modulation frequency 2 mHz to 1 MHz Offset 0 to min min is the smaller value of pulse wave duty cycle and 100 pulse wave duty cycle ASK Carrier Sine wave square wave ramp wave arbitrary wave Modulated signal source Internal or external Internal modulation waveform 50 square wave ASK frequency 2...

Страница 78: ...amp wave arbitrary wave Modulated signal source Internal Internal modulation waveform 50 square wave QPSK frequency 2 mHz to 1MHz OSK Carrier Sine wave Modulated signal source Internal Internal modulation waveform 50 square wave Oscillation time 8ns to 249 75μs OSK frequency 2 mHz to 1MHz SUM Carrier Sine wave square wave ramp wave Modulated signal source Internal or external Internal modulation w...

Страница 79: ...Hz to BW 2 Trigger cycle 20ns 500 s Min Cycles Period Gated source External trigger Counter Specifications Counter Specifications Measurement function Frequency period positive pulse width negative pulse width duty cycle Frequency Range 100 mHz 200 MHz Frequency resolution 7 digits Coupling method AC DC Voltage range and sensitivity non modulated signal DC offset range 1 5V DC coupling 100mHz 100 ...

Страница 80: ...Frequency 10 MHz 50Hz Impedance 50 Ω DC coupling Amplitude 1 2Vpp 50Ω Sync Output Level 3 3V LVTTL Impedance 50 Ω DC coupling Maximum frequency 1MHz General Specifications Display Display type 7 inch color LCD display Display resolution 800 Horizontal 480 Vertical pixels Display color 65536 colors 16 bits TFT Touch screen Optional capacitive multi touch Power Voltage 100 240 V 10 50 60 Hz Power co...

Страница 81: ...pecification 75 Mechanical Specification Dimension 340 mm Length 177 mm Height 90mm Width Weight Approx 2 3 kg Others IP protection IP2X Adjustment interval The recommended calibration interval is one year ...

Страница 82: ...obes as often as operating conditions require To clean the instrument exterior perform the following steps 1 Wipe the dust from the instrument and probe surface with a soft cloth Do not make any scuffing on the transparent LCD protection screen when clean the LCD screen 2 Disconnect power before cleaning your instrument Clean the instrument with a wet soft cloth not dripping water It is recommende...

Отзывы: