background image

5

OWC Mercury Elite Pro mini

Device Setup

4

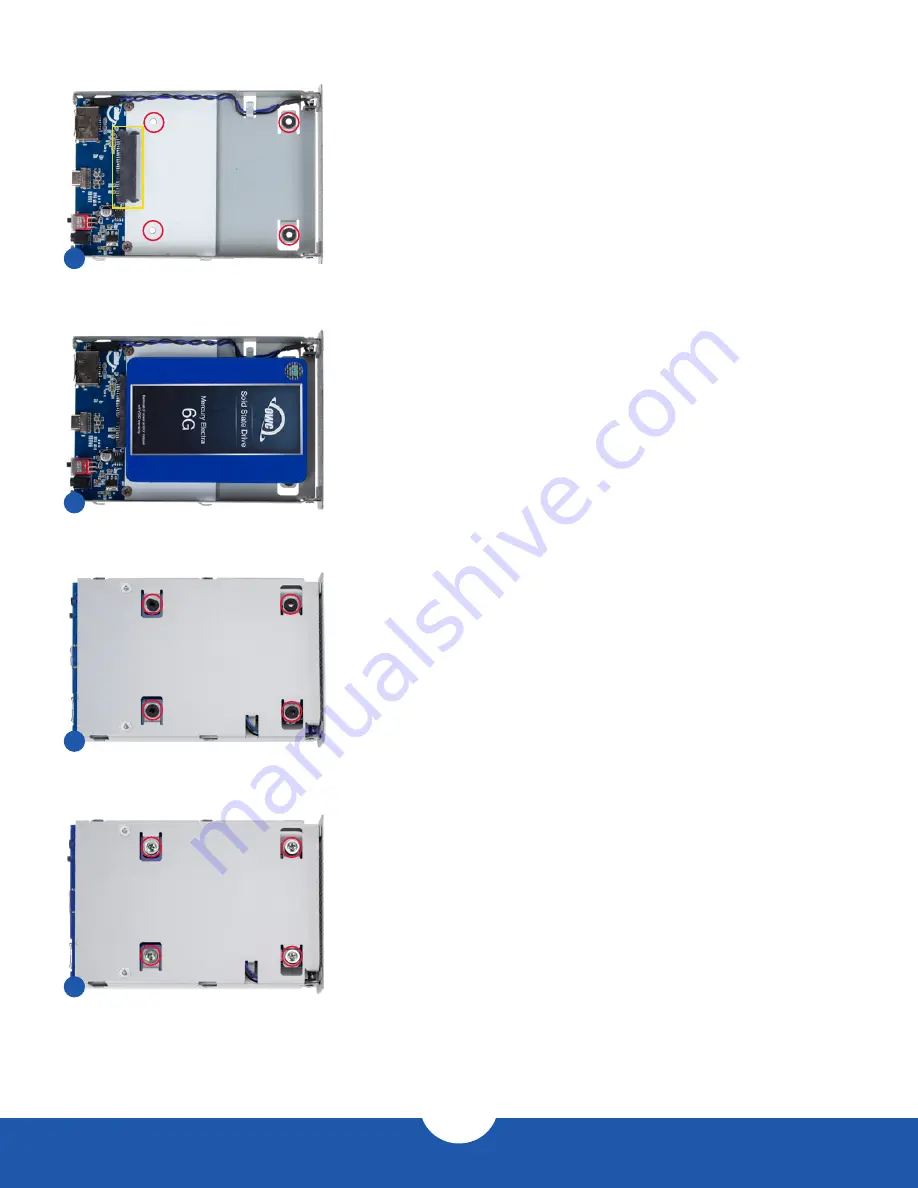
4. Note the SATA connector on the inner chassis (highlighted in 

yellow). There are also four screw holes circled in red — two 

through the metal chassis on the right and two through the 

circuit board and chassis on the left.

5

5. Place the drive in the inner chassis as shown, then slide the drive 

into the SATA connector on the circuit board. Make sure the drive 

is fully seated before proceeding.

6

6. Use one hand to hold the drive in place, then turn over the inner 

chassis. Note the four screw holes with rubber grommets, circled 

in red.

7

7. To affix the drive to the inner chassis, insert the four screws 

(included) into the screw holes, then fasten them using a Phillips 

driver. When this is done, turn over the inner chassis. 

Содержание Mercury Elite Pro Dual mini

Страница 1: ...Assembly Manual User Guide Up to 540MB s USB 3 1 Gen 2 Type C eSATA Mac Windows Bus Powered USB 3 1 Gen 1 micro B...

Страница 2: ...ents PC Requirements Supported Drives 1 2 Package Contents 1 1 3 About This Manual 1 1 4 Rear View 3 1 5 Usage Notes 3 Device Setup 2 1 Quick Start 4 2 2 Assembly 4 Support Resources 3 1 Troubleshooti...

Страница 3: ...s The cables included will depend on the model purchased Drive mounting screws are included with empty enclosures but not pictured Required tools Phillips PH2 screwdriver 1 3 About This Manual The ima...

Страница 4: ...ce the device near sources of magnetic interference such as computer displays or speakers Magnetic interference can affect the operation and stability of hard drives Protect your device from excessive...

Страница 5: ...right corner of your screen Click on the Eject icon a small green arrow over a hardware image A message will appear detailing the devices that the Eject icon controls i e Safely remove Click on this...

Страница 6: ...e USB 3 1 Gen 2 eSATA version is shown but the steps are the same for the USB 3 1 Gen 1 eSATA version The instructions show how to open the enclosure in order to install a drive If you purchased the M...

Страница 7: ...ive in the inner chassis as shown then slide the drive into the SATA connector on the circuit board Make sure the drive is fully seated before proceeding 6 6 Use one hand to hold the drive in place th...

Страница 8: ...back into the outer enclosure Note be sure to slide the inner chassis into the same side you removed it from in Step 3 otherwise the back plate will not sit flush with the enclosure 9 Seat the back p...

Страница 9: ...cury Elite Pro mini and a second copy on either your internal drive or another storage medium such as an optical backup or on another external storage unit Any data loss or corruption while using the...

Страница 10: ...interference with radio or television reception which can be determined by turning the equipment off and on the user is encouraged to try to correct the interference by one or more of the following me...

Отзывы: