background image

34

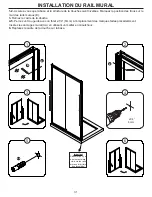
1. 

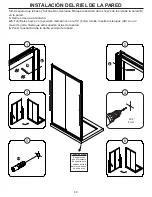
Trouvez de quel côté la rail magnétique (K) est attiré par l’aimant de la porte.

2. 

Insérez la rail magnétique (K) dans le rail (G). Assurez-vous d’insérer le côté magnétique face à l’aimant de 

la porte. Ensuite, installez le couvercle pour joint magnétique (L) sur le rail latéral (G).

3. 

Ajustez l’angle de la porte (C) en tournant la vis du milieu des roulettes supérieures pour porte (O), afin 

d’obtenir un bon ajustement entre la porte (C) et le rail latéral (G). 

4.

 Installez les vis (GG) au profile T.

5. 

Remettez la pièce en T sur les roulettes supérieures (O).

6. 

Enlevez les vis (GG).

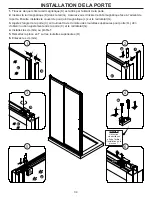
INSTALLATION DE LA PORTE

Important

Utiliser les 

vis auxiliaires 

afin de faciliter 

l’installation de la 

pièce en T.

1

C

GG

5

2

4

6

GG

K

C

K

L

C

C

G

O

3

G

O

Содержание ELLIS

Страница 1: ...e _________________________ Product Tracking Reference ________________________ Questions problems missing parts Before returning to your retailer call our customer service department at 1 866 839 288...

Страница 2: ...UIRED 5 SAFETY INFORMATION 6 PREPARATION 6 SHOWER REVERSIBILITY 7 BASE INSTALLATION GUIDELINES OPTIONAL 8 SHOWER FRAME INSTALLATION 9 WALL TRACK INSTALLATION 13 DOOR INSTALLATION 15 HANDLE INSTALLATIO...

Страница 3: ...3 PACKAGE CONTENT M E B C H F G O J K L P S N T Q I E R...

Страница 4: ...al strip 2 99SRU0150 WM K Magnetic strip 1 99SRU0151 WM L Magnetic strip cover 1 99SGC0043 WM M Top metal track 1 99SGS0030 WM N Bottom metal track 1 99SGS0031 WM O Door top roller 2 99SWE0026 WM P Fi...

Страница 5: ...ne Rubber mallet Cutter Safety glasses Allen key 2 5 4 5mm Ratchet 5mm Bit socket Drill with ceramic tile bit 1 8 3mm 1 4 6mm AA Wall Anchor 6x30mm 6 2 Ladder GG Bolt M4x30mm 2x CC Screw ST4x20mm 8 2...

Страница 6: ...a floor that is level and able to accommodate the weight of the unit and an occupant Please consult local building codes and compliance standards prior to installation and ensure conformity SAFETY INF...

Страница 7: ...all the shower head on the door s side This will reduce the risk of leaking Measure the thickness of your tiles on either side before installing the metal tracks A thicker tile will limit your space t...

Страница 8: ...8 BASE INSTALLATION GUIDELINES OPTIONAL 1 2 4 Tile wall Studs Drywall Silicone 5 Shower Base 3 Shower Base Cement Floor Wood shim Flange Stud Flange Drywall Silicone...

Страница 9: ...n the bottom metal track N and mark the positions of the 2 holes 3 Drill pilot holes with a 1 8 3mm drill bit 4 Secure sliding door guide Q with screws CC 5 Put the rubber fitting back to the sliding...

Страница 10: ...he top metal track M 2 Insert the fixed panel s bottom seal strip R at the base of the fixed panel B 3 Place the fixed panel B into the sliding door guide Q 4 5 Place the top metal track M and the wal...

Страница 11: ...r track G on the top metal track M and the bottom metal track N using the screws DD 5 Place the gasket I between the fixed panel B and the wall jamb F Use a wood stick for help as it will fit tightly...

Страница 12: ...12 1 2 Place the 2 wall tracks E on the fixed panel B and the corner track G 3 Place the whole shower frame onto the base SHOWER FRAME INSTALLATION E 1 2 B E G 3...

Страница 13: ...pilot holes in the marked locations with a 1 4 6mm drill bit Insert the wall anchors AA using a rubber mallet until the wall anchors are flush with the wall 6 Replace the whole shower frame onto the...

Страница 14: ...both 3 places 5 6 Secure the 2 wall tracks E using screws CC fittings FF and caps EE WALL TRACK INSTALLATION Helpful Hint Do not overtighten This may crack the acrylic or tile walls 1 E EE FF BB EE FF...

Страница 15: ...or panel C Use a ratchet to strongly tighten the bolts 3 Insert the door bottom seal strip T onto the door panel C 4 Place the door C on the top metal track M 5 6 Place the glass panel s vertical seal...

Страница 16: ...to the corner track G 3 Adjust the angle of the door C by turning the middle screw of the door top rollers O to ensure the fittness between the door C and the corner track G 4 Install the auxiliary s...

Страница 17: ...bar Apply a clear silicone water sealant around the outside perimeter of any fixed shower components horizontally between bottom of fixed side glass panel and the base as well as vertically between th...

Страница 18: ...ase date Distributor further warrants the structure of the acrylic shell against loss of water through fiberglass laminate of the acrylic body as a result of defect in materials and workmanship for a...

Страница 19: ...duit ______________________ Questions probl mes ou pi ces manquantes Avant de retourner le produit votre d taillant contactez notre service la client le au 1 866 839 2888 du lundi au vendredi de 9h00...

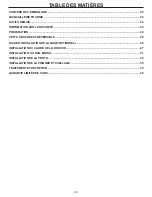
Страница 20: ...R PARATION 24 CETTE DOUCHE EST R VERSIBLE 25 GUIDE D INSTALLATION DE LA BASE OPTIONNEL 26 INSTALLATION DU CADRE DE LA DOUCHE 27 INSTALLATION DU RAIL MURAL 31 INSTALLATION DE LA PORTE 33 INSTALLATION D...

Страница 21: ...21 CONTENU DE L EMBALLAGE M E B C H F G O J K L P S N T Q I E R...

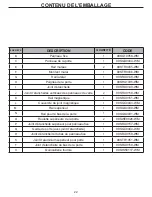
Страница 22: ...gn tique 1 99SRU0151 WM L Couvercle du joint magn tique 1 99SGC0043 WM M Rail sup rieur 1 99SGS0030 WM N Rail pour le bas de la porte 1 99SGS0031 WM O Roulette sup rieure de la porte 2 99SWE0026 WM P...

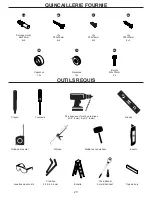
Страница 23: ...le OUTILS REQUIS Perceuse avec foret ceramique 1 8 3mm 1 4 6mm Tournevis Crayon Niveau Ruban mesurer Silicone Maillet en caoutchouc Exacto AA Ancrage mural 6x30mm 6 2 GG Boulon M4x30mm 2x CC Vis ST4x2...

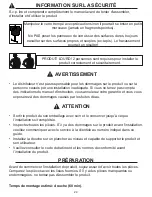
Страница 24: ...aus s par les fuites d eau ATTENTION Sortir le produit de son emballage avec soin et le conserver jusqu ce que l installation soit compl t e Inspectez toutes les pi ces S il y a des dommages sur le pr...

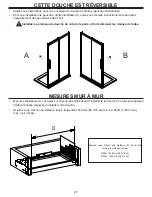
Страница 25: ...une distance D de la tuile droite la tuile gauche de D Min 1478mm 58 3 16 po D Max 1493mm 58 3 4 po Installez le pommeau de douche du c t de la porte afin de diminuer les risques de fuites MESURES MUR...

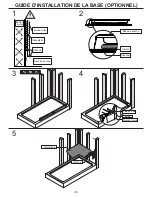
Страница 26: ...IDE D INSTALLATION DE LA BASE OPTIONNEL 1 2 4 Mur de tuiles Montant mural Placopl tre Silicone 5 Base de douche 3 Base de douche Ciment Plancher Cale en bois Bride Montant mural Placopl tre Silicone B...

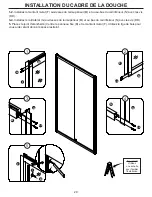
Страница 27: ...u rail de m tal N et marquez la position des 2 trous 3 Percez 2 trous guides avec un foret 1 8 3mm 4 S curisez le guide Q pour porte coulissante avec les vis CC 5 Remettez les raccords de caoutchouc a...

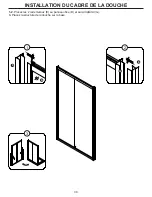
Страница 28: ...d aluminium S dans les rails de m tal M 2 Ins rez le joint d tanch it du panneau fixe R la base du panneau fixe B 3 Placez le panneau fixe B dans le guide Q 4 5 Placez le rail de m tal sup rieur M et...

Страница 29: ...us du rail sup rieur M et au bas du rail inf rieur N avec les vis DD 5 Placez le joint d tanch it I entre le panneau fixe B et le montant mural F Utilisez la tige de bois pour vous aider tant donn l e...

Страница 30: ...30 1 2 Placez les 2 rails muraux E au panneau fixe B et au rail lat ral G 3 Placez la structure de la douche sur la base INSTALLATION DU CADRE DE LA DOUCHE E 1 2 B E G 3...

Страница 31: ...uche 4 5 Percez un trou guide avec un foret 1 4 6mm l emplacement des marques faites pr c demment Ins rez les ancrages mural AA en utilisant un maillet en caoutchouc 6 Replacez le cadre de la douche s...

Страница 32: ...le rails muraux E en utilisant les vis CC les raccords FF et les capuchons EE INSTALLATION DU RAIL MURAL 1 E EE FF BB FF E 3 5 B EE CC 1 8 3 mm B Important Ne pas serrer trop fortement cela pourrait c...

Страница 33: ...Utilisez une cl rochet afin de serrer les boulons fortement 3 Ins rez le joint d tanch it du bas de la porte T au bas de la porte C 4 Placez la porte C sur la rail sup rieur M 5 6 Placer les joint d t...

Страница 34: ...rail lat ral G 3 Ajustez l angle de la porte C en tournant la vis du milieu des roulettes sup rieures pour porte O afin d obtenir un bon ajustement entre la porte C et le rail lat ral G 4 Installez l...

Страница 35: ...tement fix s aux panneaux de verre Appliquez un scellant tanche base de silicone sur le contour ext rieur de toutes les composantes de la douche et verticalement entre le mur le ch ssis et tous les pa...

Страница 36: ...a date d achat Le distributeur garantit galement la structure de la coquille d acrylique contre les fuites travers la pellicule de fibre de verre de la coquille caus es par des d fauts de mat riel et...

Страница 37: ...el producto ___________________ Preguntas problemas piezas faltantes Antes de volver a la tienda llame a nuestro departamento de servicio al cliente al 1 866 839 2888 9 am 5 pm HDE Lunes a Viernes ELL...

Страница 38: ...DE SEGURIDAD 42 PREPARACI N 42 REVERSIBILIDAD DE LA DUCHA 43 GU A PARA LA INSTALACI N LA BASE OPCIONAL 44 INSTALACI N DEL MARCO DE LA DUCHA 45 INSTALACI N DEL RIEL DE LA PARED 49 INSTALACI N DEL PANEL...

Страница 39: ...39 CONTENIDO DEL PAQUETE M E B C H F G O J K L P S N T Q I E R...

Страница 40: ...anqueidad magn tico 1 99SRU0151 WM L Cubierta de la banda magn tica 1 99SGC0043 WM M Parte superior del carril met lico 1 99SGS0030 WM N Parte inferior del carril met lico 1 99SGS0031 WM O Rodillo sup...

Страница 41: ...5mm Bit socket Escalera Taladro con brocas para cer mica 1 8 3mm 1 4 6mm Destornillador L piz Nivel Cinta medidora Silicona Mazo de goma Cuchilla AA Tarugo 6x30mm 6 2 GG Perno M4x30mm 2x CC Tornillo S...

Страница 42: ...PRECAUCI N Retire con cuidado los productos de envase y embalaje mantendr hasta que la instalaci n se haya completado Inspeccione todas las piezas en busca de da os si hay da os en la unidad antes de...

Страница 43: ...D de baldosas en el lado izquierdo de la teja en el lado derecho D Min 1478mm 58 3 16 pu D Max 1493mm 58 3 4 pu Instale la cabeza de la ducha hacia el lado de la puerta Esto reducir el riesgo de esca...

Страница 44: ...44 PAUTAS PARA LA INSTALACI N BASE OPCIONAL 1 2 4 Pared de Baldosas Soportes Tablaroca Silicona 5 Plato de ducha 3 Plato de ducha Cemento Piso Madera cu as Brida Soportes Tablaroca Silicona Brida...

Страница 45: ...de la puerta Q en el carril met lico inferior N y marque la posici n de los dos hoyos 3 Perfore los agujeros gu a con una broca de 1 8 3mm 4 Fijar el corredizo guiador de la puerta Q con tornillos CC...

Страница 46: ...et lico M 2 Inserte la sello de estanqueidad en parte inferior del panel fijo R en la base del panel fijo B 3 Coloque el panel fijo B en el gu a Q de la puerta corrediza 4 5 Pone el parte superior del...

Страница 47: ...parte superior del carril met lico M y en el parte inferior del carril met lico N utilizando los tornillos DD 5 Coloque la empaquetadura I entre el panel fijo B y el jamba mural F Utilice y pedazo de...

Страница 48: ...48 1 2 Poner las dos pistas de la pared E en el panel fijo B y el pista de esquina G 3 Coloque toda la ducha sobre la base INSTALACI N DEL MARCO DE LA DUCHA E 1 2 B E G 3...

Страница 49: ...s hoyos en la posici n marcado con el 1 4 6mm tornillo Inserte los tarugos AA con un mazo de goma hasta que estos queden al ras de la pared 6 Poner la estructura de la ducha encima de la base INSTALAC...

Страница 50: ...tas de la pared E utilizando los tornillos CC los accesorios FF y los capuchones EE INSTALACI N DEL RIEL DE LA PARED 1 E EE FF BB FF E 3 5 B EE CC 1 8 3 mm B Consejos tiles No apriete excesivamente Se...

Страница 51: ...ara apretar firmemente los pernos 3 Inserte la sello de estanqueidad en parte inferior de puerta T en el panel de la puerta C 4 Coloque la puerta C en la parte superior del carril met lico M 5 6 Coloq...

Страница 52: ...ta de esquina G 3 Ajustar el ngulo de la puerta C usando el tornillo centro de los rodillos superiores de la puerta O para asegurar la seguridad entre la puerta C y la pista esquina G 4 Instale los to...

Страница 53: ...la barra se soporte Aplique silicona transparente resistente al agua alrededor del per metro interno y externo de todos los componentes de la ducha horizontalmente entre la parte inferior del panel d...

Страница 54: ...ha de compra Asimismo el distribuidor garantiza la estructura de la corteza acr lica contra p rdida de agua a trav s del laminado de fibra de vidrio del cuerpo acr lico como resultado de defectos en m...

Отзывы: