


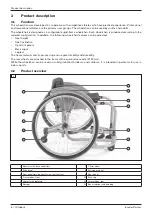


Use
Invader Pointer
Ottobock | 13
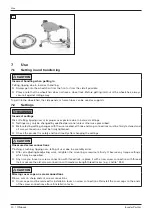
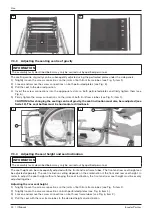
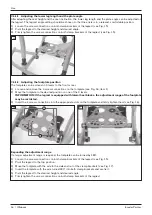
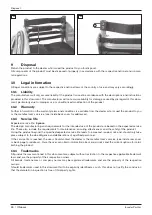
5) Insert the screw connections into the appropriate slots on the rear frame tubes and firmly tighten them (see
Fig� 6, item 2)�
6) Firmly tighten the screw connections on the joints of both front frame tubes (see Fig� 5, item 1)�
7) Firmly tighten the screw connection on both perforated plates (see Fig� 6, item 1)�
CAUTION! The front and rear seat height must be coordinated with one another. The seat bottom must
be horizontal or tilted back.
Adjusting the front seat height
1) Slightly loosen the screw connections on the joints of both front frame tubes (see Fig� 5, item 1)�
2) Slightly loosen the screw connections on both perforated plates (see Fig� 6, item 1)�
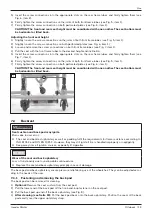
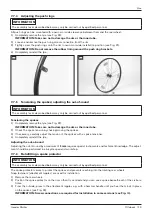
3) Loosen and remove the screw connections on both front frame tubes (see Fig� 7, item 1)�
4) Pull the seat with the front frame tubes to the desired height and inclination�
5) Insert the screw connections into the appropriate slots on the rear frame tubes and firmly tighten them (see
Fig� 7, item 1)�
6) Firmly tighten the screw connections on the joints of both front frame tubes (see Fig� 5, item 1)�
7) Firmly tighten the screw connection on both perforated plates (see Fig� 6, item 1)�
CAUTION! The front and rear seat height must be coordinated with one another. The seat bottom must
be horizontal or tilted back.
7
7.4 Backrest
WARNING
Seat cushion and back pad may ignite
Burns due to user error
f
The seat and backrest upholstery as well as padding fulfil the requirements for flame resistance according to
ISO 8191-2 and DIN EN 1021-2� However, they may still ignite if fire is handled improperly or negligently�
f
Keep away from all ignition sources, especially lit cigarettes�
NOTICE
Wear of the seat and back upholstery
Loss of functionality due to unallowable continued use
f
Replace the seat and back upholstery promptly in case of damage�
The back pad and back upholstery ensure pressure relief during use of the wheelchair� They can be adjusted accor-
ding to the needs of the user�
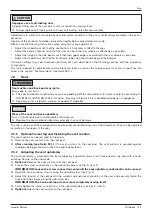
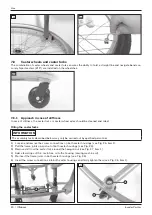
7.4.1 Fastening and removing the back pad
The back pad can be removed for cleaning�
1) Optional: Remove the seat cushion from the seat pad�
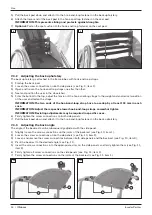
2) Pull the lower end of the back pad off the hook-and-loop fastener on the seat pad�
3) Pull the back pad up and off the back upholstery (see Fig� 8)�
4) After cleaning (see Seite 23): Put the back pad back onto the back upholstery� Position the seam of the back
pad exactly over the upper upholstery strap�
Содержание Invader Pointer
Страница 1: ...Invader Pointer Instructions for use 3...
Страница 2: ...Invader Pointer 2 Ottobock...
Страница 30: ...Invader Pointer 30 Ottobock...