background image

Warning 

IMPORTANT NOTICE


Disclaimer of Warranty

Our company makes no representations or warranties, either expressed or implied, by or 
concerning any content of these written materials or software, and in no event shall be liable for 
any implied warranty of merchantability or fitness for any particular purpose or for any 
consequential, incidental or indirect damages (including but not limited to damages for loss of 
business profits, business interruption and loss of business information) arising from the use or 
inability to use these written materials or software. Some states do not allow the exclusion or 
limitation of liability for consequential or incidental damages, so the above limitations may not 
apply to you.   

 
Safety Considerations

To prevent fire or shock hazard, do not expose the unit to rain or moisture. 
 

WARNING (

For the customers in the U.S.A

)


Note : 

This equipment has been tested and found to comply with the limits for a Class B digital device, 
pursuant to Part 15 of the FCC Rules. These limits are designed to provide reasonable protection 
against harmful interference in a residential installation. This equipment generates, uses, and can 
radiate radio frequency energy and, if not installed and used in accordance with the instructions, 
may cause harmful interference to radio communications. However, there is no guarantee that 
interference will not occur in a particular installation. If this equipment does cause harmful 
interference to radio or television reception, which can be determined by turning the equipment off 
and on, the user is encouraged to try to correct the interference by one or more of the following 
measures: 
1.


Reorient or relocate the receiving antenna. 

2.


Increase the separation between the equipment and receiver. 

3.


Connect the equipment into an outlet on a circuit different from that to which the receiver is 
connected. 

4.


Consult the dealer or an experienced radio/TV technician for help. 

The supplied interface cable must be used with the equipment in order to comply with the limits for 
a digital device pursuant to Subpart B of Part 15 of FCC Rules. 
 

CAUTION :


You are cautioned that any changes or modifications not expressly approved in this manual could 
void your authority to operate this equipment. 


Last Update: 20-Jul-06 


3


Содержание PV-690S

Страница 1: ...PV 690S Portable Video Recorder for Mobile Surveillances User s Manual Version 1 0 English...

Страница 2: ...AL VIEW 8 NAMES AND FUNCTIONS OF PARTS 9 GETTING START 10 KEY PAD FUNCTIONS 10 IDENTIFY THE ICONS 10 INSTALLATION OF 2 5 HDD TO THE UNIT 13 CONNECTING YOUR PVR WITH EXTERNAL DEVICES 16 OPERATES YOUR P...

Страница 3: ...e reasonable protection against harmful interference in a residential installation This equipment generates uses and can radiate radio frequency energy and if not installed and used in accordance with...

Страница 4: ...disassemble the device as it may cause damage to the unit For internal repairs consult your dealer or an Authorized Service Centre Protect from humidity 1 The device is not water resistant Do not put...

Страница 5: ...chable battery pack you should only dispose of it in a designated collection point for used batteries The Product The symbol of crossed out garbage can here shows that this product should not treated...

Страница 6: ...ckage you have purchased please check the items The illustrations below are for your reference only Actual objects are subject to change without notice AC DC adaptor Stereo earphone Lithium Polymer ba...

Страница 7: ...rchased if you need these items please check back with the vendor you have purchase the item from for the stock availabilities The pictures below are for your reference only Actual objects are subject...

Страница 8: ...Get to know the PVR The 3 Dimensional View Last Update 20 Jul 06 8...

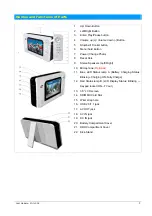
Страница 9: ...Speakers Left Right 10 Microphone Optional 11 Blue LED Status lamp A Battery Charging Status Blinking Charging ON Fully Charge 12 Red Status lamp B LCD Display Status Blinking Keypad locked ON TV out...

Страница 10: ...ppears in the center of the screen for keypads lock All keypads of the unit will be locked Press and hold this key again unit the lock icon disappears in the screen to unlock keypads Identify the Icon...

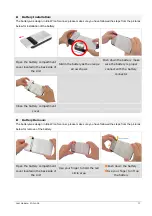
Страница 11: ...Push down the battery make sure the battery is proper connect with the battery connector Close the battery compartment cover Battery Remove The battery was design in Idiot Proof manner please make su...

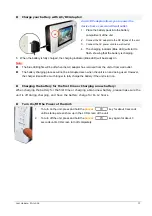
Страница 12: ...from wall outlet The battery charging process will not be interrupted even when the unit is on and being used However the charger time will be much longer to fully charge the battery if the unit is tu...

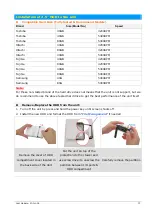
Страница 13: ...drive does not means that the unit is not support but we do recommend to use the above tested hard drive to get the best performance of the unit itself Remove Replace the HDD from the unit 1 Turn off...

Страница 14: ...partment In case you have lost your supplied HDD remover you may use your hand to remove the HDD too Insert back your HDD noBeware of the ditch show in the orange circles when insert back the partitio...

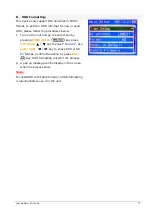
Страница 15: ...up menu by pressing MENU HOLD key press UP Down key to select Format Use Left right key to chose HDD or SD for format Confirm the action by press Enter Key HDD formatting will start it s process 2 A p...

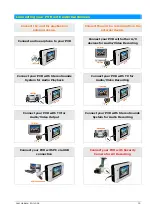
Страница 16: ...with other A V devices for Audio Video Recording Connect your PVR with Stereo Sounds System for Audio Playback Connect your PVR with TV for Audio Video Recording Connect your PVR with TV for Audio Vi...

Страница 17: ...nt selected storage media for recording file browsing or file playback Battery Status Indicate current battery level From the bottom of the screen XXGB Indicate the remaining storage capacity of selec...

Страница 18: ...eo playback Stop Exit File list Button This Button has dual function as follow 1 Stop Escape Work as a stop key during video recording Work as an Exit key during file list browsing or setup menu 2 Fil...

Страница 19: ...ecord video in selected video resolution Quality Options Low Middle High Record video in selected video Quality Rec Time Options Cancel 1 HR 2 HR 3 HR 4 HR Set Auto stop timer during manual recording...

Страница 20: ...o external TV TV Out Options NTSC PAL Switching TV System to NTSC or PAL Time Setup Options Year Month Date Hour Setup system time according to your local time zone Brightness Options Lowest Low Norma...

Страница 21: ...g Timer recording will only start at pre set date and time recording duration can be set to Cancel continuous 1 2 3 4 hours 1 Duration set to Cancel the unit will start to record the event continuousl...

Страница 22: ...f If set the motion detect recording to On a pop up screen will show up in the screen for confirmation use Left Right key to select yes or no then press Enter key to confirm Motion Setup Press Enter k...

Страница 23: ...ents are detected during motion detect recording the recoding will not automatically stop even pre set motion detect timer is up Another motion trigger will start if movements is detected again LCD Au...

Страница 24: ...he lowest level Go to setup menu and select prefer recording mode Manual Timer Motion the current recording mode will be display in the screen If recording mode is set to Motion or timer recording wil...

Страница 25: ...ng Note Date Time Stamp During video recording the current year date time will be displayed in the screen in YYYY MM DD HH MM SS format these information will be included in the recorded file and it w...

Страница 26: ...n the screen these files were named under HH MM SS format representing files were begin to record at that time A file named 181530 meaning this recorded file were created at 18 15 30 z Once a file is...

Страница 27: ...to file browning mode by pressing Stop Exit key from the recording standby mode Delete a single or Multiple folders z To delete a folder and all files in the folder move the highlighted bar to the fo...

Страница 28: ...after marking the file file name will become 110034 ASF z Repeat above method to mark multiple files if needed z After all files has been selected and mark RED z Press Menu Hold key for a pop up menu...

Страница 29: ...process all key will be disable on the unit 4 check the PC screen and see if PC has detect a new drive Note Once USB link is established all keys on the unit will be disable no operation on the unit...

Страница 30: ...ot directory of unit s HDD if an older update patch is exist confirm to overwrite the old firmware patch with new one 5 Use PC file explorer to double check if the update patch has copied to the root...

Страница 31: ...ith LED backlight 320 x240 RGB Digital Interface AV Connection RCA 3 in 1 AV Input RCA 3 in 1 AV Output Support earphone Input Interface High speed USB2 0 USB1 1 compatible Supported TV System NTSC PA...

Отзывы: