background image

www.oster.com

8

www.oster.com

9

How to Chop

NOTE: Make sure the unit is turned OFF and unplugged before use. Never use 

hand to push food into processor. Do not use the processor continuously for more 

than 3 minutes at a time.

1   Lock the bowl onto base.  

(See “How to assemble the bowl”)

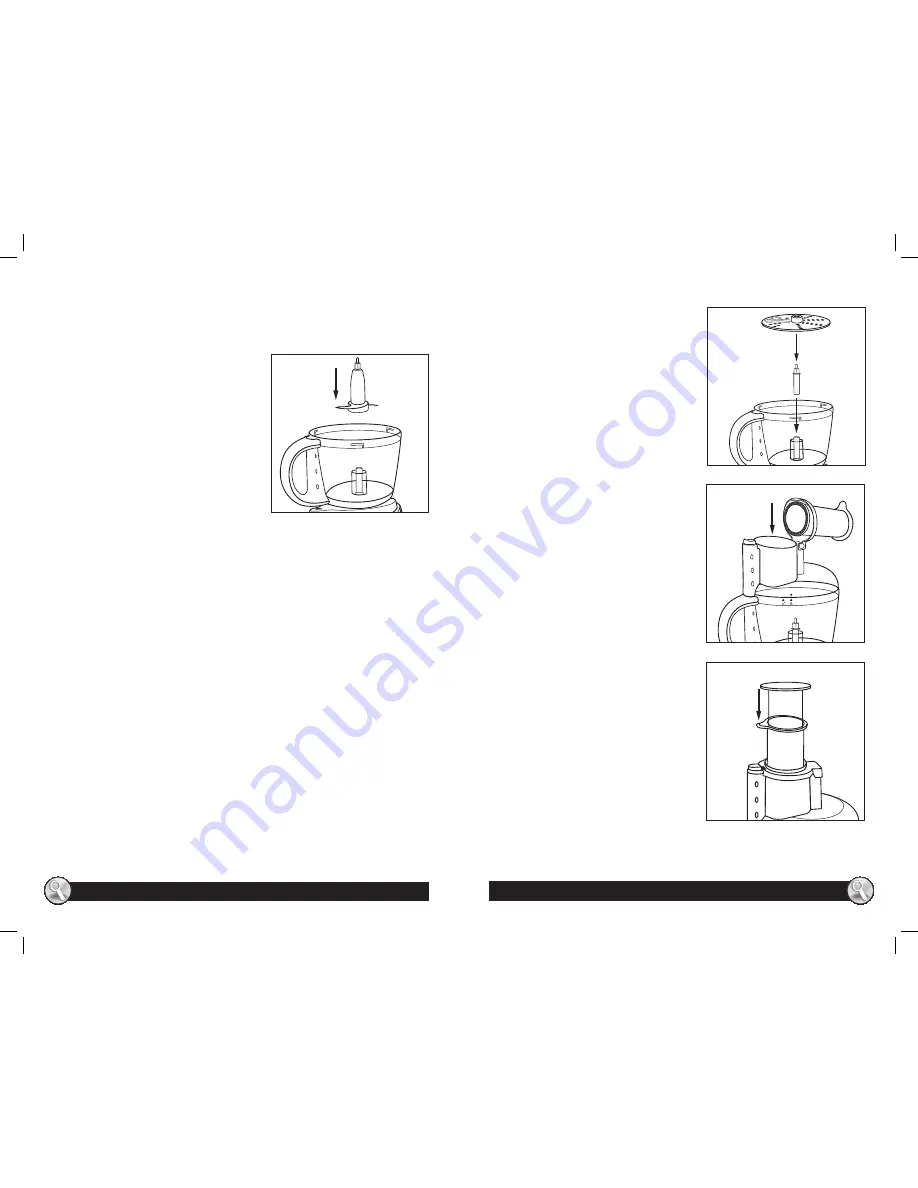
2    Grasp the chopping blade by its stem 

and slide it onto the center post  

(Figure 9).

3  Place food into bowl.
4   Lock cover onto bowl.  

(See “How to Lock the cover”)

5   Lock the Food Chute Lid.  

(See “How to Lock the Food Chute Lid”). 

Insert Small Food Pusher into Large  

Food Pusher.

6   Plug the cord into an electric outlet.  

Use the Food Guide to prepare food  

for chopping.

7   Press Pulse to run unit (or press ON for continuous processing). When pulsing, 

hold the Pulse button for 2–3 seconds, check results, repeat if desired.

8   When finished processing, release the Pulse button, or if you were using 

continuous ON, press OFF, allow the chopping blade to stop rotating.

9   Take out the Small Food Pusher. Twist the cover towards to unlock mark  

to remove.

10  Hold the Chopping Blade by its stem and remove. Unlock the bowl by turning 

it clockwise towards the UNLOCK mark, and lift off. Empty the processed food.

NOTE: Chopping Blade is very sharp, use caution when handling.

How to Slice or Shred

NOTE: Make sure the unit is turned OFF  

and unplugged before use. Never use hand 

to push food into processor. Do not use the 

processor continuously for more than  

3 minutes at a time.
Process Large Food

1   Lock the bowl onto base.  

(See “How to assemble the bowl”)

2    Slide the Disc Stem onto the center post 

of the base. With the desired side facing 

up (slicing or shredding), push the slice/

shred disc onto the disc stem (Figure 10). 

Use caution when handling disc, blades 

are extremely sharp.

3    Lock cover onto bowl.  

(See “How to Lock the cover”)

4   Fill the Food Chute with large food  

such as a chunk of cabbage, green 

pepper, whole tomato (Figure 11).  

Lock the food chute lid. (See “How to  

Lock the Food Chute Lid”). Use the  

Food Guide to help you prepare food  

for slice/shred processing.

5   Slide the Small Food Pusher into the  

Large Food Pusher, plug the cord into  

an electric outlet.

6   Firmly press the ON button, then press 

down lightly but firmly on the Food 

Pusher (Figure 12).

7    When finished processing, press OFF, 

allow the disc to stop rotating. Twist the 

Bowl Lid towards the UNLOCK mark to 

remove the cover.

8   Carefully remove the Shredding Disc.  

Unlock the bowl by turning it clockwise 

towards the UNLOCK mark and lift off.  

Empty the processed food.

NOTE: Shredding Disc is very sharp, use 

caution when handling.

Figure 9

Figure 10

LOCK

UNLOCK

Figure 11

Figure 12

FPSTFP4250-FP_IB_REV-A.indd   8-9

6/2/09   11:00:19 AM

Содержание FPSTFP4250

Страница 1: ...Jarden Consumer Solutions Boca Raton Florida 33431 Para preguntas sobre los productos llame Sunbeam Consumer Service EE UU 1 800 334 0759 Canad 1 800 667 8623 www oster com 2009 Sunbeam Products Inc o...

Страница 2: ...hileoperatingappliance 15 Neverfeedfoodintofoodchutebyhand alwaysusethefoodpusher 16 BesuretoturnswitchtoOFFpositionaftereachuse 17 Donotusethisapplianceforotherthanitsintendeduse This unit is intende...

Страница 3: ...s you check processed results and control the consistency 2 On When this button is pressed unit runs continuously until OFF button is pressed 3 Off Processor should always be left in OFF position when...

Страница 4: ...he base The unit will not operate if the bowl does not lock onto the base How to Lock the Cover Place the cover onto the bowl Align the mark on the cover and the mark on the bowl as illustrated in Fig...

Страница 5: ...dling How to Slice or Shred Note Make sure the unit is turned OFF and unplugged before use Never use hand to push food into processor Do not use the processor continuously for more than 3 minutes at a...

Страница 6: ...process small amounts of liquids 2 cups or less at a time Larger amounts may leak from the bowl Care Cleaning NOTE Do not attempt to sharpen the cutting edges of the chopping blade or the reversible...

Страница 7: ...desired smoothness Squash Butternut Pumpkin or Sweet Potatoes pureed Up to 5 cups 1250ml of 1 inch 2 54cm cubes Add 60ml cup of cooking liquid per cup of food Pulse to finely chop then process continu...

Страница 8: ...to jurisdiction How to Obtain Warranty Service In the U S A If you have any question regarding this warranty or would like to obtain warranty service please call 1 800 334 0759 and a convenient servi...

Страница 9: ...electrodom stico El cable de extensi n debe instalarse de modo que no cuelgue de la mesada o mesa donde pueda ser jalado por ni os o pueda ocasionar tropiezos GUARDE ESTAS INSTRUCCIONES Gracias por a...

Страница 10: ...esadora no funcionar a menos que el recipiente est trabado correctamente en la base y la tapa est trabada de manera adecuada en el recipiente No intente hacer funcionar la unidad sin la tapa del recip...

Страница 11: ...on la mano No utilice la procesadora continuamente por m s de 3 minutos por vez 1 Trabe el recipiente en la base Vea C mo colocar el recipiente 2 Tome la cuchilla de picar por su base y desl cela hast...

Страница 12: ...Finos NotA Aseg rese de que la unidad est APAGADA y desenchufada antes de utilizarla Nunca coloque alimentos en la procesadora con la mano No utilice la procesadora continuamente por m s de 3 minutos...

Страница 13: ...iente y procesar hasta obtener migas finas Ar ndanos picados 3 tazas 750ml Pulsar para picar hasta la fineza deseada Tambi n puede agregarse az car para preparar una salsa de ar ndanos Huevos picados...

Страница 14: ...ta garant a La garant a es v lida para el comprador minorista original a partir de la fecha de compra inicial y la misma no es transferible Conserve el recibo de compra original Para solicitar servici...

Отзывы: