background image

28 / 60 

CANOPY    

819

CHEST BELT  

828


Содержание Novus

Страница 1: ...INGLESE Cod 22510 21 03 13 USE AND MAINTENANCE HANDBOOK PUSHCHAIR PUSHCHAIR ACCORDING TO THE ANSI RESNA WC 19 ...

Страница 2: ......

Страница 3: ...fully understand its contents In addition to help you becoming familiar with the stroller quickly it also contains practical tips for making the best use of it safely and keeping it in good working order If after reading it you still have questions contact your retailer who will be happy to help you or call ORMESA directly at 39 0742 22927 send a fax to 39 0742 22637 or send an e mail to info orme...

Страница 4: ...EPARATION 17 HOW TO ASSEMBLE Novus 18 OPEN AND BLOCK THE PUSHCHAIR 18 FIX THE UPHOLSTERY TO THE SEAT 19 FIX THE WHEELS 20 HOW NOVUS WORKS AND HOW TO USE IT 21 BRAKING the STROLLER 21 ADJUSTMENT of the BACKREST 21 ADJUSTMENT of the SEAT WIDTH 22 ADJUSTMENT of the SEAT DEPTH 22 ADJUSTMENT of the BACKREST HEIGHT 23 REMOVING the WHEELS 23 ADJUSTMENT of the LEGREST 24 ADJUSTMENT of the FOOTREST 24 FOLD...

Страница 5: ...AL SUPPORTS 863 38 SIDE WRAPPABLE and FLEXIBLE SIDE SUPPORTS for the TRUNK 868 40 891 SET OF 4 TIEDOWN HOOKS 4 RINGS 41 45 BELT FOR THE PELVIS 894 42 FIVE POINT VEST HARNESS 903 43 HAND BRAKE 905 44 FIVE POINT HARNESS 906 49 PARASOL 854 51 FOOT PLATE PADDED COVERING 892 54 VENT TRAY 911 55 BOTTLE HOLDER 922 57 MAINTENANCE CLEANING AND DISINFECTION OF NOVUS 58 CUSTOMER SERVICE AND SPARE PARTS 59 CO...

Страница 6: ...ucts are not to be used as restraints in moving vehicle THE STROLLER IS INTENDED FOR USE BY PEOPLE WHOSE SIZE AND WEIGHT fall within the range of the Technical Specifications on pages 15 16 and was exclusively designed for the transport and placement of children and teens NOVUS is available in three sizes change to a larger stroller as the child grows The 812 direction locks on the front wheels we...

Страница 7: ...ERLY and in GOOD CONDITION otherwise warranty will fail and marking will lapse PRODUCT REPAIRS other than the regular maintenance shown on page 58 59 of the manual must be ONLY MADE by a SPECIALIZED SERVICE CENTER in the maintenance of mechanical aids for disables otherwise warranty and marking will be voided Any CHANGES in the product ARE NOT AUTHORIZED REFER ONLY TO ORMESA otherwise warranty and...

Страница 8: ... TO STORE AND TRANSPORT THE MEDICAL DEVICE W TO STORE AND TRANSPORT THE MEDICAL DEVICE THE DEVICE MUST BE STORED AND PACKED using the Ormesa original packaging materials unless the guarantee will be voided Once unpacked THE TRANSPORT OF THE DEVICE must be done by ANCHORING ADEQUATELY it to the vehicle When travelling by plane or in the car DO NOT SUBJECT THE FOLDED FRAME TO LOADS THAT especially w...

Страница 9: ...ANCE chapter on pages 58 59 DO NOT LET ANYONE CLIMB ONTO THE FOOTREST OR RIDE ON THE BACK OF THE DEVICE DO NOT LIFT THE PRODUCT BY THE LEG SUPPORT FRAME OR FOOTREST i e TO CLIMB OVER OBSTACLE DO NOT USE THE PRODUCT TO CLIMB OR DESCEND STAIRS ITS STRUCTURE WAS NOT DESIGNED FOR THIS PURPOSE NEVER LEAVE THE STROLLER PARKED FOR A LONG TIME IN DIRECT SUNLIGHT OR NEAR SOURCES OF HEAT THIS WILL AVOID OVE...

Страница 10: ...8 60 HOW TO TILT THE NOVUS AND CLIMB UP PAVEMENTS CLIMB FACING FORWARD DESCEND FACING BACKWARD ...

Страница 11: ...y be used in addition THE STROLLER MUST BE ANCHORED TO THE MOTOR VEHICLE WITH THE BACKREST AND THE LEGREST IN THE UPRIGHT POSITION by 1 a four point strap type tiedown system that complies with either SAE J2249 or ISO 10542 2 supplied by the vehicle and 2 our accessory 891 set of 4 tie down hooks see fig 1 and 2 page 9 fig 3 page 10 and fig 4 page 12 ATTENTION ORMESA RECOMMENDS THE USE OF A COMPLE...

Страница 12: ...NTS NOTCHES INDICATED ON THE FRAME AND FIX THEM FOLLOWING THE INSTRUCTIONS ON PAGE 11 VIEW FROM THE FRONT VIEW FROM BEHIND 891 SECUREMENT POINTS FIXING HOLE 891 SECUREMENT POINTS FIXING HOLE 891 SECUREMENT POINTS FIXING HOLE 891 SECUREMENT POINTS FIXING HOLE ...

Страница 13: ...t ANSI RESNA WC 19 or ISO 10542 approved i e belts with a label of conformity to these standards Postural belts such as models 817 868 828 853 894 903 and 906 are not approved for use as restraint systems and can only be used in addition the vehicle must be suitable for transporting orthopaedic strollers in conformity with current law read the notices and instructions provided on page 9 of this us...

Страница 14: ...4 RINGS AS SHOWN IN THE FIGURE AND IN THE DIRECTION OF TRAVEL OF THE VEHICLE 4 POINT STRAP TYPE TIEDOWN STROLLER RESTRAINT types of tie down end fittings that are compatible with our accessory 891 set of 4 tiedown hooks Direction of travel of the vehicle Vehicle s ISO 10542 2 or SAE J2249 belts and hooks 891 TIEDOWN HOOKS Fig 4 891 TIEDOWN HOOKS ...

Страница 15: ... zone from 30 to 75 to the horizontal similar to that shown in Figure 5 A steeper greater angle within the preferred zone is desirable ATTENTION Our postural belts 817 868 828 853 894 903 and 906 are are not intended to be as an occupant restraint in a moving but they can be used in addition YES beneath the armrest and the frame SIDE VIEW FRONT VIEW NO above the armrest and the frame THE INCORRECT...

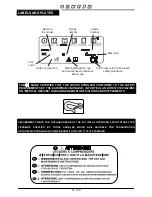
Страница 16: ...SUPPLEMENTS SECUREMENT POINTS FOR THE ANCHORAGE OF THE ISO 10542 2 APPROVED 4 POINT STRAP TYPE TIEDOWNS SUPPLIED BY THOSE VEHICLES WHICH ARE SUITABLE FOR TRANSPORTING ORTHOPEDIC STROLLER IN COMPLIANCE WITH THE ISO 7176 19 STANDARD Name of the model Series number Article number Max load Date of production Warning Read the use and maintenance handbook before use Conformity with the European safety s...

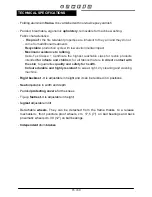
Страница 17: ...products intended for infants and children for all fabrics that are in direct contact with the skin to guarantee quality and safety for health Colours durable and highly resistant to sweat light dry cleaning and washing machine Rigid backrest It is adjustable in height and it can be reclined in 4 positions Seat adjustable in width and depth Padded protecting covers for the knees Tip up footrest It...

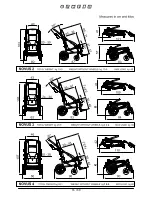
Страница 18: ...16 7 1 8 0 60 7 5 8 1 62 17 3 18 5 ...

Страница 19: ...17 INITIAL PREPARATION ...

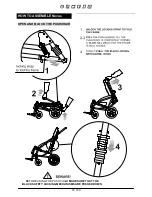
Страница 20: ...18 HOW TO ASSEMBLE Novus OPEN AND BLOCK THE PUSHCHAIR PUSH BEFORE USING THE PUSHCHAIR MAKE SURE THAT THE BLACK SAFETY LOCKING MECHANISMS ARE PUSHED DOWN S ...

Страница 21: ...19 FIX THE UPHOLSTERY TO THE SEAT FOUR STUDS TO THE FOUR STUDS THE THREE STUDS STRAPS WITH BUTTONS FOR ATTACHING CUSHION ...

Страница 22: ...20 FIX THE WHEELS FIX THE WHEELS AS IT IS SHOWN IN THE PICTURE A CLICK MEANS THAT THE WHEELS HAVE BEEN WELL LOCKED ...

Страница 23: ...AND HOW TO USE IT BRAKING the STROLLER LOCK UNLOCK ADJUSTMENT of the BACKREST BEWARE BEFORE POSITIONING OR TAKING THE CHILD OUT FROM THE STROLLER AND BEFORE ANY ADJUSTMENT OF ITS PARTS IT IS NECESSARY TO BRAKE THE AID 1 2 ...

Страница 24: ...22 ADJUSTMENT of the SEAT WIDTH ADJUSTMENT of the SEAT DEPTH KNOB VIEW FROM UNDER THE SEAT ...

Страница 25: ...of the BACKREST HEIGHT LOOSEN THE TWO SCREWS ON THE BACK OF THE BACKREST USING THE SUPPLIED ALLEN KEY SET THE BACKREST HEIGHT TO THE REQUIRED POSITION TIGHTEN THE SCREWS REMOVING the WHEELS VIEW FROM THE BACK WRENCH ...

Страница 26: ...24 ADJUSTMENT of the LEGREST ADJUSTMENT of the FOOTREST ...

Страница 27: ...25 FOLDING the STROLLER ...

Страница 28: ...26 FIXING THE ACCESSORIES WHEEL DIRECTION LOCKS 812 INGUINAL STRAPS 817 ...

Страница 29: ...27 THERMAL COVER 818 REAR VIEW ...

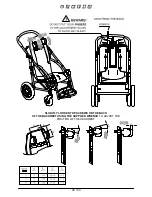
Страница 30: ...28 60 CANOPY 819 CHEST BELT 828 ...

Страница 31: ...29 RAIN COVER 825 CAREFULLY ...

Страница 32: ...30 60 TRAY 824 Sizes 2 and 3 one adjustment position Size 4 two adjustment position ...

Страница 33: ...31 60 FRONT HANDLE 839 PRESS BOTH PUSH BUTTONS AT THE SAME TIME TO ADJUST THE INCLINATION OF THE FRONT HANDLE handwheel clamping lever ATTENTION TIGHTEEN THE KNOB ...

Страница 34: ...32 60 FOOTSTRAPS 827 ABDUCTION BLOCK 834 FOOTSTRAPS 827 ABDUCTION BLOCK 834 WRENCH TIGHTEN THE KNOB WRENCH ...

Страница 35: ...33 60 SIDE PADDED SUPPORTS 838 LOOSEN THE SCREWS ON THE BACK OF THE BACKREST USING THE SUPPLIED WRENCH TO ADJUST THE POSITION OF THE SIDE SUPPORTS BLOCKING ELEMENT STUD ...

Страница 36: ...34 60 SIDE PROTECTING COVERS 844 MESH BASKET 858 ...

Страница 37: ...35 60 VEST HARNESS 853 ...

Страница 38: ...36 60 HEADREST with PARIETAL SUPPORTS 852 It is adjustable in height and width BLOCKING ELEMENT ...

Страница 39: ...37 60 SLIGHTLY LOOSEN THE SCREWS ON THE BACK OF THE BACKREST USING THE SUPPLIED WRENCH TO ADJUST THE POSITION OF THE HEADREST ...

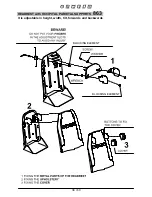
Страница 40: ...38 60 HEADREST with OCCIPITAL PARIETAL SUPPORTS 863 It is adjustable in height width tilt forwards and backwards BLOCKING ELEMENT BLOCKING ELEMENT ...

Страница 41: ...39 60 SLIGHTLY LOOSEN THE SCREWS ON THE BACK OF THE BACKREST USING THE SUPPLIED WRENCH TO ADJUST THE POSITION OF THE HEADREST ...

Страница 42: ...for the TRUNK 868 They are wrappable for the trunk and adjustable in height and width LOOSEN THE SCREWS ON THE BACKREST USING THE SUPPLIED WRENCH TO ADJUST THE POSITION OF THE WRAPPABLE SUPPORTS BLOCKING ELEMENT FLEXIBLE NUT WRENCH WASHER WRENCH ...

Страница 43: ...or transport facing in the direction of travel on moving vehicles private cars buses etc 891 According to the ANSI RESNA WC 19 ATTENTION FOR THE ASSEMBLY OF THE 891 ACCESSORY AND ANCHORING THE STROLLER TO THE VEHICLE CAREFULLY READ THE INSTRUCTIONS AND NOTICES ON PAGES 9 10 11 12 AND 13 OF THIS MANUAL VIEW FROM BEHIND SET OF 4 ...

Страница 44: ...42 60 45 BELT FOR THE PELVIS 894 LATERAL VIEW ...

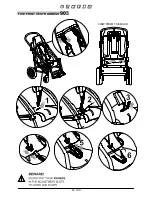
Страница 45: ...43 60 FIVE POINT VEST HARNESS 903 VIEW FROM THE BACK ...

Страница 46: ...AND BRAKE 905 A REMOVE THE UPHOLSTERY SEE PAGE 19 BEWARE The hand brake must be installed by qualified personnel such as the manufacturer or the dealer who sold the product or a specialized mechanical company ...

Страница 47: ...R WRENCH WASHER SCREW NUT 1 CUT AND TAKE 2 5 cm OF THE RUBBER TUBE OUT FROM THE MIDDLE OF THE PUSH HANDLE 2 GET THE PLASTIC PART OF THE BRAKE LEVER WARM BY USING A DRYER 3 PUT THE BRAKE LEVER ON THE PUSH HANDLE 4 FIX AND TIGHTEN THE SCREW WAASHER AND NUT ...

Страница 48: ...46 60 C ASSEMBLING THE TWO PLATES VIEW FROM THE BACK WRENCH SCREW ...

Страница 49: ...47 60 D FIXING THE DOUBLER OF THE BRAKE VIEW FROM THE BACK WRENCH SCREW WASHER WRENCH NUT DOUBLER ...

Страница 50: ...48 60 E FIXING THE CABLES VIEW FROM THE BACK CABLE LOCK HOLE TO INSERT THE CABLE SHEATH CABLE RUBBER RINGS CABLE LOCK ...

Страница 51: ...49 60 FIVE POINT HARNESS 906 FIXING THE BACK BUCKLES FIXING THE STRAPS ON THE UPPER PART OF THE BACKREST VIEW FROM THE BACK FIXING THE STRAP ON THE SEAT ...

Страница 52: ...50 60 FIXING THE FRONT BUCKLES ASSEMBLED HARNESS 4 5 SIZE CIRCUMFERENCE min max cm ...

Страница 53: ...51 60 PARASOL A PLACEMENT and MOUNTING Tighten the knob to secure it Tighten the parasol on its fixing part 854 ...

Страница 54: ...52 60 B ADJUSTMENT WITH BUTTONS The opening and closing of the parasol are like a conventional parasol button for adjusting in backward forward position button for adjusting from left to right ...

Страница 55: ... parasol in all directions D REMOVING THE PARASOL To remove it PRESS the button and SIMULTANEOUSLY PULL the Parasol To reinsert the parasol it is not necessary to press the button Button to remove the parasol NOTE before folding the pushchair remove the parasol VIEW OF THE PUSHCHAIR D N I H E B M O R F ...

Страница 56: ...54 60 FOOT PLPATE PADDED COVERING 892 VIEW FROM BEHIND OF THE FOOTPLATE Velcro Velcro Velcro Elastic Velcro ...

Страница 57: ...55 60 VENT TRAY 911 NUT M6 WRENCH SCREW M6X16 WRENCH NUT M6 SCREW M6X16 BUSHING SCREW M6X25 SCREW M6X25 NUT M6 BUSHING ...

Страница 58: ...56 60 LATERAL VIEW BUSHING REAR VIEW BUSHING ...

Страница 59: ...57 60 BOTTLE HOLDER 922 ...

Страница 60: ...below CLEANING AND DISINFECTING THE VARNISHED AND CHROMIUM PLATED FRAME Clean and disinfect the varnished chromium plated parts of the stroller with a soft cloth dipped in diluted wethylated spirit CLEANING AND DISINFECTING THE UPHOLSTERY Clean the 819 canopy the 825 rain cover and the 834 abduction block with a soft cloth dipped and diluted in water In order to wash the upholstery of the Novus sc...

Страница 61: ...nments clean more often anoint the parts exposed to salt corrosion such as chrome bolts and screws EXTRAORDINARY MAINTENANCE or corrective EXTRAORDINARY MAINTENANCE MEANS ALL THOSE WORKS ON THE PUSH CHAIR WHICH ARE DIFFERENT FROM THE ABOVE MENTIONED ONES WE ASK THE USER DEALER AND ALL PUBLIC HEALTH SERVICES TO LET THE MANUFACTURER OR OTHER OFFICIALLY AUTHORIZED COMPANIES INTERVENE WITH EXTRAORDINA...

Страница 62: ... it is required that 1 a doctor or therapist verifies that the aid is appropriate and adequate to meet the dimensional functional and postural needs of the new user and if all its components are suitable appropriate for him You should also consider that the marking and the manufacturer s responsibility for safety requirements for the product remain only if the original product still has not change...

Страница 63: ......

Страница 64: ...is handbook are not binding ORMESA reserves the right to carry out any necessary change without prior notice or replacements CRASH TESTED ACCORDING TO THE ANSI RESNA WC 19 PRODUCT CERTIFIED BY CERAH FRANCE PRODUCT TESTED BY TÜV HANNOVER SINCE 1980 FDAREGISTERED USA ...

Отзывы: