


CONDITIONS FOR DURABILITY, REUSE AND REASSIGNMENT TO A
NEW USER
Granted that Ormesa products should be selected, evaluated and ordered for
the needs of an individual user, reuse is however possible with the respect of
the following conditions.
Based on the experience of other similar sold models, on technological progress, on
the guarantees of the Quality Management System certificated in 1998 according to
ISO 9001, there is adequate confidence that
the average lifespan of JUDITTA is
about 5 years, on condition that it is used according to the directions given in
the user manual.
Only when the conditions for storage and transport of chapter HOW TO STORE AND
TRANSPORT THE MEDICAL DEVICE” are followed, the periods in which the product
is stored at the dealer should not be considered in that time period
Factors unrelated to the product such as the development of the user, its
diseases, the use and the surrounding environment can make significantly
lower the duration of life of the product; on the contrary, if the indications on
the use and maintenance are properly observed, the reliability of the product
can extend well beyond the lifetime average above.
Prior to recycling or reassignment an already used Ormesa product, it is
required that:
1. a doctor or therapist verifies that the aid is appropriate and adequate to
meet the dimensional, functional and postural needs of the new user,
and if all its components are suitable / appropriate for him. You should
also
consider
that
the
-marking
and
the
manufacturer's
responsibility for safety requirements for the product remain only if the
original product still has not changed and only original accessories or
spare parts have been applied
2. qualified technical personnel of a company specialized in the
maintenance of technical aids for disabled people performs a detailed
technical inspection to verify its condition and wear, the absence of
any damage and failure of all components / adjustments, the presence
of the user’s manual, of the label with the date and serial number. A
copy of the manual and maintenance may be always requested to the
retailer that supplied the product or directly to Ormesa
3. The product has been thoroughly cleaned and disinfected following the
directions
given
in
the
“MAINTENANCE,
CLEANING
AND
DISINFECTION” Chapter
We recommend to keep written records on all inspections performed on the product before any
assignment to the new user.
In case of doubt about the safety of the product or damage to
parts or components, you are urged to immediately discontinue
use and contact a specialized service center in the maintenance
of mechanical aids for disabled, or directly ORMESA
86/86
Содержание Juditta B12
Страница 1: ...tilt in space wheelchair USE AND MAINTENANCE HANDBOOK model B30 model B60 model B12 ING cod 220160 ...
Страница 2: ......
Страница 12: ...10 86 ...
Страница 27: ...ASSEMBLY BOTH SIDES 25 86 ...
Страница 28: ...26 86 ...
Страница 29: ...BOTH SIDES 27 86 ...
Страница 30: ...CLAMPING LEVER INSERT THE HEADREST AND LOCK IT WITH THE CLAMPING LEVER 28 86 ...
Страница 31: ...A CLICK INDICATES THAT IT IS WELL LOCKED MAKE SURE THAT THE LEGRESTS ARE WELL INSERTED AND DO NOT ROTATE 29 86 ...
Страница 41: ...REMOVING THE LEGRESTS 1 PRESS THE LOCK BUTTON 2 REMOVE THE LEGREST Lock button 39 86 ...
Страница 43: ...TURNING THE CALF RESTS 41 86 ...
Страница 44: ...DEPTH ADJUSTMENT of the CALFRESTS FLESSO EXTENSION of the CALFRESTS wrench depth adjustment nut 42 86 ...
Страница 45: ...ADJUSTING THE HEIGHT OF THE ARMRESTS Locking lever FRONT VIEW Unlock Lock Locking lever 43 86 ...
Страница 53: ...TILT ADJUSTMENT OF THE PUSH HANDLE BUTTON 51 86 ...
Страница 58: ...8 turn the locking part of the tray outwards 9 tighten the screw ASSEMBLED 2 1 0 1 60 wrench 56 86 ...
Страница 61: ...ADJUSTING THE TILT OF THE TABLE VIEW FROM BELOW unlocked lever locked lever 59 86 ...
Страница 63: ...ABDUCTION BLOCK 834 WARNING TIGHTEN THE KNOB WELL 61 86 ...
Страница 65: ...B UNLOCKING the footrest lock LOCKING LEVER C OPERATING the footrest lock LOCKING LEVER 63 86 ...
Страница 66: ...CALF REST 916 1 REMOVE THE KNEE PADS 64 86 ...
Страница 67: ...2 FIX THE CALF REST 916 Adjust the depth by loosening the velcro 65 86 ...
Страница 69: ...REMOVABLE TABLE COVER 896 VIEW FROM BELOW OF THE TABLE 67 86 ...
Страница 71: ...IV POLE 933 B30 and B12 version 69 86 ...
Страница 72: ...70 86 ...
Страница 73: ...SET OF HAND BRAKES 905 B30 version ASSEMBLE THE BRAKE LEVER AND THE DOUBLER Strap cable control doubler 71 86 ...
Страница 74: ...Strap Strap Strap 72 86 ...
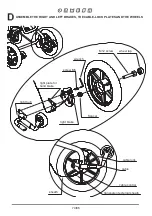
Страница 75: ...REMOVE THE REAR WHEELS wheel tap M12 screw Spacer REMOVE THE BRAKE SYSTEM screw wrench brake system 73 86 ...
Страница 77: ...SET OF HAND BRAKES 905 B60 version Strap cable control doubler 75 86 ...
Страница 78: ...Strap Strap Strap 76 86 ...
Страница 79: ...77 86 ...
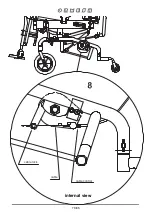
Страница 80: ...cable lock cable cable control internal view 78 86 ...
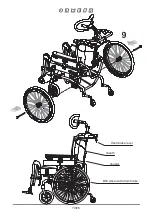
Страница 81: ...Hand brake lever sheath doupler B60 wheel with drum brake 79 86 ...
Страница 89: ......
Страница 90: ......
Страница 91: ......


