HOW TO USE JUDITTA FOR TRANSPORT ON A MOVING VEHICLE
(private cars, bus, etc..)
JUDITTA WHEELCHAIR conforms to the ISO 7176-19 and ANSI RESNA WC/19 standard,
which defines the safety requirements for transport, facing in the direction of travel on
moving vehicles (private cars, buses, etc..) following these warnings:
-
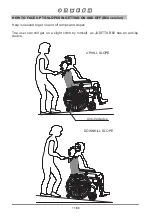
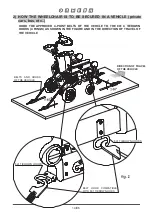
THE WHEELCHAIR-SEATED OCCUPANT MUST FACE THE FRONT OF THE VEHICLE
(see
fig. 2, page 14). According to the ISO 7176-19 point 6.3.4, compliance with ISO 7176-19 does not
preclude using the wheelchair facing rearwards in large accessible vehicles equipped and
approved with rear-facing wheelchair passenger stations
-
The User should weigh no more than 136 kilos
because the CRASH TEST provided by the
ISO and ANSI/RESNA standards only refers to wheelchairs/pushchairs for users whose weight is
136 kilos or less
-
THE
VEHICLE
MUST
BE
APPROVED
FOR
TRANPORTING
ORTHOPAEDIC
WHEELCHAIRS/PUSHCHAIRS IN CONFORMITY WITH STANDARD ISO 7176-19
(see fig.2,
page 14)
-
THE WHEELCHAIR MUST BE ANCHORED TO THE VEHICLE WITH THE BACKREST AND
THE LEGRESTS IN THE UPRIGHT POSITION using: 1) a four-point strap-type tie down
system that complies with ISO 10542-2 supplied with the vehicle
(see fig.2, page 14)
and 2)
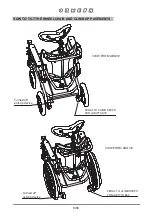
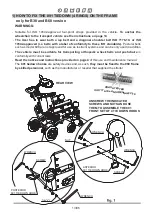
our accessory 891 – SET OF 4 TIE-DOWN HOOKS (4 rings)
(see fig. 1, page 13, fig.2 page 14
and fig.3 page 15)
−
THE USER MUST WEAR BOTH A LAP BELT AND A DIAGONAL SHOULDER BELT ISO
7176-19 or ISO 10542- APPROVED (i.e. belts with a label of conformity to these ISO
standards). THE USE OF A LAP BELT BY ITSELF IS NOT RECOMMENDED. Postural belts,
such as model 828 are not type-approved for use as restraint systems and can only be
used in addition
WARNINGS!
ORMESA RECOMMENDS THE USE OF A COMPLETE ISO 10542-2 COMPLIANT “WTORS”
SYSTEM, which consists of restraint systems for both the wheelchair and its occupant
-
Whenever the user is transferred on a seat of the vehicle, the unoccupied wheelchair
should be stored in a cargo area or secured in the vehicle during the travel
-
In order to preserve their effectiveness,
belt restraints should not be held away from the body
by wheelchair components or pats,
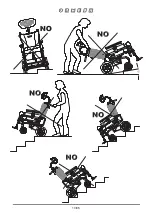
such as the wheelchair armrests or wheels (see fig. 3 and
4, page 15)
-
shoulder-belt restraints should fit over the shoulders
(see fig. 3 page 15)
-
belt restraints should be adjusted as tightly as possible,
consistent with user comfort and belt
webbing should not be twisted when in use
-
in order to reduce the potential of injury to vehicle occupants, during transport
the tray and all
accessories should be removed and secured separately in the vehicle
THE WHEELCHAIR MUST BE INSPECTED BY THE MANUFACTURER OR ITS AUTHORIZED
RETAILER OR DISTRIBUTOR BEFORE REUSE FOLLOWING INVOLVEMENT IN ANY TYPE
OF VEHICLE COLLISION
ANY ALTERATION OR SUBSTITUTION OF THE 891 TIEDOWN HOOKS OR WHEELCHAIR
PARTS OR COMPONENTS, WITHOUT THE WRITTEN AUTHORIZATION OF ORMESA SRL,
IS FORBIDDEN AND WILL VOID THE “
” MARK AND THE WARRANTY
12/86
Содержание Juditta B12
Страница 1: ...tilt in space wheelchair USE AND MAINTENANCE HANDBOOK model B30 model B60 model B12 ING cod 220160 ...
Страница 2: ......
Страница 12: ...10 86 ...
Страница 27: ...ASSEMBLY BOTH SIDES 25 86 ...
Страница 28: ...26 86 ...
Страница 29: ...BOTH SIDES 27 86 ...
Страница 30: ...CLAMPING LEVER INSERT THE HEADREST AND LOCK IT WITH THE CLAMPING LEVER 28 86 ...
Страница 31: ...A CLICK INDICATES THAT IT IS WELL LOCKED MAKE SURE THAT THE LEGRESTS ARE WELL INSERTED AND DO NOT ROTATE 29 86 ...
Страница 41: ...REMOVING THE LEGRESTS 1 PRESS THE LOCK BUTTON 2 REMOVE THE LEGREST Lock button 39 86 ...
Страница 43: ...TURNING THE CALF RESTS 41 86 ...
Страница 44: ...DEPTH ADJUSTMENT of the CALFRESTS FLESSO EXTENSION of the CALFRESTS wrench depth adjustment nut 42 86 ...
Страница 45: ...ADJUSTING THE HEIGHT OF THE ARMRESTS Locking lever FRONT VIEW Unlock Lock Locking lever 43 86 ...
Страница 53: ...TILT ADJUSTMENT OF THE PUSH HANDLE BUTTON 51 86 ...
Страница 58: ...8 turn the locking part of the tray outwards 9 tighten the screw ASSEMBLED 2 1 0 1 60 wrench 56 86 ...
Страница 61: ...ADJUSTING THE TILT OF THE TABLE VIEW FROM BELOW unlocked lever locked lever 59 86 ...
Страница 63: ...ABDUCTION BLOCK 834 WARNING TIGHTEN THE KNOB WELL 61 86 ...
Страница 65: ...B UNLOCKING the footrest lock LOCKING LEVER C OPERATING the footrest lock LOCKING LEVER 63 86 ...
Страница 66: ...CALF REST 916 1 REMOVE THE KNEE PADS 64 86 ...
Страница 67: ...2 FIX THE CALF REST 916 Adjust the depth by loosening the velcro 65 86 ...
Страница 69: ...REMOVABLE TABLE COVER 896 VIEW FROM BELOW OF THE TABLE 67 86 ...
Страница 71: ...IV POLE 933 B30 and B12 version 69 86 ...
Страница 72: ...70 86 ...
Страница 73: ...SET OF HAND BRAKES 905 B30 version ASSEMBLE THE BRAKE LEVER AND THE DOUBLER Strap cable control doubler 71 86 ...
Страница 74: ...Strap Strap Strap 72 86 ...
Страница 75: ...REMOVE THE REAR WHEELS wheel tap M12 screw Spacer REMOVE THE BRAKE SYSTEM screw wrench brake system 73 86 ...
Страница 77: ...SET OF HAND BRAKES 905 B60 version Strap cable control doubler 75 86 ...
Страница 78: ...Strap Strap Strap 76 86 ...
Страница 79: ...77 86 ...
Страница 80: ...cable lock cable cable control internal view 78 86 ...
Страница 81: ...Hand brake lever sheath doupler B60 wheel with drum brake 79 86 ...
Страница 89: ......
Страница 90: ......
Страница 91: ......


