background image

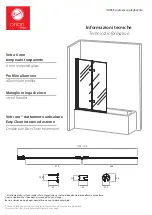
Informazioni tecniche

Technical information

Maniglie in lega di zinco

Vetro 6 mm
temperato trasparente

* Il trattamento Easy Clean rende in fase di produzione i vetri del box doccia idrorepellenti e anticalcare.
Questo significa che il box doccia rimarrà pulito più a lungo.
Basterà rimuovere dopo ogni doccia l'acqua con un panno morbido.

*

 The Easy Clean treatment makes the glasses repellent and anti-limescale in production.

This means that the shower enclosure will remain clean longer.

6 mm tempered glass

metal handles

Double side Easy Clean treatement

Vetri con * trattamento anticalcare
Easy Clean interno ed esterno

ULISSE sopravasca pieghevole

Profili in alluminio

alluminium profiles

1190 - 1210

570

545

24,5

44

36

32,7

22

42

Содержание BDULD0010CRO

Страница 1: ...a lungo Baster rimuovere dopo ogni doccia l acqua con un panno morbido The Easy Clean treatment makes the glasses repellent and anti limescale in production This means that the shower enclosure will r...

Страница 2: ...ieghevole Folding Door Guarnizioni Deflectors Nottolino superiore Top Pivot Nottolino inferiore Bottom Pivot Tasselli Wall plugs Viti Screws M4x30 Viti Screws M4x12 Viti Screws M4 5x25 Copriviti Screw...

Страница 3: ...Istruzioni per l installazione Assembling instructions ULISSE sopravasca pieghevole 3...

Страница 4: ...ro con le apposite viti e tasselli WALL PROFILES Fig 1 Level the pro les straight out on the wall trace the xing points to the wall with the pencil assemble the pro les to the wall with the appropriat...

Страница 5: ...ite il montaggio dei nottolini inferiore e superiore Usa le appositi viti M4 5X25 POST ASSEMBLING Fig 2 Assemble the post to the glass door by xing the top and bottom pivots Please use the M4 2X25 scr...

Страница 6: ...M4x12 e aggiungi in ultima i relativi coprivite L e K POST ASSEMBLING TO THE WALL POST Fig 3 Assemble the post to the wall post by xing the M4X12 screws Finally add the screw covers L and K Viti M4x1...

Страница 7: ...e cerniere ai vetri In ne inserisce la guarnizione salvagoccia sottoporta A2 DOOR ASSEMBLY Fig 4 Insert the de ector between the two doors then assemble the door A2 to the A1 by xing the hinges to the...

Страница 8: ...nte tra il pro lo e la parete Attendi 24 ore prima dell uso A2 DOOR ASSEMBLY Fig 5 Add the cover to the wall post and apply the silicone sealant internally and externally between the pro le and the wa...

Страница 9: ...inse Another product is hot water and lemon PULIZIA PROFILI IN ALLUMINIO ALLUMINIUM PROFILES CLEANING Per rimuovere il calcare puoi usare un prodotto chimico anticalcare o un prodotto naturale l impor...

Страница 10: ...e valida per ogni modello elencato al punto 1 per i prodotti immessi sul mercato a partire dalla data di emissione a prescindere del numero di lotto 3 Usi previsti del prodotto conformemente alla UNI...

Страница 11: ...ZATA Pulibilit Resistenza agli urti Propriet di frammentazione Durabilit PASSA PASSA PASSA 4 2 EN 14428 2015 4 3 EN 14428 2015 4 4 EN 14428 2015 Si rilascia la presente dichiarazione di prestazione so...

Страница 12: ...ULISSE sopravasca pieghevole...

Отзывы: