background image

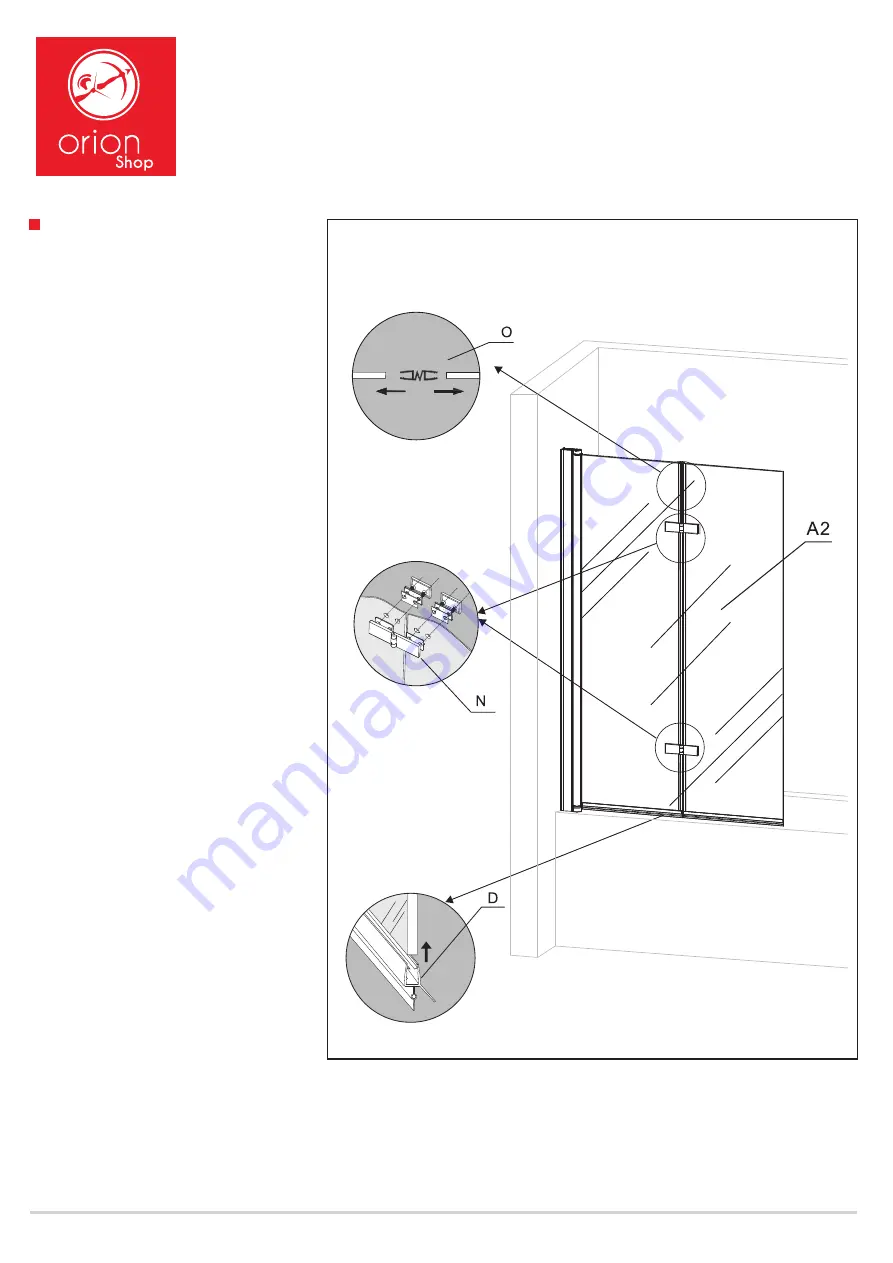
Fig. 4

ASSEMBLAGGIO ANTA A2 (Fig. 4)

Inserisci la guarnizione di tenuta tra le

due ante, poi assembla l'anta A2 all'A1 

tramite il fissaggio delle cerniere ai vetri. 

Infine inserisce la guarnizione salvagoccia 

sottoporta.

A2 DOOR ASSEMBLY (Fig. 4)

Insert the deflector between the two doors, then 

assemble the door A2 to the A1 by fixing the

hinges to the glass. Finally, insert the deflector 

under the doors.

ULISSE sopravasca pieghevole

Istruzioni per l'installazione

Assembling instructions

5

Содержание BDULD0010CRO

Страница 1: ...a lungo Baster rimuovere dopo ogni doccia l acqua con un panno morbido The Easy Clean treatment makes the glasses repellent and anti limescale in production This means that the shower enclosure will r...

Страница 2: ...ieghevole Folding Door Guarnizioni Deflectors Nottolino superiore Top Pivot Nottolino inferiore Bottom Pivot Tasselli Wall plugs Viti Screws M4x30 Viti Screws M4x12 Viti Screws M4 5x25 Copriviti Screw...

Страница 3: ...Istruzioni per l installazione Assembling instructions ULISSE sopravasca pieghevole 3...

Страница 4: ...ro con le apposite viti e tasselli WALL PROFILES Fig 1 Level the pro les straight out on the wall trace the xing points to the wall with the pencil assemble the pro les to the wall with the appropriat...

Страница 5: ...ite il montaggio dei nottolini inferiore e superiore Usa le appositi viti M4 5X25 POST ASSEMBLING Fig 2 Assemble the post to the glass door by xing the top and bottom pivots Please use the M4 2X25 scr...

Страница 6: ...M4x12 e aggiungi in ultima i relativi coprivite L e K POST ASSEMBLING TO THE WALL POST Fig 3 Assemble the post to the wall post by xing the M4X12 screws Finally add the screw covers L and K Viti M4x1...

Страница 7: ...e cerniere ai vetri In ne inserisce la guarnizione salvagoccia sottoporta A2 DOOR ASSEMBLY Fig 4 Insert the de ector between the two doors then assemble the door A2 to the A1 by xing the hinges to the...

Страница 8: ...nte tra il pro lo e la parete Attendi 24 ore prima dell uso A2 DOOR ASSEMBLY Fig 5 Add the cover to the wall post and apply the silicone sealant internally and externally between the pro le and the wa...

Страница 9: ...inse Another product is hot water and lemon PULIZIA PROFILI IN ALLUMINIO ALLUMINIUM PROFILES CLEANING Per rimuovere il calcare puoi usare un prodotto chimico anticalcare o un prodotto naturale l impor...

Страница 10: ...e valida per ogni modello elencato al punto 1 per i prodotti immessi sul mercato a partire dalla data di emissione a prescindere del numero di lotto 3 Usi previsti del prodotto conformemente alla UNI...

Страница 11: ...ZATA Pulibilit Resistenza agli urti Propriet di frammentazione Durabilit PASSA PASSA PASSA 4 2 EN 14428 2015 4 3 EN 14428 2015 4 4 EN 14428 2015 Si rilascia la presente dichiarazione di prestazione so...

Страница 12: ...ULISSE sopravasca pieghevole...

Отзывы: