10
11
Note: The
Screen Stretch Window
does not work for the
Live Video Window
,
only for open images captured by the camera.
In the
Screen Stretch Window
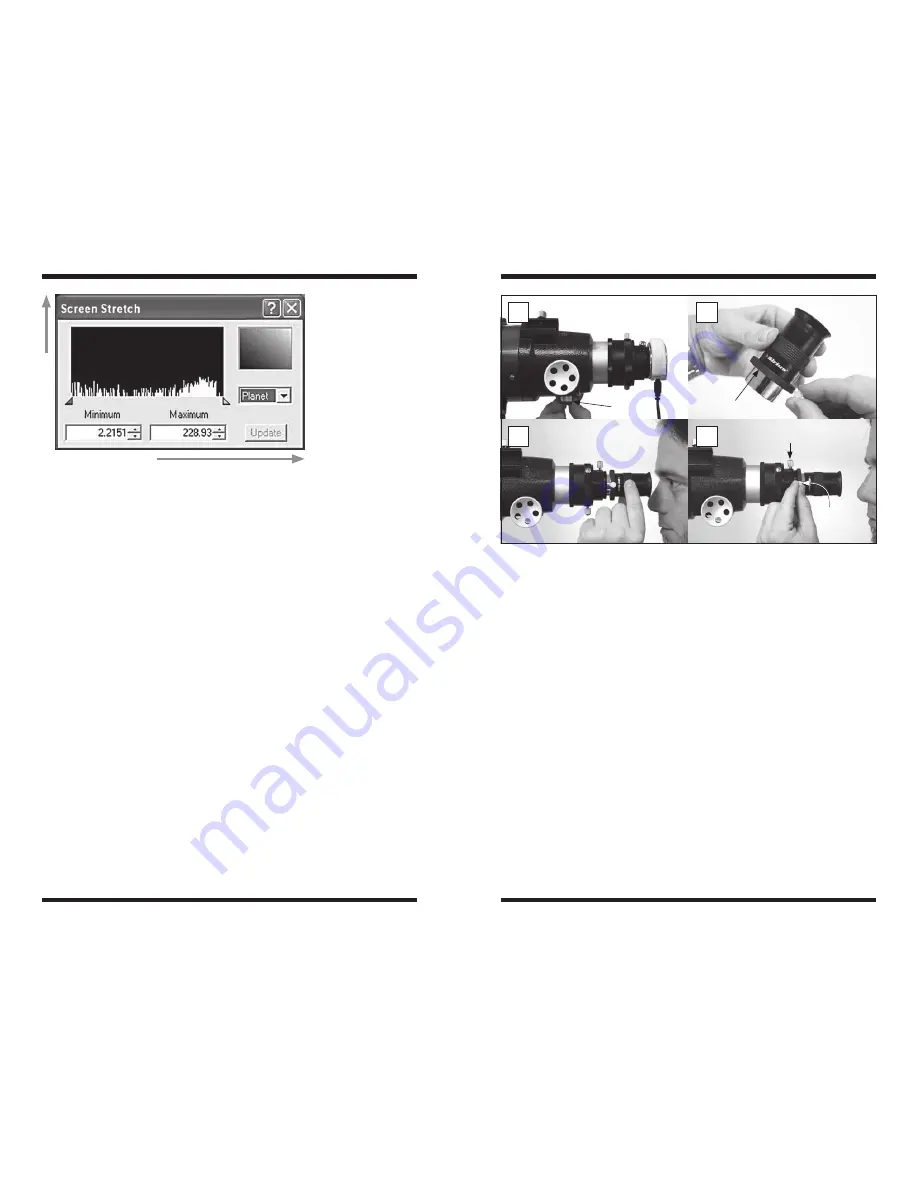
, you will notice a graph. This is called the
“histogram” of the currently displayed image (Figure 7).
A histogram is a simple bar graph that shows the range of brightness in an
image. Each bar in the graph represents a level of brightness; the bar to the
far left in the histogram represents the dimmest pixels, and the bar to the far
right is for the brightest pixels. The height of the bar is the total number of
pixels at that brightness level in the image. Every image has a different histo-
gram depending on how much of the image is bright or dark. Directly viewing
the histogram of your image in the
Screen Stretch Window
provides an easy
interface for making decisions on how the screen stretch should be set.
In MaxIm DL Essentials, the two parameters entered in the
Screen Stretch
Window
are
Minimum
and
Maximum
. A pixel that is at the
Minimum
value
is set to zero (black), and a pixel at the
Maximum
value is set to 255 (white).
An easy way to adjust the
Maximum
and
Minimum
values is to move the
slider arrows located directly under the histogram of the image in the
Screen
Stretch Window
. The red slider arrow corresponds to the
Minimum
value and
the green arrow corresponds to the
Maximum
value. Simply left-click and then
drag each arrow to adjust it to the desired level. The best results are obtained
by tweaking the arrows (numbers) until the most pleasing display appears.
There are also seven automatic settings in the
Screen Stretch Window
.
Typically, Moon and Planet will give the best results. The default screen stretch
setting is Moon.
Instead of using the
Screen Stretch Window
, it is faster to use the
Quick
Stretch
facility. This allows you to modify the image appearance instantly with
small up/down and left/right movements of the mouse. To do this, hold down
the
Shift
key, then left-click and drag the mouse on the image. You’ll find this
feature to be a great convenience when fine adjusting the screen stretch to get
an image to look its best.
The problem with stretching is determining exactly how to stretch the image for
best effect. Often there are several different possibilities for the same image.
Trial-and-error will be the best way to judge what the best screen stretch set-
ting is. Try several different settings until you find one you think looks best.
When the image is subsequently saved, the screen stretch setting information
will be kept when the image is next opened.
use of the Parfocal ring
A parfocal ring is included with your camera to help with focusing. The ring is
intended to be used with a 1.25" eyepiece (not included), preferably one with a
focal length of at least 10mm to provide high enough magnification for precise
focusing. The ring goes on the barrel of the eyepiece. When the ring is properly
positioned on the barrel, you can use the eyepiece to focus, replace the eye-
piece with the camera, and the camera should be close to focused.
Figure 8a-d. (8a.)
To properly set the position of the parfocal ring on an eyepiece,
first focus the camera in the telescope. If you have a focus lock thumbscrew on your
telescope’s focuser, tighten it.
(8b.)
Place the parfocal ring on the eyepiece’s barrel
and slide it all the way up. Tighten the thumbscrew on the ring.
(8c.)
Remove the
camera, and focus the eyepiece by sliding it in-and-out of the focuser drawtube. When
eyepiece focus is achieved, tighten the thumbscrew on the focuser drawtube to secure
the eyepiece in that position.
(8d.)
Now, loosen the thumbscrew on the parfocal ring,
slide the ring all the way forward, and retighten the thumbscrew on the ring.
8a
8c
8b
8d
Focus lock
thumbscrew
Parfocal ring
Figure 7.
A histogram is a visual
representation of the
range and level of
brightness in an image.
Brightness
level
Brightness range


