

8
9
Note: The image in the eyepiece of the FunScope will be upside-down (rotated
180º). This is normal for Newtonian reflector telescopes.
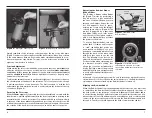
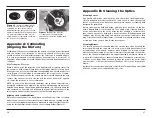
Without moving the telescope, use the Red-dot finder’s azimuth (left/right) and
altitude (up/down) adjustment knobs to position the red dot on the object in
the eyepiece (Figure 7).
When the red dot is centered on the distant object, check to make sure that
the object is still centered in the telescope’s field of view. If not, recenter it and
adjust the Red-dot finder’s alignment again. When the object is centered in the
eyepiece and on the red dot, the Red-dot finder is properly aligned with the
telescope (Figure 8).
Once aligned, Red-dot finder will usually hold its alignment even after being
removed and remounted. Otherwise, only minimal realignment will be needed.
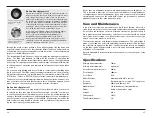
replacing the red-dot finder Battery
Replacement 3-volt lithium batteries for the Red-dot finder are available from
many retail outlets. Remove the old battery by inserting a small flat-head
screwdriver into the slot on the battery casing and gently prying open the case.
Then carefully pull back on the retaining clip and remove the old battery. Do
not overbend the retaining clip. Slide the new battery under the battery lead
with the positive (+) side facing down and replace the battery casing.
using Your telescope
choosing an observing site
When selecting a location for observing, get as far away as possible from
direct artificial light such as street lights, porch lights, and automobile head-
lights. The glare from these lights will greatly impair your dark-adapted night
vision. Avoid viewing over rooftops and chimneys, as they often have warm
air currents rising from them. Similarly, avoid observing from indoors through
an open (or closed) window, because the temperature difference between the
indoor and outdoor air will cause image blurring and distortion.
If at all possible, escape the light-polluted city sky and head for darker country
skies. You’ll be amazed at how many more stars and deep-sky objects are vis-
ible in a dark sky!
tracking celestial objects
The Earth is constantly rotating about its polar axis, completing one full rota-
tion every 24 hours; this is what defines a “day”. We do not feel the Earth
rotating, but we see it at night from the apparent movement of stars from east
to west.
When you observe any astronomical object, you are watching a moving target.
This means the telescope’s position must be continuously adjusted over time
to keep an object in the field of view. This is easy to do with the FunScope
because of its smooth motions on
both axes. As the object moves off
towards the edge of the field of view,
just lightly nudge the telescope to
re-center it.
Objects appear to move across the
field of view faster at higher magni-
fications. This is because the field
of view becomes narrower. Objects
seen through the eyepiece will be
upside down and reversed left-to
right (rotated 180º).
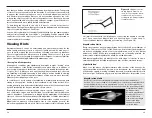
Eyepiece selection
By using eyepieces of different focal
lengths, it is possible to attain many
magnifications or powers with the
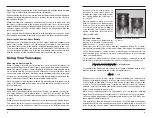
FunScope. Your telescope comes with two
eyepieces
(Figure 9): a 20mm,
which gives a magnification of 30x, and a 10mm, which gives a magnification
of 15x. Other eyepieces can be used to achieve higher or lower powers. It is
quite common for an observer to own five or more eyepieces to access a wide
range of magnifications.
To calculate the magnification of a telescope-eyepiece combination, simply
divide the focal length of the telescope by the focal length of the eyepiece.
Telescope Focal Length (mm)
= Magnification
Eyepiece Focal Length (mm)
For example, the FunScope, which has a focal length of 300mm, used in com-
bination with the 20mm eyepiece, yields a magnification of:
300mm
= 15x
20mm
Whatever you choose to view, always start by inserting your lowest-power
(longest focal length) eyepiece to locate and center the object. Low magni-
fication yields a wide field of view, which shows a larger area of sky in the
eyepiece. This makes finding and centering an object much easier. Trying to
find and center objects with a high power (narrow field of view) eyepiece is like
trying to find a needle in a haystack!
Once you’ve centered the object in the eyepiece, you can switch to a higher
magnification (shorter focal length) eyepiece, if you wish. This is recommend-
ed for small and bright objects, like planets and double stars. The Moon also
takes higher magnifications well.
The best rule of thumb with eyepiece selection is to start with a low power,
wide-field eyepiece, and then work your way up in magnification. If the object
looks better, try an even higher magnification eyepiece. If the object looks
Figure 9:
The 20mm and 10mm
eyepieces