

6
7
operating the red-dot Finder
reflex Finder
The
Red-dot finder reflex finder
(2)
(Figure 7) works by projecting a
tiny red dot onto a lens mounted in
the front of the unit. When you look
through the Red-dot finder, the red
dot will appear to float in space,
helping you locate even the faintest
of deep space objects. (Figure 8) The
red dot is produced by a light-emit-
ting diode (LED), not a laser beam,
near the rear of the sight. A replace-
able 3-volt lithium battery provides
the power for the diode.
To use the Red-dot finder, turn the
power knob clockwise until you hear
a “click” indicating that power has
been turned on. With you eye posi-
tioned at a comfortable distance, look
through the back of the reflex sight
with both eyes open to see the red
dot. The intensity of the dot can be
adjusted by turning the power knob.
For best results when stargazing, use
the dimmest possible setting that
allows you to see the dot without dif-
ficulty. Typically, a dim setting is used
under dark skies and a bright setting
is used under light-polluted skies or
in daylight.
At the end of your observing session, be sure to turn the power knob counter-
clockwise until it clicks off. When the two white dots on the Red-dot finder’s
rail and power knob are lined up, the Red-dot finder is turned off.
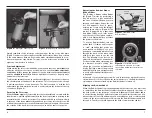
aligning the red-dot finder
When the Red-dot finder is properly aligned with the telescope, an object that
is centered on the Red-dot finder’s red dot should also appear in the center of
the field of view of the telescope’s eyepiece. Alignment of the Red-dot finder
is easiest during daylight, before observing at night. Aim the telescope at a
distant object at least 1/4 mile away, such as a telephone pole or chimney and
center it in the telescope’s eyepiece. Now, turn the Red-dot finder on and look
through it. The object should appear in the field of view near the red dot.
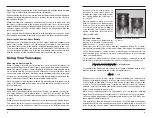
Figure 8:
The Red-Dot finder
superimposes a tiny red dot on the
sky, showing right where the telescope
is pointed.
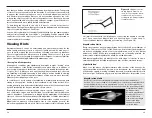
Simply take hold of the telescope tube opening at the top or the side brace
(Figure 5) and move it left or right so that the base rotates. Move it up or down
in the same manner. Both motions can be made simultaneously and in a con-
tinuous manner for easy aiming. This way you can point to any position in the
night sky, from horizon to horizon.
tension adjustment
When aiming the telescope in altitude, you may find that the
optical tube(3)
is
either too hard to move or does not stay in place. Use the
altitude adjustment
tension knob (5)
to change the amount of tension between the
optical tube (3)
and the
altazimuth base (6)
to find the right level of tension to properly move
and balance the telescope.
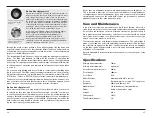
To adjust the azimuth tension you will need to tighten or loosen the lock nut on
the circular plate at the base of the telescope. This is very easy to do; though
it will require the use of two wrenches. The first is needed to hold the bolt
underneath the base while the second is used to adjust the lock nut at the top
of the base. (Figure 6)
Focusing the telescope
With the
20mm eyepiece (1)
inserted into the
focuser (4)
and secured with the
thumbscrews, aim the
optical tube (3)
so the front (open) end is pointing in the
general direction of an object at least 1/4-mile away. With your fingers, slowly
rotate one of the
focus wheels (9)
until the object comes into sharp focus. Go
a little bit beyond sharp focus until the image starts to blur again, then reverse
the rotation of the knob, just to make sure you’ve hit the exact focus point.
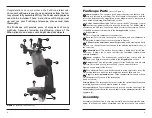
Figure 5:
Aiming the FunScope 76
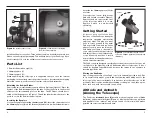
Figure 6:
Adjusting the azimuth tension
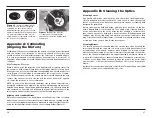
Figure 7:
Overview of the
Red-Dot Finder
Power
knob
Azimuth
adjustment knob
Battery
casing
Mounting
bracket
Altitude
adjustment knob