

4
5
install the visual accessories. These will be found in a box within the main box.
Please save all original packaging. This will help protect your FunScope if you
wish to transport it or in the unlikely event repair service is necessary.
Parts list
1 Red-dot finder reflex sight (2)
1 20mm eyepiece (1)
1 10mm eyepiece (11)
When unpacking the telescope it is suggested that you save the internal
packaging. In the unlikely event the product needs to be returned the shipping
materials can be re-used to ensure it arrives safely at its destination.
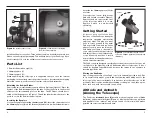
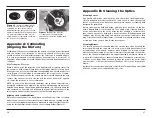
attaching the red-dot Finder
Remove the two metal thumbscrews from the optical tube (Figure 3). Place the
bracket of the
Red-dot finder (2)
on the tube
so that the holes in the bracket
slide over the two threaded posts on the tube. The EZ Finder should be ori-
ented so that it appears as in Figure 1. Thread the thumbscrews back onto the
posts to secure the Red-dot finder in place.
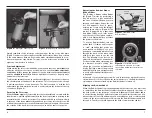
inserting the Eyepiece
Loosen the
eyepiece securing thumbscrews (10)
.
Insert the chrome barrel of
the
20mm eyepiece (1)
into the
focuser (4)
and secure it with the thumbscrews.
Set aside the
10mm eyepiece (11)
for
use later.
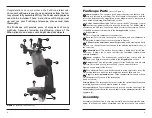
Your telescope is now fully assem-
bled and should resemble Figure 1.
Remove the dust cap from the front
of the telescope when it is in use.
Replace it when you are finished
observing.
Getting started
It’s best to get a feel for the basic
functions of the FunScope during the
day, before observing astronomical
objects at night. This way you won’t
have to orient yourself in the dark!
Find a spot outdoors where you’ll have
plenty of room to move the telescope,
and where you’ll have a clear view of
some object or vista that is at least 1/4
mile away. It is not critical that the tele-
scope
be exactly level, but it should
be placed on a relatively flat surface to
ensure smooth movement.
The FunScope was designed specifically for visual observation of astronomi-
cal objects in the night sky. Like all Newtonian reflector telescopes, it is not
suited for daytime terrestrial usage because the image in the eyepiece is
inverted (upside-down).
Placing the Funscope
One of the great assets of the FunScope is its extremely portable size. Due
to its overall short height, you will find that viewing while sitting next to the
telescope is the most comfortable. If you wish to raise the telescope off the
ground so that it can be used while standing or sitting in a chair, then a plat-
form, such as a milk crate or table can be used.
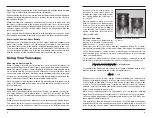
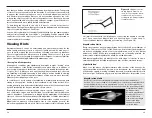
altitude and azimuth
(aiming the telescope)
The FunScope
altazimuth base (6)
permits motion along two axes: altitude
(up/down) and azimuth (left/right) (Figure 4). Moving the telescope up/down
and right/left is the “natural” way people search for objects; which makes
pointing the telescope intuitive and easy.
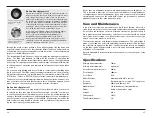
Figure 2:
Details of the focuser
Figure 3:
Thumbnuts for installing
Red-Dot Finder bracket
Figure 4:
The StarBlast has two axes
of motion: altitude (up/down) and azimuth
(left/right).
Altitude
Azimuth
10
9
1