Reset tracking force if necessary
Now that your cartridge is adjusted you will almost
certainly find that your initial tracking force reading has
changed.
Re-set the tracking force to it's correct reading using the
same procedure as before.
SIDE BIAS
Side bias (sometimes called “Anti-skate”) applies an
opposing (outward) balancing force, to the natural
inward
drag of a pivoting arm while playing. Left
uncontrolled, the stylus would push up against the
groove inner wall, causing distortion both from mis-
tracking and a cantilever skewed in relation to the
cartridge generator.
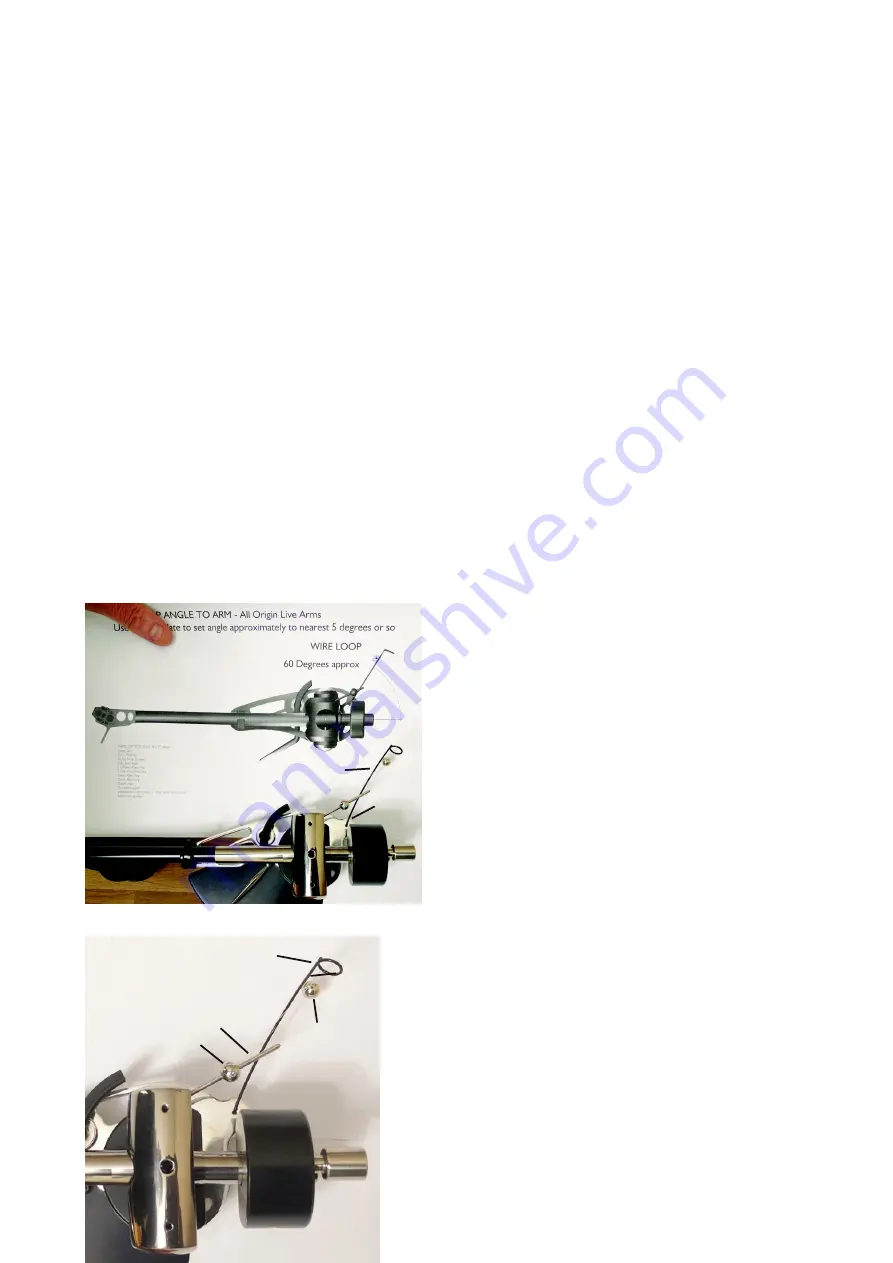
Orientate wire loop
Carefully orientate the wire loop to the correct angle
relative to the arm base. Hold the enclosed paper
template alongside the arm to do this (see below). The
angle only needs to be approximate.
The wire loop is clamped in position by a set screw at
it’s base – this can be re-tightened if necessary using the
Allen key supplied.
Use paper template to set angle of wire loop
Fit side bias balls
Carefully unpack the 2 balls and joining thread
(shown in below).
Photo showing side bias ball arrangement
Fit the “clamp ball” which slides along the side
bias rod. Lightly clamp in position (approx 5mm
away from the yoke) using a 1.5mm Allen key in
the tiny set screw of the ball.
Thread the thin nylon filament line through the
small gap of the wire “eye” to allow the ball weight
to hang freely.
Side bias force is set by varying the position of the
clamp ball along the rod. To increase side bias, un-
clamp the ball and move it outwards. To decrease
side force move the ball inwards.
Once correct position is finalized, clamp the ball in
position.
It's possible that the hanging ball can foul the wire
loop when the arm gets close to the end of the
record. If this occurs simply bend the wire loop
downwards near the base, whilst at the same time
increasing the bend thus pulling the “loop” portion
closer.
Checking side bias
Ideally you need a test record with a track for
checking side bias (not all have this, so check
before you buy - The Ultimate Analogue Test LP is
recommend as it has an Anti-skating test; 315Hz
amplitude sweep to +12dbu (Lateral). Also the Hi
Fi News test record has an Anti-skate/bias setting
track.
In the absence of a side bias test track then the
following method is better than nothing. Find a test
record or a record with approx 10mm of blank
vinyl between the end of the lead out groove and
the record label. Lower the stylus needle on the
blank uncut vinyl and observe whether the needle
skates inwards towards the centre of the record or
outwards. Increase anti-skate until the arm starts to
slowly drift inward towards the label.
Also, watch the stylus when you set it into a
groove. Does it move to the right or left relative to
the cartridge body? This indicates too much or too
little anti-skating.
Page 7
CLAMP
BALL
HANGING
BALL
WIRE
LOOP
SIDE-BIAS ROD
CLAMP BALL
HANGING BALL
WIRE
LOOP
PAPER TEMPLATE
HELD PARALLEL
WIRE
LOOP
PAPER TEMPLATE
HELD PARALLEL
CLAMP
SCREW


