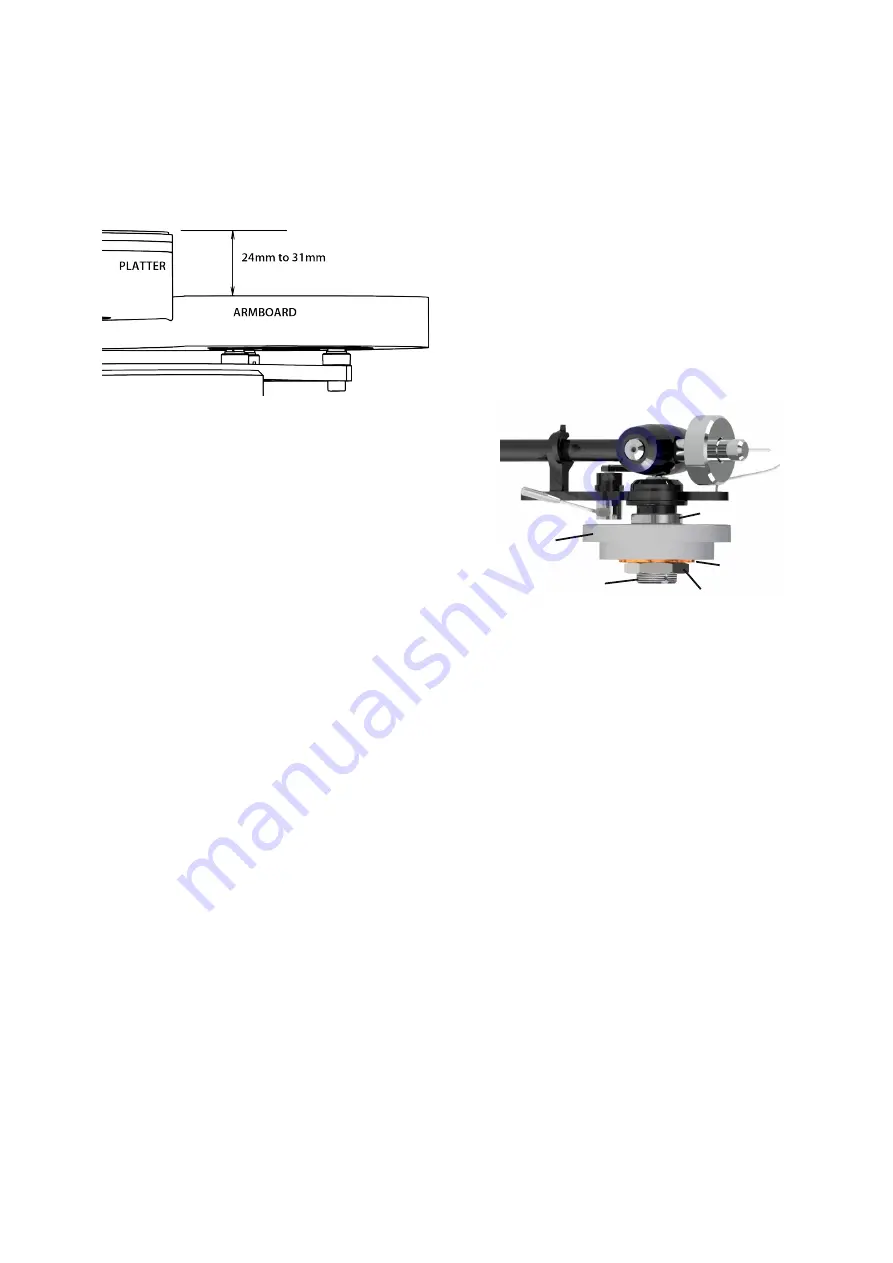
Height consideration
Origin Live arms can be raised by approx 16mm using
VTA adjustment. However performance is optimized
with the arm raised as little as possible. Ideally the
height from the top of armboard to top of platter should
be 24mm but not lower.
If this dimension is significantly larger on your deck,
you can use spacing washers – a 4mm Acrylic washer is
included for this purpose. This should be placed directly
on top of your armboard before fitting the arm.
There are other methods of adjusting armboard height
which may be advised by your turntable manufacturer.
Achieve Mounting Conditions
If your deck already has correct mounting dimensions
then skip the next section and read “Mounting the Arm”.
If your deck does not yet have the correct geometry then
alternatives are as follows.
Modify your existing armboard
You can probably modify your existing arm board to
achieve the required geometry. Please refer to our web
site – on any tonearm page see right side menu “fitting
guidance” tab.
Obtain a compatible armboard
Origin Live arm geometry is identical to that of Rega
arms. This means they are perfect drop in replacements
for all Rega arms. Many deck manufacturers cater for
mounting Rega arms and can supply you with a Rega
geometry armboard that will perfectly fit your Origin
Live arm.
If necessary ask how to fit an “old style Rega geometry,
threaded base mounting”? This is easier than the newer 3
point mount and may save you money. They should
understand what is required.
Note that although newer Rega arms have a 3 point
mounting, their armboards always have a central 24mm
diameter hole and this is all you need to mount Origin
Live arms.
If your arm has an SME mount there is an adaptor plate
available on the Origin Live website – see Accessories >
Vinyl > Adaptors
Mounting the Arm
Refer to diagram below.
1. Insert arm through mounting hole in the
armboard.
2. Fit cork washer underneath the armboard.
3. Follow this with the large clamping nut
and tighten to just finger tight.
The mistake is often made of over tightening this
nut with the result that the music sounds deadened.
Simply tighten to finger tight - as hard as you can.
If you don't have a strong grip then use a spanner,
pliers or mole grips to “nip” the nut a fraction
tighter.
CONNECT THE ARM
Fit Cable Clip
For optimal performance, support the arm cable
with a clip fastened underneath the plinth. This
helps prevent vibration feeding into the arm.
Leave a slight droop in the cable so it's not tight.
Clipping the cable is not always possible or
convenient so may be omitted.
Connect the arm to your Phono stage /
Amplifier
Plug the arm cable phono plugs into your phono
stage (amplifier). You should ensure they are a
reasonably tight fit to sockets. If this is not the case
it pays to nip the outer jaws with a pair of pliers to
close it up a little.
Earthing arrangements
Optimal earthing arrangement is largely a matter of
trial and error as it depends on your phono stage /
amplifier design. Most vinyl systems hum slightly
at high volume levels, especially valve amplifiers.
This can be reduced sometimes by changing the
earthing arrangement.
Some of our external tonearm leads have a different
number of earth leads so please read the section
Page 2
ARMBOARD
CLAMPING NUT
VTA ADJUSTER RING
CORK WASHER
THREADED BASE


