Photo of stylus force gauge to set tracking force
From this number you can assess whether you need to
increase the tracking force or vice-versa. Move the tone-
arm counterweight accordingly and re-measure the
tracking force. Repeat this procedure until the correct
reading is obtained.
A digital force gauge works slightly differently so
follow the manufacturer’s instructions.
Adjusting tracking Force
Set tracking force by sliding the large counterweight to
the correct position on the rear stub. Sliding the
counterweight towards the cartridge increases tracking
force and away decreases it.
Set arm height
How to raise and lower arm base to set VTA
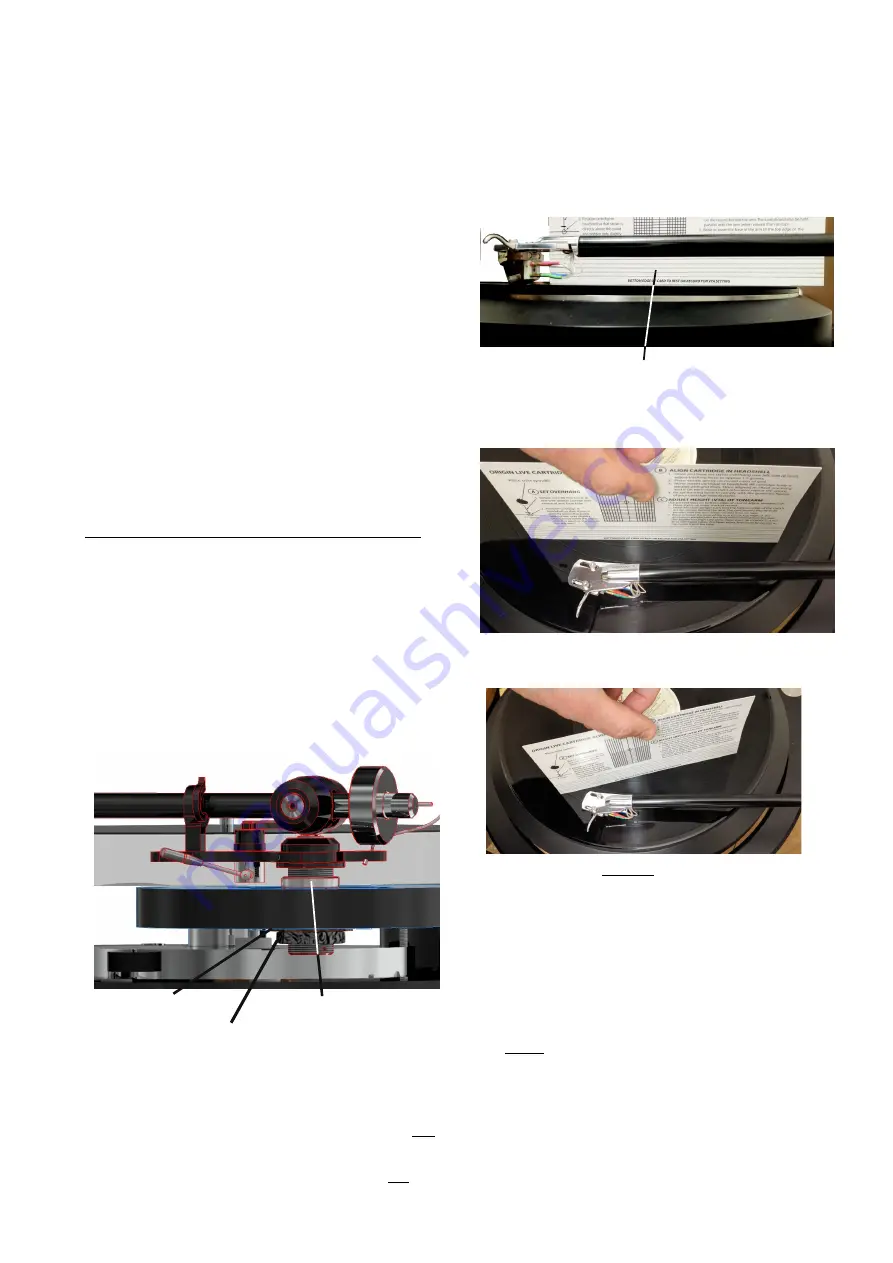
To raise or lower the base of the arm use the VTA
adjuster ring – see diagram below.
The arm must be un-clamped for the adjuster to work. So
slacken the large clamping nut to allow movement
required.
Just under the arm plate is the thin silver VTA height
adjuster ring – To raise the arm, turn the ring clockwise
(anti-clockwise to lower it).
Judging correct arm height is described later but once
achieved, clamp the arm using the clamp nut to tension
described previously.
The wheel is capable of raising the arm around 16mm.
Adjust VTA
Set the arm height so that the arm tube is parallel to the
surface of the record. This is fundamental for VTA and
for the lift lower to work correctly.
To check arm height, lower the cartridge onto a flat
record. Use a track position approx midway across
the record.
Looking sideways across the arm, see if the arm
tube is parallel to the horizontal lines on the
alignment gauge. If the arm is down at the rear then
raise the base of the arm and visa versa.
To obtain an accurate assesment on parallel you
must hold the card parallel to the arm tube in both
planes as shown below.
Above photo shows correct orientation of alignment
card
Above photo shows incorrect orientation of alignment
card
Notes on VTA fine tuning
Cartridge suspensions “bed down” over the first 40
hours. There are also manufacturing variations in
stylus angle tolerances.
For these reasons, final VTA tuning is best carried
out by ear after this time period. There is a detailed
Youtube video on how to do this on our Youtube
channnel.
Experimentally set the optimum arm height by
listening to different VTA settings. If the arm base
is too high, the sound is usually slightly on the
bright side and lacking body in the bass – too low
and it veers on the dull side.
Page 5
HORIZONTAL LINES ON ALIGNMENT GUAGE
VTA ADJUSTER RING
CLAMPING NUT
CORK WASHER


