


18
09.09/WE
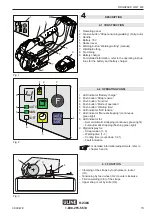
ORGAPACK OR-T 400
1
2
3
Fig. 9
1
2
Fig. 11
MAN.
AUTO
MAN.
SOFT
blinkend /
fl ashing /
clignote
AUTO
MAN.
SOFT
AUTO
MAN.
SOFT
AUTO
MAN.
SOFT
1.
2.
AUTO
MAN.
+
AUTO
3
4
5
6
Fig. 10
1
3
2
H-2386
1-800-295-5510
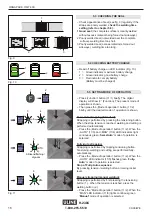
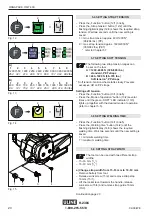
5.3 CHECKING THE SEAL
– Check appearance of seal (see
fi
g. 9) regularly. If the
straps are poorly welded,
check the welding time
setting (refer to chapter 5.8).
1 Good seal
(the complete surface is cleanly welded
without excess material being forced out sideways).
2 Poorly welded seal (not welded over the complete
surface), welding time too short.
3 Poorly welded seal (excess material is forced out
sideways), welding time too long.
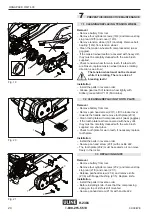
5.5 SETTING MODE OF OPERATION
– Press „Function“ button (11/1) brie
fl
y. The digital
display will show „F“ (Function). The present mode of
operation is shown.
– Then press the „Mode of operation“ button (11/2)
brie
fl
y until the desired mode of operation is shown.
Semi-Auto strapping (Standard):
Strapping is performed by pressing the tensioning button.
When the strap tension is reached, welding and cutting is
performed automatically.
– Press the „Mode of operation“ button (11/2). When the
„AUTO“ (11/3) and „MAN“ (11/4) LED indicators light
continuous green „
Semi-Auto
“ mode of operation is
selected.
Fully-Auto strapping:
Strapping is performed by tapping tensioning button.
Tensioning, welding and cutting are performed fully-
automatically.
– Press the „Mode of operation“ button (11/2). When the
„AUTO“ LED indicator (11/5)
fl
ashes green „
Fully-
Auto
“ mode of operation is selected.
Stop of Fully-Auto sequence:
By pressing tension- /welding button or raising rocker
lever.
Manual strapping (manual welding):
Strapping is performed by
fi
rst pressing the tensioning
button (1.). When the tension is reached, press the
welding button (2.).
– Press the “Mode of operation” button (11/2). When the
“MAN” LED indicator (11/6) lights continous green
“
Manual
” mode of operation is selected.
5.4 CHECKING BATTERY CHARGE
– Read off battery charge on LED indicator (Fig. 10):
1 = Green indicator: maximum battery charge
2 = Green indicator: good battery charge
3 = Red indicator: empty battery
(Battery must be charged)


