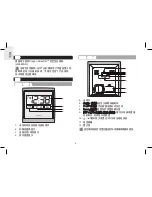
background image

4

中文简

时钟信号接收指示器

:

信号强

信号弱

没有信号

正接收信号


装置需约2-10 分钟来接收时钟信号。如果信号

微弱,装置可能需要24 个小时来接收有效的信号。
要启动/关闭信号接:
长按   及

   .

手动设置时钟

1.   长按   /   以关闭信号接收。
2.  长按Clock (时钟),画面会显示ZONE (区域)及数字

会闪动。

3.   单击或长按    /    以调教设置。对于  EU/UK 
 

(欧盟/英国),时间区域补偿会从接收到的时钟信号
来设置时钟 +/-23 个小时。而对于US (美国),时间
区域设置是 0(P)、1(M)、2(C)、3(E)。

4.  

按下Clock (时钟)以确定。 

5.   单击或长按  /   以调教12/24 小时制式、小时、
 

分钟、年份、月历格式 

(月-日/日-月)、月份、


日期、语言及温度单位 (

o

C/

o

F)。

6.   按下Clock (时钟)以确定。


语言选择有英文(E)、德文(D)、法文 (F)、

意大利文(I)及西班牙文(S)。

要选择显示模式

:

按下Clock (时钟) 以在秒数及星期显示之间选择。


当温度低于-5 

o

C (29.0 

o

F),画面会显示LL.L。

当温度高于 50 

o

C (122.0 

o

F),画面则会显示 HH.H。

闹钟

基本功能

1.   

当每日闹钟响起时,按下Alarm (闹钟)即可停止响闹。

2.   响闹会于2 分钟后停止,而除非按下Alarm (闹钟),
 

否则响闹会在8 分钟后再次响起。


在第二次响闹后,不论是否有按下Alarm (闹钟),

直至下一天前响闹都不会再次响起。

显示响闹时间

1.   当画面显示现在日期时按下 Alarm (闹钟)。
2.  要显示现在日期,当画面显示响闹时间时,请按下

Clock (时钟)。

设置闹钟

1.   长按Alarm (闹钟),闹钟的小时会闪动。
2.   单击或长按   /   以更改设置。
3.   按下Alarm (闹钟) 来确定,   便会显示。

Содержание JM889NR

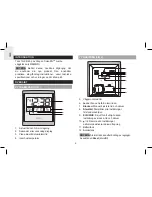
Страница 1: ...Jumbo Wall Clock Model JM889NR USER MANUAL...

Страница 2: ...Battery 3 Placement Of Unit 3 Clock 3 Clock Reception 3 Set The Clock Manually 4 Alarm 4 Basic Functions 4 Displaying Alarm Time 4 Set The Alarm 4 Enable Disable The Alarm 5 Reset 5 Precautions 5 Spe...

Страница 3: ...2 Seconds or weekday display 3 Current Date Alarm Time Display 4 Indoor temperature display BACK VIEW FIG 2 EU UK US JM889NR MADE IN C HINA 12 11 10 9 8 7 6 5 5 Wall mount hole 6 Alarm Display and adj...

Страница 4: ...es when displays or when the display is dim PLACEMENT OF UNIT The clock can be mounted on a wall or stand on a at surface Method Instruction Table Stand Pull out the table stand see FIG 2 at the back...

Страница 5: ...calendar format month day day month month date language and temperature unit o C o F 6 Press Clock to con rm NOTE The language options are English E German D French F Italian I and Spanish S To selec...

Страница 6: ...not clean the unit with abrasive or corrosive materials Do not tamper with the unit s internal components This invalidates the warranty Only use fresh batteries Do not mix new and old batteries Image...

Страница 7: ...this user manual and to amend it at its sole discretion at any time without prior notice To the extent that there is any inconsistency between English version and any other language versions the Engl...

Страница 8: ...dealer or an experienced radio TV technician for help This Class B digital apparatus complies with Canadian ICES 3 B NMB 3 B DECLARATION OF CONFORMITY The following information is not to be used as co...

Страница 9: ...res specialising in separate collection of waste electrical and electronic equipment or given back to the dealer when purchasing a new WEEE pursuant to and in accordance with Article 14 as implemented...

Страница 10: ...er Cominciare 3 Inserire Le Batterie 3 Posizionamento Dell orologio 3 Orologio 3 Ricezione Dell orologio 3 Impostare L orologio Manualmente 4 Sveglia 4 Funzioni Di Base 4 Visualizzazione Orario Della...

Страница 11: ...ualizzazione di secondi e iniziali del giorno della settimana 3 Data odierna Visualizzazione orario sveglia 4 Visualizzazione della temperatura interna VISUALIZZAZIONE POSTERIORE FIG 2 EU UK US JM889N...

Страница 12: ...ostituire le batterie quando si visualizza o quando l illuminazione dello schermo basso POSIZIONAMENTO DELL OROLOGIO L orologio pu essere montato su una parete o essere posizionato su una super cie pi...

Страница 13: ...C 3 E 4 Premere Clock Orologio per confermare 5 Premere una volta o premere e tenere premuto per regolare l impostazione per il formato 12 24h ore ore minuti anno formato calendario mese giorno giorno...

Страница 14: ...attiva RESET Premere Reset sul retro dell orologio usando un oggetto a punta Tutte le impostazioni vengono ripristinate in default PRECAUZIONI Non sottoporre il prodotto a forza eccessiva urti polvere...

Страница 15: ...zioni sui prodotti Oregon Scienti c visitate il nostro sito web www oregonscienti c com Per richiedere informazioni contattate il nostro Servizio Clienti all indirizzo info oregonscienti c it Oregon S...

Страница 16: ...tallation Des Piles 3 Placement De L unite 3 Horloge 3 Reception De L horloge 3 Pour Ajuster L horloge Manuellement 4 Alarme 5 Fonctions De Base 5 Af chage De L heure De L alarme 5 R glage De L alarme...

Страница 17: ...a date ou l af chage du jour de la semaine 4 Af chage de la temp rature int rieure VUE ARRIERE FIG 2 EU UK US JM889NR MADE IN C HINA 12 11 10 9 8 7 6 5 5 Trou de xation murale 6 Alarm Alarme Pour af c...

Страница 18: ...les piles lorsque s af che ou lorsque la luminosit de l cran est faible PLACEMENT DE L UNITE Vous pouvez installer l unit sur un mur ou la poser sur une surface plane M thode Instruction Support Tabl...

Страница 19: ...U UK La fonction fuseau horaire r gle l horloge 23 heures de l heure du signal re u Pour US les r glages du fuseau horaire sont 0 P 1 M 2 C 3 E 4 Appuyez sur Clock Horloge pour con rmer 5 Appuyez une...

Страница 20: ...yez sur Alarm Alarme pour con rmer L icone s af che alors ACTIVATION D SACTIVATION DE L ALARME Lorsque l cran LCD af che l heure de l alarme appuyez sur Alarm Alarme pour activer ou d sactiver l alarm...

Страница 21: ...n du fabricant pour obtenir plus d informations Le contenu de ce mode d emploi ne peut tre reproduit sans la permission du fabricant Ne pas jeter les piles usag es avec les d chets municipaux non tri...

Страница 22: ...a seule discr tion n importe quand et sans avis pr alable Dans la mesure o des incoh rences sont constat es entre la version anglaise et les versions traduites en langues trang res la version anglaise...

Страница 23: ...tz 3 Einlegen Der Batterien 3 Aufstellung Des Ger tes 3 Uhr 4 Zeitsignal empfang 4 Manuelle Einstellung Der Uhrzeit 4 Alarm 5 Grundfunktionen 5 Anzeigen Der Alarmzeit 5 Einstellen Der Alarmfunktion 5...

Страница 24: ...gst rke Indikator 2 Sekunden oder Wochentag Anzeige 3 Aktuelles Datum Alarmzeit Anzeige 4 Innentemperatur Anzeige R CKANSICHT ABB 2 EU UK US JM889NR MADE IN C HINA 12 11 10 9 8 7 6 5 5 ffnung f r Wand...

Страница 25: ...arisierungsangaben 3 Bet tigen Sie die Reset R cksetzen Taste nach jedem Batteriewechsel HINWEIS Wechseln Sie die Batterien aus sobald der Indikator erscheint oder wenn die Anzeige schw cher wird AUFS...

Страница 26: ...eren 2 Dr cken und halten Sie die Clock Taste In der Anzeige erscheint nun ZONE Zeitzone und die Nummer der Zeitzone blinkt 3 Dr cken Sie einmal oder halten Sie gedr ckt um die Einstellung auszuf hren...

Страница 27: ...aktuelle Datum anzuzeigen w hrend die Alarmzeit in der Anzeige erscheint EINSTELLEN DER ALARMFUNKTION 1 Dr cken und halten Sie die Alarm Taste Die Stundenanzeige f r die Alarmzeit blinkt nun 2 Dr cke...

Страница 28: ...ts chlichen Anzeige abweichen Bitte achten Sie darauf dass dieses Ger t als Sonderm ll entsorgt wird und geben Sie dieses nicht in den regul ren Hausm ll Durch die Aufstellung dieses Ger tes auf besti...

Страница 29: ...ienti c de Oregon Scienti c Global Distribution Limited beh lt sich das Recht vor die Inhalte Bedingungen und Bestimmungen in dieser Bedienungsanleitung zu interpretieren und auszulegen und diese jede...

Страница 30: ...e Inicio 3 Instalaci n De Las Pilas 3 Ubicaci n De La Unidad 3 Reloj 3 Recepci n De La Hora 3 Ajuste Manual De La Hora 4 Alarma 4 Funciones B sicas 4 Visualizaci n De La Hora De La Alarma 5 Ajuste De...

Страница 31: ...a de alarma 4 Visualizaci n de la temperatura interior VISTA TRASERA FIG 2 EU UK US JM889NR MADE IN C HINA 12 11 10 9 8 7 6 5 5 Agujero de montura mural 6 Alarma Para mostrar y ajustar la hora de la a...

Страница 32: ...uando aparezca o cuando la pantalla se aten e UBICACI N DE LA UNIDAD El reloj puede montarse en la pared o depositarse sobre una super cie plana M todo Instrucciones Pata de soporte Tire hacia fuera d...

Страница 33: ...C 3 E 4 Pulse Clock para con rmar 5 Pulse una vez o mant ngalo pulsado para ajustar el formato de 12 24 horas las horas los minutos el a o el formato de fecha mes d a d a mes mes d a del mes idioma y...

Страница 34: ...a aseg rese de que el reloj est mostrando la hora actual REINICIAR En la parte trasera de la unidad pulse Reset con un objeto puntiagudo Todos los ajustes volver n a los valores predeterminados de f b...

Страница 35: ...sterior Algunas unidades vienen equipadas con una cinta de seguridad en el compartimento de la pila Retire la cinta del compartimento antes de utilizar el producto por primera vez ESPECIFICACIONES TIP...

Страница 36: ...creci n en cualquier momento y sin aviso previo Si hubiese alguna divergencia entre la versi n en ingl s y las versiones de otros idiomas prevalecer la versi n en ingl s EU DECLARACI N DE CONFORMIDAD...

Страница 37: ...LCD 3 In cio 3 Insira A Bateria 3 Posicionamento Da Unidade 3 Rel gio 3 Recep o De Rel gio 3 De ni o Manual Do Rel gio 4 Alarme 4 Fun es B sicas 4 Apresenta o Da Hora De Alarme 5 Con gure O Alarme 5...

Страница 38: ...ual Hora de Alarme 4 Apresenta o da temperatura de interior VISTA TRASEIRA FIG 2 EU UK US JM889NR MADE IN C HINA 12 11 10 9 8 7 6 5 5 Orif cio de montagem na parede 6 Alarm Alarme Apresentar e ajustar...

Страница 39: ...apresentado ou quando a tela estiver farca POSICIONAMENTO DA UNIDADE O rel gio pode ser montado numa parede ou suportado sobre uma superf cie plana M todo Instru o Suporte de Mesa Extraia o suporte d...

Страница 40: ...so hor rio 0 P 1 M 2 C 3 E 4 Pressione em Clock Rel gio para con rmar 5 Pressione uma vez e mantenha para ajustar a con gura o para o formato de hora 12 24h hora minuto ano formato de calend rio m s d...

Страница 41: ...TA Quando pressiona Alarme quando o alarme est em curso isso s interrompe o alarme Para desativar o alarme certi que se que o rel gio est em modo de espera RESET RESTABELECER Pressione Reset Restabele...

Страница 42: ...res duos separadamente para tratamento espec co Porfavornotequealgunsunidadesest oequipadas com uma faixa de seguran a das baterias Remova a faixa do componente de bateria antes da primeira utiliza o...

Страница 43: ...mited reserva o direito de interpretar e de nir quaisquer conte dos termos e disposi es neste manual do usu rio e de o modi car a seu exclusivo crit rio em qualquer altura e sem aviso pr vio No caso d...

Страница 44: ...Voorbereiding 3 Plaats De Batterijen 3 Plaatsing Van Het Apparaat 3 Klok 3 Klokontvangst 3 De Klok Handmatig Instellen 4 Alarm 4 Basisfuncties 4 Alarmtijd Weergeven 4 Het Alarm Instellen 5 Het Alarm I...

Страница 45: ...3 Huidige datum Alarmtijd display 4 Binnentemperatuur display ACHTERAANZICHT FIGUUR 2 EU UK US JM889NR MADE IN C HINA 12 11 10 9 8 7 6 5 5 Opening voor wandmontage 6 Alarm Aanduiding en instellen alar...

Страница 46: ...niet helder is PLAATSING VAN HET APPARAAT De klok kan aan de wand of op een horizontale ondergrond worden geplaatst Methode Instructies Tafel stand De tafelstand aan de achterkant van het apparaat ui...

Страница 47: ...er indrukken of ingedrukt houden voor het selecteren van 12 24h uur formaat uur minuut jaar kalenderformaat maand dag dag maand maand datum taal en temperatuureenheid o C o F 6 Druk op Klok om te beve...

Страница 48: ...en met kranten gordijnen enz Het apparaat niet in water onderdompelen Als water op het apparaat terecht komt onmiddellijk afdrogen met een zachte pluisvrije doek Het apparaat niet schoonmaken met schu...

Страница 49: ...ti c com Oregon Scienti c Global Distribution Limited behoudt zich het recht voor enige inhoud bepalingen en voorwaarden in deze gebruikershandleiding te interpreteren en deze te allen tijde naar eige...

Страница 50: ...3 Komma Ig ng 3 S tt I Ett Batteri 3 Placering Av Styrenhet 3 Klockan 3 Mottagning Klocksignal 3 St ll In Klockan Manuellt 4 Larm 4 Grundl ggande Funktioner 4 Visa Larmtiden 4 St ll In Larmet 5 Aktive...

Страница 51: ...ekunder eller veckodag display 3 Visa aktuellt datum alarmtid 4 Inomhustemperatur VY BAKIFR N FIG 2 EU UK US JM889NR MADE IN C HINA 12 11 10 9 8 7 6 5 5 V ggmonterad h l 6 Larm Visa och st ll in larmt...

Страница 52: ...r displayen r m rk PLACERING AV STYRENHET Klockan kan monteras p en v gg eller st p an plan yta Metod Instruktion Bordsstativ Dra ut bordsstativ se g 2 p baksidan av enheten och placera sedan huvuden...

Страница 53: ...g ng eller tryck p och h ll ned f r att justera inst llningen f r 12 24h timmars format timme minut r kalenderformat m nad dag dag m nad m nad dag spr k och temperaturenhet o C o F 6 Bekr fta genom a...

Страница 54: ...t f rem l t ex tidningar gardiner osv Doppa inte enheten i vatten Om du spiller v tska ver den torka den omedelbart med en mjuk luddfri trasa Reng r inte enheten med repande eller fr tande material G...

Страница 55: ...t kontakta v r Kundtj nst p info oregonscienti c se Oregon Scienti c Global Distribution Limited reserverar sig r tten att redigera och uttolka inneh ll terminologi och f reskrifter i denna manual sam...

Страница 56: ...1 JM889NR 2 2 2 2 LCD 3 3 3 3 3 3 4 4 4 4 4 5 5 5 5 Oregon Scienti c 6...

Страница 57: ...2 Oregon Scienti cTM JM889NR 1 O Z NE Yr 1 2 3 4 1 2 3 4 2 EU UK US JM889NR MADE IN C HINA 12 11 10 9 8 7 6 5 5 6 Alarm 7 Clock 8 Reset 9 EU UK USUS 10 11 12...

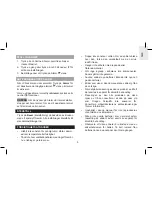
Страница 58: ...3 LCD 1 2 2 3 Reset 2 a b c EU UK US EU DCF UK MSF US WWVB...

Страница 59: ...2 10 24 1 2 Clock ZONE 3 EU UK 23 US 0 P 1 M 2 C 3 E 4 Clock 5 12 24 o C o F 6 Clock E D F I S Clock 5 o C 29 0 o F LL L 50 o C 122 0 o F HH H 1 Alarm 2 2 Alarm 8 Alarm 1 Alarm 2 Clock 1 Alarm 2 3 Ala...

Страница 60: ...5 LCD Alarm Alarm Alarm Alarm Reset Oregon Scientific x x 234 x 220 x 23 426 0 O C 40 o C 32 o F 104 o F o C o F DCF MSF WWVB 24 12 AM PM 2 2 x UM 3 AA 1 5 V...

Страница 61: ...6 OREGON SCIENTIFIC www oregonscienti c com enquiry oregonscienti c com Oregon Scienti c Global Distribution Limited...

Страница 62: ...1 JM889NR 2 2 2 2 LCD 3 3 3 3 3 3 4 4 4 4 4 5 5 5 5 Oregon Scienti c 6...

Страница 63: ...2 Oregon Scienti cTM JM889NR 1 O Z NE Yr 1 2 3 4 1 2 3 4 2 EU UK US JM889NR MADE IN C HINA 12 11 10 9 8 7 6 5 5 6 Alarm 7 Clock 8 Reset 9 EU UK US 10 11 12...

Страница 64: ...3 LCD 1 2 2 3 Reset 2 a b c EU UK US EU DCF UK MSF US WWVB...

Страница 65: ...2 10 24 1 2 Clock ZONE 3 EU UK 23 US 0 P 1 M 2 C 3 E 4 Clock 5 12 24 o C o F 6 Clock E D F I S Clock 5 o C 29 0 o F LL L 50 o C 122 0 o F HH H 1 Alarm 2 2 Alarm 8 Alarm 1 Alarm 2 Clock 1 Alarm 2 3 Ala...

Страница 66: ...5 LCD Alarm Alarm Alarm Alarm Reset Oregon Scientific x x 234 x 220 x 23 426 0 O C 40 o C 32 o F 104 o F o C o F DCF MSF WWVB 24 12 AM PM 2 2 x UM 3 AA 1 5 V...

Страница 67: ...6 OREGON SCIENTIFIC www oregonscienti c com cn enquiry oregonscienti c com cn Oregon Scienti c Global Distribution Limited...

Страница 68: ...2014 Oregon Scientific All rights reserved P N 300100696 00010 10...

Отзывы: