OREC America Snow Bull SGW803 Скачать руководство пользователя страница 25


-24- 

5.2.4


How to adjust the tension on the crawler tracks 


Crawler track parts may stretch and become loose after a period of use.    If the crawler tracks are not 

adjusted to the correct tension, they can slip off during operation and their lifespan may decrease. 
Follow the steps below to adjust crawler track tension. 


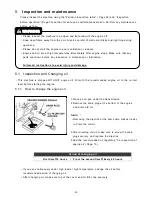
1.   Loosen both crawler track tensioning bolts, lock nut 

(M12), located at the front of the machine 

 
2.  Turn the crawler track tensioning bolt to tighten it. 

Clockwise will tighten the crawler. 
Counter clockwise will loosen the crawler. 


3.  Adjust tension so that there is a clearance of 2/5” to   

3/5” when you push down on the crawler track with 
11lbf (5kgf). Adjust the left and right crawler tracks so 

that equal tension is placed on them. 


4. Securely tighten the lock nut after adjusting. 
 

While the idler pulley is removed, it is recommended 
that you grease the shaft. Do not grease the 
tightening bolt. 


5.2.5


How to inspect and replace the scraper 


The scraper is considered a consumable part. When it is worn and the side covers touch the 
ground, it will decrease the plow’s durability and results. If the scraper is worn, adjust its 
position or replace the scraper. 


1.  Lower the plow so that it is on the ground and the 

side cover is more than 1/16 in above. 


2.  If it’s below 1/16 in (2mm), loosen the four bolts & 

nuts shown in the picture and adjust the scraper’s 
position properly. 


3. If there is not enough space, between the side 

covers and ground, please replace the scraper. 


A rubber scraper is also available (Sold separately) 


Содержание Snow Bull SGW803

Страница 1: ...ne keep it as a reference Also the engine manual is included as a set with the owner s manual Please read both carefully For any questions about this manual please contact your OREC dealer the distrib...

Страница 2: ...lease read these instructions regarding safety and operation before operating this machine Please carry this manual all times when using the machine Please provide this manual to any new operator of t...

Страница 3: ...20 Engine Transmission oil inspection replacement and lubrication 20 How to Inspect Maintain and Adjust each part 22 22 24 Long term storage 27 Specifications 29 Included tools 29 Consumable parts 29...

Страница 4: ...a place that is well ventilated Do not remove any parts from this machine that have been fitted as standard To prevent accidents be sure to use all covers and parts in the same state as they have bee...

Страница 5: ...ld If you notice any strange noises smells heat or vibrations during the operation of this machine switch off the engine immediately Have the machine inspected for damage and obstructions and have any...

Страница 6: ...ns and recommended maintenance When you inspect adjust or maintain the machine make sure all any parts have cooled down wear appropriate protective gear and use appropriate tools Work on a flat and op...

Страница 7: ...rning labels are attached to the machine to draw attention to particularly serious dangers Please be sure to fully understand the meaning of each warning label before operating this machine In the cas...

Страница 8: ...hine Fuel cap Track Belt cover Handle height adjusting bolt Main clutch lever Speed change lever Plow side plate Plow angle adjustment lever Driving clutch lever Engine stop switch Throttle lever Muff...

Страница 9: ...when you start stop the engine START the engine starts STOP the engine stops If you push this switch the engine will immediately stop Main clutch lever Shift the main clutch lever when you start the e...

Страница 10: ...Forward slowly 2 Forward fast Make sure that the lever is fixed at the right position The machine may not move backward if the plow gets stuck in the snow If this occurs lower the handle to raise the...

Страница 11: ...ever grasp the release lever at the bottom of the lever Depending on the situation you can chose fixed height or free height of plow How to adjust angle of plow To adjust the angle of plow at the 15 o...

Страница 12: ...the handle height be sure not to pinch or bend the cable When you adjust the handle height tighten the adjusting bolt firmly aligning the groove at the bottom of handle To avoid injury accidents or d...

Страница 13: ...Make sure to close the fuel filler cap after refueling When you refuel the gas please follow these instructions Please refuel the gas on a flat and well ventilated area Stop the engine Keep away from...

Страница 14: ...cooled down before checking oil This machine is shipped WITHOUT engine oil Fill with engine oil to the correct level before starting the engine even if there are traces of residual oil in the engine f...

Страница 15: ...ark obstacles grooves slopes or soft ground so you can avoid those areas To avoid burns do not touch the muffler while operating the machine Let it cool for at least 10 minutes before touching or cove...

Страница 16: ...e sure the area around you is free from obstacles and other people Release the starter grip slowly to avoid damage to the machine After starting the engine move the choke lever gradually to the OPEN p...

Страница 17: ...is a possibility of gear failure which is dangerous Grasp the driving clutch lever Start working after the machine moves Adjust speed using throttle lever Raise the plow above snow when you turn the...

Страница 18: ...side plate of plow After removing side plate re tighten the nut firmly If the amount of snow is causing difficulty you should adjust the width see diagram You can move the machine without starting th...

Страница 19: ...ill the engine please move each lever to the correct position See How to start the engine section for re start How to stop the machine in normal conditions Release the driving clutch lever then move t...

Страница 20: ...ading the machine secure it with rope and take care not to damage cables or plastic parts of the machine Do not secure it so tightly that you change the shape of any parts Loading While loading raise...

Страница 21: ...id injury and damage 5 1 Inspection and Changing oil This machine is shipped WITHOUT engine oil Fill with the recommended engine oil to the correct level before starting the engine 5 1 1 How to change...

Страница 22: ...in the picture There is enough gear oil if the oil comes out through that hole 3 Check oil level and quality Replace if necessary Oil Change Replace oil after the first 20 hours of operation and rough...

Страница 23: ...rom the inside of the filter in an outward direction 5 Wipe any dirt from the inside of the case and reassemble back to its original position When washing the foam element remove gently to avoid teari...

Страница 24: ...if present Replace the spark plug with a new one if the ceramic part has cracked or the electrode shows extensive wear and tear Please adjust the spark plug electrode clearance to 0 028 0 031in 0 7 0...

Страница 25: ...Adjust the left and right crawler tracks so that equal tension is placed on them 4 Securely tighten the lock nut after adjusting While the idler pulley is removed it is recommended that you grease th...

Страница 26: ...d change cable Adjust the position of the adjust nut when If the speed change lever won t stay in R position when the machine takes load Tighten the speed change cable If the speed change lever won t...

Страница 27: ...ere is 1 7 1 4 inch 4 6mm slack if you push the belt lightly when the main clutch lever is on If the belt is too loose adjust main clutch cable tension first Refer 5 2 8 If there is not enough room fo...

Страница 28: ...hat the engine and muffler have cooled before touching the machine There is a danger of burns Take care to dispose of fuel in accordance with local laws and regulations 1 Empty fuel from inside the fu...

Страница 29: ...en lending this machine to another person When lending this machine to another person it is the owner is responsible for following The owner should explain how to operate the machine and require the n...

Страница 30: ...S1CY Power 3 3kw 4 4HP Oil 0 185 lbs Ignition plug W20EPR U DENSO Fuel Tank 0 52lbs 6 2 Included tools No Name Specification Quantity Remarks 1 Engine tools 1 2 Funnel 1 For lubrication Hose 1 3 Dual...

Страница 31: ...Too much amount of snow for one time Remove snow in several times Wet and heavy snow Remove snow in several times Failure of transmission Repair or replace transmission Does not stop Cannot disengage...

Страница 32: ...of the engine heavy Use the correct oil depending on the outside temperature Ignition coil or unit is defective Replace the ignition coil or unit Defective spark plug Inspect the gap between spark pl...

Страница 33: ...racked or deformed and the nuts and bolts are secure 9 9 9 Engine Lubricati on Quantity cleanliness Oil quantity is suitable not dirty or mixed with any water or metals 9 9 9 Oil leakage Oil seal and...

Страница 34: ...ve Tracks Tension of rubber crawler Standard tension is observed 9 9 9 Cracking damage wear and tear No cracks damage or wear and tear 9 9 9 Metal stones etc stuck in the track There is no debris in r...

Страница 35: ...f you have a request for replacement parts after this period has passed please consult with OREC for availability and prices If you have any questions please talk to staff at the point of purchase or...

Страница 36: ...rranty This warranty dose NOT cover tire replacement or repair caused by punctures from outside objects such as nails thorns stumps or glass During the warranty period the warranty holder is responsib...

Страница 37: ...the dealer from whom they purchased the machine or to an authorized Orec America dealer 2 The owner must present the warranty registration sheet or the invoice or receipt received at time of purchase...

Страница 38: ......

Страница 39: ...f rence Le manuel du moteur est galement compris avec le manuel d utilisation Les deux manuels devraient tre lus attentivement Pour toute question relative ce manuel veuillez contacter soit votre d ta...

Страница 40: ...re utilis pour une autre t che propos de ce manuel Veiller lire les instructions relatives la s curit et l utilisation avec d utiliser cet appareil Veiller transporter ce manuel en tout temps lors de...

Страница 41: ...le 23 Comment inspecter entretenir et ajuster chaque composante 24 Entreposage long terme 29 Sp cifications 32 Outils inclus 32 Liste des pi ces consommables 32 34 D pannage 34 Lorsque le moteur ne fo...

Страница 42: ...sser se refroidir Il y a un danger de feu et de br lure lors du ravitaillement d un moteur chaud Veiller faire le plein dans un endroit bien ventil Veiller ne retirer aucune composante de cet appareil...

Страница 43: ...o l appareil pourrait se trouver tr s mouill S assurer qu il n y a personne surtout aucun enfant animal ou v hicule proximit avant d utiliser l appareil Toujours utiliser l appareil avec une tenue ap...

Страница 44: ...avoir un prise s r de l appareil et qu aucun individu ou obstacle ne se trouve derri re l appareil Si un signe suspect est remarqu lors de l utilisation de l appareil bruit trange odeurs chaleur vibra...

Страница 45: ...ivantes Afin de garder l appareil s curitaire et en bonne condition effectuer des inspections quotidiennes et annuelles en plus de l entretien recommand Lors de l entretien de l inspection ou de l aju...

Страница 46: ...urant Entreposer l appareil l int rieur pour tout entreposage long terme Enlever les d tritus la poussi re ou la neige sur l appareil et autour de celui ci Si ces instructions ne sont pas respect es i...

Страница 47: ...8 Emplacement des tiquettes de caution 0929 75100 0929 75400 0215 83200 0929 75300 0929 75500 0031 74100 0929 75200...

Страница 48: ...ie Levier d embrayage principal Levier de changement de vitesse Plaque lat rale de la charrue Levier d embrayage de conduite Interrupteur d arr t du moteur Manette des gaz Silencieux Charrue Grattoir...

Страница 49: ...age et de l arr t du moteur MARCHE Le moteur d marre ARR T Le moteur s teint En poussant cet interrupteur le moteur s arr tera imm diatement Levier d embraye principal D placer le levier d embrayage p...

Страница 50: ...iminue le r gime moteur Bouger gauche Augmente le r gime moteur Levier de changement de vitesse D placer le levier lors du changement de vitesse R Marche arri re 1 Avancement lent 2 Avancement rapide...

Страница 51: ...r ajuster la hauteur de la charrue attraper l g rement le levier avec la main droite et abaisser la poign e Pour fixer la hauteur de la charrue rel cher le levier Il est possible de fixer la charrue n...

Страница 52: ...oteur Enlever le boulon d ajustement de la poign e pour ensuite le revisser la position d sir e S assurer que les rainures soient align es La poign e peut tre pli e pour l entreposage seulement Ajuste...

Страница 53: ...ssurer de fermer le bouchon de la goulotte de remplissage apr s avoir fait le plein En faisant le plein d essence merci de suivre ces instructions Veiller faire faire le plein sur un terrain plat et b...

Страница 54: ...efroidi avant de v rifier l huile Cet appareil est livr SANS huile moteur Remplir avec de l huile moteur au niveau appropri avant de d marrer le moteur m me s il reste des traces d huile dans le moteu...

Страница 55: ...des cavit s des pentes ou du terrain meuble afin de les viter Pour viter les br lures ne pas toucher le silencieux pendant que l appareil est en marche Laisser le silencieux refroidir pendant au moins...

Страница 56: ...assurer que la zone environnante est libre d obstacles et de gens Rel cher la poign e de d marrage doucement pour viter d endommager l appareil Apr s le d marrage de l appareil d placer graduellement...

Страница 57: ...e levier d embrayage de conduite puis d placer vigoureusement le levier de changement de vitesse Si la vitesse de d raillage est inad quate il est possible que les engrenages soient d faillants ce qui...

Страница 58: ...retirer Si les bandes de roulement chenille glissent il est possible de les r enclencher en poussant vers le bas sur la poign e Cependant si les bandes de roulement chenille continuent glisser ou que...

Страница 59: ...mmages Nettoyer l appareil apr s utilisation afin de le rendre s curitaire et disponible pour le prochain d blayage 4 1 3 ARR T Toujours s arr ter sur une surface plane S arr ter sur une pente pourrai...

Страница 60: ...r assurer la stabilit Utiliser une rampe con ue pour ce genre de chargement S assurer que la rampe est assez large et solide et que l appareil reste au centre de la rampe Toujours utiliser l engrenage...

Страница 61: ...pection p riodique page 32 et inspection avant utilisation page 30 pour une utilisation s curitaire et confortable Effectuer tout entretien avant l utilisation Veiller inspecter l appareil sur un terr...

Страница 62: ...ment pour de lourdes charges et sous de hautes temp ratures changer l huile avant les p riodes recommand es Apr s avoir chang l huile s assurer de remettre le couvercle et le bouchon de remplissage d...

Страница 63: ...d bris Ne pas d marrer le moteur sans filtre air la poussi re et les d bris seront aspir s dans le moteur Cela causera des troubles de moteur et une usure anormale 1 D visser l crou papillon et retir...

Страница 64: ...compl tement 3 Placer l anneau dans la soupape de carburant puis installer le pot s diments Resserrer le pot s diments de mani re s curitaire 4 Placer la soupape de carburant en position MARCHE ON v...

Страница 65: ...e pression quivalent 11lbf 5kgf est appliqu e dessus Ajuster les bandes droite et gauche afin que toutes deux subissent la m me tension 4 Resserrer de mani re s curitaire l crou de serrage apr s l aju...

Страница 66: ...l crou d ajustement quand Si le levier de changement de vitesse ne reste pas dans sa position lorsque r gl sur R alors que l appareil porte une charge Serrer le c ble de changement de vitesse Si le l...

Страница 67: ...2 3 heures d usage Comment ajuster la tension de la courroie V rifier qu il y ait entre 1 7 et 1 4 de po 4 6mm de jeu lorsque le levier de l embrayage principal est actionn et ce en exer ant une pres...

Страница 68: ...arettes allum es ou d autres sources de flammes nues De plus garder les feux d artifice et les armes feu l cart car il y a un risque que l appareil prenne feu En retirant du carburant s assurer que le...

Страница 69: ...onctionner correctement et permet d viter les dommages 5 3 3 Les tapes suivantes devraient tre effectu es avant la prochaine op ration Toujours utiliser du carburant neuf Inspecter l appareil avant ut...

Страница 70: ...guider l utilisateur jusqu ce que ce dernier ait une bonne compr hension du mode d op ration de l appareil et des consignes de s curit z Lors du pr t de cet appareil a une personne qui ne lit pas le...

Страница 71: ...2 36 2 PCS Huile de transmission 0 20 lbs Hiver 80 t 90 Moteur Nom Honda Mod le GX160H2 S1CY Puissance 3 3kw 4 4HP Huile 0 185 lbs Bougie d allumage W20EPR U DENSO R servoir de carburant 0 52lbs 6 2...

Страница 72: ...ajustement de hauteur 0925 76200 1 7 C ble d acc l rateur 0925 71800 1 With Lever 8 Bande de roulement chenille en caoutchouc 0929 30200 1 9 Charrue 0929 21100 1 Largeur 31 5 10 Grattoir 0925 21810 1...

Страница 73: ...roulement chenille Retirer l objet tranger Trop grande quantit de neige pour un seul chargement D blayer la neige en plusieurs fois Neige lourde et humide D blayer la neige en plusieurs fois D faillan...

Страница 74: ...e sont m lang s dans le syst me d acheminement du carburant Retirer le corps tranger inspecter les bandes de fixation et remplacer les parties endommag es par des neuves Par temps froid l huile s pais...

Страница 75: ...effectuer une inspection avant chaque utilisation de l appareil Q Quotidiennement M Mensuellement A Annuellement Inspection Content Fr quence d inspection Q M A Moteur Moteur Corps principal Condition...

Страница 76: ...Le capuchon de recul n est pas bouch par des herbes 9 9 9 Accumulation de mauvaises herbes dans le silencieux Il n y a pas d accumulation de mauvaises herbes autour du silencieux 9 9 9 Transmission C...

Страница 77: ...s de fissures d endommagement ou d usure 9 9 9 M tal roches etc coinc s dans la bande Aucun d bris dans la bande de roulement 9 9 9 Propulseur Bandes de roulement chenille Boulons et crous manquants o...

Страница 78: ...Pour toute demande de pi ces de rechange apr s cette p riode merci de consulter OREC pour conna tre la disponibilit et les prix Pour tout renseignement suppl mentaire merci de consulter le personnel a...

Отзывы: