background image

for assembling; before assembling please check whether all needed parts are available. 
It is strongly recommended this machine to be assembled by two or more people to avoid possible injury. 


ASSEMBLY INSTRUCTION 


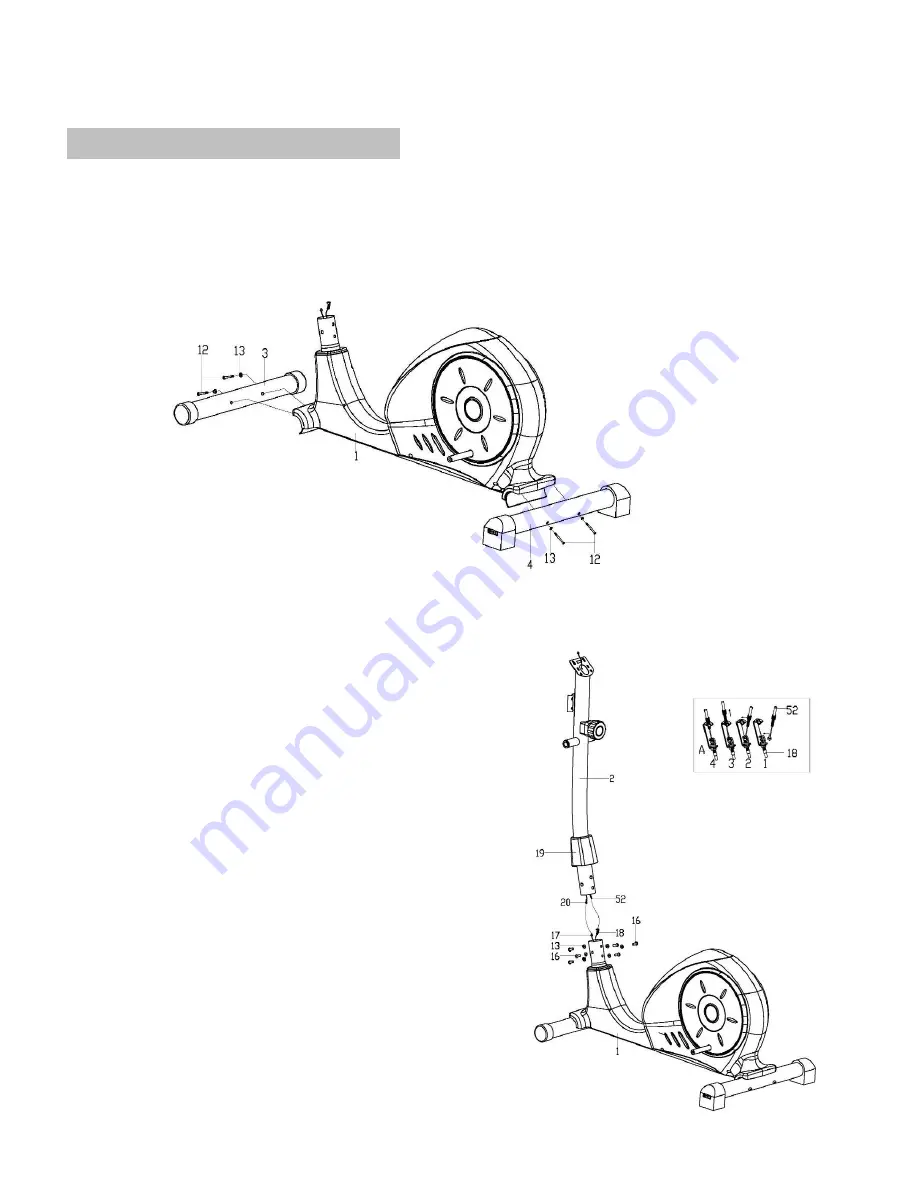
STEP 1 

Attach the front stabilizer (3) and the rear stabilizer (4) to the main frame (1) with the Carriage bolt 
(12) and Arc washers (13) as shown. 


STEP 2 

I: 

Slip the Front Cover (19) onto the handlebar 

post (2);


II: 

Connect the Sensor connection wire (20) to the 

sensor wire (17), and then install the lower tension 
control cable (18) to the tension controller (52) as 
shown. 

III: 

Fix the handlebar post (2) on the main frame 

(1), using the Inner hexagon bolt (16), Arc washer 
(13) as shown. 

IV: 

Slip down the Front Cover (19) and fit in the 

place. 


Page 5 


Содержание OBE794

Страница 1: ......

Страница 2: ...ich you may train yourself and can get precise information during training This machine is not suitable for therapeutic purpose 7 Only do training on the machine when it is in correct working way Use...

Страница 3: ...EXPLODED DIAGRAM Page 2...

Страница 4: ...Page 3...

Страница 5: ...foam grip 1 49 Bolt 2 50 bolt 1 51 Arch washer 1 52 Tension control 1 53 Hex bolt 1 54 Sensor 1 55 Cross pan head 2 71 Flywheel axle 1 56L R Handlebar cover 1p r 72 Hex bolt 2 57 Hex bolt 4 73 Spring...

Страница 6: ...abilizer 4 to the main frame 1 with the Carriage bolt 12 and Arc washers 13 as shown STEP 2 I Slip the Front Cover 19 onto the handlebar post 2 II Connect the Sensor connection wire 20 to the sensor w...

Страница 7: ...h Bolt 28 Spring washer 27 Spacer 22 Flat washer 26 and Wave washer 23 don t tighten them first The same way fix the Right Pedal support 5R to the Crank 21R Connect the Swing tube 6L R and Pedal suppo...

Страница 8: ...handlebar 2 with hex bolt 47 arch washer 41 and nut 40 Attach the handlebar 7L R to the swing tube 6L R with bolt 42 arch washer 41 and nut 40 STEP 5 Connect the Connection wire 20 and pulse sensor wi...

Страница 9: ...ogging jumping jacks jump rope and running in place STRETCHING Stretching while your muscles are warm after a proper warm up and again after your strength or aerobic training session is very important...

Страница 10: ...time is 99 minutes iii Display Body Mass Index BMI 3 DISTANCE BMR i Count the total distance from exercise start to the end and the range is 0 00 9 99 99 9KM Or if the meter showing M the range will b...

Страница 11: ...t pulse recovery function 4 BODYFAT BMI BMR In non exercising status press BODYFAT to enter body fat parameters settings You can set from the below sequence exerciser No 1 8 weight KG height CM age YE...

Отзывы: