background image

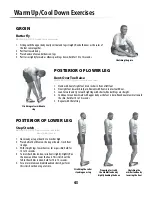
ANTERIOR OF THIGH AND HIP FLEXOR

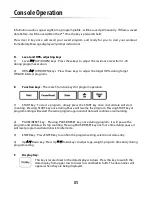
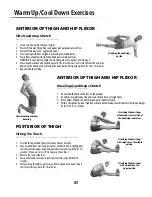
Side Quadricep Stretch

MUSCLE(S) AFFECTED: 

quadriceps and iliopsoas

Lie on left side with both legs straight.

Place left forearm flat on floor and upper arm perpendicular to floor.

Place left forearm at 45° angle with torso.

Flex right leg with heel of right foot moving toward buttocks.

Grasp front of ankle with right hand and pull toward buttocks.                                                 

WARNING: Do not pull on ankle so hard that pain or discomfort is felt in knee.

Move knee backward and slightly upward. The stretch occurs not so much from the excessive 

flexion of the knee but from moving the knee back and slightly up; hold for 10 to 15 seconds.

Repeat with the left leg.

1.

2.

3.

4.

5.

6.

7.

ANTERIOR OF THIGH AND HIP FLEXOR

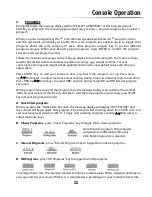
Kneeling Quadriceps Stretch

MUSCLE(S) AFFECTED: 

quadriceps

Kneel with the balls of the feet on the ground.

Keep hips straight (upper leg and torso should be in a straight line).

Place palms of hands on buttocks and push slightly forward.

With a straight body, lean slightly backward until developmental stretch is felt in quadriceps; 

hold for 10 to 15 seconds.

1.

2.

3.

4.

POSTERIOR OF THIGH

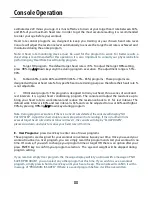
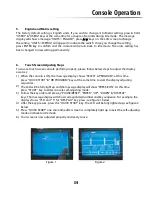
Sitting Toe Touch

MUSCLE(S) AFFECTED: 

hamstrings, spinal erectors and gastrocnemius

Sit with the upper body nearly vertical and legs straight.

Lean forward from waist and grasp toes with each hand, slightly pull 

toes towards the upper body, and pull chest towards leg; hold for 10 

seconds. (If you are very stiff, try to grasp the ankles.) 

Release toes and relax foot.

Grasp ankles and continue to pull chest towards legs; hold for 10          

seconds.

Still grasping the ankles, point away from body and continue to pull 

chest towards legs; hold for 10 seconds.

1.

2.

3.

4.

5.

Stretching the quadriceps

on side 

Stretching the quadriceps

kneeling

Stretching the hamstrings 

with emphasis on insertion of 

the hamstrings and calves.

Stretching the hamstrings 

with emphasis on the middle 

portion.

Stretching the hamstrings

with emphasis on the

upper portion.

Warm Up/Cool Down Exercises

41

Содержание Raptor CDX

Страница 1: ...Raptor CDX Raptor CDX Elliptical User Manual ...

Страница 2: ...on BeforeYou Begin Assembly Stride Adjustment Console Overview Console Operation MonitoringYour Heart Rate Chest Strap Operation Stretching Flexibility Warm Up CoolDownExercises Maintenance Troubleshooting Guide 2 3 4 5 24 25 26 27 28 29 34 35 36 37 38 44 45 46 2 ...

Страница 3: ...nd consult your physician before continuing Never operate the unit when it has been dropped or damaged Return the equipment to a service center for examination and repair Never drop or insert objects into any opening in the equipment Always check the unit for loose components before each use DO NOT turn pedals by hand DO NOT use the equipment outdoors or near water It is imperative that your ellip...

Страница 4: ...nce presented in this guide PERSONAL SAFETY DURING ASSEMBLY It is strongly recommended that a qualified dealer assemble the equipment Assistance is required Before beginning assembly please take the time to read the instructions thoroughly Read each step in the assembly instructions and follow the steps in sequence Do not skip ahead If you skip ahead you may learn later that you have to disassemble...

Страница 5: ......

Страница 6: ......

Страница 7: ...Step 2 A Insert Mainframe Cover K into Mainframe A and secure using Six 63 M5x12 phillips pan head bolt NOTE The Mainframe Cover K is in a small unmarked box 7 ...

Страница 8: ......

Страница 9: ...S to Upright F using One 78 M10x20 hex head bolt One 90 M10 spring washer One 84 M10 washer C Insert End Cap 122 into Right Stride Adjustment Frame S D Secure Left Stride Adjustment Frame J to Upright F using One 78 M10x20 hex head bolt One 90 M10 spring washer One 84 M10 washer E Insert End Cap 122 into Left Stride Adjustment Frame J 9 ...

Страница 10: ......

Страница 11: ...Step 4 A Remove the Hex Nut B and Busing A step by step B Assemble the linkage D the Adjust Knob E sequentially and tighten the Philip Head Screw F on the Adjust Knob E 11 ...

Страница 12: ......

Страница 13: ... Junction Frame B onto Shaft Sleeve 163 and secure using Four 54 M8x12 allen head Four 86 M8 flat washer B Lift and place Left Junction Frame B onto Shaft Sleeve 163 and secure using Four 54 M8x12 allen head Four 86 M8 flat washer 13 ...

Страница 14: ......

Страница 15: ...10 nut NOTE It is recommended that two adults align and secure the Legs to the Stride Frame B Connect Leg M to Left Stride Frame N using One 81 M10x81 5 hex head bolt One 98 M10 nut NOTE Please ensure that Pedal 25 is centered onto Shaft Sleeve 163 as shown in the diagram on the far right 15 ...

Страница 16: ......

Страница 17: ...ng One 66 M5x12 phillips head pan screw NOTE Do not overtighten screw this will damage Bracket Cover 30 B Connect Bracket Cover 30 to Left Stride Adjustment Frame J using One 66 M5x12 phillips head pan screw NOTE Do not overtighten screw this will damage Bracket Cover 30 17 ...

Страница 18: ......

Страница 19: ...Insert Right Arm G into Right Stride Adjustment Frame S and secure using Three 77 M8x16 allen head bolt B Insert Left Arm I into Left Stride Adjustment Frame J and secure using Three 77 M8x16 allen head bolt 19 ...

Страница 20: ......

Страница 21: ... Rate ground spade connector is connected to the left of the red console harness Ensure that all wires are secure inside console Be careful not to pinch wires B Secure Console 15 to Upright F using Four 63 M5x12 phillips pan head bolt NOTE The four Console Screws are located in the Step 9 hardware bag 21 ...

Страница 22: ......

Страница 23: ...ect the harness on Handle Bar E to the harness on Upright F as shown B Connect Handle Bar E to Upright F using NOTE Ensure that all wires are secure inside Handle Bar E and Upright F Be careful not to pinch wires 23 ...

Страница 24: ......

Страница 25: ...ust the stride loosen Knob 1 in the direction shown on the knob s sticker B Loosen Knob 2 in the direction shown on the knob C Pull knob 2 and adjust the stride by moving it up or down D Secure Knob 1 and 2 by tightening the knobs ...

Страница 26: ...Stride Adjustment 26 3 1 2 ...

Страница 27: ......

Страница 28: ...gment you are currently in and show your workout progress Classic Interval programs There are also 10 rows representing 20 levels of resistance Each row represents 2 levels of resistance The appropriated row will light up when you adjust the resistance level HR programs There are 10 rows representing 100 Max HR Each row represents 10 of HR During program execution the target HR row will light up o...

Страница 29: ...tch the data displays from upper row to lower row or vice versa by pressing the DISPLAY key next to it g Segment time window Note Display sleep mode If there is no RPM the display will shut down and enter sleep mode Previous activities will be stored for 3 minutes To resume simply pedal again If no RPM for more than 3 minutes the console will be reset and previous activities will be lost except fo...

Страница 30: ... a different program You can always press START key anytime to start the program right away C User keys User 1 User 2 User 3 User 4 There are 4 User programs for you to save the favorite workouts If you wish to save a program simply press hold a User key for a few seconds until you hear a beep All your program This key is designed to start your workout without any hassle Pressing this key will jump...

Страница 31: ...gram simply press the START key once and all data will start counting Pressing START key once during Pause will resume the program Pressing START key at program ending will restart the same program again and all data will continue accumulating 2 PAUSE RESET key Pressing PAUSE RESET key once during program it will pause the program and all data will stop counting Pressing PAUSE RESET key one more t...

Страница 32: ...ce level anytime during Classic Interval program execution Press HR Up Down keys to adjust HR anytime during Target HR and HR interval program execution When program time is up and the program ends the message display will scroll thru the workout totals for your review At this time if you d like to start the same program again simply press START key and your program will restart A Quick Start prog...

Страница 33: ...nsole will adjust the resistance up to bring your heart rate to work interval and reduce the resistance back to L1 for rest interval The default work interval is 80 and rest interval is 65 and can be adjusted to low at 60 and high at 90 by pressing HR Up Down keys during program Note During program execution if there is no heart rate detected the console will display NO VALID PULSE Adjust the ches...

Страница 34: ...he display accuracy 1 When the console is ON the message display shows SELECT A PROGRAM at this time The LCD will be fully light up and the message display will show PRESS ICON At this time press QUICK START HR PROGRAM keys at the same time to start the display adjusting sequences 2 press START key to enter console self adjusting mode 3 Follow the key order and presses PAUSE RESET ENTER UP DOWN DI...

Страница 35: ...your heart rate at these times at rest after warming up during your workout and two minutes into your cool down to accurately track your progress as it relates to better fitness During your first several months of exercising the AHA recommends aiming for the lower part of the target heart rate zone 60 then gradually progressing up to 75 According to the AHA exercising above 75 of your maximum heart ...

Страница 36: ......

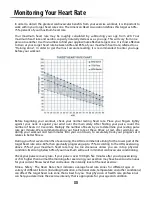
Страница 37: ...emostcommonandmostpopulartypeofstretchingisthestaticstretchingtechnique Thisformofstretchinginvolvesvoluntary completerelaxationofthemuscleswhilethey are elongated A static stretch is a constant steady stretch in which the end position is held for 10 to 30 seconds This technique is popular because it is easy to learn effective and accompanied by minimal soreness with the least risk of injury Ballis...

Страница 38: ... with palms facing each other Slowly straighten the arms above the head with palms up Continue to reach upward with hands and arms While continuing to reach upward slowly reach slightly backward hold for 10 seconds 1 2 3 4 Stretching the shoulders chest and upper back LOWER BACK Spinal Twist Pretzel MUSCLE S AFFECTED internal oblique external oblique and spinal erectors Sitting with legs straight ...

Страница 39: ... NECK Look Right and Left MUSCLE S AFFECTED sternocleidomastoid Stand or sit with head and neck upright Turn head to the right using a sub maximal concentric contraction hold for 10 seconds Turn head to the left using a sub maximal concentric contraction hold for 10 seconds 1 2 3 NECK Flexion and Extension MUSCLE S AFFECTED sternocleidomastoid suboccipitals and splenii Standing or sitting with hea...

Страница 40: ... Do not bend knees After moving as far as possible hold for 10 seconds Repeat to the left side 1 2 3 4 5 6 SIDES Side Bend with Bent Arms MUSCLE S AFFECTED external oblique latissimus dorsi serratus anterior and triceps Stand with feet 14 to 16 inches apart Flex right arm and raise elbow above head Reach the right hand down toward the left shoulder Grasp the right elbow just above the elbow with t...

Страница 41: ...ight line Place palms of hands on buttocks and push slightly forward With a straight body lean slightly backward until developmental stretch is felt in quadriceps hold for 10 to 15 seconds 1 2 3 4 POSTERIOR OF THIGH Sitting Toe Touch MUSCLE S AFFECTED hamstrings spinal erectors and gastrocnemius Sit with the upper body nearly vertical and legs straight Lean forward from waist and grasp toes with e...

Страница 42: ......

Страница 43: ...as the foot is dorsi flexed near maximal toward the shin hold for 10 to 15 seconds Repeat with the left leg 1 2 3 4 5 POSTERIOR OF LOWER LEG Step Stretch MUSCLE S AFFECTED gastrocnemius and soleus also achilles tendon Have ready a step or board 3 to 4 inches high Place balls of both feet on the step or board 1 inch from its edge With straight legs lower heels as far as possible hold for 10 to 15 se...

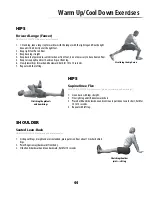
Страница 44: ...conds Repeat with the left leg 1 2 3 4 5 6 7 HIPS Supine Knee Flex MUSCLE S AFFECTED hip extensors gluteus maximus and hamstrings Lie on back with legs straight Flex right leg and lift knee toward chest Place both hands below knee and continue to pull knee toward chest hold for 10 to 15 seconds Repeat with left leg 1 2 3 4 SHOULDER Seated Lean Back MUSCLE S AFFECTED deltoids and pectoralis major S...

Страница 45: ......

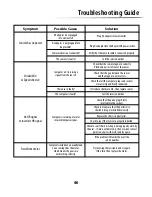
Страница 46: ...ulse plugs firmly inserted into the sockets Check to make sure that the batteries in the chest strap are installed correctly Replace the chest strap batteries Check to see if the receiver is properly installed Check to see if the chest strap is being properly worn by the user if skin is extremely dry then moisten contact points on chest with water and try again If the problem still exists then call...

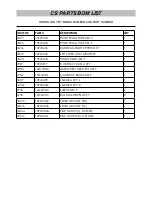
Страница 47: ...ER ARM GRAPHITE 1 3A3U 10E23A3U HANDLE BAR ASS Y 1 39ZY 10E239ZY CONTROL PANEL ASS Y 1 2HNU 10D12HNU IDIER WHEEL BRACKET ASS Y 1 2YDZ 10G42YDZ MAGNETIC BRAKE ASS Y 1 3A3P 10E23A3P LINKGE ASS Y L 1 3A3Q 10E23A3Q LINKGE ASS Y R 1 2Y43 10G52Y43 SLEEVE ASS Y 2 2Y45 10G42Y45 ROLLING WHEEL ASS Y 2 3AM5 10E23AM5 LEVER ARM ASS Y R 1 3AM6 10E23AM6 LEVER ARM ASS Y L 1 3AMA 10E23AMA SIDE COVER L OUTSIDE 1 3A...

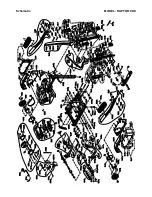
Страница 48: ...Schematic MODEL RAPTOR CDX ...

Страница 49: ......

Отзывы: