background image

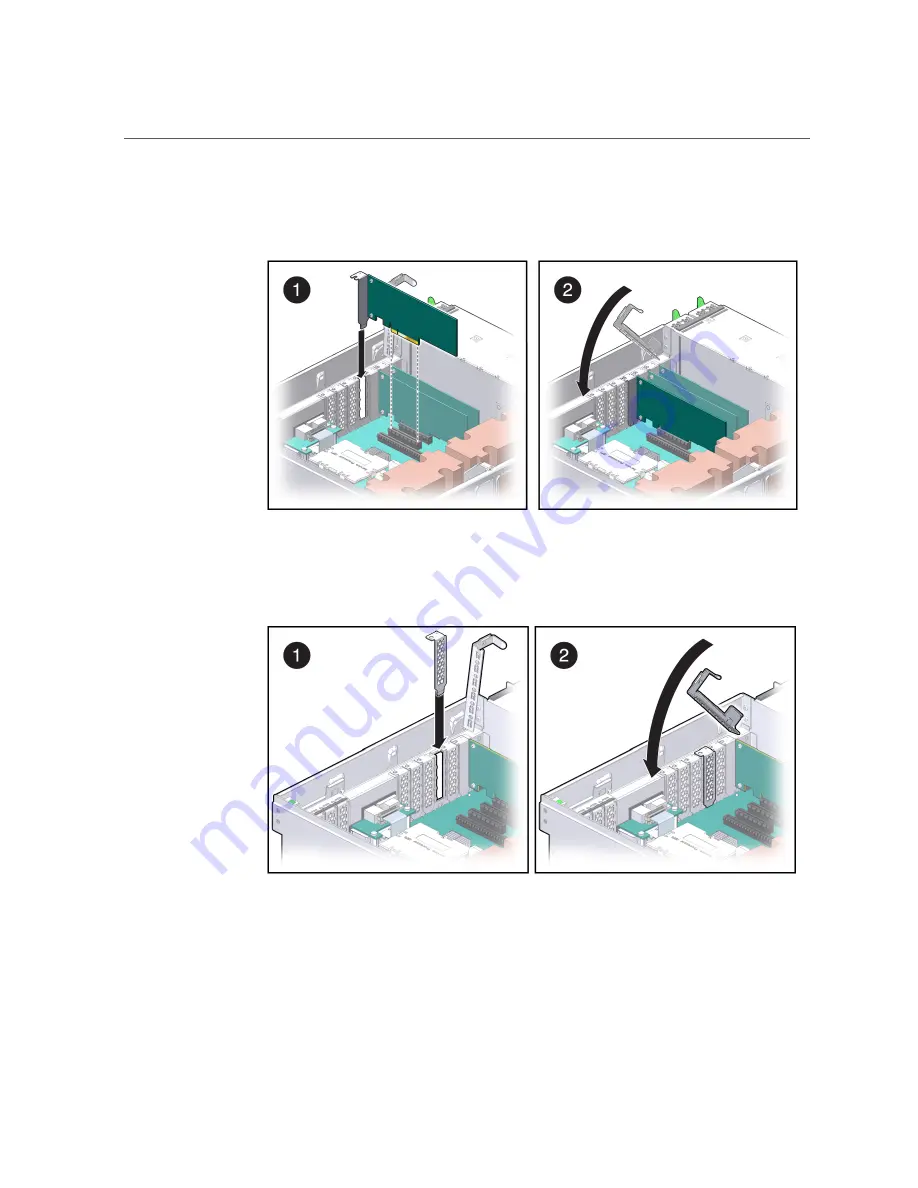
Install a PCIe Card or Filler

See these figures if you are installing a PCIe card.

See these figures if you are installing a PCIe card filler.

6.

Return the server to operation.

See 

“Returning the Server to Operation” on page 171

.

132

SPARC T7-2 Server Service Manual • July 2019

Содержание SPARC T7-2

Страница 1: ...SPARC T7 2 Server Service Manual Part No E54987 10 July 2019 ...

Страница 2: ......

Страница 3: ...rmation management applications It is not developed or intended for use in any inherently dangerous applications including applications that may create a risk of personal injury If you use this software or hardware in dangerous applications then you shall be responsible to take all appropriate fail safe backup redundancy and other measures to ensure its safe use Oracle Corporation and its affiliat...

Страница 4: ...n des informations Ce logiciel ou matériel n est pas conçu ni n est destiné à être utilisé dans des applications à risque notamment dans des applications pouvant causer un risque de dommages corporels Si vous utilisez ce logiciel ou ce matériel dans le cadre d applications dangereuses il est de votre responsabilité de prendre toutes les mesures de secours de sauvegarde de redondance et autres mesu...

Страница 5: ...ations 22 Power Distribution and Fan Module Component Locations 24 Server Block Diagram 25 Detecting and Managing Faults 29 Checking for Faults 29 Related Information 30 Log In to Oracle ILOM Service 30 Identify Faulted Components 31 Identify Disabled Components 33 Component Names Displayed by Diagnostic Software 34 Interpreting LEDs 35 Front Panel Controls and LEDs 36 Rear Panel Controls and LEDs...

Страница 6: ...oving Power From the Server 53 Prepare to Power Off the Server 53 Power Off the Server Oracle ILOM 54 Power Off the Server Server Power Button Graceful 55 Power Off the Server Emergency Shutdown 55 Disconnect Power Cords 56 Accessing Server Components 56 Prevent ESD Damage 57 Extend the Server to the Service Position 57 Release the CMA 59 Remove the Server From the Rack 61 Remove the Top Cover 62 ...

Страница 7: ...y 88 Verify a Power Supply 90 Servicing Memory Risers and DIMMs 91 Memory Riser and DIMM Configuration 91 Identifying DIMMs 92 Memory Riser and DIMM FRU Names 93 Add Memory to the Server 95 Locating and Replacing a Faulty DIMM 96 Locate a Faulty DIMM Oracle ILOM 96 Locate a Faulty DIMM LEDs 97 Replace a Faulty DIMM 99 Remove a Memory Riser 100 Remove a DIMM 102 Install a DIMM 104 Install a Memory ...

Страница 8: ...l a PCIe Card or Filler 131 Verify a PCIe Card 133 Servicing the SPM 135 SPM Firmware and Configuration 135 Remove the SPM 136 Install the SPM 137 Verify the SPM 140 Servicing the Fan Board 141 Remove the Fan Board 141 Install the Fan Board 143 Verify the Fan Board 145 Servicing the Motherboard 147 Remove the Motherboard 147 Install the Motherboard 151 Reactivate RAID Volumes 155 Verify the Mother...

Страница 9: ... Backplane 165 Install the PS Backplane 167 Verify the PS Backplane 169 Returning the Server to Operation 171 Replace the Top Cover 172 Return the Server to the Normal Operating Position 173 Attach Power Cords 174 Power On the Server Oracle ILOM 174 Power On the Server System Power Button 175 Glossary 177 Index 183 9 ...

Страница 10: ...10 SPARC T7 2 Server Service Manual July 2019 ...

Страница 11: ... providers Required knowledge Advanced experience troubleshooting and replacing hardware Product Documentation Library Documentation and resources for this product and related products are available at http www oracle com goto t7 2 docs Feedback Provide feedback about this documentation at http www oracle com goto docfeedback Using This Documentation 11 ...

Страница 12: ...12 SPARC T7 2 Server Service Manual July 2019 ...

Страница 13: ...ent Locations on page 17 Motherboard Component Locations on page 21 I O Component Locations on page 22 Power Distribution and Fan Module Component Locations on page 24 Server Block Diagram on page 25 Related Information Detecting and Managing Faults on page 29 Preparing for Service on page 47 Front Panel Components Service The following figure shows the layout of the server front panel including t...

Страница 14: ...ice Action Required LEDs amber for fan module FAN processor CPU and memory MEM Servicing Fan Modules on page 77 Servicing the Motherboard on page 147 Servicing Memory Risers and DIMMs on page 91 7 PS Service Action Required LED amber Servicing Power Supplies on page 85 8 Overtemp LED amber Front Panel Controls and LEDs on page 36 9 Serial number 10 Two USB 2 0 connectors Server Installation USB po...

Страница 15: ...agram on page 25 Rear Panel Components Service No Description Links 1 Power supply 0 status indicator LEDs Servicing Power Supplies on page 85 2 Power supply 0 AC inlet 3 Power supply 1 status indicator LEDs Servicing Power Supplies on page 85 4 Power supply 1 AC inlet 5 Server status LEDs Rear Panel Controls and LEDs on page 38 6 PCIe card slots 1 to 4 left to right Servicing PCIe Cards on page 1...

Страница 16: ... this connection is broken which causes the server to power down Power supply backplane signal cable 1 ribbon cable This cable carries signals between the power supply backplane and the power distribution board Motherboard signal cable 1 ribbon cable This cable carries signals between the power distribution board and the motherboard Drive data cables 2 bundled These cables carry data and control s...

Страница 17: ...ont Panel Components Service on page 13 Rear Panel Components Service on page 15 Internal System Cables on page 16 Internal Component Locations on page 17 Server Block Diagram on page 25 Internal Component Locations The following figures identify the replaceable component locations with the top cover removed Identifying Components 17 ...

Страница 18: ... the SPM on page 135 2 PCIe card in slot 1 SYS MB PCIE1 SYS MB PCIE2 SYS MB PCIE3 SYS MB PCIE4 SYS MB PCIE5 SYS MB PCIE6 SYS MB PCIE7 SYS MB PCIE8 Servicing PCIe Cards on page 125 3 Power supplies SYS PS0 outer SYS PS1 inner Servicing Power Supplies on page 85 18 SPARC T7 2 Server Service Manual July 2019 ...

Страница 19: ...isers SYS MB CM0 CMP MR0 SYS MB CM0 CMP MR1 SYS MB CM0 CMP MR2 SYS MB CM0 CMP MR3 SYS MB CM1 CMP MR0 SYS MB CM1 CMP MR1 SYS MB CM1 CMP MR2 SYS MB CM1 CMP MR3 Servicing Memory Risers and DIMMs on page 91 10 Fan board SYS FANBD Servicing the Fan Board on page 141 11 Fan modules As viewed from front of server SYS FANBD F0 left front SYS FANBD F1 center front SYS FANBD F2 right front SYS FANBD F3 left...

Страница 20: ...5 top Related Information Internal System Cables on page 16 Motherboard Component Locations on page 21 I O Component Locations on page 22 Power Distribution and Fan Module Component Locations on page 24 Server Block Diagram on page 25 20 SPARC T7 2 Server Service Manual July 2019 ...

Страница 21: ...vicing the SPM on page 135 2 Memory riser SYS MB CMn CMP MRn Servicing Memory Risers and DIMMs on page 91 3 DIMMs SYS MB CMn CMP MRn BOBn CHn D0 Servicing Memory Risers and DIMMs on page 91 4 Motherboard SYS MB Servicing the Motherboard on page 147 5 Battery SYS MB BAT Servicing the Battery on page 117 Identifying Components 21 ...

Страница 22: ...ge 50 Servicing Memory Risers and DIMMs on page 91 Servicing the Motherboard on page 147 Servicing the Battery on page 117 I O Component Locations No Component Oracle ILOM Target LInks 1 Drives SYS DBP HDD0 bottom SYS DBP HDD1 SYS DBP HDD2 Servicing Drives on page 65 22 SPARC T7 2 Server Service Manual July 2019 ...

Страница 23: ...Drive Backplane on page 159 3 DVD drive SYS DBP DVD Servicing the DVD Drive on page 113 4 Drive backplane SYS DBP Servicing the Drive Backplane on page 159 Related Information Component Service Categories on page 50 Servicing Drives on page 65 Servicing the DVD Drive on page 113 Servicing the Drive Backplane on page 159 Identifying Components 23 ...

Страница 24: ... ILOM Target Links 1 PS backplane and cover SYS PDB Servicing the PS Backplane on page 165 2 Power supplies SYS PS0 outer SYS PS1 inner Servicing Power Supplies on page 85 3 Fan modules SYS FANBD F0 SYS FANBD F1 SYS FANBD F2 SYS FANBD F3 SYS FANBD F4 Servicing Fan Modules on page 77 24 SPARC T7 2 Server Service Manual July 2019 ...

Страница 25: ...n page 165 Servicing Fan Modules on page 77 Servicing the Fan Board on page 141 Server Block Diagram This block diagram shows the connections between and among components and device slots on the server Use this block diagram to determine the optimum locations for optional cards or other peripherals based on your server s configuration and intended use Note For more detail on root complexes related...

Страница 26: ...er Block Diagram Related Information Component Service Categories on page 50 Internal Component Locations on page 17 Motherboard Component Locations on page 21 26 SPARC T7 2 Server Service Manual July 2019 ...

Страница 27: ...Server Block Diagram I O Component Locations on page 22 Power Distribution and Fan Module Component Locations on page 24 Identifying Components 27 ...

Страница 28: ...28 SPARC T7 2 Server Service Manual July 2019 ...

Страница 29: ...rpreting LEDs on page 35 2 Perform additional troubleshooting if needed Performing Advanced Troubleshooting on page 40 3 Manage faults following a service procedure Clear a Fault Manually on page 45 4 Contact technical support if the problem persists https support oracle com Related Information Identifying Components on page 13 Preparing for Service on page 47 Returning the Server to Operation on ...

Страница 30: ...ftware Component Names Displayed by Diagnostic Software on page 34 Related Information Interpreting LEDs on page 35 Performing Advanced Troubleshooting on page 40 Clear a Fault Manually on page 45 Log In to Oracle ILOM Service At the terminal prompt type ssh root SP IP address Password password Oracle R Integrated Lights Out Manager Version 3 2 x Copyright c 2014 Oracle and or its affiliates Inc A...

Страница 31: ...mt shell y n y faultmgmtsp fmadm faulty Time UUID msgid Severity 2015 01 16 17 55 26 f4ee56c 9fdd ca19 efb5 ae39675dfee3 SPT 8000 PX Major Problem Status open Diag Engine fdd 1 0 System Manufacturer Oracle Corporation Name SPARC T7 2 Part_Number 12345678 11 1 Serial_Number 1238BDC0DF Suspect 1 of 1 Fault class fault component misconfigured Certainty 100 Affects SYS MB CM1 CMP MR3 BOB1 CH1 DIMM Sta...

Страница 32: ...fb5 ae39675dfee3 which is unique to each fault Message ID SPT 8000 PX which can be used to obtain additional fault information from Knowledge Base articles 2 Use the message ID to obtain more information about this type of fault a Obtain the message ID from console output SPT 8000 PX in the example above b Go to https support oracle com and search on the message ID in the Knowledge tab or type the...

Страница 33: ...t Names Displayed by Diagnostic Software on page 34 For example show t SYS MB CM0 CMP MR3 BOB0 CH1 DIMM Target Property Value SYS MB CM0 CMP MR3 BOB0 CH1 DIMM type DIMM SYS MB CM0 CMP MR3 BOB0 CH1 DIMM ipmi name P0 M3 B0 C1 D0 SYS MB CM0 CMP MR3 BOB0 CH1 DIMM requested_config_state Enabled SYS MB CM0 CMP MR3 BOB0 CH1 DIMM current_config_state Enabled SYS MB CM0 CMP MR3 BOB0 CH1 DIMM disable_reason...

Страница 34: ...bottom SYS DBP HDD1 SYS DBP HDD2 SYS DBP HDD3 SYS DBP HDD4 SYS DBP HDD5 top Servicing Drives on page 65 DVD drive SYS DBP DVD Servicing the DVD Drive on page 113 Fan board SYS FANBD Servicing the Fan Board on page 141 Fan modules As viewed from front of server SYS FANBD F0 left front SYS FANBD F1 center front SYS FANBD F2 right front SYS FANBD F3 left rear SYS FANBD F4 center rear SYS FANBD F5 rig...

Страница 35: ...ter SYS PS1 inner Servicing Power Supplies on page 85 PS backplane and cover SYS PDB Servicing the PS Backplane on page 165 SP SYS MB SPM Servicing the SPM on page 135 Related Information Log In to Oracle ILOM Service on page 30 Identify Faulted Components on page 31 Identify Disabled Components on page 33 Interpreting LEDs Use these steps to determine if an LED indicates that a component has fail...

Страница 36: ...cing Memory Risers and DIMMs on page 91 Servicing PCIe Cards on page 125 Servicing the Motherboard on page 147 Related Information Checking for Faults on page 29 Performing Advanced Troubleshooting on page 40 Clear a Fault Manually on page 45 Front Panel Controls and LEDs No LED Icon or Label Description 1 System Server Locator LED and button white You can turn on the Locator LED to identify a par...

Страница 37: ...operating state No service actions are required Blink green SPM is initializing the Oracle ILOM firmware Steady on amber An SPM error has occurred and service is required 5 Fan Module Fault LED amber FAN Indicates these conditions Off Steady state no service action is required Steady on A fan module failure event has been acknowledged and a service action is required on at least one of the fan mod...

Страница 38: ...ly and is within specifications Amber steady on AC power is applied to this power supply and is below 85V 2 PS DC OK LED green Indicates these conditions Off 12V DC output from this power supply is disabled or not within specification Steady on 12V DC output from this power supply is present and within specifications 3 PS Fault LED amber Indicates these conditions Off Steady state no service actio...

Страница 39: ...ome fault conditions individual component fault LEDs are lit in addition to the Service Action Required LED 7 Power OK LED green Indicates these conditions Off Server is not running in its normal state Server power might be off The SPM might be running Steady on Server is powered on and is running in its normal operating state No service actions are required Fast blink Server is running in standby...

Страница 40: ...Solaris on page 41 View Log Files Oracle ILOM on page 41 Generate and examine low level diagnostic information generated by POST POST Overview on page 42 Configure POST on page 42 Oracle ILOM Properties That Affect POST Behavior on page 45 Related Information Checking for Faults on page 29 Interpreting LEDs on page 35 Clear a Fault Manually on page 45 Check the Message Buffer The dmesg command che...

Страница 41: ...n the var adm messages file After a period of time usually every week a new messages file is automatically created The original contents of the messages file are rotated to a file named messages 1 Over a period of time the messages are further rotated to messages 2 and messages 3 and then deleted 1 Log in as superuser 2 Type more var adm messages 3 To view all logged messages type more var adm mes...

Страница 42: ...ms and the amount of diagnostic information POST displays Refer to the section on setting the SPARC host keyswitch state in the Oracle ILOM Administrator s Guide for Configuration and Maintenance Firmware Release 3 2 x for a list of parameters and values If POST detects a faulty component the component is disabled automatically If the server is able to run without the disabled component the server...

Страница 43: ...et r default_verbosity Diag verbosity in the default cause no error or hw change default_verbosity Possible values none min normal max default_verbosity User role required for set r error_level Diag level when running after an error reset error_level Possible values off min max error_level User role required for set r error_verbosity Diag verbosity when running after an error reset error_verbosity...

Страница 44: ...vel max Refer to the section on setting the SPARC host keyswitch state in the Oracle ILOM Administrator s Guide for Configuration and Maintenance Firmware Release 3 2 x for a description of parameters and values 4 View the current values for settings For example show HOST diag HOST diag Targets Properties default_level off default_verbosity normal error_level max error_verbosity normal hw_change_l...

Страница 45: ...lt condition is repaired automatically In cases where the fault condition is not automatically cleared you must clear the fault manually 1 After replacing a faulty component power on the server and verify that the fault for that component has cleared Use the fmadm faulty command to confirm that the fault is clear 2 Determine your next step If no fault was detected you do not need to do anything el...

Страница 46: ... Enterprise Manager Ops Center software if applicable Clearing a fault with the fmadm aquit command does not clear that fault in the Oracle Enterprise Manager Ops Center software You must manually clear the fault or incident For more information refer to the section on marking an incident repaired in the Oracle Enterprise Manager Ops Center Feature Reference Guide at http www oracle com pls topic ...

Страница 47: ...remove power from the server Removing Power From the Server on page 53 8 Move the server out of the rack and gain access to internal components Accessing Server Components on page 56 9 Attach devices to the server to perform service procedures Attaching Devices During Service on page 63 Related Information Identifying Components on page 13 Returning the Server to Operation on page 171 Safety Infor...

Страница 48: ...ck and danger to personal health follow the instructions ESD Measures ESD sensitive devices such as the cards drives and DIMMS require special handling Caution Circuit boards and drives contain electronic components that are extremely sensitive to static electricity Ordinary amounts of static electricity from clothing or the work environment can destroy the components located on these boards Do no...

Страница 49: ...Prevent ESD Damage on page 57 Tools Needed For Service on page 49 Tools Needed For Service You need the following tools for most service operations Antistatic wrist strap Antistatic mat No 2 Phillips screwdriver 2 5 mm hex driver or key Pen or pencil to power on server Related Information Safety Information on page 47 Fillers A filler is an empty metal or plastic enclosure that is installed at the...

Страница 50: ...ries Hot service replaceable by customer Cold service replaceable by customer Cold service replaceable by authorized service personnel Cold service procedures require that you shut the server down and unplug the power cables that connect the power supplies to the power source Although hot service procedures can be performed while the server is running you should usually bring it to standby mode as...

Страница 51: ...PCIe Cards on page 125 eUSB Servicing the eUSB Drive on page 121 Cold service replaceable by authorized service personnel Fan board Servicing the Fan Board on page 141 Motherboard Servicing the Motherboard on page 147 Transfer SCC PROM to new motherboard Drive backplane Servicing the Drive Backplane on page 159 Power supply backplane Servicing the PS Backplane on page 165 Related Information Ident...

Страница 52: ...e Server You can use the Locator LEDs to identify one particular server from many other servers 1 At the Oracle ILOM prompt type set System locator_indicator on The white System Locator LEDs one on the front panel and one on the rear panel blink 2 After locating the server with the blinking System Locator LED turn it off by pressing the Locator button with a stylus Alternatively you can type an Or...

Страница 53: ...owering off the server 1 Log in as superuser or equivalent Depending on the type of problem you might want to view server status or log files You also might want to run diagnostics before you shut down the server 2 Notify affected users that the server will be shut down Refer to the Oracle Solaris system administration documentation for additional information 3 Save any open files and quit all run...

Страница 54: ...wer off the server See Prepare to Power Off the Server on page 53 2 Switch from the system console to the Oracle ILOM prompt by typing the Hash Dot key sequence 3 Power off the server stop System Note You can also use the Server Power button on the front of the server to initiate a graceful server shutdown See Power Off the Server Server Power Button Graceful on page 55 This button is recessed to ...

Страница 55: ...ower Off the Server Oracle ILOM on page 54 Power Off the Server Emergency Shutdown on page 55 Front Panel Components Service on page 13 Power Off the Server Emergency Shutdown Caution All applications and files will be closed abruptly without saving changes File system corruption might occur 1 Prepare to power off the server See Prepare to Power Off the Server on page 53 2 Press and hold the Serve...

Страница 56: ...tton Graceful on page 55 Power Off the Server Emergency Shutdown on page 55 Rear Panel Components Service on page 15 Related Information Safety Information on page 47 Accessing Server Components These topics explain how to access components on the outside and the inside of the server Perform these tasks in this order as needed Prevent ESD Damage on page 57 Extend the Server to the Service Position...

Страница 57: ...mat Antistatic bag used to wrap a replacement part ESD mat Disposable ESD mat shipped with some replacement parts or optional components 2 Attach an antistatic wrist strap When servicing or removing server components attach an antistatic strap to your wrist and then to a metal area on the chassis See Safety Information on page 47 Related Information Safety Information on page 47 Extend the Server ...

Страница 58: ...upplied with the server is hinged to accommodate extending the server you should ensure that all cables and cords are capable of extending 2 From the front of the server release the two slide release latches Squeeze the green slide release latches to release the slide rails 3 While squeezing the slide release latches slowly pull the server forward until the slide rails latch 4 Release the CMA See ...

Страница 59: ... the CMA For some service procedures such as replacing a power supply if you are using a CMA you might need to release the CMA to gain access to the rear of the chassis Note For instructions on how to install the CMA for the first time refer to Server Installation 1 Press and hold the tab Preparing for Service 59 ...

Страница 60: ...rvice steps that require the CMA to be out of the way swing the CMA closed and latch it to the left rack rail Check that the CMA and the cables are functioning properly after completing service Related Information Extend the Server to the Service Position on page 57 Remove the Server From the Rack on page 61 Returning the Server to Operation on page 171 60 SPARC T7 2 Server Service Manual July 201...

Страница 61: ... to the maintenance position See Extend the Server to the Service Position on page 57 5 Release the CMA from the rail assembly The CMA is still attached to the cabinet but the server chassis is now disconnected from the CMA See Release the CMA on page 59 6 From the front of the server pull the release tabs forward and pull the server forward until it is free of the rack rails A release tab is loca...

Страница 62: ...re that the AC power cords are disconnected from the server power supplies 2 Unlatch the server top cover Insert your fingers under the two cover latches and simultaneously lift both latches in an upward motion as shown in panel 1 3 Lift the cover slightly and slide it toward the front of the server chassis about 0 5 inch 12 mm 4 Lift up and remove the top cover as shown in panel 2 A metal air baf...

Страница 63: ...acle ILOM VGA_REAR_PORT policy set SP policy VGA_REAR_PORT enabled For more details on selecting an active video port refer to Accessing the Server in SPARC T7 Series Servers Administration Guide If you plan to connect to the Oracle ILOM software over the network connect an Ethernet cable to the Ethernet port labeled NET MGT Note The SPM uses the NET MGT out of band port by default You can configu...

Страница 64: ...64 SPARC T7 2 Server Service Manual July 2019 ...

Страница 65: ...age devices based on solid state memory using the NVMe software interface NVMe drives are supported in the top four drive slots while other drives are supported in any slot Any of these drives can be a boot device Note The terms drive and HDD are used in a generic sense to refer to internal storage devices These topics explain how to service drives Drive LEDs on page 66 Determine Which Drive Is Fa...

Страница 66: ... idle and available for use 3 Activity SSDs Green Indicates the drive s availability for use On Read or write activity is in progress Off Drive is idle and available for use Flashes on and off This situation occurs during hot service operations You can ignore this situation Note The front and rear panel Service Action Required LEDs are also lit when the server detects a drive fault See Front Panel...

Страница 67: ...age 35 2 From the front of the server check the drive LEDs to identify the faulty drive The amber Service Required LED is lit on the drive that needs to be replaced See Drive LEDs on page 66 3 Remove the faulty drive See Remove a Drive on page 67 Related Information Drive LEDs on page 66 Remove a Drive on page 67 Install a Drive on page 72 Verify a Drive on page 75 Detecting and Managing Faults on...

Страница 68: ...ris prompt list all drives in the device tree including drives that are not configured cfgadm al This command lists dynamically reconfigurable hardware resources and shows their operational status In this case look for the status of the drive you plan to remove This information is listed in the Occupant column Ap_id Type Receptacle Occupant Condition c0 scsi bus connected configured unknown c0 dsk...

Страница 69: ...removal procedure b Disable the NVMe drive hotplug disable SYS DBP NVME0 Check that the drive s state has changed from ENABLED to POWERED hotplug list lc c Power down the NVMe drive hotplug poweroff SYS DBP NVME0 Check that the drive s state has changed from POWERED to PRESENT hotplug list lc In this state the blue OK to Remove LED on the NVMe drive is lit Note Do not remove the drive unless the b...

Страница 70: ...the drive out of the slot Caution When you remove a drive replace it with a filler or another drive Otherwise the server might overheat due to improper airflow 6 After you remove an NVMe drive check that the drive slot s state has changed to EMPTY hotplug list lc 7 Install a replacement drive or a drive filler See Install a Drive on page 72 or Install a Drive Filler on page 74 Related Information ...

Страница 71: ...ve filler you want to remove complete the following tasks Caution The latch is not an ejector Do not bend it too far to the right Doing so can damage the latch a Push the release button to open the latch and unlock the drive panel by moving the latch to the right b Grasp the latch and pull the filler out of the drive slot Caution When you remove a drive filler replace it with another filler or a d...

Страница 72: ...g a drive into a server is a two step process You must first install the drive into the drive slot and then configure that drive to the server Note If you removed an existing drive from a slot in the server you must install the replacement drive in the same slot as the drive that was removed Drives are physically addressed according to the slot in which they are installed 1 Take the necessary ESD ...

Страница 73: ...e Power On the Server Oracle ILOM on page 174 or Power On the Server System Power Button on page 175 If you hot serviced the drive configure it using the cfgadm c configure command The following example shows the drive at c0 dsk c1t1d0 being configured cfgadm c configure c0 dsk c1t1d0 Replace c0 dsk c1t1d0 with the drive name that applies to your situation If you hot serviced an NVMe drive it shou...

Страница 74: ...ive on page 75 Related Information Determine Which Drive Is Faulty on page 67 Remove a Drive on page 67 Remove a Drive Filler on page 71 Install a Drive Filler on page 74 Verify a Drive on page 75 Install a Drive Filler 1 Fully open the release lever on the drive filler 2 Install the drive by completing the following tasks 74 SPARC T7 2 Server Service Manual July 2019 ...

Страница 75: ...erform administrative tasks to reinstall software before the server can boot Refer to the Oracle Solaris OS administration documentation for more information 2 At the Oracle Solaris prompt list all drives in the device tree including any drives that are not configured cfgadm al This command helps you identify the drive you installed Ap_id Type Receptacle Occupant Condition c0 scsi bus connected co...

Страница 76: ...sk connected configured unknown usb0 1 unknown empty unconfigured ok usb0 2 unknown empty unconfigured ok 6 Perform one of the following tasks based on your verification results If the previous steps did not verify the drive see Detecting and Managing Faults on page 29 If the previous steps indicate that the drive is functioning properly perform the tasks required to configure the drive These task...

Страница 77: ...from the rack to access the fan modules Each fan module is an integrated hot serviceable component These topics explain how to service faulty fan modules Fan Module LEDs on page 78 Determine Which Fan Module Is Faulty on page 79 Remove a Fan Module on page 79 Install a Fan Module on page 81 Verify a Fan Module on page 83 Related Information Preparing for Service on page 47 Servicing the Fan Board ...

Страница 78: ...erver is powered on and the fan module is functioning correctly Service Action Required Amber The fan module is faulty Related Information Determine Which Fan Module Is Faulty on page 79 Detecting and Managing Faults on page 29 78 SPARC T7 2 Server Service Manual July 2019 ...

Страница 79: ...ecting and Managing Faults on page 29 Remove a Fan Module This is a hot service procedure that can be performed by a customer while the server is running Caution While the fan modules provide some cooling redundancy if a fan module fails replace it as soon as possible to maintain server availability When you remove one of the fan modules in the rear row fan modules 3 4 or 5 you must replace it wit...

Страница 80: ... fan modules you can only remove or replace the fan modules Do not service any other components in the fan compartment unless the server is shut down and the power cords are removed 4 Install a new fan module See Install a Fan Module on page 81 Related Information Extend the Server to the Service Position on page 57 80 SPARC T7 2 Server Service Manual July 2019 ...

Страница 81: ...stomer while the server is running Caution To ensure proper cooling ensure that you install the replacement fan module in the same slot from which the faulty fan module was removed 1 Take the necessary ESD precautions See Prevent ESD Damage on page 57 2 Align the fan module and slide it into the fan module slot Servicing Fan Modules 81 ...

Страница 82: ...u hear a click when the fan module is properly seated 4 Return the server to the normal operating position See Return the Server to the Normal Operating Position on page 173 Related Information Return the Server to the Normal Operating Position on page 173 Remove a Fan Module on page 79 Verify a Fan Module on page 83 82 SPARC T7 2 Server Service Manual July 2019 ...

Страница 83: ...y to check for faults If faults are reported see Detecting and Managing Faults on page 29 If no faults are reported then the component has been replaced successfully 4 Consider these possibilities If any of the LEDs are illuminated see Interpreting LEDs on page 35 If none of the LEDs are illuminated the fan module has been replaced successfully Related Information Determine Which Fan Module Is Fau...

Страница 84: ...84 SPARC T7 2 Server Service Manual July 2019 ...

Страница 85: ...cies refer to Servers Administration and the Oracle ILOM documentation These topics describe how to service power supply modules Power Supply LEDs on page 85 Determine Which Power Supply Is Faulty on page 87 Remove a Power Supply on page 87 Install a Power Supply on page 88 Verify a Power Supply on page 90 Related Information Servicing the PS Backplane on page 165 Power Supply LEDs Each power supp...

Страница 86: ...n 3 AC Present Green AC voltage is applied to the power supply Note The front and rear panel Service Action Required LEDs are also lit when the server detects a power supply fault See Front Panel Components Service on page 13 and Rear Panel Components Service on page 15 Related Information Determine Which Power Supply Is Faulty on page 87 Verify a Power Supply on page 90 86 SPARC T7 2 Server Servi...

Страница 87: ...r is running Caution Hazardous voltages are present To reduce the risk of electric shock and danger to personal health follow the instructions Caution If a power supply fails and you do not have a replacement available to ensure proper airflow leave the failed power supply installed in the server until you replace it with a new power supply 1 Prepare for servicing See Preparing for Service on page...

Страница 88: ... supply to prevent it from falling 5 Install a new power supply See Install a Power Supply on page 88 Related Information Determine Which Power Supply Is Faulty on page 87 Install a Power Supply on page 88 Install a Power Supply This is a hot service procedure that can be performed by a customer while the server is running 88 SPARC T7 2 Server Service Manual July 2019 ...

Страница 89: ...wer supply with the empty power supply chassis bay 3 Slide the power supply into the bay until it is fully seated 4 Move the release latch up to secure the power supply in place 5 Reconnect the power cord to the power supply 6 Verify power supply functionality See Verify a Power Supply on page 90 Related Information Remove a Power Supply on page 87 Verify a Power Supply on page 90 Servicing Power ...

Страница 90: ...s are not lit See Interpreting LEDs on page 35 3 Consider these possibilities If any of the LEDs are illuminated see Interpreting LEDs on page 35 If none of the LEDs are illuminated the power supply has been replaced successfully Related Information Determine Which Power Supply Is Faulty on page 87 Front Panel Components Service on page 13 Rear Panel Components Service on page 15 90 SPARC T7 2 Ser...

Страница 91: ...ify a DIMM on page 108 DIMM Configuration Errors on page 111 Memory Riser and DIMM Configuration The server includes eight memory risers each containing four DIMM slots Four memory risers are associated with each CPU Either 16 or 32 DIMMs may be installed in the server The memory configuration rules for the server are as follows All eight memory risers must be installed in all configurations In ha...

Страница 92: ...ith CM0 and sixteen 64 Gbyte DIMMs associated with CM1 Related Information Identifying DIMMs on page 92 Memory Riser and DIMM FRU Names on page 93 Locate a Faulty DIMM LEDs on page 97 Remove a DIMM on page 102 Install a Memory Riser on page 106 Identifying DIMMs Each DIMM is affixed with an identifying label The first four characters on the label describe the DIMM memory capacity the second four c...

Страница 93: ...r and DIMM FRU Names This server includes eight memory risers Four memory risers are associated with each CMP in the server A label is next to each memory riser that shows the number of the CMP and of the riser Four DIMM slots are on each memory riser Note The server fails to boot unless all memory riser slots are populated For more information about memory riser configuration see Memory Riser and...

Страница 94: ...CMP MR0 BOB1 CH1 DIMM Black White Black White CM0 MR1 SYS MB CM0 CMP MR1 riser SYS MB CM0 CMP MR1 BOB0 CH0 DIMM SYS MB CM0 CMP MR1 BOB0 CH1 DIMM SYS MB CM0 CMP MR1 BOB1 CH0 DIMM SYS MB CM0 CMP MR1 BOB1 CH1 DIMM Black White Black White CM0 MR2 SYS MB CM0 CMP MR2 riser SYS MB CM0 CMP MR2 BOB0 CH0 DIMM SYS MB CM0 CMP MR2 BOB0 CH1 DIMM SYS MB CM0 CMP MR2 BOB1 CH0 DIMM SYS MB CM0 CMP MR2 BOB1 CH1 DIMM ...

Страница 95: ...IMM Black White Black White CM1 MR3 SYS MB CM1 CMP MR3 riser SYS MB CM1 CMP MR3 BOB0 CH0 DIMM SYS MB CM1 CMP MR3 BOB0 CH1 DIMM SYS MB CM1 CMP MR3 BOB1 CH0 DIMM SYS MB CM1 CMP MR3 BOB1 CH1 DIMM Black White Black White Related Information Memory Riser and DIMM Configuration on page 91 Add Memory to the Server Caution These procedures require that you handle components that are sensitive to ESD Follo...

Страница 96: ...mory in the server remove all of the existing DIMMs on the memory risers and the motherboard 7 Install the new DIMMs 8 Install the memory risers 9 Return the server to operation 10 Enable and verify the new DIMMs Locating and Replacing a Faulty DIMM You can locate a failed DIMM either by using the Oracle ILOM show faulty command or with the DIMM fault LEDs located on the motherboard and the memory...

Страница 97: ...is example SYS MB CM0 CMP MR1 BOB1 CH0 DIMM indicates the memory riser that is second farthest from the power supplies and the DIMM in a slot with white handles and a black slot Related Information Locate a Faulty DIMM LEDs on page 97 Remove a DIMM on page 102 Locate a Faulty DIMM LEDs This procedure describes how to identify a faulty DIMM using buttons and LEDs on the motherboard and the two memo...

Страница 98: ...middle of each slot ensures that the DIMM is correctly oriented 3 Memory Riser Power LED Green Amber Indicates that the riser is operating normally Indicates that the riser has a fault 4 Memory Riser Remind button Blue Push this button to identify the faulty or misconfigured DIMMs Note The front and rear panel Service Required LEDs are also lit when the server detects a DIMM fault Related Informat...

Страница 99: ...DIMM on the motherboard or a memory riser 1 Identify the faulty DIMM to be removed using the ILOM show faulty command 2 Prepare the system for service 3 Unplug the power cords 4 Remove the appropriate memory riser To remove a DIMM from the motherboard you must remove the memory riser above that DIMM to enable access 5 Locate the faulty DIMM on the motherboard or memory riser using the DIMM fault L...

Страница 100: ...e to ESD which can cause server components to fail Note Your server could include a memory riser that is secured with a flat head screw If that is the case use a No 1 flat blade screwdriver to service that memory riser 1 Prepare for servicing See Preparing for Service on page 47 2 Identify the memory riser with the faulty DIMM by pressing the Remind button on the air divider as shown in the follow...

Страница 101: ...Ms on this riser are operating properly If the memory riser Service Action Required LED is on amber one or more of the DIMMs installed on this riser is faulty or misconfigured 3 Loosen the captive screw that secures the memory riser to the chassis Servicing Memory Risers and DIMMs 101 ...

Страница 102: ...et Related Information Install a Memory Riser on page 106 Remove a DIMM on page 102 Remove a DIMM Caution This procedure requires handling components that are sensitive to ESD Follow antistatic practices to avoid damage or component failure DIMMs or DIMM fillers must be removed 102 SPARC T7 2 Server Service Manual July 2019 ...

Страница 103: ...tion about cold service procedures Caution Whenever you remove a DIMM or a DIMM filler you should replace it with another DIMM or DIMM filler before powering on the server Otherwise the server might overheat due to improper airflow 1 Press down both DIMM slot ejector tabs as far as they can go 2 Carefully lift the DIMM straight up and place it on an antistatic mat Related Information Install a DIM...

Страница 104: ...ver or are replacing a faulty memory riser without upgrading memory You can perform this procedure but the server must first be completely powered down and all power cords unplugged See Component Service Categories on page 50 for more information about cold service procedures Caution Whenever you remove a DIMM you should replace it with another DIMM before applying power to the server Otherwise th...

Страница 105: ...MM ejector lever 3 Align each DIMM with the empty connector slot aligning the notch in the DIMM with the key in the connector The notch ensures that the DIMM is oriented correctly 4 Gently press the DIMM into the slot until the ejector tabs lock the DIMM in place Related Information Install a Memory Riser on page 106 Servicing Memory Risers and DIMMs 105 ...

Страница 106: ...Memory Riser Note Your server might include a memory riser that is secured with a flat head screw If that is the case use a No 1 flat blade screwdriver to service that memory riser 1 Take the necessary ESD precautions See Prevent ESD Damage on page 57 106 SPARC T7 2 Server Service Manual July 2019 ...

Страница 107: ...r 2 Push the memory riser module into the associated CPU memory riser slot until the riser module locks in place 3 Tighten the captive screw that secures the memory riser to the chassis Servicing Memory Risers and DIMMs 107 ...

Страница 108: ...peration on page 171 Related Information Memory Riser and DIMM Configuration on page 91 Remove a DIMM on page 102 Enable and Verify a DIMM on page 108 Enable and Verify a DIMM 1 At the Oracle ILOM prompt type show faulty If the output indicates a POST detected fault go to step 2 108 SPARC T7 2 Server Service Manual July 2019 ...

Страница 109: ...eyswitch to diag so that POST runs in Service mode set HOST keyswitch_state Diag Set keyswitch_state to Diag b Power cycle the server stop System Are you sure you want to stop System y n y Stopping System start System Are you sure you want to start System y n y Starting System c Check if the host has been powered off Allow approximately one minute before performing this step Type the show HOST com...

Страница 110: ...ts on page 31 4 Switch to the Oracle ILOM command shell 5 Type show faulty Target Property Value SP faultmgmt 0 fru SYS MB CMP0 CMP MR0 BOB1 CH0 DIMM SP faultmgmt 0 timestamp Nov 18 16 02 56 SP faultmgmt 0 sunw msg id SPSUN4V 8000 CQ faults 0 SP faultmgmt 0 uuid 7c7efb20 3333 e2d7 b8ea 986b3e9dbaa9 faults 0 SP faultmgmt 0 timestamp Nov 18 16 02 56 faults 0 If the show faulty command reports a faul...

Страница 111: ...l error message Please refer to the service documentation for supported memory configurations In some cases the server boots a degraded state WARNING Running with a nonstandard DIMM configuration Refer to service document for details In other cases the configuration error is fatal Fatal configuration error forcing power down In addition to these general memory configuration errors one or more rule...

Страница 112: ...112 SPARC T7 2 Server Service Manual July 2019 ...

Страница 113: ...emove a DVD Drive on page 113 Install a DVD Drive on page 114 Related Information Detecting and Managing Faults on page 29 Remove a DVD Drive This is a cold service procedure that can be performed by a customer Power down the server completely before performing this procedure 1 Prepare for servicing See Preparing for Service on page 47 Note You do not need to remove the top cover to service the DV...

Страница 114: ...Related Information Install a DVD Drive on page 114 Install a DVD Drive This is a cold service procedure that can be performed by a customer Power down the server completely before performing this procedure 1 Take the necessary ESD precautions See Prevent ESD Damage on page 57 114 SPARC T7 2 Server Service Manual July 2019 ...

Страница 115: ...lide the DVD drive into the front of the chassis until it seats 3 Return the server to operation See Returning the Server to Operation on page 171 Related Information Remove a DVD Drive on page 113 Servicing the DVD Drive 115 ...

Страница 116: ...116 SPARC T7 2 Server Service Manual July 2019 ...

Страница 117: ...ming these procedures Replace the Battery on page 117 Related Information Detecting and Managing Faults on page 29 Preparing for Service on page 47 Disconnect Power Cords on page 56 Replace the Battery 1 Prepare the host for battery replacement To correctly reset the date and time before replacing a battery you must revent the host from automatically powering on and disable any NTP connections a C...

Страница 118: ...he battery Replacing the battery is a cold service procedure The server must be completely powered off and power cables disconnected before performing this procedure a Prepare the server for service b Remove memory risers CM0 MR0 CM0 MR2 and CM0 MR3 c Remove the old battery Gently push the battery toward the memory risers to release it from the retention clip 118 SPARC T7 2 Server Service Manual J...

Страница 119: ... set SP clock datetime 081221302016timezone EDT Set datetime to 081221302016 set timezone to EDT show d properties SP clock Properties datetime Mon Aug 22 13 20 16 2016 timezone EDT EST5EDT uptime 2 days 19 56 49 usentpserver disabled b If the SP policy HOST_POWER_ON was enabled before you replaced the battery you must re enable it set SP policy HOST_POWER_ON enabled c If the SP clock usentpserver...

Страница 120: ...120 SPARC T7 2 Server Service Manual July 2019 ...

Страница 121: ...on Detecting and Managing Faults on page 29 Remove the eUSB Drive This is a cold service procedure that can be performed by a customer Power down the server completely before performing this procedure Caution This procedure requires that you handle components that are sensitive to electrostatic discharge Static discharges can cause the components to fail 1 Prepare the system for service See Prepar...

Страница 122: ...t the eUSB drive up to disconnect it from the motherboard 5 Install a new eUSB drive See Install the eUSB Drive on page 122 Related Information Install the eUSB Drive on page 122 Install the eUSB Drive This is a cold service procedure that can be performed by a customer Power down the server completely before performing this procedure 122 SPARC T7 2 Server Service Manual July 2019 ...

Страница 123: ...e the necessary ESD precautions See Prevent ESD Damage on page 57 2 Press the eUSB drive into the socket on the motherboard 3 Tighten the screw to secure the drive to the motherboard 4 Install memory risers CM0 MR0 CM0 MR2 and CM0 MR3 See Install a Memory Riser on page 106 5 Return the server to operation See Returning the Server to Operation on page 171 Servicing the eUSB Drive 123 ...

Страница 124: ...Install the eUSB Drive Related Information Remove the eUSB Drive on page 121 124 SPARC T7 2 Server Service Manual July 2019 ...

Страница 125: ...ur slots are also capable of supporting x16 PCIe cards All Slots x8 electrical interface Slots 1 2 7 and 8 x16 electrical interface To determine the slot in which to install a PCIe card follow these guidelines 1 Install cards that require a specific slot Refer to the SPARC T7 2 Server Product Notes and the documentation for each card to determine if there are slot requirements 2 Install the first ...

Страница 126: ...rives Two drives to support a redundant NMVe configuration Use these tables and the labels on the NMVe cable to properly connect the NMVe switch cards to the disk backplane TABLE 1 Single NMVe Card Configuration DBP NVMe Connector NVMe Card Connectors Slot 1 3 3 2 2 1 1 0 0 TABLE 2 Dual NVMe Card Configuration DBP NVMe Connector NVMe Card Connectors Slot 1 NVMe Card Connectors Slot 2 3 3 2 2 1 3 0...

Страница 127: ...ci 301 pci 2 SYS MB PCIE4 PCIeSlot5 1 3 x8 pci 302 pci 2 SYS MB PCIE5 PCIeSlot6 1 0 x8 pci 303 pci 2 SYS MB PCIE6 PCIeSlot7 1 2 x16 pci 304 pci 1 SYS MB PCIE7 PCIeSlot8 1 1 x16 pci 305 pci 1 SYS MB PCIE8 NET0 0 1 x8 pci 300 pci 1 network 0 SYS MB NET0 NET1 0 1 x8 pci 300 pci 1 network 0 1 SYS MB NET1 NET2 1 3 x8 pci 302 pci 1 network 0 SYS MB NET2 NET3 1 3 x8 pci 302 pci 1 network 0 1 SYS MB NET3 ...

Страница 128: ...pci 6 nvme 0 disk 1 NVMe1 Single NMVe card Slot 1 Single NVMe Card Slot 2 Dual NVMe Switch Cards 0 0 x4 pci 306 pci 1 pci 0 pci 5 nvme 0 disk 1 pci 307 pci 1 pci 0 pci 5 nvme 0 disk 1 pci 306 pci 1 pci 0 pci 7 nvme 0 disk 1 NVMe2 Single NMVe card Slot 1 Single NVMe Card Slot 2 Dual NVMe Switch Cards 1 0 x4 pci 306 pci 1 pci 0 pci 6 nvme 0 disk 1 pci 307 pci 1 pci 0 pci 6 nvme 0 disk 1 pci 307 pci ...

Страница 129: ...paring for Service on page 47 2 Locate the PCIe card or filler that you want to remove See Rear Panel Components Service on page 15 for information about PCIe slots and their locations If you are removing a PCIe card filler go to step 5 3 If necessary note the slot location for each PCIe card you plan to remove 4 Unplug all data cables from the PCIe card Note the location of all cables for reinsta...

Страница 130: ...if you are removing a PCIe card See these figures if you are removing a PCIe card filler 6 Disengage the PCIe card slot crossbar from its locked position by pulling it toward the interior of the chassis 130 SPARC T7 2 Server Service Manual July 2019 ...

Страница 131: ...ons See Prevent ESD Damage on page 57 2 Ensure that the server is powered off and all power cords are disconnected from the server power supplies See Removing Power From the Server on page 53 3 Determine which slot to install the PCIe card in If you are not replacing an existing PCIe card and need information about deciding which slot to install the card in see PCIe Card Configuration on page 125 ...

Страница 132: ...these figures if you are installing a PCIe card See these figures if you are installing a PCIe card filler 6 Return the server to operation See Returning the Server to Operation on page 171 132 SPARC T7 2 Server Service Manual July 2019 ...

Страница 133: ...erify a PCIe Card 1 Verify that the fault LED is not illuminated on the PCIe card 2 Verify that the System Service Required LEDs are not illuminated 3 Perform one of the following actions based on your verification results If any of the LEDs are illuminated see Interpreting LEDs on page 35 If none of the LEDs are illuminated configure the PCIe card as described in the documentation shipped with th...

Страница 134: ...134 SPARC T7 2 Server Service Manual July 2019 ...

Страница 135: ...ou must restore the configuration settings maintained in the SPM Before replacing the SPM save the configuration using the Oracle ILOM backup utility Refer to the Oracle ILOM documentation for instructions on backing up and restoring the Oracle ILOM configuration After replacing the SPM the new SPM firmware component and the existing host firmware component must be consistent with each other To en...

Страница 136: ...ive to electrostatic discharge Static discharges can cause the components to fail The amber SP Fault LED on the front panel will be lit when an SPM fault is detected 1 Back up the Oracle ILOM configuration before removing the SPM At the Oracle ILOM prompt type cd SP config dump destination uritarget where acceptable values for uri are tftp ftp sftp scp http https and target is the location where y...

Страница 137: ...PM up and away from the motherboard panel 2 6 Install a new SPM See Install the SPM on page 137 Related Information SPM Firmware and Configuration on page 135 Install the SPM on page 137 Install the SPM Replacing the SPM is a cold service procedure that must be performed by qualified service personnel The server must be completely powered down before performing this procedure Caution This procedur...

Страница 138: ...e is not compatible with the existing host firmware further action will be suspended and the following message will be displayed Unrecognized Chassis This module is installed in an unknown or unsupported chassis You must upgrade the firmware to a newer version that supports this chassis Note Whenever you replace the SPM or the motherboard update the firmware on the server so the portions of firmwa...

Страница 139: ...At the Oracle ILOM prompt type cd SP config load source uritarget Where acceptable values for uri are tftp ftp sftp scp http https and target is the location where you stored the configuration information For example load source tftp 129 99 99 99 pathname 9 Set the time and date on the new SPM set SP clock datetime 10 If TPM was initialized on the replaced SPM complete these steps a Reinitialize T...

Страница 140: ...M initializes the Oracle ILOM firmware See Interpreting LEDs on page 35 for information about the status of the SPM LED 2 At the Oracle ILOM prompt start the fault management shell start SP faultmgmt shell Are you sure you want to start SP faultmgmt shell y n y faultmgmtsp 3 Type fmadm faulty to check for faults If faults are reported see Detecting and Managing Faults on page 29 If no faults are r...

Страница 141: ...e procedure that must be performed by qualified service personnel Power down the server completely before performing this procedure Caution This procedure requires that you handle components that are sensitive to ESD which can cause server components to fail 1 Prepare for servicing See Preparing for Service on page 47 2 Remove all fan modules See Remove a Fan Module on page 79 3 Remove all memory ...

Страница 142: ... motherboard panel 2 Caution When removing the ribbon cable from the motherboard grasp the cable connector on either side and pull straight up to disconnect the cable Do not rock the cable side to side Doing so could damage the connector Save the cables for use with the new fan board 7 Remove the front memory riser guide by pulling it up and out of the chassis panel 3 8 Pull the fan board back and...

Страница 143: ...ust be performed by qualified service personnel Power down the server completely before performing this procedure Caution This procedure requires that you handle components that are sensitive to ESD which can cause server components to fail 1 Take the necessary ESD precautions See Prevent ESD Damage on page 57 2 Using the fan board cable and power cables from the faulty fan board plug the cables i...

Страница 144: ... and power cable into the connectors on the motherboard panel 3 Caution When connecting the ribbon cable to the motherboard take care to center the cable on the connector before inserting the cable 6 Secure the fan board by reinserting and tightening the two screws on each side of the outside of the chassis panel 3 7 Tighten the three captive screws to hold the front memory riser guide in place pa...

Страница 145: ... serial number is located on a label on the front of the chassis Related Information Remove the Fan Board on page 141 Verify the Fan Board on page 145 Verify the Fan Board 1 At the Oracle ILOM prompt start the fault management shell start SP faultmgmt shell Are you sure you want to start SP faultmgmt shell y n y faultmgmtsp 2 Type fmadm faulty to check for faults If faults are reported see Detecti...

Страница 146: ...146 SPARC T7 2 Server Service Manual July 2019 ...

Страница 147: ... includes a top cover safety interlock switch These topics describe how to service the motherboard Remove the Motherboard on page 147 Install the Motherboard on page 151 Reactivate RAID Volumes on page 155 Verify the Motherboard on page 158 Related Information Component Service Categories on page 50 Servicing the SPM on page 135 Remove the Motherboard This is a cold service procedure that must be ...

Страница 148: ...cific information stored on these modules Whenever you replace the motherboard or the SPM you must update the firmware so the portions of firmware in the SPM and on the motherboard are consistent 1 Prepare for servicing See Preparing for Service on page 47 2 Remove all PCIe cards See Remove a PCIe Card or Filler on page 129 3 If installed remove any NVMe cables that are connected to the drive back...

Страница 149: ...ard power cable and the ribbon cable from the motherboard Caution When removing the ribbon cable from the motherboard grasp the cable connector on either side and pull straight up to disconnect the cable Do not rock the cable side to side Doing so could damage the connector d If necessary disconnect the four NVMe drive cables from the drive backplane Note the order in which the cables are connecte...

Страница 150: ...PS backplane See Remove the PS Backplane on page 165 12 Position the drive end of the cables off to the side using the tab on the top of the plastic power supply cover 13 Remove the motherboard a Loosen the captive screw in the corner near the fans that secures the motherboard to the chassis panel 1 b Grasp the handle on the motherboard and slide it toward the front of the chassis panel 2 150 SPAR...

Страница 151: ...ard and install these components on the new motherboard The SPM contains the Oracle ILOM system configuration data and the SCC PROM contains the system host ID and MAC address Transferring these components preserves the system specific information stored on these modules Whenever you replace the motherboard or the SPM you must update the firmware so the portions of firmware in the SPM and on the m...

Страница 152: ...the power supplies back into place 7 Reattach all cables to the motherboard a In the center rear of the motherboard connect the fan board power cable and the ribbon cable to the motherboard Caution When connecting the ribbon cable to the motherboard take care to center the cable on the connector before inserting the cable b Near the drives connect two shorter cables to the motherboard One cable go...

Страница 153: ...es properly 9 Reconnect all cables from the power supply backplane drive backplane and fan board to their original locations on the motherboard 10 Reinstall all memory risers See Install a Memory Riser on page 106 11 Install the SPM that you removed from the old motherboard See Install the SPM on page 137 12 Install the eUSB drive that you removed from the old motherboard See Install the eUSB Driv...

Страница 154: ...mware to a newer version that supports this chassis Note Whenever you replace the motherboard or the SPM update the firmware on the server so the portions of firmware in the two components remain consistent 20 Prepare to download the system firmware If necessary configure the server s NET MGT port so that it can access the network Log in to the SPM through the NET MGT port Refer to the Oracle ILOM...

Страница 155: ...e RAID Volumes on page 155 Verify the Motherboard on page 158 Reactivate RAID Volumes Perform this task only if your server had RAID volumes prior to replacing the motherboard 1 Prior to powering on the server log in to the SPM Refer to Servers Administration for instructions 2 At the Oracle ILOM prompt disable auto boot so that the server will not boot the OS when the server powers on set HOST bo...

Страница 156: ...n inactive state ok show volumes For example the following output shows an inactive volume ok show volumes Volume 0 Target 389 Type RAID1 Mirroring WWID 03b2999bca4dc677 Optimal Enabled Inactive 2 Members 583983104 Blocks 298 GB Disk 1 Member 0 Optimal Target a HGST H101860SFSUN600G A770 PhyNum 1 Disk 0 Member 1 Optimal Target b HGST H101860SFSUN600G A770 PhyNum 2 7 For each RAID volume listed as ...

Страница 157: ... 0 Unit 0 Removable Read Only device TEAC DV W28S C LT11 pci 303 pci 1 scsi 0 FCode Version 1 00 64 MPT Version 2 05 Firmware Version 5 05 00 00 Target 9 Unit 0 Disk HGST H101860SFSUN600G A770 1172123568 Blocks 600 GB SASDeviceName 5000cca02f0a1560 SASAddress 5000cca02f0a1561 PhyNum 0 Target 389 Volume 0 Unit 0 Disk LSI Logical Volume 3000 583983104 Blocks 298 GB VolumeDeviceName 33b2999bca4dc677 ...

Страница 158: ...ell start SP faultmgmt shell Are you sure you want to start SP faultmgmt shell y n y faultmgmtsp 2 Type fmadm faulty to check for faults If faults are reported see Detecting and Managing Faults on page 29 If no faults are reported then the motherboard has been replaced successfully Related Information Install the Motherboard on page 151 Reactivate RAID Volumes on page 155 158 SPARC T7 2 Server Ser...

Страница 159: ...ce procedure that must be performed by qualified service personnel Power down the server completely before performing this procedure Caution This procedure requires that you handle components that are sensitive to ESD which can cause server components to fail 1 Prepare for servicing See Preparing for Service on page 47 2 Remove all drives and fillers See Remove a Drive on page 67 Note Note the pos...

Страница 160: ...s ribbon cable and four NVMe drive cables if installed from the drive backplane panel 1 7 Push up on the wire tab in the upper corner of the drive backplane panel 1 8 Swing the drive backplane back and out of the chassis panel 2 9 Install a new drive backplane See Install the Drive Backplane on page 161 Related Information Install the Drive Backplane on page 161 160 SPARC T7 2 Server Service Manua...

Страница 161: ...tions See Prevent ESD Damage on page 57 2 Insert the drive backplane into the chassis Angle the bottom of the backplane into position first then move the backplane forward to align the side hooks then press the backplane into position Verify that the drive backplane is seated properly at the bottom in the small slot near the DVD drive 3 Lift up the metal hook and press the drive backplane to the f...

Страница 162: ...he other SAS cable into the bottom connector 5 Replace the System Remind button assembly air divider 6 Replace all memory risers you removed See Install a Memory Riser on page 106 7 Replace the DVD drive See Install a DVD Drive on page 114 8 Replace all drives and filler panels See Install a Drive on page 72 9 Return the server to operation See Returning the Server to Operation on page 171 162 SPA...

Страница 163: ...Information Remove the Drive Backplane on page 159 Verify the Drive Backplane on page 163 Verify the Drive Backplane 1 At the Oracle ILOM prompt start the fault management shell start SP faultmgmt shell Are you sure you want to start SP faultmgmt shell y n y faultmgmtsp 2 Type fmadm faulty to check for faults If faults are reported see Detecting and Managing Faults on page 29 If no faults are repo...

Страница 164: ...164 SPARC T7 2 Server Service Manual July 2019 ...

Страница 165: ...down the server completely before performing this procedure Caution Power is supplied to the PS backplane even when the server is powered off To avoid personal injury or damage to the server you must disconnect power cords before you service the PS backplane 1 Prepare for servicing See Preparing for Service on page 47 2 Pull both power supplies at least part way out of the chassis to disconnect th...

Страница 166: ...PS backplane cover around two pins on the inside of the power supply cage a Lift the cover up a little to clear the first part of the slots b Push the cover a little towards the front of the chassis c Push the tooth at the bottom of the cover to clear the edge of the power supply cage d Lift the cover out of the chassis 8 Remove the four bus bar screws that secure the motherboard to the PS backpla...

Страница 167: ...at must be performed by qualified service personnel Power down the server completely before performing this procedure Caution This procedure requires that you handle components that are sensitive to ESD which can cause server components to fail 1 Unpack the replacement PS backplane and place it on an antistatic mat 2 Hold the PS backplane at the end of the power supply cage at an angle and connect...

Страница 168: ...ews until the PS backplane and the motherboard are securely fastened to the bus bars 6 Replace the PS backplane cover panel 3 a Align the PS backplane cover Ensure that the tooth at the bottom of the cover is clear of the power supply cage You must guide two slots on the PS backplane cover around two pins on the inside of the power supply cage b Fit the two slots on the cover around the two pins c...

Страница 169: ...age 171 Related Information Remove the PS Backplane on page 165 Verify the PS Backplane on page 169 Verify the PS Backplane 1 At the Oracle ILOM prompt start the fault management shell start SP faultmgmt shell Are you sure you want to start SP faultmgmt shell y n y faultmgmtsp 2 Type fmadm faulty to check for faults If faults are reported see Detecting and Managing Faults on page 29 If no faults a...

Страница 170: ...170 SPARC T7 2 Server Service Manual July 2019 ...

Страница 171: ...ver to its normal operating position Replace the Top Cover on page 172 Return the Server to the Normal Operating Position on page 173 2 Connect the power cords to the server Attach Power Cords on page 174 3 Power on the server Power On the Server Oracle ILOM on page 174 Power On the Server System Power Button on page 175 Returning the Server to Operation 171 ...

Страница 172: ... that it is about 1 inch 2 5 cm forward of the rear of the server 2 Slide the top cover toward the rear of the chassis until the rear cover lip engages with the rear of the chassis 3 Close the top cover by pressing down on the cover with both hands until both latches engage panel 2 4 Return the server to its normal operating position See Return the Server to the Normal Operating Position on page 1...

Страница 173: ...lease tabs on the side of each rail 2 While pushing on the release tabs slowly push the server into the rack Ensure that the cables do not get in the way 3 Reconnect the cables to the rear of the server If the CMA is in the way disconnect the left CMA release and swing the CMA open See Release the CMA on page 59 4 Reconnect the CMA Swing the CMA closed and latch it to the left rack rail See Server...

Страница 174: ...age 175 Related Information Power On the Server Oracle ILOM on page 174 Power On the Server System Power Button on page 175 Power On the Server Oracle ILOM Note If you are powering on the server following an emergency shutdown that was triggered by the top cover interlock switch you must use the poweron command At the Oracle ILOM prompt type start System An alert message appears on the system cons...

Страница 175: ... Fault LED is illuminated solid green when the SPM has successfully booted After the SPM has booted the Power LED on the front panel begins flashing slowly indicating that the host is in standby power mode 2 Press and release the recessed system Power button on the server front panel No Description 1 Power LED 2 Power button 3 SP Fault LED When main power is applied to the server the main Power LE...

Страница 176: ...176 SPARC T7 2 Server Service Manual July 2019 ...

Страница 177: ...stem recovery AWG American wire gauge B BMC Baseboard management controller BOB Memory buffer on board C chassis Server enclosure CMA Cable management arm SPARC T7 1 and SPARC T7 2 Cable management assembly SPARC T7 4 CMP Chip multiprocessor CRU Customer replaceable unit D DHCP Dynamic Host Configuration Protocol Glossary 177 ...

Страница 178: ... runs the Oracle Solaris OS and other applications The term host is used to distinguish the primary computer from the SP See SP hot pluggable Describes a component that can be replaced with power applied but the component must be prepared for removal hot swappable Describes a component that can be replaced with power applied and no preparation is required I ID PROM Chip that contains system inform...

Страница 179: ...hysical device address used for remote access configuration management See Oracle ILOMand SDM name name space Top level Oracle ILOM target NEBS Network Equipment Building System Netra products only NET MGT Network management port An Ethernet port on the server SP NIC Network interface card or controller NMI Nonmaskable interrupt NVMe Nonvolatile memory express controller The optional NVMe switch c...

Страница 180: ...eral component interconnect PCIe PCI Express an industry standard bus architecture that supports high bandwidth peripherals and I O devices POST Power on self test PROM Programmable read only memory PSH Predictive self healing S SAS Serial attached SCSI SCC System configuration chip SCC PROM System configuration chip on programmable read only memory Removable module containing system configuration...

Страница 181: ...gement control of the host Seehost SPM Service processor module This is the physical component that contains the service processor firmware SSD Solid state drive SSH Secure shell T Tma Maximum ambient temperature U U S NEC United States National Electrical Code UCP Universal connector port UI User interface UL Underwriters Laboratory Inc UTC Coordinated Universal Time UUID Universal unique identif...

Страница 182: ...182 SPARC T7 2 Server Service Manual July 2019 ...

Страница 183: ...rols front panel 36 D DB 15 video connector location of 15 diagnostics low level 42 DIMM configuration errors 111 DIMMs adding 95 enabling new 108 FRU names 93 identifying 92 installing 104 locating faulty LEDs 97 Oracle ILOM 96 physical layout 93 rank classification 92 removing 102 replacing faulty 99 disabled component detection checking for 33 dmesg command 40 drive backplane installing 161 rem...

Страница 184: ...ith advanced troubleshooting 40 LEDs 35 faulty DIMMs locating LEDs 97 filler installing drives 74 removing drives 71 fmadm command 31 45 front panel components 13 controls and LED 36 G graceful shutdown defined 55 H hot service 50 I installing DIMMs 104 drive backplane 161 drive filler 74 drives 72 DVD drive 114 eUSB drive 122 fan board 143 fan modules 81 memory risers 106 motherboard 151 PCIe car...

Страница 185: ...ewing Oracle Solaris 41 motherboard installing 151 reactivate RAID volumes 155 removing 147 verifying function of replaced 158 N NET MGT port Link and Activity LED 38 NET MGT port Speed LED 38 network NET ports location of 15 NVMe cards configuration rules 126 O Oracle ILOM checking for disabled components 33 checking for faults 31 fault management shell 31 locating failed DIMMs 96 logging in to 3...

Страница 186: ...over 62 replaceable component locations 17 replacing DIMMs 99 RJ 45 serial port location of 15 root complex 127 S safety information topics 47 precautions 47 symbols 48 SCC PROM installing 153 removing 148 schematic diagrams 25 SER MGT port location of 15 serial number chassis locating 51 server locating 52 Service Action Required LED 13 Service Required LED 36 38 show disabled command 33 slide ra...

Страница 187: ...fying function of replaced drive backplane 163 drives 75 fan board 145 fan modules 83 motherboard 158 power supplies 90 PS backplane 169 SPM 140 video connector location of 13 viewing message log files Oracle ILOM 41 Oracle Solaris 41 187 ...

Страница 188: ...188 SPARC T7 2 Server Service Manual July 2019 ...

Отзывы: