


39
Operation
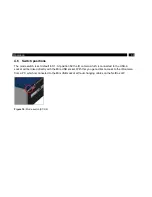
4.6 Switch positions
The mode switch is set default to S1. At position S2 the IR camera which is connected to the USB-A
socket will be linked directly with the Mini-USB socket. With this you get a direct access to the IR camera
from a PC which is connected to the Mini USB socket without changing cables on the NetBox LW.
Figure 14:
Mode switch (S1/ S2)
Содержание PI LightWeight kit
Страница 12: ...12 ...
Страница 16: ...16 1 Used standards Figure 2 Used standards ...
Страница 23: ...23 Technical Data Figure 4 Measurement field of the infrared camera optris PI representing the 23 x 17 lens ...
Страница 26: ...26 3 1 Mechanical Data PI 400 PI 450 LW Figure 6 Dimensions PI 400 PI 450 LW ...
Страница 27: ...27 Installation 3 2 Mechanical Data PI NetBox LW Figure 7 Dimensions PI NetBox LW ...
Страница 28: ...28 Figure 8 Controls and connections PI NetBox LW ...
Страница 30: ...30 ...
Страница 33: ...33 Operation Figure 9 Recommended video system integration of the PI LightWeight ...
Страница 76: ...76 ...
Страница 81: ...81 System recovery Figure 50 Rename option ...
Страница 82: ...82 After this the system shuts down The NetBox is ready for use again Figure 51 System update ...
Страница 87: ...87 Basics of Infrared Thermometry Figure 55 Noncontact thermometry ...
Страница 90: ...90 Figure 57 Spectral emissivity of several materials 1 Enamel 2 Plaster 3 Concrete 4 Chamotte ...
Страница 91: ...91 CE Conformity 7 CE Conformity ...
Страница 92: ...optris PI LightWeight kit MA E2014 11 B ...