background image

18

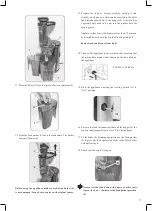
19.  Juice  and  pulp  are  automatically  separated,  the  juice  is 

sent into the juice collection container/jug (2) through the 
spout (4a) while the pulp is sent into the pulp collection 
container (3). This means that a large quantity of food can 
be processed without having to clean the appliance.

20.  If you need to empty the collection containers (2 and 3) 

during use, stop the appliance by setting the control dial 
(9) to “OFF”.

21. Before remove the container (2) close the cap (4c).
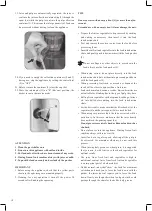
22.  Move the interrupter (11) on “R” (Reverse) position, the 

basket turns in the inverse mode.

ATTENTION

1. Clean the parts before use.
2. Do not use this appliance without food inside.
3. Put food only after they have been cleaned of any seeds.
4. If using frozen fruit combine always with juice or milk.
5. To push the foods use only and exclusively the pusher.

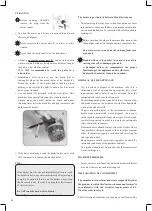
IMPORTANT

1.  Before  using  the  appliance,  check  that  the  yellow  parts 

shown in the right image are mounted properly.

2.  Cleaning:  for  easy  operation  it  turn  off  the  power  30 

seconds after inishing the squeezing.

TIPS

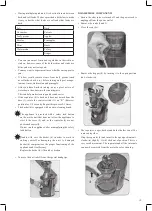
Do not operate with an empty bowl (4) for more than a few

seconds.

Extended use with an empty bowl (4) may damage the unit.

•   Prepare the fruit or vegetables to be processed by washing 

and  cutting  as  necessary  then  insert  it  into  the  food 
introduction chute.

•   Peel and remove the seeds or cores from the food before 

processing them.

•   Insert the cut fruit and vegetables into the food introduction 

chute and gently push it downwards with the food pusher 
(9).


Do  not  use  ingers  or  other  objects  to  press  down  the 
food, always use the food pusher (9).

•   When  using  carrots,  do  not  place  directly  into  the  food 

introduction chute but cut them into pieces and push down 
with the food pusher (9).

•   When  processing  fruit  such  as  avocado  or  bananas  the 

result will be closer to a puree than a fruit juice.

•   Food such as melon, banana, avocado, kiwi and similar are 

not suitable for blending due to the type of pulp they have.

•   Roll up fresh vegetables such as spinach, cabbage, lettuce 

etc.  into  balls  before  putting  into  the  food  introduction 
chute.

•   For the best results, make sure that the ilter basket (6), the 

separator (4) and the juice spout (4a) are not blocked.

•   When using very mature fruit, the juice extracted will be 

quite heavy. In this case, make sure that the juice density 
does not block the pouring spout (4a).

Do not process excessively hard or ibrous foods such as
rhubarb.

•   Do not place ice into the appliance. If using frozen fruit 

combine always with juice or milk.

•   Insert  food  at  a  regular  speed,  allowing  all  the  pulp  to 

be  extracted.  For  maximum  eficiency,  do  not  rush  this 

process.

•   When juicing leafy greens or wheat grass, it is suggested 

that  you  mix  it  with  fruits  or  other  hard  vegetables  for 
optimal results.

•   The  juice  from  fresh  fruit  and  vegetables  is  high  in 

nutritional content. Juice from fresh fruit and vegetables 
is an important part of a balanced diet.

•   Unlike normal juicer that“chew“ the food for maximum 

extraction and need you to force the food down with the 
pusher,  the  juicer  doesn’t  require  you  to  force  the  food 
down. Gently use the pusher when food gets stuck or aid 
passage through the chute for foods like leafy greens.

Содержание RKS-2100

Страница 1: ...SOKOWIR WKA WOLNOOBROTOWA RKS 2100 PL Instrukcja obs ugi 7 UK Operating Instructions 11...

Страница 2: ...dawcy SERWIS ARCONET ul Grobelnego 4 05 300 MI SK MAZOWIECKI tel 48 25 759 12 31 INFOLINIA 0801 44 33 22 LISTA PUNKT W SERWISOWYCH www arconet pl RKS2100_IM_PL_UK_05072015 IMPORTER DYSTRYBUTOR Expo se...

Страница 3: ...a konserwacja odkamienianie do wykonania kt rych zobowi zany jest U ytkownik we w asnym zakresie 7 Gwarancj nie s obj te a elementy szkalne np dzbanki talerze sznury przy czeniowe do sieci wtyki gniaz...

Страница 4: ...4...

Страница 5: ...5...

Страница 6: ...6...

Страница 7: ...ie wieszaj go na ostrych kraw dziach np sto u lub p ki i nie pozw l aby styka si z gor cymi powierzchniami Urz dzenie nale y wy czy z zasilania gdy sokowir wka nie jest u ywana przed otwarciem urz dze...

Страница 8: ...nty zabezpieczaj ce je podczas transportu folie tekturki i nast pnie sprawdzi czy nie uleg o uszko dzeniu 2 Umy i dok adnie osuszy sokowir wk i wszystkie jej cz ci a szczeg lnie te elementy kt re maja...

Страница 9: ...9 pasuje do otworu tylko z jednej strony OBS UGASOKOWIR WKI 1 Przygotuj produkty do obr bki poprzez poci cie je na mniejsze kawa ki tak eby zmie ci y si do podajnika 8 Du y dozownik o rednicy 75 mm um...

Страница 10: ...a bezpiecznie przyst pi do de monta u urz dzenia 11 Je li separator 4 jest zablokowany i nie mo na go od czy od nap du naci nij przycisk cofania R rewers na 3 5 sekund Powt rz czynno 2 3 razy a nast p...

Страница 11: ...by dok adnie osuszone Nie nale y umieszcza sokowir wki lub jakichkolwiek jej cz ci w zmywarce Produkty spo ywcze z w asnym trwa ym kolorem np mar chewka mog pozostawia kolorowe plamy na plastikowych e...

Страница 12: ...szkodze urz dzenia lub jego cz ci sk adowych skontaktuj si z autoryzowanym serwisem PRZECHOWYWA W BEZPIECZNYM MIEJSCU Gdy urz dzenie nie jest u ywane przechowuj je wraz ze wszystkimi akcesoriami i ins...

Страница 13: ...nstallation use and maintenance Keep this booklet for future reference The packaging materials plastic bags polystyrene boxes etc must not be left within reach of children as potential sources of dang...

Страница 14: ...two minutes followed by two minutes of pause After each use disconnect the plug from the mains outlet Place the unit away from sinks and faucets The appliance MUST be checked and or repaired at an au...

Страница 15: ...not allow the appliance to start if the hopper 8 and the separator 4 are not positioned correctly Do not run the appliance after manipulating the safety lock button PACKAGE CONTENTS Slow juicer applia...

Страница 16: ...triangle mark on the separator 4 Ensure that the basket 6 is completely pushed down Check that the yellow parts are correctly positioned 6 Place the auger 7 into the basket 6 Ensure that the auger 7...

Страница 17: ...meter less than 75 mm can be inserted directly into the big food introduction hole Remove seeds and stones from fruits 14 Connect the appliance to the mains socket ensuring that the mains data matches...

Страница 18: ...er 9 Do not use ingers or other objects to press down the food always use the food pusher 9 When using carrots do not place directly into the food introduction chute but cut them into pieces and push...

Страница 19: ...this process 2 3 times The basket 6 is equipped with an auto cleaning brush The appliance is provided with a safety lock button on the motor unit that does not allow the appliance to start if the cove...

Страница 20: ...inserting the plug in the mains outlet ensure that the appliance and all its components are completely dry Do not process excessively hard or ibrous foods such as rhubarb Handle with care the basket 6...

Страница 21: ...act an authorized dealer Failure to comply with the above may compromise the safety of the device If you decide not to use this appliance again you must make it inoperative by cutting the cord after r...

Страница 22: ...22...

Страница 23: ...23...

Страница 24: ...24...

Отзывы: