background image


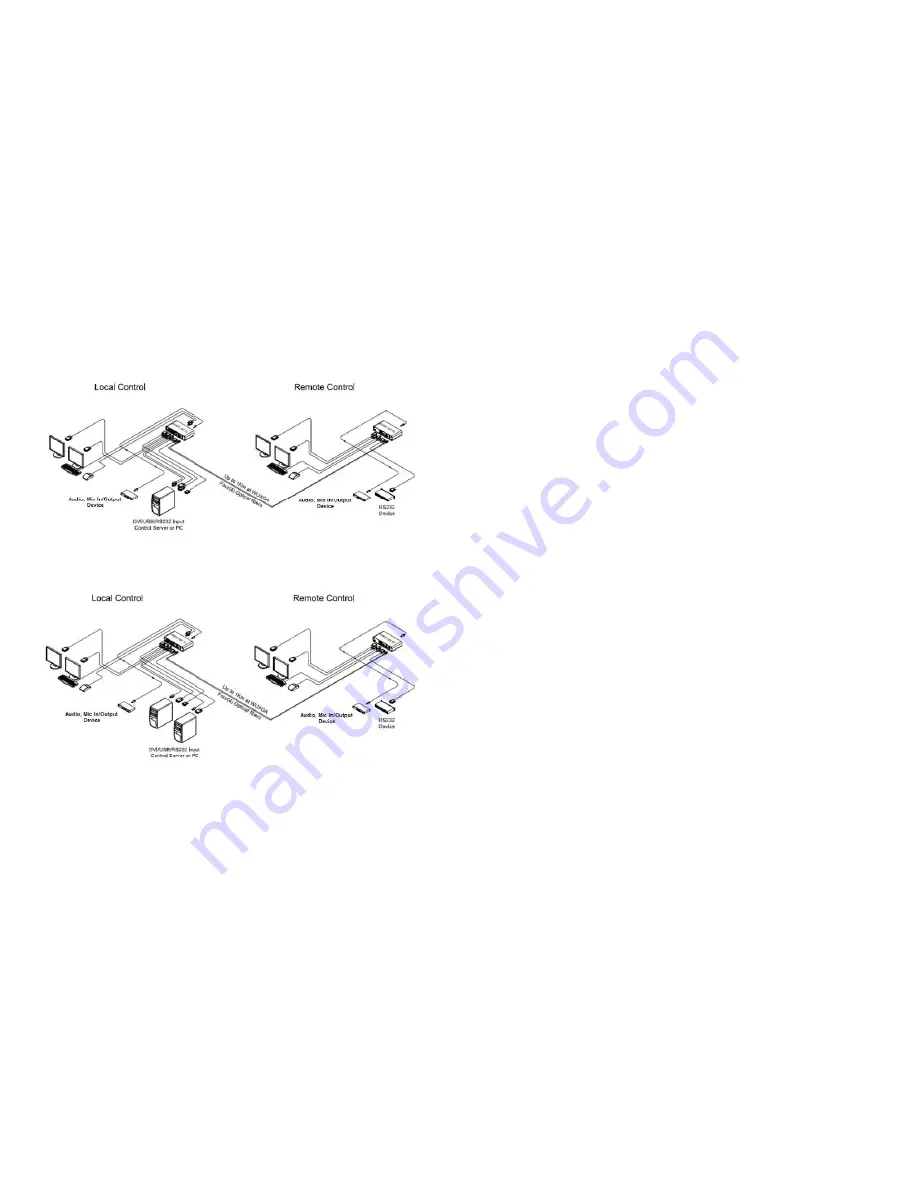
Connection Diagram 
 

This page describes the connections on the KVMX-100 Transmitter (Tx) and 
Receiver (Rx). 


Figure 1

– Connection Diagram for a PC, equipped dual DVI ports 


Figure 2

– Connection Diagram for two (2) PCs, equipped each DVI port


1-2 connection Diagram


System Requirements for Setup 


Hardware requirements 


You  have  a  graphic  controller  card  with  a  DVI  port  in  your 

Windows/Mac (Mac is option), or SUN system. It should support 

the  maximum  graphic  resolution  feature  of  the  display  to  be 

connected. 


In  case  of  using  a  computer,  no  special  memory  size,  CPU 

speed and chipsets are required. 


Proper initial trial of the entire platform with its application using 

a short length copper cable is recommended prior to install with 

the optical link. 


Software requirements 


No  special  needs,  if  the  DVI  graphic  controller  and  display 

peripheral  are  operational  with  the  platform’s  OS  and 

application. 


1-3 System Requirements for Setup


Содержание KVMX-100-TR

Страница 1: ...on 1 1 2 Jan 2015 Opticis Locations Headquarters Opticis Co Ltd 16Fl Kins Tower 8 Sungnam daero 331 beon gil Bundang gu Seongnam si Gyunggi do 463 844 South Korea Te l 82 31 719 8033 Fax 82 31 719 8032 www opticis com For order support please contact your Distributor or Reseller For technical support check with the Opticis web site www opticis com or contact techsupp opticis com ...

Страница 2: ...th keyboard mouse and bi directional audio But the key feature of 2 1 KVM switch function inside KVMX 100 TR enables users to select one between two 2 PCs as a host KVMX 100 TR transmits DVI USB HID RS232 and bi directional stereo audio signal up to 1 0km 3280feet over two 2 duplex LC single mode fibers or 300m 985feet over two 2 duplex LC multi mode fibers Designed for high resolution performance...

Страница 3: ...in your Windows Mac Mac is option or SUN system It should support the maximum graphic resolution feature of the display to be connected In case of using a computer no special memory size CPU speed and chipsets are required Proper initial trial of the entire platform with its application using a short length copper cable is recommended prior to install with the optical link Software requirements No...

Страница 4: ...p Step 5 if you don t need local control Figure 3 Connection of Transmitter 1 4 Installation Step 6 Connect the DVI 1 OUT and 2 OUT port of Receiver to the two 2 single link DVI displays over DVI copper cables Attach keyboard and mouse for remote control If necessary connect the RS 232 cable audio IN OUT and mic IN OUT connectors on the front side of Receiver Figure 4 Connection of Receiver Step 7...

Страница 5: ...nsmitter and Receiver will be turned on Then you can switch and control by setting the PC 1 and PC 2 switch on the front of Receiver at Remote side The next step is the same as Local control Note If you need switching function with a PC dual DVI ports please set and choose the multi display mode that you want In this case you can switch and control two 2 sources from a PC without any setting the s...

Страница 6: ...cis com 1 8 Troubleshooting Maintenance Technical Support Product Specifications KVMX 100 TR Optical KVM Extender OPTICAL INTERCONNECTION Number Connectors Wavelength Operating Distance Four 4 fiber Four 4 LC connector 1310 1550 nm Up to 1 0 km 3280feet over LC single mode Up to 300m 985feet over LC multi mode VIDEO Supported Resolution Pixel data bit depth Connectors Tx Connector Rx WUXGA 1920x12...

Страница 7: ...board Mouse Supports bi directional stereo audio Auto mix EDID programming Lossless Image Quality with no Frame Dropping USB HID ports for keyboard and mouse Provides Serial Control Data RS232C through 9pin D sub connector Remote console switch 19 1RU mounting rack as an option Certifications CE FCC 1 10 Features Firmware download Step 1 Please download the setup and firmware file Note Opticis wil...

Страница 8: ... and connect a PC to Service port on the front side of Transmitter or Receiver over Mini USB cable Step 9 Operate Download GUI and select Comport to select communication port of PC Then click Download button 1 12 Firmware download Step 10 Click Open button and select download file bin Format Step 11 Click Start button Then the firmware will be downloaded Step 12 The firmware download is completed ...

Страница 9: ...ave no further obligation under the foregoing limited warranty if the product has been damaged due to abuse misuse neglect accident unusual physical or electrical stress unauthorized modifications tampering alterations or service other than by Opticis or its authorized agents causes other than from ordinary use or failure to properly use the product in the application for which said product is int...

Отзывы: