background image

30

Overview

OMATION® Series 410 Envelopener™ Operator Manual

OPEX Corporation

 3.2. Equipment Model/Serial Number Locations

Before contacting OPEX Technical Support, locate the Model/Serial label


on 

your machine so that you can provide the assisting technician with your 
Reference Serial Number (Figure 3-3). See 

“Contacting OPEX” on page 2

 for 

contact information.

Figure 3-3: Model/Serial label

Model

Serial

Содержание OMATION Envelopener 410 Series

Страница 1: ...or retrieval system other than for its intended use without the express written consent of OPEX Corporation April 2019 OMATION Series 410 Envelopener Operator Manual WARNING Read this manual thoroughl...

Страница 2: ...nd serial number of the product ready see Equipment Model Serial Number Locations on page 30 For other inquiries OPEX Corporation 305 Commerce Dr Moorestown NJ 08057 4234 USA Tel 1 856 727 1100 Fax 1...

Страница 3: ...y requirements IEC 61000 3 2 2014 Harmonics IEC 61000 3 3 2013 Flicker IEC 61000 4 2 2008 Electro Static Discharge Immunity Test IEC 61000 4 3 2006 IEC 61000 4 3 2006 AMD1 2007 IEC 610004 3 2006 AMD2...

Страница 4: ...equirements IEC 61000 3 2 2014 Harmonics IEC 61000 3 3 2013 Flicker IEC 61000 4 2 2008 Electro Static Discharge Immunity Test IEC 61000 4 3 2006 IEC 61000 4 3 2006 AMD1 2007 IEC 610004 3 2006 AMD2 201...

Страница 5: ...2 2014 Harmonics IEC 61000 3 3 2013 Flicker IEC 61000 4 2 2008 Electro Static Discharge Immunity Test IEC 61000 4 3 2006 IEC 61000 4 3 2006 AMD1 2007 IEC 610004 3 2006 AMD2 2010 Radiated Radio Frequen...

Страница 6: ...s IEC 61000 3 2 2014 Harmonics IEC 61000 3 3 2013 Flicker IEC 61000 4 2 2008 Electro Static Discharge Immunity Test IEC 61000 4 3 2006 IEC 61000 4 3 2006 AMD1 2007 IEC 610004 3 2006 AMD2 2010 Radiated...

Страница 7: ...0 3 2 2014 Harmonics IEC 61000 3 3 2013 Flicker IEC 61000 4 2 2008 Electro Static Discharge Immunity Test IEC 61000 4 3 2006 IEC 61000 4 3 2006 AMD1 2007 IEC 610004 3 2006 AMD2 2010 Radiated Radio Fre...

Страница 8: ...y requirements IEC 61000 3 2 2014 Harmonics IEC 61000 3 3 2013 Flicker IEC 61000 4 2 2008 Electro Static Discharge Immunity Test IEC 61000 4 3 2006 IEC 61000 4 3 2006 AMD1 2007 IEC 610004 3 2006 AMD2...

Страница 9: ...9 OMATION Series 410 Envelopener Operator Manual OPEX Corporation 0 3 Document History Doc Rev Date Changes click blue text to go to that page 19 01 Apr 30 2019 Initial release CE compliant...

Страница 10: ...nd IR 6 0 2 5 EU Declaration of Conformity Switzerland SW 7 0 2 6 EU Declaration of Conformity United Kingdom UK 8 0 3 Document History 9 Chapter 1 Introduction 1 1 About This Manual 14 1 1 1 Manual n...

Страница 11: ...Order of Operation 37 4 2 2 Output Tray Position 42 4 2 3 Clearing Jams 43 4 3 Routine Maintenance 44 4 3 1 Cleaning the Series 410 Envelopener 44 4 3 2 Replacing the Print Cartridge 47 4 3 3 Cutter...

Страница 12: ...12 Table of Contents OMATION Series 410 Envelopener Operator Manual OPEX Corporation...

Страница 13: ...OMATION Series 410 Envelopener Operator Manual 1 Introduction 1 1 About This Manual 14 1 1 1 Manual navigation aids 14...

Страница 14: ...ment This manual will be updated to reflect equipment design changes part number changes or to correct errors a table detailing the document revision history can be viewed on Page 9 Be sure to retain...

Страница 15: ...tion 16 2 1 1 Safety message conventions 17 2 2 Safety Guidelines 18 2 2 1 Safety guidelines English translation 18 2 2 2 Consignes de S curit traduction fran aise 19 2 3 Safety Labels 20 2 3 1 Interl...

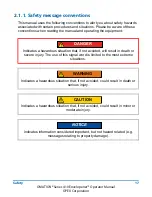
Страница 16: ...you on various safety issues regarding the operation and maintenance of the OPEX equipment described in this manual This chapter provides an explanation of the safety conventions used throughout this...

Страница 17: ...rating the equipment DANGER Indicates a hazardous situation that if not avoided will result in death or severe injury The use of this signal word is limited to the most extreme situations WARNING Indi...

Страница 18: ...rized representative Machine Maintenance Machine maintenance particular operations and all adjustments whether mechanical or electrical shall be carried out by persons authorized to do so in accordanc...

Страница 19: ...es ou lectriques doivent tre effectu s par des personnes autoris es le faire conform ment un syst me de travail s r N essayez pas de nettoyer la machine pendant son fonctionnement Un chiffon ou un mat...

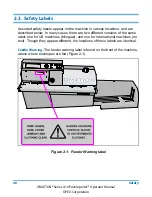
Страница 20: ...ibed below In many cases there are two different versions of the same label one for US machines bilingual and one for International machines no text Though they appear different the locations of these...

Страница 21: ...0 Envelopener Operator Manual OPEX Corporation Pinch point warnings The keep fingers away from gaps near moving parts label 1637200 is found at the beginning and end of the feed belt path Figure 2 2 F...

Страница 22: ...ound on the rear of the machine Figure 2 3 Figure 2 3 Disconnect Power Before Opening label Dielectric and ground test label The following label P24838 01 is found on the rear of the machine Figure 2...

Страница 23: ...e The FCC compliance label P24839 03 is found on the rear of North American machines only Figure 2 5 Figure 2 5 FCC Compliance Label Model and Serial The machine s model serial number and related info...

Страница 24: ...n ICES 003 label The compliance label 7611000 for Canadian ICES 003 is on the back of North American machines only Figure 2 7 Figure 2 7 ICES 003 Label Chip Bin Label The following label 9280100 is lo...

Страница 25: ...tion 2 3 1 Interlock system 1 The interlock system will stop all the motors in the machine whenever the nip arm cover Figure 2 9 or chip bin tray Figure 2 10 is removed Figure 2 9 Top cover removal in...

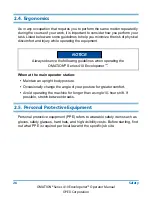
Страница 26: ...n at the main operator station Maintain an upright body posture Occasionally change the angle of your posture for greater comfort Avoid operating the machine for longer than a single 10 hour shift If...

Страница 27: ...OMATION Series 410 Envelopener Operator Manual 3 Overview 3 1 System Overview 28 3 2 Equipment Model Serial Number Locations 30...

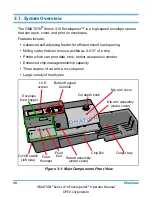
Страница 28: ...pening Milling cutter that can remove as little as 0 010 of a chip Printer which can print date time and or a sequence number Enhanced chip management chip capacity Three depths of cut and a no cut op...

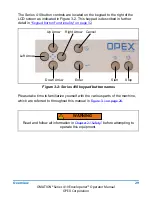
Страница 29: ...further detail in Keypad Button Functionality on page 32 Figure 3 2 Series 410 keypad button names Please take time to familiarize yourself with the various parts of the machine which are referred to...

Страница 30: ...ial Number Locations Before contacting OPEX Technical Support locate the Model Serial label on your machine so that you can provide the assisting technician with your Reference Serial Number Figure 3...

Страница 31: ...34 4 2 Operating Instructions 37 4 2 1 Order of Operation 37 4 2 2 Output Tray Position 42 4 2 3 Clearing Jams 43 4 3 Routine Maintenance 44 4 3 1 Cleaning the Series 410 Envelopener 44 4 3 2 Replaci...

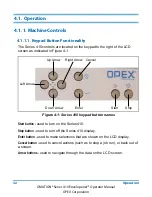
Страница 32: ...in Figure 4 1 Figure 4 1 Series 410 keypad button names Start button used to turn on the Series 410 Stop button used to turn off the Series 410 display Enter button used to make selections that are s...

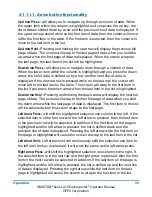
Страница 33: ...st item in the list is highlighted Down Arrow Hold Pressing and holding the down arrow will display the next full page of data The screen will wrap to the first full page of data when you hold the dow...

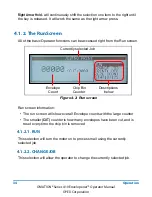
Страница 34: ...m the Run screen Figure 4 2 Run screen Run screen information The run screen will show overall Envelope counts with the large counter The smaller CUT counter is how many envelopes have been cut and is...

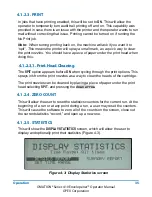
Страница 35: ...int head when doing this 4 1 2 3 1 Print Head Cleaning The SPIT option appears before ON when cycling through the print options This sprays ink from the print nozzles as a way to clean the heads of th...

Страница 36: ...together into four views SUMMARY Pulls together all jobs run within the specified time range in one view SET TIME RANGE allows operator to set specified date and time for pulling the above informatio...

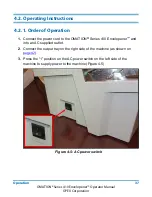
Страница 37: ...tion 1 Connect the power cord to the OMATION Series 410 Envelopener and into an AC supplied outlet 2 Connect the output tray on the right side of the machine as shown on page 42 3 Press the 1 position...

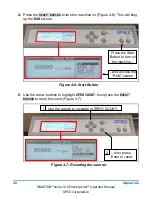
Страница 38: ...his will bing up the RUN screen Figure 4 6 Start Button 5 Use the arrow buttons to highlight ZERO COUNT then press the Enter button to reset the count Figure 4 7 Figure 4 7 Resetting the counter Press...

Страница 39: ...s the Enter button Figure 4 8 Figure 4 8 Getting to the Select Job screen 7 Select a job by highlighting it with the arrow buttons and then pressing Enter Figure 4 8 Figure 4 9 Selecting the Date Time...

Страница 40: ...e cutter depth knob Figure 4 10 for the desired cut Position 1 is the shallowest cut and 3 is the deepest Figure 4 10 Setting the cut depth 9 Once ready to begin use the arrow buttons to highlight Run...

Страница 41: ...The nip arm assembly guides the individual envelope under the printer where the envelope can be printed on if a print job option is selected 13 The envelope then passes under the cutter which will op...

Страница 42: ...The position of the output tray can be adjusted for processing larger envelopes Simply lift the output tray up move it to the desired position and press it down onto the stepped tray hitch see Figure...

Страница 43: ...ng Jams From time to time you will experience the inevitable jam A jam refers to any occurrence that causes the machine to stop not necessarily because an item is physically jammed in the machine You...

Страница 44: ...life of the machine and result in longer periods of up time Therefore you should perform the following tasks once per day 4 3 1 Cleaning the Series 410 Envelopener 1 Unplug the power cord 2 Press the...

Страница 45: ...er Operator Manual OPEX Corporation 3 Continue lifting the cover off on the left side to remove it Figure 4 14 Figure 4 14 Lifting the Nip arm cover 4 Lift the Nip arm wheels to clean under them Figur...

Страница 46: ...EX equipment prior to the operation of equipment When cleaning glass and plastic surfaces use detergent based cleaners such as Fantastic or Formula 409 Detergent based cleaners are recommended because...

Страница 47: ...faded on the envelopes the print cartridge may need to be replaced To replace the printer cartridge 1 Either unplug the AC power cord or turn off the AC power switch on the left side of the machine 2...

Страница 48: ...tab on the printer cartridge and pull in an arc motion Figure 4 17 Figure 4 17 Removing the print cartridge 4 Replace the printer cartridge and push into place Figure 4 18 Figure 4 18 Replacing the p...

Страница 49: ...be adjusted To adjust the cutter depth 1 Set the Cut knob to the Standard Cut position Figure 4 19 This position should always cut standard mail deep enough to remove the contents but not cut any of...

Страница 50: ...he screw in 1 4 turn increments to the right for a deeper cut or to the left for a shallower cut Figure 4 20 Adjusting the cutter depth 4 Replace the cover and run an envelope through to verify if it...

Страница 51: ...ck the circuit breaker on the back of the machine The breaker shown has been tripped and is open Figure 4 21 Figure 4 21 Open circuit breaker 2 Unplug the power cord and push the circuit breaker towar...

Страница 52: ...r Manual OPEX Corporation 3 Plug the power cord back into the machine 4 Verify the machine has a power display and operates normally If the circuit breaker pops back out call OPEX Tech Support to have...

Страница 53: ...tion 4 4 User Replaceable Parts The parts on the following pages can be replaced by the user If you re viewing the electronic version of the manual on a tablet click or tap the circle pointing to the...

Страница 54: ...pener Operator Manual OPEX Corporation Figure 4 24 Output Tray Assembly Click to return 7549180 Tray only 7584100 Sound Dampening Pad 7603700 Spreader Bar 7662300 Screw 4X 7221810 Rubber Foot 4X 91313...

Страница 55: ...er Operator Manual OPEX Corporation Figure 4 25 Chip Bin Tray Assembly Figure 4 26 3387500 Printer Cartridge under transport cover Click to return 7618700 Sticker 7023100 Magnet 7549166 Tray only 9131...

Страница 56: ...Envelopener Operator Manual OPEX Corporation Figure 4 27 8067050 Cutter Depth Knob Figure 4 28 8096750 Transport Cover Figure 4 29 8069225 Transport Cover Latch under transport cover Click to return...

Страница 57: ...re 4 30 AC Power Cords Table 4 1 Additional Power Cords Country Part Number Australia 109008 Denmark 109015 India South Africa 109016 Switzerland 109018 Italy 109019 Japan 2952200 OPEX Part 109003 Nor...

Страница 58: ...58 Operation OMATION Series 410 Envelopener Operator Manual OPEX Corporation This page intentionally left blank...

Страница 59: ...OMATION Series 410 Envelopener Operator Manual 5 Specifications 5 1 Physical Specifications 60 5 2 Features 60 5 3 Electrical Requirements 61 5 4 Environmental Specifications 61...

Страница 60: ...fication Value Speed Up to 400 envelopes minute using 6 envelopes Envelope Sizes Types Min length 3 50 Max length 14 00 Min height 3 00 Max height 9 50 Thickness Up to 0 188 4 8 mm Cutter Settings Cut...

Страница 61: ...tion Value Power US 110 120 VAC 60HZ 5A EURO 220 240 VAC 50HZ 3A JAPAN 100 VAC 50 60HZ 3A Specification Value BTU Rating US 1964 BTU h max 115v 5A EURO 2357 BTU h max 230v 3A JAPAN 1024 BTU h max 100v...

Страница 62: ...62 Specifications OMATION Series 410 Envelopener Operator Manual OPEX Corporation This page intentionally left blank...

Страница 63: ...Operator Manual OMATION Series 410 Envelopener G Glossary...

Страница 64: ...ked to be fed into the retard assembly Envelopener A machine that opens envelopes Feed Thumper A rotating cam that helps to jog the mail for improved feeding Feed belt This belt grabs the bottom envel...

Страница 65: ...gh quality exceptional customer service stability stewardship and unwavering independence Utilizing a vast global workforce of direct employees OPEX serves a variety of industries including financial...

Страница 66: ...66 OMATION Series 410 Envelopener Operator Manual OPEX Corporation OMATION Series 410 Envelopener...

Отзывы: