background image

9

SPEAKER SETUP

STEP 1: SETUP SPEAKER STANDS

This step is only for 16’ and 20’ 
systems.  9’ and 12’ systems do not 
include speaker stands.  So if you have 
a 9’ or 12’ system, skip to next step. 

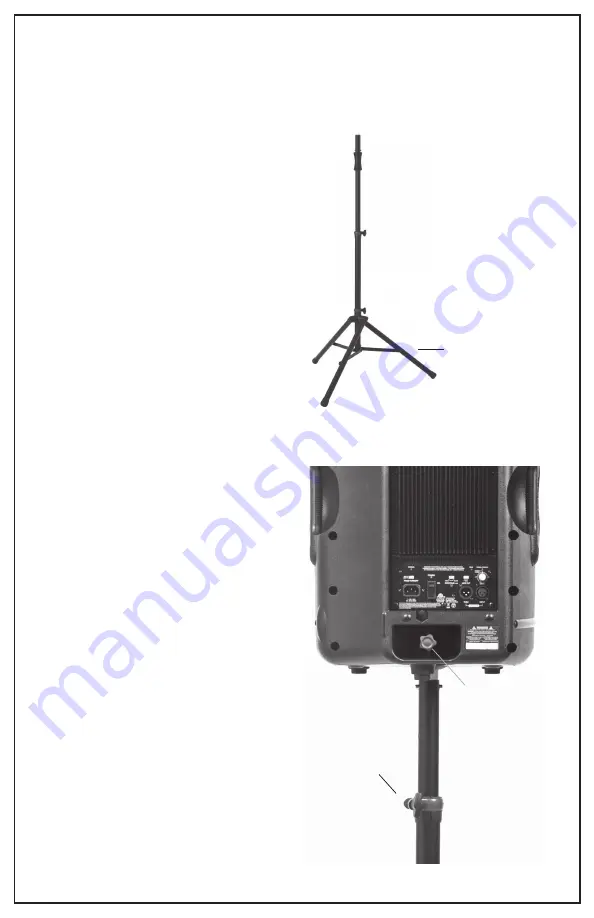
Remove speaker stands from 
protective bags and pace about 
five feet to each side of the Open 
Air Home Screen.

Extend the speaker stand legs so 
that the  leg supports are parallel 
to the ground.

Leg supports 
are parallel to 
ground

STEP 2: PLACE SPEAKERS

For 9’ and 12’ systems, place 
speakers on ground about five 
feet to each side of the Open Air 
Home Screen.

For 16’ and 20’ systems, place 
speakers on speaker stands. 
Secure speaker to stand with 
locking knob located on the back 
of the speaker, (some speakers 
do not have a locking knob). 
Raise speaker on speaker stand 
to desired height. Secure with 
pin then tighten locking knob on 
stand so the speaker does not 
rotate.

ATTENTION: Do not over tighten 
the locking knob. The pin 
supports the weight of the 
speaker, not the locking knob on 
the stand.

Secure speaker
with locking
knob so speaker 
doesn’t
rotate

Adjust height
of speaker
stand to 
desired
height

(actual speaker not pictured, for illustration purposes only)

(actual speaker stand not pictured, for illustration purposes only)

Содержание CINEBOX HOME SYSTEM

Страница 1: ...CINEBOX HOME SYSTEM USER GUIDE www openaircinema us ...

Страница 2: ... help you make your event a success and will ensure that your equipment will last for many years to come The first time you set up your system it may take about a half an hour but once you ve used your system once or twice you ll be able to set it up in ten minutes or less We ve given very specific instructions in this manual for how to setup and use your system but if you have any questions feel ...

Страница 3: ...Setup Speaker Setup CineBox Home A V Console Setup Video Image Alignment System Takedown Connecting Other Devices Care and Maintenance Troubleshooting Upgrades Accessories Warnings Warranty TABLE OF CONTENTS 4 6 9 11 15 16 17 17 18 19 20 ...

Страница 4: ...stakes for 9 12 16 screens straight for 20 Screen 1 Air Blower model may vary with screen size 2 Powered Speakers 2 Speaker Stands 16 20 systems only 1 Dual Speaker Stand Bag 16 20 systems only 2 Speaker cables 1 Mallet 20 system only actual products and component models may vary for illustration purposes only SYSTEM COMPONENTS ...

Страница 5: ...console 1 Video Projector 2 3 XLR Audio Cables pre plugged into console 2 50 XLR Audio Cables 9 12 16 systems 2 100 XLR Audio Cables 20 system 1 3 5mm headphone cable 1 Blu Ray Player or DVD Player or Playstation Depending on system definition 1 Projector power cable pre plugged into console 1 CineBox Home Console with protective carrying case 1 Flashlight actual products and component models may ...

Страница 6: ...er debris Uncoil white tethers from four corners of screen top and bottom Screen should be at least 10 away from structures and objects such as fences buildings trees overhead branches power lines electrical wires walls etc Choose a location where no direct light will hit the screen ATTENTION Do not drag screen across concrete pavement or other rough surfaces Properly unfolded screen Uncoiled whit...

Страница 7: ...referrably using a clove hitch knot There are eight tethers total four attached to the top of the screen four to the bottom Make sure bottom tethers are taut when connected to stakes but leave about 3 feet of slack in the top tethers Tether length can be adjusted using the black sliders on each tether ATTENTION Be aware of any underground pipes or utilities before driving stakes into the ground Pl...

Страница 8: ...ch cord is secured tightly around the coupling of the air blower Place the air blower in an area where it will not suck in dirt or leaves Do not use near water Do not block vents on blower Intake vent left and air blower right Pull intake vent over blower pipe INFLATABLE SCREEN SETUP Tighten cinch cord around blower pipe Properly attached intake vent Air blower model will vary with each screen siz...

Страница 9: ...each side of the Open Air Home Screen For 16 and 20 systems place speakers on speaker stands Secure speaker to stand with locking knob located on the back of the speaker some speakers do not have a locking knob Raise speaker on speaker stand to desired height Secure with pin then tighten locking knob on stand so the speaker does not rotate ATTENTION Do not over tighten the locking knob The pin sup...

Страница 10: ... way down counterclockwise before connecting speakers to power or CineBox console Do not power on speakers until XLR cables have been connected to CineBox console Failure to do so could result in damage to speakers due to power surge Plug this end of 50 or 100 XLR cables into XLR middle input into the back of each speaker SPEAKER SETUP Run this end of 50 or 100 XLR cable to the CineBox Console fro...

Страница 11: ...r s zoom function will allow for image size adjustment after the projector has been placed DISTANCE TO PLACE CINBOX CONSOLE FROM CENTER OF SCREEN BY SYSTEM SIZE 9 Home System 12 Home System 16 Home System 20 Home System 14 feet 18 feet 24 feet 30 feet Center console to screen at the distance specified above CineBox Console Stakes and tethers Speakers Front of screen Air blower illustration not to ...

Страница 12: ...re plugged into console ATTENTION Be sure all volume knobs are turned all the way down counterclockwise on the audio mixer CINEBOX CONSOLE SETUP Main console power cord Left white and Right red XLR audio cables HDMI cable HD and gaming systems only RCA yellow video cable pre plugged for standard def systems only although included loose in HD and gaming system consoles Projector power cord Be sure ...

Страница 13: ...tor Plug in the main CineBox power cord to your power source CINEBOX CONSOLE SETUP Long XLR audio cables running from speakers Short XLR audio cables from back of CineBox Console Connect the long XLR cable from the RIGHT speaker to the RED XLR cable Connect the long XLR cable from the LEFT speaker to the WHITE XLR cable For standard definition systems connect yellow RCA cable to video port For HD ...

Страница 14: ... STEP 5 POWER ON SPEAKERS AND AUDIO VOLUME Return to speakers and turn them on Next slowly increase the speaker level volume to 50 so the line on the volume knob is pointing directly up Audio should not be heard at this point The volume is now adjustable through the audio mixer in the CineBox console STEP 6 PEFORM SOUND CHECK Slowly increase the volume knob labeled Level 1 until the volume from th...

Страница 15: ...res Image needs keystone adjustment Properly adjusted image STEP 2 WIDESCREEN 16 9 VS FULLSCREEN 4 3 IMAGE The Open Air Screen has an aspect ratio of 16 9 widescreen Some Blu Ray and DVD content may be formated in a 4 3 fullscreen aspect ratio which will not fill the entire screen and may leave unused space on the left and right side of the image Settings in the media player and the projector can ...

Страница 16: ...s Zip up CineBox console Take down speaker stands and return to speaker stand cases for 16 and 20 systems Turn off air blower and guide the screen down so that it folds in half top to bottom as shown on step one of screen setup Unzip the air vent and disconnect the intake sleeve from air blower Unclip or untie tethers from stakes Remove stakes from ground and clean off any debris or dirt Fold the ...

Страница 17: ...ne of the avail able input channels on the back of the CineBox audio mixer CONNECTING iPODS AND MP3 PLAYERS Use the supplied 3 5mm headphone cable to connect other audio players to the CineBox console To play sound and video from an iPod you will need a special iPod audio video cable made for the iPod Audio connections from the iPod will plug into the audio mixer and the video cords will plug in t...

Страница 18: ...ll air vents are zipped closed Make sure inflatable tubes are not twisted SCREEN DOES NOT INFLATE Starting at the audio source make sure 1 All components are connected to the correct audio input and output 2 The audio source audio mixer and speakers are properly plugged in and turned on 3 The volume is turned up on the audio source audio mixer and speakers NO SOUND Starting at the image source mak...

Страница 19: ...d water resistant air tight Projector Replacement Lamps Short Throw or Long Throw Projector Lenses compatible with upgraded projector Backup DVD BluRay Player Extra Cables Extension Cords Custom Cables Adaptor Kits Extra Tarps Stakes Tables Contact us at 866 802 8202 or write us at info openaircinema us to order any of the above items today Alternatively you can visit our website at www openaircin...

Страница 20: ...oes not cover damage from materials becoming wet storage of product after it has become wet mold mildew improper folding and storage dragging the screen along hard surfaces or acts of God Customer must submit photos if damage is visible and written explanation of defective product to Open Air Cinema before replacement can take place 90 day warranty ap plies to screen tethers clips stakes storage b...

Страница 21: ...www openaircinema us ...

Отзывы: