


55
En
IntelliVolume
■
IntelliVolume
`
–12dB
to
0dB
to
+12dB
in 1 dB steps.
With IntelliVolume, you can set the input level for each
input selector individually. This is useful if one of your
source components is louder or quieter than the others.
Use
e
/
r
to set the level.
If a component is noticeably louder than the others, use
e
to reduce its input level. If it’s noticeably quieter, use
r
to
increase its input level.
A/V Sync
■
A/V Sync
`
0msec
to
250msec
in 5 msec steps.
When using your DVD player’s progressive scanning
function, you may find that the picture and sound are out
of sync. With the A/V Sync setting, you can correct this
by applying a delay to the audio signal.
To view the TV picture while setting the delay, press
ENTER
.
To return to the previous screen, press
RETURN
.
If HDMI Lip Sync is enabled (
➔
60
) and your TV or dis-
play supports HDMI Lip Sync, the displayed delay time
will be the summation of the A/V Sync delay time and the
HDMI Lip Sync delay time. The HDMI Lip Sync delay
time is displayed underneath in parentheses.
Note
• A/V Sync is disabled when the Pure Audio listening mode is
selected, or when the Direct listening mode is used with an ana-
log input source.
• “
A/V Sync
” is not operable when the input selector is set to
“
NET/USB
”.
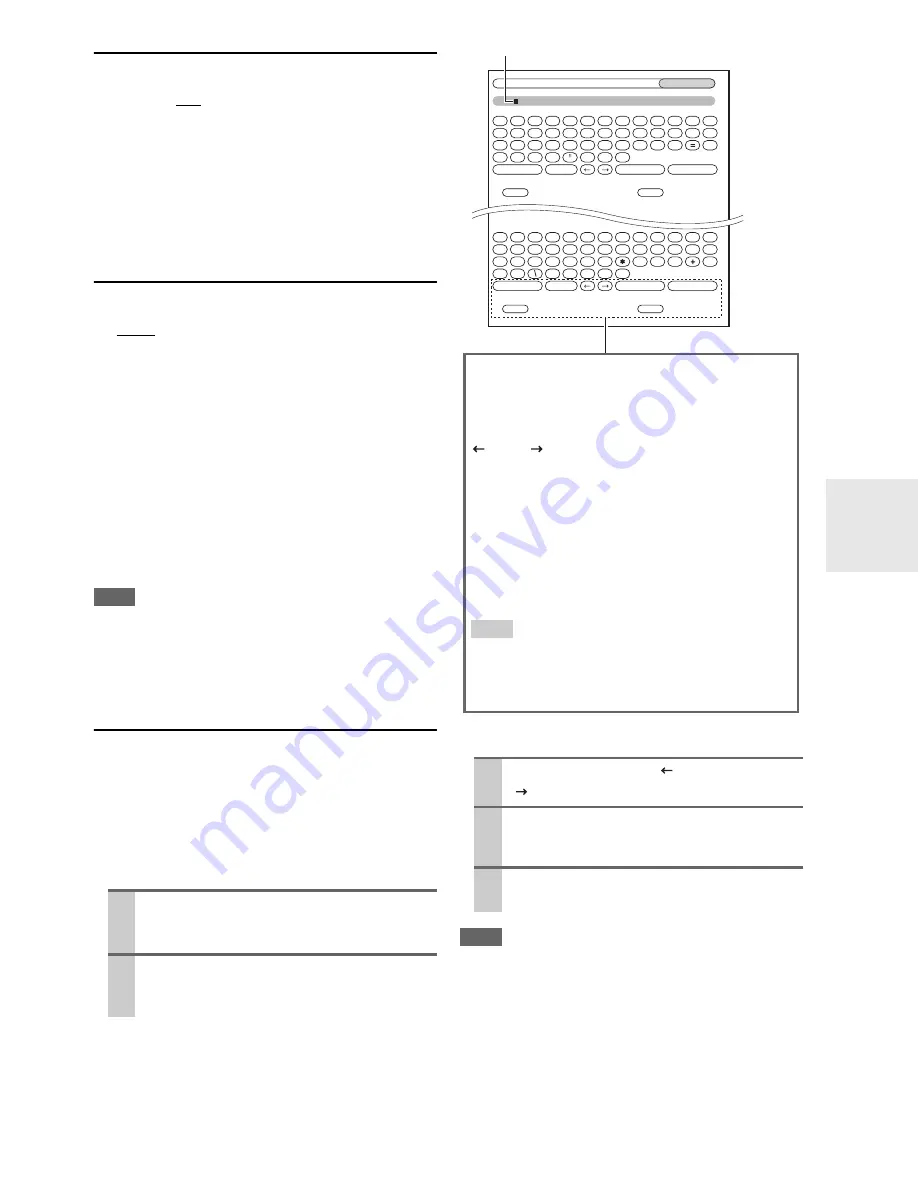
Name Edit
You can enter a custom name for each individual input
selector (excluding
TUNER
) and radio preset for easy
identification. When entered, the custom name will appear
on the display.
The custom name is edited using the character input
screen.
■
Name
To correct a character:
Note
• To name a radio preset, use
TUNER
to select AM or FM, and
then select the preset (
➔
33
).
•
(North American models)
You cannot enter a custom name for
SIRIUS radio presets.
• “
Name Edit
” is not operable when the input selector is set to
“
NET/USB
”.
To restore a custom name to the default, erase the custom
name by entering an empty white space for each letter.
1
Use
q
/
w
/
e
/
r
to select a character, and then
press
ENTER
.
Repeat this step to enter up to 10 characters.
2
When you’ve finished, to store a name, be sure
to use
q
/
w
/
e
/
r
to select “OK”, and then press
ENTER
. Otherwise it will not be saved.
1
Use
q
/
w
/
e
/
r
to select “
”(Left) or
“
”(Right), and then press
ENTER
.
2
Press
ENTER
several times to select the incor-
rect character (The cursor moves one letter
each time
ENTER
is pressed).
3
Use
q
/
w
/
e
/
r
to select the correct character,
and then press
ENTER
.
BD/DVD
Shift
All Erase
Shift
All Erase
4-4. Name Edit
Name
D/DVD
a
b
c
d
e
f
g
h
i
j
k
l
m
n
o
p
q
r
s
t
u
v
w
x
y
z
1
2
3
4
5
6
7
8
9
0
–
`
Space
Back Space
Shift
OK
{
}
|
:
<
>
?
A
B
C
D
E
F
G
H
I
J
K
L
M
N
O
P
Q
R
S
T
U
V
W
X
Y
Z
;
’
,
.
/
[
]
Space
Back Space
Shift
OK
!
@
#
$
%
^
&
(
)
_
~
+10
CLR
+10
CLR
Name input area
Shift
*1
:
Switches the displayed character.
Space
:
Enters a space character.
(Left)/ (Right):
Selected when the cursor is moved within the Name
input area.
Back Space
*2
:
“
Back Space
” moves the cursor backward one char-
acter space. In addition, “
Back Space
” deletes the
character to the left of the cursor.
OK
:
Selects when the entry is complete.
Tip
*1
You can also be performed on the remote controller by
using
+10
.
*2
Press
CLR
on the remote controller, you can delete all
characters in the input.


