background image

74

Impostare il tipo di pellicola

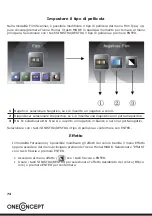
Nella modalità Film Scanner, è possibile modificare il tipo di pellicola dal menu Film Type; op

-

pure cliccare/premere l’icona Home/ il tasto MODE in qualsiasi momento per tornare al menu 

principale. Selezionare con i tasti SINISTRA/DESTRA il tipo di pellicola e premere ENTER.

1

Negativo: selezionare Negativo, se si è inserito un negativo a colori.

2

Diapositiva: selezionare Diapositiva, se si è inserita una diapositiva nel porta diapositive. 

3

B & N: selezionare B & N se si è inserito un negativo in bianco e nero nel porta negativi.  

Selezionare con i tasti SINISTRA/DESTRA il tipo di pellicola e confermare con ENTER.

Effetto

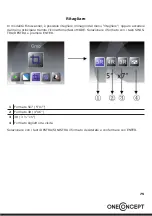
In modalità Fotoscanner, è possibile modificare gli effetti del colore tramite il menu Effetto 

oppure accedere dal menu principale premendo l’icona Home/MODE. Selezionare “Effetto” 

con i tasti freccia e premere ENTER. 

•  Accedere al menu effetto ( 

) con i tasti freccia e ENTER. 

•  Usare i tasti SINISTRA/DESTRA per selezionare l’effetto desiderato del colore (BN/co

-

lore) e premere ENTER per confermare.

Содержание 10029475

Страница 1: ...DiaScanner 979GY 10029475...

Страница 2: ...en Sie keine Gegenst nde aus Metall in dieses Ger t fallen Stellen Sie keine schweren Gegenst nde auf dieses Ger t Reinigen Sie das Ger t nur mit einem trockenen Tuch Blockieren Sie keine Bel ftungs f...

Страница 3: ...erpoliert Konversionsrate 12bit Kanal Scan Methode Single Pass Lichtquelle 7 x 2 LED Backlight 3 LED LED Lebensdauer 10000 Zyklen Einschalten Schnittstelle zur Daten bertragung USB 2 0 Men sprachen En...

Страница 4: ...4 Teile bersicht Ger t Diahalter Negativ Halter Foto Halter USB Kabel...

Страница 5: ...en Halters es sollte perfekt hineinpassen Hinweise Behandeln Sie Dias mit Sorgfalt Staub Kratzer oder Fingerabdr cke werden auf dem gespeicherten Bild zu sehen sein Tragen Sie wenn m glich Baumwollhan...

Страница 6: ...Negativhalter dass die L cher genau auf den Kerben des Halters aufliegen Hinweise Behandeln Sie Negative mit Sorgfalt Staub Kratzer oder Fingerabdr cke wer den auf dem gespeicherten Bild zu sehen sein...

Страница 7: ...Vorbereitungen Fotos Einf hren Positionieren Sie die Rahmen in der ben tigten Gr e auf dem Foto Einschub Schieben Sie die Rahmenteile nach unten bis sie f hlbar einrasten und nicht mehr ver schiebbar...

Страница 8: ...8 Legen Sie ein Foto ein Schieben Sie dann das Foto mitsamt Rahmen in die Aufnahme an der Oberseite des Ge r ts...

Страница 9: ...ithilfe eines USB Kabels an das Ger t an Dr cken Sie die POWER Taste um den Film Fotoscanner einzuschalten Hinweis Der Filmscanner sowie der Fotoscanner Modus werden durch entsprechende LEDs angezeigt...

Страница 10: ...Sprache ausw hlen 1 4 Wiedergabemodus USB Modus 2 5 Filmtyp Aufnahmemodus 3 6 Aufl sung Hauptmen Foto Scanner Modus Sprache ausw hlen 1 5 Effekt mehrfarbig S W USB Modus 2 6 Zuschneiden Aufnahmemodus...

Страница 11: ...rt einzustellen Der Bildschirm zeigt nun eine Tabelle f r EV Helligkeit sowie die Hauptfarben R ot G r n und B lau an W hlen und Ver ndern Sie die Einstellungen mit den Pfeiltasten und ENTER Dr cken S...

Страница 12: ...oder die Speicherkarte auswechslen um die Aufnahme fortzusetzen Wiedergeben und Bearbeiten Dr cken Sie nach dem Einschalten des Ger ts die LINKS RECHTS Tasten f r die Wieder gabe oder klicken dr cken...

Страница 13: ...ECHTS Tasten durch die einzelnen Bilder scrollen Sobald Sie ein Bild des internen Speichers oder der Speicherkarte zum Bearbeiten ausgew hlt haben k nnen Sie durch Dr cken von ENTER den Bearbeiten Mod...

Страница 14: ...ias in den Diahalter eingelegt haben 3 S W w hlen Sie S W wenn Sie einen S W Negativfilm in den Filmhalter eingelegt haben W hlen Sie mit den LINKS RECHTS Tasten den Filmtyp und best tigen Sie mit ENT...

Страница 15: ...oder klicken dr cken Sie den Home Icon die MODUS Taste um jederzeit zum Hauptmen zur ckzukehren W hlen Sie mit den LINKS RECHTS Tasten das Format und best tigen Sie mit ENTER 1 5X7 5 X7 Format 2 4R 4...

Страница 16: ...scher Ger tschaften Richten Sie sich nach den rtlichen Regelungen und entsorgen Sie Altger te nicht ber den Hausm ll Durch die regelkonforme Ent sorgung der Altger te werden Umwelt und die Gesundheit...

Страница 17: ...duct may not be opened or changed The components cannot be serviced by the user The manufacturer is not responsible for any radio or TV interference caused by unauthorized modifications The appliance...

Страница 18: ...on 12bit color channel Scan method Single Pass Light source 7 x 2 LED Backlight 3 LED LED light lifetime 10 000 regular on off cycles Data transfer interface USB 2 0 Operating languages English German...

Страница 19: ...19 Parts Overview Device Positive slides holder Negative film holder Picture frame USB cable...

Страница 20: ...older the slide should fit perfectly Note Handle slides with care Any dust scratches or fingerprints will show up on your sa ved images If possible use cotton gloves when handling slides It is recomme...

Страница 21: ...e up with the notches on the holder Note Handle negatives with care Any dust scratches or fingerprints will show up on your saved images If possible use cotton gloves when handling negatives It is rec...

Страница 22: ...ns on the photo tray Note that for 5x7 photographs the brackets do not need to be fitted into the photo tray Place the brackets into the slots and slide the brackets downwards to secure Check that the...

Страница 23: ...23 Insert the photo into appropriately sized photo tray 5 x7 5R 4 x6 4R 3 x5 3R name card Insert the photo tray into the photo tray slot from the top of the film photo scanner...

Страница 24: ...r scanning After you have finished scanning take out the memory card Note The film photo scanner has a built in memory for recording when there is a me mory card inserted it will take priority for sav...

Страница 25: ...ge selection 1 4 Playback mode USB mode 2 5 Media type negative slide Scan mode 3 6 Resolution setting Main Menu Foto Scan Mode Language selection 1 5 Effect color b w USB mode 2 6 Crop Scan mode 3 7...

Страница 26: ...Aufnehmen Once entered capture mode there will be an indicator on the left top corner to indicate it is in live view mode You can also press ENTER button then press LEFT RIGHT button to adjust EV valu...

Страница 27: ...ve to down load the images to a PC or replace another memory card for continued capture Playback Edit Press LEFT RIGHT button to go to theplayback mode or access the main menu by the pressing the Home...

Страница 28: ...select the picture stored in internal me mory or memory card which is intended to be modified then press the ENTER button again to go to the edit mode to modify If there is no memory card inserted or...

Страница 29: ...ide is in the holder 3 B W select B W when load B W negative film in holder You can press LEFT RIGHT button to select the film type then press the ENTER button to confirm Effect When the Photo scanner...

Страница 30: ...or access the main menu by the Home icon MODE button during operation Press LEFT RIGHT button for Crop and press ENTER button to confirm 1 5R 5 X7 crop proportion 2 4R 4 X6 crop proportion 3 3R 3 x5 c...

Страница 31: ...uct is disposed of correctly you will help prevent potential negative consequences for the environment and human health which could otherwise be caused by in appropriate waste handling of this product...

Страница 32: ...sec Ne pas obstruer les ouvertures d a ration Utiliser uniquement les accessoires recommand s par le fabricant ou par une entreprise sp cialis e et qualifi e Baisser le volume sonore avant de branche...

Страница 33: ...on 12 bits canal M thode de scannage Single Pass Source lumineuse 7 x 2 LED 3 LED de r tro clairage Dur e de vie des LED 10 000 cycles allumages Interface USB pour la transmission USB 2 0 Langues du m...

Страница 34: ...34 Aper u du mat riel Appareil Support pour diapositives Support pour n gatifs Support pour photographies C ble USB...

Страница 35: ...entrer parfaitement Remarque manipuler les diapositives avec pr caution La poussi re les rayures et les empreintes de doigt seront visibles sur l image enregistr e Si possible porter des gants de cot...

Страница 36: ...ons reposent sur les crans Remarque manipuler les diapositives avec pr caution La poussi re les rayures et les empreintes de doigt seront visibles sur l image enregistr e Si possible porter des gants...

Страница 37: ...nage Insertion de photos D limiter le cadre sur le support de photo en fonction des dimensions n cessaires Faire glisser les pi ces d encadrement vers le bas jusqu ce qu elles s encastrent com pl teme...

Страница 38: ...38 Placer une photographie Puis glisser la photographie avec son cadre dans l enregistreur situ sur le dessus de l appareil...

Страница 39: ...nner de pellicules et de photos en marche Remarque l activation des modes de scannage respectifs de pellicule et de photo est signifi e par le t moin LED lumineux correspondant Pour scanner se reporte...

Страница 40: ...la langue 1 4 Mode de lecture Mode USB 2 5 Type de pellicule Mode d enregistrement 3 6 R solution Menu principal fonction de scannage de photos S lection de la langue 1 5 Effet couleurs N B Mode USB 2...

Страница 41: ...n EV L cran affiche pr sent un tableau des indices de lumina tion EV ainsi que des couleurs primaires R rouge G vert et B bleu S lectionner et modifier les param tres l aide des touches fl ch es et de...

Страница 42: ...images sur un PC ou d introduire une nouvelle carte m moire pour poursuivre le scannage Lecture et dition Apr s le d marrage de l appareil appuyer sur les touches GAUCHE DROITE pour pro c der la lect...

Страница 43: ...ssible de faire d filer les images une une l aide des touches GAUCHE DROITE Une fois qu une image a t s lectionn e dans la m moire interne ou sur la carte m moire afin d y apporter des modifications a...

Страница 44: ...diapositive a t ins r e dans le support pour diapositives 3 N B s lectionner N B lorsqu un n gatif noir et blanc a t ins r dans le support pour n gatifs S lectionner le type de pellicule l aide des t...

Страница 45: ...ou cliquer appuyer sur l ic ne Home la touche MODE pour retourner tout moment au menu principal S lectionner le format souhait avec les touches GAUCHE DROITE et confirmer avec ENTER 1 Format 5 X 7 5 X...

Страница 46: ...s Conformez vous aux r glementations locales et ne jetez pas vos anciens produits avec les ordures m nag res Le respect des r gles de recycla ge des vieux produits aide la protection de l environnemen...

Страница 47: ...ca das incluso desde poca altura Mantenga el producto alejado de la humedad y del calor extremo No deje caer objetos de metal sobre el aparato No coloque objetos pesados encima del aparato Limpie el a...

Страница 48: ...versi n 12 bit canal M todo de esc ner Single pass Fuente de luz 7x2 LED backlight 3 LED Vida til LED 10000 ciclos encendido Ranura para transferencia de datos USB 2 0 Idiomas del men Ingl s alem n fr...

Страница 49: ...49 Partes descripci n Dispositivo Soporte para diapositivas Soporte para negativos Soporte para fotos Cable USB...

Страница 50: ...Indicaci n trate las diapositivas con cuidado El polvo los ara azos o las huellas de de dos pueden verse posteriormente en la imagen Utilice si es posible guantes de algod n durante el trabajo con la...

Страница 51: ...trate los negativos con cuidado El polvo los ara azos o las huellas de dedos pueden verse posteriormente en la imagen Utilice si es posible guantes de algod n duran te el trabajo con los negativos Uti...

Страница 52: ...reparaci n del esc ner Introducir fotos Coloque los marcos del tama o necesario en las gu as correspondientes Deslice las partes del marco hacia abajo hasta que encajen completamente y no que den visi...

Страница 53: ...53 Introduzca una foto Desplace la foto junto con el marco en la ranura de la parte superior del aparato...

Страница 54: ...o con un cable USB Pulse el bot n POWER para encender el esc ner de pel culas y fotos Advertencia los modos escaneado de pel culas y de foto se indicar n por medio de los LED correspondientes Siga las...

Страница 55: ...idioma 1 4 Modo reproducci n Modo USB 2 5 Tipo de pel cula Modo captura 3 6 Resoluci n Men principal modo escaneado de im genes Seleccionar idioma 1 5 Efecto multicolor blanco y negro Modo USB 2 6 Re...

Страница 56: ...pantalla mues tra una tabla para el EV brillo y para los colores principales R rojo G verde y B azul Seleccione y modifique los ajustes con los botones de direcci n y pulsando ENTER Pulse este bot n d...

Страница 57: ...tinuar con las capturas Reproducci n y edici n Pulse los botones IZQUIERDA DERECHA tras encender el aparato para activar el modo reproducci n o haga clic pulse el bot n de inicio el bot n MODUS para r...

Страница 58: ...de diapositivas Puede navegar entre las distintas im genes con los botones IZQUIERDA DERECHA Cuando haya elegido una imagen de la memoria interna o de la tarjeta de memoria para su edici n active el...

Страница 59: ...su soporte correspondiente 3 S W seleccione este modo cuando ha introducido negativos en blanco y negro en su soporte correspondiente Seleccione el tipo de pel cula con los botones IZQUIERDA DERECHA...

Страница 60: ...e el icono de inicio el bot n MODUS para regresar al men principal Seleccione el formato con los botones IZQUIERDA DERECHA y confirme la acci n pulsando ENTER 1 5x7 Formato 5 x7 2 4R Formato 4 x6 3 3R...

Страница 61: ...s Respete las leyes territoriales y no arroje aparatos viejos al cubo de la basura dom stica Una retirada de aparatos conforme a las leyes contribuye a proteger el medio ambiente y a las personas a su...

Страница 62: ...aso di urti colpi o cadute anche da altezze minime Non esporre il prodotto all umidit e al calore eccessivo Non fare cadere oggetti di metallo nel dispositivo Non fare cadere oggetti pesanti sul dispo...

Страница 63: ...max 22MP interpololata Conversione dati 12bit canale del colore Metodo scansione Single pass Fonte luce 7 x 2 LED Backlight 3 LED Durata LED 10000 cicli accensione Interfaccia per il trasferimento dat...

Страница 64: ...64 Descrizione dei componenti Dispositivo Porta diapositive Porta negativi Porta foto Cavo USB...

Страница 65: ...ar scorrere la diapositiva nell apposito vano questa deve inserirsi perfettamente Nota maneggiare le diapositive con cura La polvere i graffi o le impronte sono visibili sull immagine salvata Indossar...

Страница 66: ...in modo che le scanalature combacino perfettamente con le scanalature del porta negativi Nota maneggiare i negativi con cura La polvere i graffi o le impronte sono visibili sull immagine salvata Si co...

Страница 67: ...scansione Inserire le foto Posizionare le staffe nel supporto per la foto in base alla dimensione necessaria Far scorrere le staffe verso il basso e assicurarsi che siano inserite correttamente e che...

Страница 68: ...68 Inserire una foto Far scorrere la foto con il supporto nell apposito alloggiamento del dispositivo...

Страница 69: ...vo tramite cavo USB Premere il tasto POWER per accendere il Film Fotoscanner Nota la modalit scansione della foto e la modalit scansione della diapositiva negativo vengono indicate con i rispettivi LE...

Страница 70: ...di riproduzione Modalit USB 2 5 Tipo di pellicola Modalit di registrazione 3 6 Risoluzione Menu principale modalit foto scanner Selezionare la lingua 1 5 Effetto multicolore B N Modalit USB 2 6 Ritag...

Страница 71: ...il valore EV Sul display compare una tabella per EV luminosit e i colori principali rosso verde e blu Selezionare e modificare le impostazioni con i tasti freccia e ENTER Premere di nuovo ENTER per co...

Страница 72: ...ul PC oppure cambiare scheda di memoria per continuare la registrazione Riprodurre e modificare Dopo l accensione del dispositivo premere i tasti SINISTRA DESTRA per la riproduzio ne oppure cliccare p...

Страница 73: ...gole immagini con i tasti SINISTRA DESTRA Una volta selezionata un immagine della memoria interna o della scheda memoria per modifi carla attivare la modalit di modifica premendo ENTER Se ancora non s...

Страница 74: ...si inserita una diapositiva nel porta diapositive 3 B N selezionare B N se si inserito un negativo in bianco e nero nel porta negativi Selezionare con i tasti SINISTRA DESTRA il tipo di pellicola e c...

Страница 75: ...e accedere dal menu principale tramite l icona Home tasto MODE Selezionare il formato con i tasti SINIS TRA DESTRA e premere ENTER 1 Formato 5X7 5 X7 2 Formato 4R 4 X6 3 3R 3 x5 4 Formato biglietto da...

Страница 76: ...ci Attenersi alle disposizioni vigenti e non smaltire i vecchi dispositivi con i rifiuti domestici Grazie al corretto smaltimento dei vecchi dispositivi si tutela il pianeta e la salute delle persone...

Отзывы: