background image

8

system initial states use the [OK] button enter into the sub menu.press [

] to return or exit the main

menu.

In the In browse mode, counterclockwise the rotating button, the cursor will move up or left ,

clockwise the rotating button, the cursor will move down or right . When the cursor is moved to a project

that needs to be adjusted, press the [OK] button, it will move into the setting mode, then

counterclockwise the rotating button to reduce the current parameter value;clockwise the rotating button

to increase the current parameter value. If the adjustment is completed, press [OK] button to save data.

If users need to return to the last menu, use the return button until it return to the initial state.

Rotation [knob] can not force too fast, otherwise the numerical adjustment is very small, should

rotate at a constant speed.

System initial states

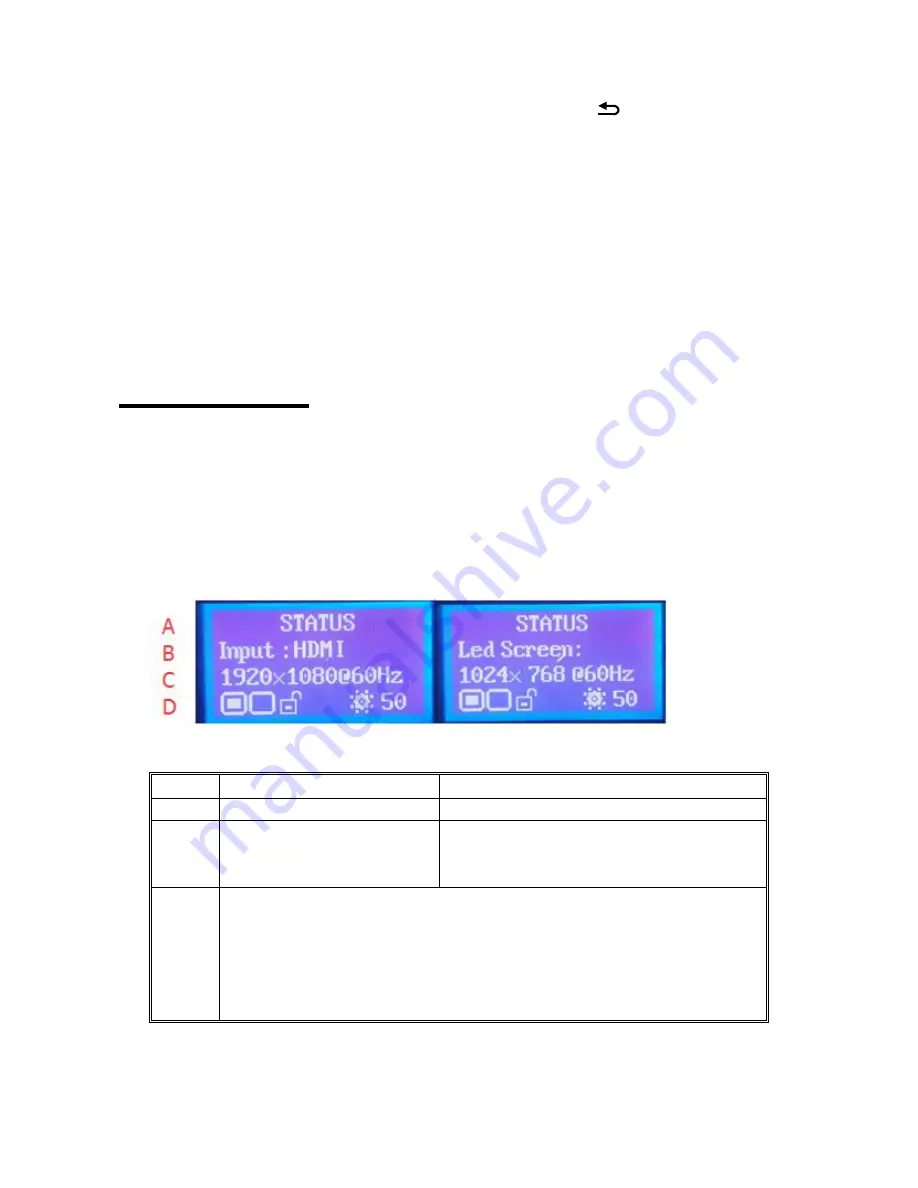
When starting the system, the LCD screen will display the Boot interface. After the start of the system,

the status of the current machine will be displayed on the screen. In the initial state of the system shows
the information in two pages, and the timing transformation is displayed. The starting menu of the system
starts as shown in the following figure:

上图中有四行显示内容,说明如下:

A

Tittle

Tittle

B

Name of input signal source

LED screen

C

Resolution format of input

signal source

Resolution format of input signal

source,corresponding to the physical resolution
of LED screen

D

Status area, to show you the status of this machine by many icons.
There are 4 icon areas from left to right, and it shows only 3 in original status
1.Status of “PART” ;
2. Status of PIP ;
3.Unlocking the keys on board ;

4. Brightness of output image

In initial status, the fourth line of the LCD screen will show current machine status ,the means of the

Содержание OVP-M3

Страница 1: ...OVP M3 User Manual OVP M3 USER MANUAL...

Страница 2: ...without our written permission And cannot use it on any business or benefit filed with any forms The specifications and information which are mentioned on the file is for reference only if there s upd...

Страница 3: ...k panel picture 4 Connect the device 5 Port connection picture 6 MENU INSTRUCTION 6 Output menu 10 image effect menu 11 Image crop menu 12 Image layout menu 12 Mode save menu 14 Advanced setting menu...

Страница 4: ...nt Please take off the power supply of LED video processor before you do any hardware operations and ESD by touching the ground Please make sure the environment is clean dry and ventilated when you us...

Страница 5: ...ution The output image will be perfect without compression and stretch Zoom in and out technique and support 8 output resolutions users can also customize the output resolution The maximum output widt...

Страница 6: ...to point Support customized output resolution the maximum width pixel is 3840 and the maximum height pixel is 1920 for single device 24 hours high and low temperature ON OFF burn in test high performa...

Страница 7: ...PART button light on MODE button image mode or save the menu shortcut button EFFECT button signage switch effect button 4 INPUT area 6 buttons in total DVI button HDMI button CV1 button CV2 button VG...

Страница 8: ...d to the LED screen HDMI port digital HD signal input port input video and audio signal VGA port computer analog signal input port connected to the computer DVI port computer digital signal input port...

Страница 9: ...6 Port connection picture MENU INSTRUCTION Network cable Video processor serial port connect cable DVI connect cable Network cable...

Страница 10: ...o signal or the format is not supported button lamp light will flicker Under the VGA signal input source continuously press the VGA button for three times the system will correct the image position an...

Страница 11: ...is very small should rotate at a constant speed System initial states When starting the system the LCD screen will display the Boot interface After the start of the system the status of the current ma...

Страница 12: ...dvanced of main menu 3 Lock on Button lock is ON users cannot do any settings by key and you can turn OFF the button lock in advanced of main menu 4 Brightness Image brightness BRI Main menu In the in...

Страница 13: ...ter setting Led screen parameters can adjust the LED screen width LED screen height Refresh rate LED screen width range from 62 3840 set the LED screen horizon width LED screen height range from 48 19...

Страница 14: ...ion Network port 1 starting Y range from 0 3840 set LED1 port image vertical starting position Test diagrams there are 6 test diagrams for LED screen testing The test diagram requires an out of sync c...

Страница 15: ...p width minimum is 128 maximum is the width of present output resolution ratio Crop height minimum is 128 maximum is the height of present output resolution ratio Crop horizontal start minimum is 0 ma...

Страница 16: ...source by INPUT button and it is limited to open PIP check from the below list for details PIP width minimum is 128 maximum is the width of present output resolution ratio PIP height minimum is 128 m...

Страница 17: ...ge the input source 1 of screen 2 When select the input source if the screen 1 and screen 2 conflict for the port then can t select the screen 2 port and prompt the signage source conflict Mode save m...

Страница 18: ...Hz 3840 630 60Hz 1080 1920 60Hz 1200 1600 60Hz 1536 1536 60Hz Custom EDID Input width customized resolution of horizontal pixels Input height customized resolution of vertical pixels Input frequency r...

Страница 19: ...is setting carefully Seamless switching used to set the switching effect between signal sources Includes fade in and fade out Key lock panel lock function when open the key lock function then the devi...

Страница 20: ...he parameter Guide mode When the machine is power on it will show the following interface Press OK button to run into the input interface as shown in picture Switch the signage source by press the fro...

Страница 21: ...on make the value bigger or smaller then return to the current menu and select effective to save data then restart the device User setting Guiding the users to quickly use the machine the following wi...

Страница 22: ...put source is not HDMI the part display will be banded to DVI Mode save cover clear In initial status short press OK button to main menu use the rotating button to enter save menu press OK button for...

Страница 23: ...zontal start 0 Led screen vertical start 0 Screen Crop Close Crop width 1024 Crop height 768 Crop horizontal start 0 screen vertical start 0 Screen PIP Close PIP Signal source HDMI PIP width 320 PIP h...

Страница 24: ...ting is too low Use the factory set in advance menu to return the machine to factory setting Image can t show fully Check if the led screen width and height setting the same as the screen physical pix...

Страница 25: ...22...

Страница 26: ...ctory address No 1299 fuchunjiang road kunshan development zone jiangsu China Shenzhen Branch Office Add Room 309 B Shiyan Sanlian industrial park Baoan District Shenzhen Tel 0086 15921814956 0086 158...

Отзывы: