


00055966.DOC, Version 1.0
25/28
6. OPERATION
The
DMP-102
can either be operated via the buttons on the front panel or via the remote control.
However, via the remote control it is not possible to directly select folders on the data carriers or to select the
function Pitch Bend.
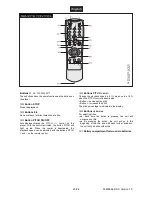
6.1 Remote control
1. When actuating a button, always direct the remote control towards the sensor. The must be no obstacles
between remote control and the sensor.
2. If the range of the remote control decreases, the batteries are probably exhausted and must be replaced.
6.2 Switching on/off
1. Prior to switching on, turn all level controls to minimum to prevent switching noise.
2. Switch
on
the
DMP-102
with the power button. If a data carrier is inserted, the display indicates the
total number of titles after the read-in. If no data carrier is inserted, "NO USB" is displayed.
3. Prior to switching the unit off, always terminate the playback with the button
or the button . Then
press the power button to switch off the unit.
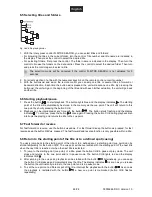
6.3 Loading, selecting and removing data carriers
1. Insert an applicable memory card with its contacts pointing downwards and the notched corner to the left
so far into the card slot, until it engages.
2. Insert USB devices into the USB port.
3. After loading a data carrier, it is selected as the playback medium and read in.
4. To switch to another data carrier, press the selector switch SD/USB. The unit must be in pause mode.
The LEDs will verify which source is active.
5. To eject a memory card, slightly press it into the slot until it comes out and can be removed.
6. To remove a USB device, disconnect it from the USB port.
CAUTION!
Never attempt to remove data carriers in play mode. Otherwise damage or loss of data
may occur.
Regarding data carriers
• This unit
supports MSC (Mass Storage Class) USB storage devices 1.0, 1.1, 2.0 including
external portable flash memory devices and digital audio players. However, hard discs, optical
discs such as external CD/DVD drives will not be recognized.
• Depending on the device used, proper playback may not be possible with all USB storage
devices.
• This units supports SD, SDHC and MMC memory cards.
• When connecting a data carrier with a large number of folders and files, some time may be
required to read in the contents
.
6.4 Basic settings
After switching on, the rotary pitch control and the modes continuous play and elapsed title time will be active
as basic settings. These settings can be changed.
1. In the basic setting, the rotary pitch control is active (button PITCH lights red) and the playback speed
can be adjusted variably up to ±16 %. To deactivate the function press the button PITCH (red LED
extinguishes).
2. In the basic setting continuous play, all titles of are played one after the other and the unit stops at the
end of the last title. Press the button SINGLE (green LED lights) on the player or the button SGL/CTN on
the remote control to switch to single title play. Then the unit is set to pause at the start of the next title
after playing a title.
3. As a basic setting, the display will show the elapsed time of the current title numerically in minutes,
seconds and frames (1 frame = 1/75 second). With the button TIME the time indication can be switched
over to remaining title time.
Содержание DMP-102
Страница 2: ...00055966 DOC Version 1 0 2 28 ...


