background image

 Product User Guide  |  6

OM-CP-OCTPRO

USER INTERFACE

First Time Use

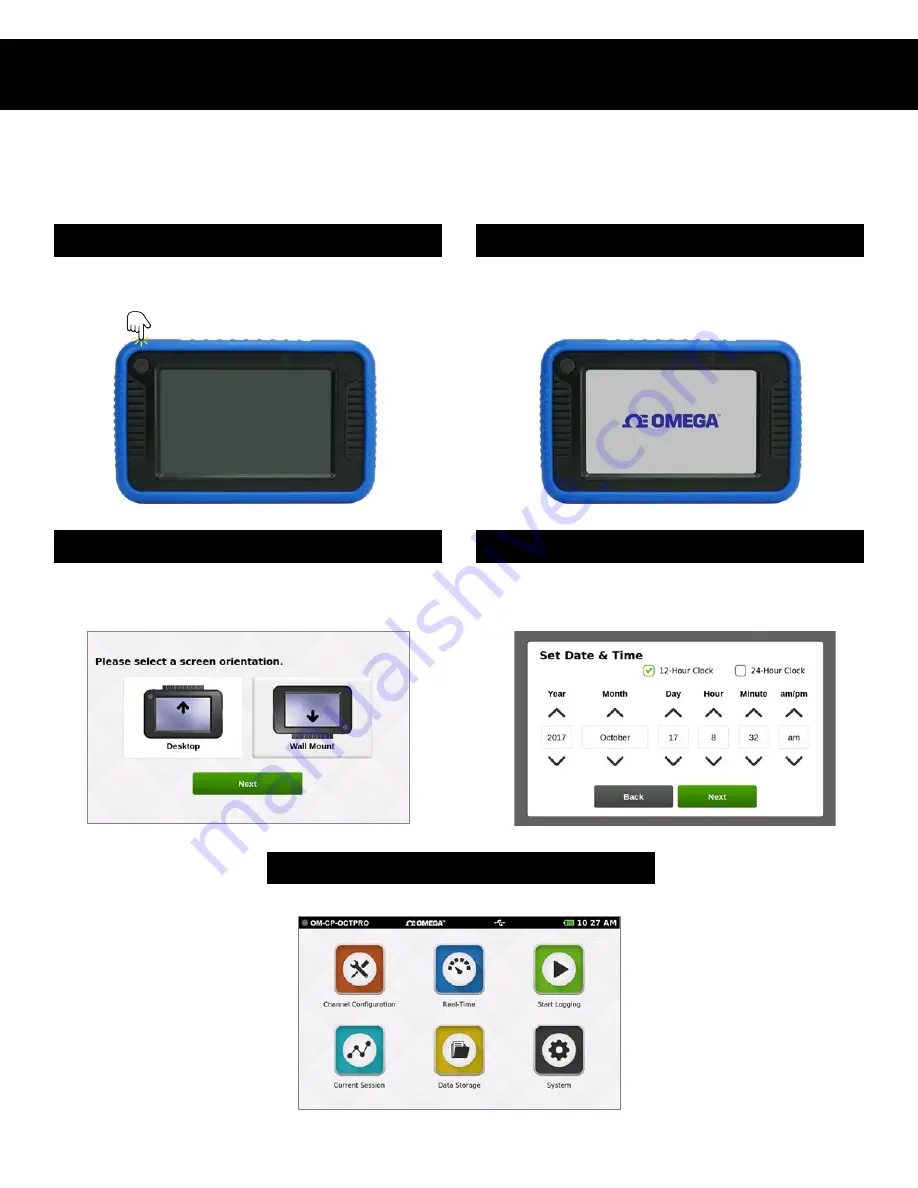
Follow these steps when the device is powered up for the first time or if the battery has been removed or replaced.

1

POWER BUTTON


Press and hold the Power Button for  

3 seconds to power up the device.

5

When the device presents the Home screen it is ready to use.

3

SELECT SCREEN ORIENTATION 


For desktop use, inputs are facing upward.  

For wall mounted use, inputs are facing downward.

2

SCREEN READY


Wait for the device to initiate, you will see  

the Omega logo when complete.

4

SET UP INITIAL DATE AND TIME


Enter the local date and time to be used by the device  

and click 

Next

 to continue to Home screen.

Содержание OM-CP-OM-CP-OCTPRO

Страница 1: ...OM CP OCTPRO Portable Data Acquisition Logger e mail info omega com For latest product manuals www omegamanual info Shop online at omega com User sGuide TM...

Страница 2: ...cifications without notice Servicing North America U S A Omega Engineering Inc Headquarters Toll Free 1 800 826 6342 USA Canada only Customer Service 1 800 622 2378 USA Canada only Engineering Service...

Страница 3: ...phic display The OM CP OCTPRO is a powerful independent tool Unlike many other data loggers the OM CP OCTPRO delivers an all in one data collection and monitoring solution that does not require a PC o...

Страница 4: ...ut channels Temperature Current or Voltage Port 9 serves as an alarm output Port 10 serves as a ground for the device Frequency or Pulse Counter Can only be used on port 1 3 Wire and 4 Wire PT100 RTD...

Страница 5: ...ly Pulse input 0 to 4 000 000 000 Pulses Voltage Volt input 0 5 V to 12 0 V Voltage Millivolt input 100 mV to 2450 mV Temperature Thermistor NTC 1 2252 25 C to 150 C Temperature Thermistor NTC 2 10K 2...

Страница 6: ...active channels Start Logging Start logging using current settings Stop logging if device is actively logging Current Session View data from the current logging session as graph tabular or real time D...

Страница 7: ...3 seconds to power up the device 5 When the device presents the Home screen it is ready to use 3 SELECT SCREEN ORIENTATION For desktop use inputs are facing upward For wall mounted use inputs are fac...

Страница 8: ...s previously saved channel configurations Save Saves the current channel configuration so it may be loaded and used later Disable All Clears the configuration of all channels returning them to the def...

Страница 9: ...Select the Measurement button to display a pop up screen of relevant measurement types to choose from Measurement Units When the user selects the Units button the device will display a pop up menu of...

Страница 10: ...ected gain value Offset User selected offset value Units Label User selected label to display Apply Saves the settings File Retrieves a previously saved Engineering Unit setting Save Saves the Enginee...

Страница 11: ...nd abbreviation Enter the low and high scale point inputs and outputs and click Apply Click the Wizard button to launch the Engineering Unit Wizard The gain and offset are automatically set Click Save...

Страница 12: ...ywhere on the screen and the keyboard will disappear from view Alarms Users can create one alarm configuration per channel with up to two alarm values per channel above and below threshold Above Indic...

Страница 13: ...Channel Enabled channel Orange Channel Disabled channel Linked Channels Gray Channels 3 or 4 wire RTD sensor types can be selected for Channels 1 3 5 and 7 This sensor type will also occupy the next...

Страница 14: ...lay the proper wiring of the unit based on the currently applied configuration Please note the position of channel 1 in regards to screen orientation Load Configuration Settings Saved channel configur...

Страница 15: ...art Logging Data button to start immediately Automatic Stop The user has the option of selecting an Automatic Stop time If no time is selected the user will use the Stop Logging button on the Home scr...

Страница 16: ...See page 27 for available reading rates Select Automatic Stop Select Reading Rate Day Use the up and down arrows to adjust the day Hour Use the up and down arrows to adjust the hour Minute Use the up...

Страница 17: ...Stop Logging Ends the current logging session Cancel Continues logging and returns the user to the Home screen View Stored Sessions Takes the user to the Data Storage screen to delete or remove store...

Страница 18: ...le if the device channels are configured Swipe Options Swipe left at the top of the screen to go to the tabular data view Swipe within the graph to scroll through the graph timeline Current Reading Di...

Страница 19: ...lds alarms are displayed as red Scroll vertically to see data timeline in tabular format View four channels at a time Swipe left at the top of the screen to see additional active channels Swipe Left t...

Страница 20: ...ipe Vertically Through Sessions Storage Space Every channel configured is considered a separate reading so the number of readings divided by the number of channels gives you the readings per channel M...

Страница 21: ...opies the stored session to an external USB drive If no USB drive is plugged into the device the Copy button will not display View Data Views the data of this session in tabular or graph view View Edi...

Страница 22: ...17 Select Data Storage Select a Session Select View Data View Edit Note When the View Edit Note option is selected the user is presented with a text entry screen Text entered here is stored as a note...

Страница 23: ...gress bar and confirm when action is complete After data is successfully removed the user will be returned to the Data Storage screen Warning Deleting a session is a permanent action Select Data Stora...

Страница 24: ...User Guide 23 OM CP OCTPRO MANAGING DATA No Stored Sessions Before first use or after all data has been deleted the Data Storage screen on the device will resemble the screen shown below Select Data...

Страница 25: ...ent date and time as well as provide the user with 12 Hour or 24 Hour clock options Hardware Version Software Version Serial Number Internal Memory Used and Available Number of Stored Sessions Factory...

Страница 26: ...ill delete all saved sessions and configurations Display The Display screen allows the user to adjust options for the touch screen display including Always Temporary Mute Contact Closure Normally Open...

Страница 27: ...4 mA Input Impedance 30 0 100 mV Range 100 mV to 2450 mV Resolution 0 0001 mV Accuracy 0 1 mV 0 to 100 mV Input Impedance 1 G Maximum Voltage 3 0 V 0 10 V Range 0 5 V to 12 0 V Resolution 0 0001 V Acc...

Страница 28: ...oltage or current measurement only 25 Hz Supports single channel of voltage or current measurement only 10 Hz Supports multiple channels of voltage or current measurement only 4 Hz 1 Second 2 Seconds...

Страница 29: ...verview 12 Save Configuration Settings 13 Load Configuration Settings 13 Wiring Diagram 13 Logging Data 14 Start Logging 14 Delayed Start 14 Automatic Stop 15 Reading Rate 15 Review Session Details an...

Страница 30: ...A if the unit is found to be defective it will be repaired or replaced at no charge OMEGA s WARRANTY does not apply to defects resulting from any action of the purchas er including but not limited to...

Страница 31: ...s M U Turbine Paddlewheel Systems M U Totalizers Batch Controllers pH CONDUCTIVITY M U pH Electrodes Testers Accessories M U Benchtop Laboratory Meters M U Controllers Calibrators Simulators Pumps M U...

Отзывы: