background image

4

Adding preset radio sta

tions

54

EN

Adding preset radio stations

Adding a radio station received manually as a preset station [Set manually]
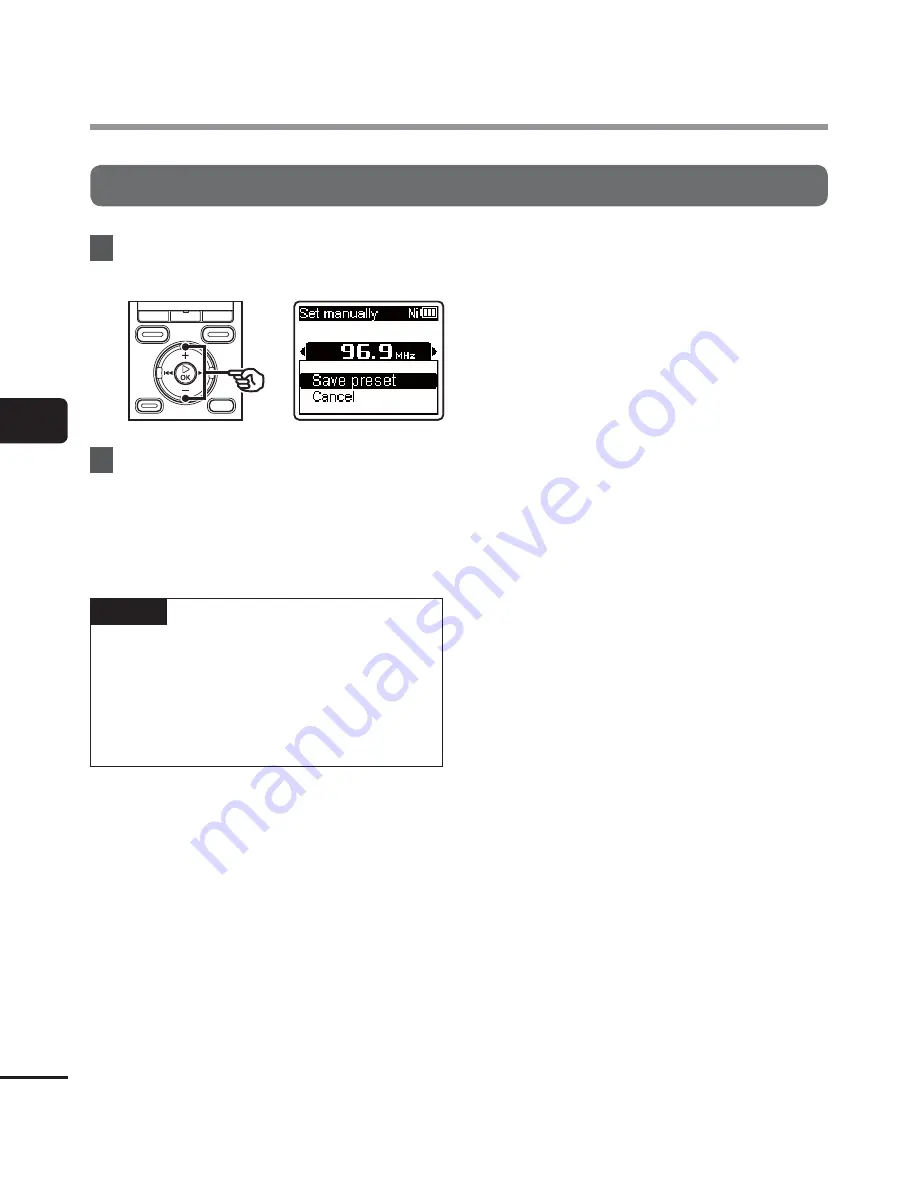
 

10

 Press 

the 

+

/

 button to select 

[

Save preset

].


11

 Press 

the 

`

OK

 button. 

• 

When the message [

Preset (number) 

saved

] appears, the procedure is 

finished.

 TIP

• 

Up to 30 radio stations can be preset. 
The message [

Preset Full

] appears if 

you attempt to preset more than 30 
stations.

• 

Preset numbers are sorted 
automatically by frequency. 

Содержание WS-821

Страница 1: ...g an Olympus digital voice recorder Please read these instructions for information about using the product correctly and safely Keep the instructions handy for future reference To ensure successful re...

Страница 2: ...derwithanotherdevice 31 Changingtherecordingscene RecScene 32 Changingtherecordingscene 32 3 Playback Playback 34 Basicplaybackprocedure 34 Playbackthroughtheearphones 35 Fast forwarding 36 Rewinding...

Страница 3: ...6 Devicemenu DeviceMenu 77 Selectingtherecordingmedia MemorySelect 77 Settingpowersavemode PowerSave 77 Settingthebatteryinuse Battery 77 Settingthedate time Time Date 78 SettingtheUSBconnection USBSe...

Страница 4: ...SCENE button 5 F2 button 6 Built in speaker 7 Strap hole 8 EAR earphone jack 9 MIC microphone jack 0 Display F1 button button REC record s button 9 button button LIST button ERASE button OK button 0 b...

Страница 5: ...order status indicator Recording indicator Recording pause indicator Stop indicator Playback indicator Fast forward indicator Fast rewind indicator Fast playback indicator Slow playback indicator Modi...

Страница 6: ...on button guide display 6 File name Playback indicator 7 Folder indicator speaker muting indicator and file lock 8 Voice recorder status indicator Playback indicator Stop indicator Fast forward indica...

Страница 7: ...ator 9 Recording format indicator 0 Elapsed recording time Possible recording time TIP Pressing and holding the STOP 4 button while the voice recorder is in stop mode displays the Time date and Remain...

Страница 8: ...r ON Getting started 3 3 Select the battery setting Select the battery setting to match the inserted battery Select the setting for a nickel metal hydride rechargeable battery or the setting for an al...

Страница 9: ...card cover while lightly pressing down on it 2 Insert a AAA battery making sure its positive and negative terminals are placed correctly Slide the battery card cover completely closed Insert the batt...

Страница 10: ...ng cursor on the hour appears in the display after setting the battery Setting the date time 1 Press the 9 or 0 button to select the item to set 2 Press the button to change the number To change the s...

Страница 11: ...USB connector slide lever in the direction of the arrow The USB connector extends out The USB connector cover is stored inside the voice recorder 3 After making sure the voice recorder is stopped conn...

Страница 12: ...proximate time needed to fully charge a completely flat battery at room temperature Battery charging time will depend on the amount of remaining power and the state of the battery NOTE Never attempt t...

Страница 13: ...USB connection setting P 89 Before connecting the AC adapter release HOLD mode P 19 1 Connect the voice recorder to the USB connector on the AC adapter To USB connector of AC adapter model A514 2 Conn...

Страница 14: ...or 2 is blinking Charge the battery in an ambient temperature of between 5 and 35 C 41 and 95 F 1 Ambient temperature is too low 2 Ambient temperature is too high If battery life has become noticeabl...

Страница 15: ...r life When not using the voice recorder for an extended period remove the rechargeable battery before storage to prevent fluid leakage or rust NOTE Due to the nature of nickel metal hydride rechargea...

Страница 16: ...chargeable battery model BR404 When buying rechargeable batteries always select model BR404 nickel metal hydride rechargeable batteries Operation is not guaranteed If a battery from another manufactur...

Страница 17: ...r crookedly could damage its contact surface or cause it to jam in the slot A microSD card not inserted fully until it clicks into place might not record data 3 Close the battery card cover The record...

Страница 18: ...the voice recorder and not be recognized properly For microSD card compatibility under Olympus verification please contact our customer support at http www olympusamerica com Note that our customer su...

Страница 19: ...1 Slide the POWER HOLD switch to the HOLD position Hold appears in the display and the recorder enters HOLD mode Releasing HOLD mode 1 Slide the POWER HOLD switch to position A shown below NOTE When...

Страница 20: ...e playback stop position at power OFF is stored in memory TIP Turning the power OFF whenever the voice recorder is not in use minimizes battery consumption Power Save mode When the voice recorder has...

Страница 21: ...he application you want by selecting one of the voice recorder s modes WS 823 model only 1 Press the F1 HOME button to display the Home screen For WS 823 model For WS 822 and WS 821models 2 Press the...

Страница 22: ...d back P 26 P 34 When Music is selected The voice recorder enters Music mode In this mode you can play music files transferred to the voice recorder P 34 When Calendar Search is selected The voice rec...

Страница 23: ...er D Folder E Recordings made with the microphone are saved here FM Radio Recordings from the radio are saved here WS 823 model only Files and folders placed directly within the Recorder folder not wi...

Страница 24: ...Music mode is selected Forward OK button Each press of the OK button opens the currently selected folder or file in the list moving forward to the next lower level in the folder hierarchy When a list...

Страница 25: ...lder or file Home screen Used to select the voice recorder mode P 21 List display Displays the folders and files recorded in the voice recorder Pressing the F2 FOLDER button changes the display to the...

Страница 26: ...recording in P 24 Each new voice recording file is saved in the selected folder 3 Point the built in microphone in the direction of the sound to record 4 Press the REC s button to start recording d b...

Страница 27: ...cording after the LED indicator light has lit or mode indicator has appeared in the display When the remaining possible recording time is 60 seconds the LED indicator light starts flashing It flashes...

Страница 28: ...e REC s button during recording Recording pauses and the indicator appears in the display along with the blinking message Rec pause Recording is stopped automatically after being paused for at least 6...

Страница 29: ...recording to different recording conditions Rec Level P 63 Sets the recording sensitivity Rec Mode 1 P 64 Sets the recording sound quality Zoom Mic 2 P 64 Sets the built in stereo microphone s direct...

Страница 30: ...ee Recording P 26 for descriptions of recording operations TIP See Accessories optional P 105 for the compatible external microphones NOTE Connecting an external microphone to the voice recorder s MIC...

Страница 31: ...device perform a test recording and adjust the output level of the connected device as needed Recording audio from this recorder with another device Audio from this recorder can be recorded to anothe...

Страница 32: ...utton 2 Press the OK button 3 Press the button to select the desired recording application TIP You can press the 9 button to display the settings of the selected template Press the 0 button to return...

Страница 33: ...ference Rec Level Middle Rec Mode MP3 128 kbps Zoom Mic Off Low Cut Filter On VCVA Off V Sync Rec Off Meeting Rec Level Middle Rec Mode MP3 128 kbps Zoom Mic Off Low Cut Filter Off VCVA Off V Sync Rec...

Страница 34: ...ton to start playback d e c a b a Recording media indicator file name and folder indicator b Elapsed playback time c Playback position bar indicator d File length e Recording date time appears in the...

Страница 35: ...ty of sound as desired Skip Space P 73 A handy function for quickly moving the playback position and playing short segments repeatedly Play Scene P 74 Selecting a package of settings recommended for y...

Страница 36: ...ing stops when the end of the file is reached Press and hold the 9 button again to fast forward from the beginning of the next file Rewinding Rewinding while the voice recorder is in stop mode 1 With...

Страница 37: ...yback position is the beginning of the file To skip to the beginning of the previous file during playback press the 0 button twice consecutively NOTE If an index mark or temp mark is reached when skip...

Страница 38: ...nly MP3 files with variable bit rates bit rates converted variably in a single file may not play normally Linear PCM format WAV files are the only WAV files the voice recorder can play Playback of oth...

Страница 39: ...k speed tone playback operations such as stopping playback skipping to the beginning of a file and writing index marks temp marks are the same as during standard playback NOTE Altered playback speed t...

Страница 40: ...C repeat playback 1Select the starting point for repeat playback A during playback 2 When the ending point B is selected repeat playback starts 3 When the starting point for repeat playback A is cance...

Страница 41: ...yback Segment A B is set and ABC repeat playback starts If Shadowing has been set the repeat segment is played with the volume muted or lowered after it has been played at the usual volume These opera...

Страница 42: ...for this function is retained NOTE You cannot change the end position of a repeat playback segment to a position before the start position You cannot write index marks or temp marks during ABC repeat...

Страница 43: ...They are automatically erased when you select a different file transfer the file to a PC or move the file on a PC You can write up to 99 index marks temp marks in a single file The message No more ca...

Страница 44: ...o select the desired date d a b c a Number of files saved recorded on selected date b Today s date c Date file was recorded d Selected date Dates on which files were saved are underlined 9 or 0 button...

Страница 45: ...ck settings template for how to set playback settings packages P 74 1 While the voice recorder is in stop mode or playing a file press and hold the MENU SCENE button If you pressed the MENU SCENE butt...

Страница 46: ...e voice recorder is in stop mode The voice recorder returns to the stopped mode if no operation is performed for 8 seconds 3 Press the button to select All in folder or One file All in folder Erases a...

Страница 47: ...roSD card P 77 Locked files and read only files cannot be erased P 61 The voice recorder s default Recorder folders FolderA to FolderE and FM Radio folder and Music folder cannot be erased WS 823 mode...

Страница 48: ...may be improved by moving near a window when indoors or by moving out of building shadows NOTE FM radio cannot be received when you are beyond a radio station s broadcasting range or when the signal i...

Страница 49: ...the voice recorder s EAR jack 2 Press the F1 HOME button to display the Home screen 3 Press the 9 or 0 button to select FM Radio 4 Press the OK button 5 Press the MENU SCENE button 6 Press the OK but...

Страница 50: ...ation By scanning 11 Press the button to select Start 12 Press the OK button When Set by scanning completed appears the operation is finished TIP Preset numbers are sorted automatically by frequency U...

Страница 51: ...dio press the F1 HOME button to return to the Home screen You can listen to the radio through the voice recorder s built in speaker with the earphones still connected P 81 3 Press the button to adjust...

Страница 52: ...ach time you press the F2 button You cannot select preset mode if no radio stations have been preset 3 Press the 9 or 0 button to change the reception mode a b Pressing the 9 or 0 button lets you sele...

Страница 53: ...1 to 4 of the procedure given in Presetting radio stations automatically P 49 2 Press the F2 button to set frequency mode 3 Press the 9 or 0 button to select the radio station you want to preset 4 Pre...

Страница 54: ...n Set manually 10 Press the button to select Save preset 11 Press the OK button When the message Preset number saved appears the procedure is finished TIP Up to 30 radio stations can be preset The mes...

Страница 55: ...ly P 49 2 Press the F2 button to set preset mode 3 Press the 9 or 0 button to select the preset number of the radio station you want to delete 4 Press the ERASE button 5 Press the button to select Era...

Страница 56: ...eps 1 to 4 of the procedure given in Presetting radio stations automatically P 49 2 Press the 9 or 0 button to select the radio station you want to record from 3 Press the REC s button to start record...

Страница 57: ...ing FM radio TIP Files recorded from FM radio have FM appended to the beginning of the file name assigned at the time of recording P 27 FM130715_0007 MP3 Date 130715 July 15 2013 NOTE When recording F...

Страница 58: ...ile the voice recorder is in stop mode press the MENU SCENE button TIP Some menus contain items that can be set during recording playback P 60 2 Press the button to select the tab containing the item...

Страница 59: ...the 0 button instead of the OK button 8 Press the STOP 4 button to exit the menu screen When the menu screen is displayed during recording or playback press the MENU SCENE button to return to the prev...

Страница 60: ...el 2 Voice Balancer 2 3 Voice Filter 2 4 Play Mode Equalizer 5 Skip Space Backlight LED 4 Menu items that can be set while listening to the radio WS 823 model only Rec Mode 6 Set stations 6 Scan Level...

Страница 61: ...ile you want to lock P 24 Lock File is locked Unlock File lock is canceled Sorting files Sort by You can change the playback order of the files in a folder 1 Press the button to select File name Date...

Страница 62: ...e information of a file or folder from a menu screen File information 1 Press the button to switch the screen Information is displayed for the items Name Date Size Bit Rate 1 Artist 2 and Album 2 1 If...

Страница 63: ...Rec Level to Low and place the voice recorder s built in microphone near the speaker s mouth 5 to10 cm away NOTE When Rec Level is set to High Middle or Low the recording level is adjusted automatica...

Страница 64: ...rding To record conferences and presentations clearly it is recommended to set Rec Mode setting to MP3 128kbps or above NOTE When Rec Mode is set to stereo recording with a connected mono microphone r...

Страница 65: ...e during recording Low Cut Filter The voice recorder s low cut filter function lets you make recordings that reduce humming sounds from air conditioners or low frequency sounds from equipment such as...

Страница 66: ...ortion to recording sound volume The setting can be adjusted to between 01 and 23 TIP Increasing the setting number increases the VCVA activation sensitivity enabling quieter sounds to activate the st...

Страница 67: ...ndby mode when the input recording level is below the preset level for at least the set detection time Off Recording is done normally Adjusting the voice sync level for voice sync recording 1 Press th...

Страница 68: ...voice recorder automatically ends recording and returns to recording standby mode when the input sound has been below the voice sync level for at least the set detection time Each time the voice recor...

Страница 69: ...etween normal and muted playback Shadowing The voice recorder s shadowing playback function plays a repeat segment set for the ABC repeat playback function P 40 first at normal volume for listening pr...

Страница 70: ...y Adjusting low volume portions during playback Voice Balancer The Voice Balancer function adjusts low volume portions of recorded audio files to make them louder Use it to make quiet parts of convers...

Страница 71: ...een selected the Play Scene setting takes precedence The Play Scene settings cannot be changed P 74 Selecting playback modes Play Mode Several playback modes are available for different listening styl...

Страница 72: ...e last file in the folder has been played then playback stops at the start position of the last file When Playback range is set to Folder End blinks in the display for 2 seconds after the last file in...

Страница 73: ...NOTE Equalizer is only enabled in Music mode Setting a skip space Skip Space The Skip Space function lets you skip a preset amount forward forward skip or backward reverse skip in a file during playba...

Страница 74: ...recording application Transcription Is a handy setting when creating a written record by transcribing an audio file of spoken word content such as a conference or interview recording Changes the oper...

Страница 75: ...t You can adjust the contrast of the display to 12 different levels The setting can be adjusted to between 01 to 12 Setting the LED indicator light LED You can set the LED indicator light to not becom...

Страница 76: ...tput from the speaker even if the earphones are accidentally disconnected Use this setting to prevent possible embarrassment on public transport On The voice recorder s playback sound is output from t...

Страница 77: ...save mode Power Save The voice recorder turns OFF automatically when a preset amount of time has elapsed with the voice recorder stopped after power ON 5 min 10 min 30 min 1 hr Select the desired amou...

Страница 78: ...the blinking cursor then press the or button to change the number 3 Press the OK button to finalize the setting TIP When setting the hour or minute each time you press the F2 button the display change...

Страница 79: ...edure Restoring the default settings Reset Settings The Reset Settings function restores all the voice recorder s functions to their initial factory default settings Time setting and file number will...

Страница 80: ...cording media Format Formatting a recording media erases all existing files saved on it Be sure to transfer all important files to a PC before formatting See Formatting recording media Format P 91 for...

Страница 81: ...tivity Try using this setting when there are problems such as interference between radio stations Selecting the FM radio output Output You can select whether the sound of the FM radio is output from t...

Страница 82: ...ining the desired file P 24 2 Press the MENU SCENE button while the voice recorder is in stop mode 3 Press the OK button to move the cursor into the list of setting items 4 Press the OK button 5 Press...

Страница 83: ...m the process The voice recorder may not be able to properly extract non silent portions from files of non spoken word content such as recorded musical performances The voice recorder may not be able...

Страница 84: ...5 Press the OK button 6 Press the button to select the desired file movement copying method Move to memory Moves one or more files saved in the internal memory or inserted microSD card to a different...

Страница 85: ...e files in the folder 9 Press the OK button to continue to the next setting When One file was selected 1 Press the button to select the file to move or copy then press the OK button When Selected file...

Страница 86: ...ain locked after being moved or copied NOTE Files cannot be copied if there is insufficient remaining memory Files cannot be moved or copied if there are over 200 files To prevent the risk of data dam...

Страница 87: ...0 button to fast forward rewind Writing an index mark temp mark at the division point beforehand is handy 2 Press the MENU SCENE button while the voice recorder is in stop mode 3 Press the OK button...

Страница 88: ...and the second half File name_2 NOTE File Divide can be performed only when the file list is displayed Files cannot be divided if there are 200 files in the folder Locked files P 61 cannot be divided...

Страница 89: ...utton to select the Device Menu tab 3 Press the OK button to move the cursor into the list of setting items 4 Press the button to select USB Settings 5 Press the OK button 6 Press the button to select...

Страница 90: ...he voice recorder to an AC adapter model A514 optional Optional Select to confirm the connection method whenever making a USB connection 9 Press the OK button and go to Step When USB Class was selecte...

Страница 91: ...utton to move the cursor into the list of setting items 4 Press the button to select Format 5 Press the OK button 6 Press the button to select the recording media to be formatted 7 Press the OK button...

Страница 92: ...an sometimes take over 10 seconds to complete To prevent the risk of damage to data never attempt to perform any of the following processes before a formatting process has finished 1Disconnecting the...

Страница 93: ...ystem Microsoft Windows XP Vista 7 8 standard installation PC Windows PC with at least one available USB port Macintosh Operating system Mac OS X 10 5 to 10 8 standard installation PC Apple Macintosh...

Страница 94: ...onnect the connector before the drive has stopped Do not format initialize the voice recorder s drive from a PC Formatting done from a PC will not be done correctly Use the voice recorder s Format men...

Страница 95: ...is a microSD card in the voice recorder it can be used as the Removable Disk Macintosh The voice recorder is recognized and displayed on the desktop with the model name as the drive name If there is a...

Страница 96: ...afe to remove hardware appears close the window 2 Check that the voice recorder s LED indicator light is off before disconnecting the voice recorder from the PC Macintosh 1 Drag and drop the removable...

Страница 97: ...er names on the PC MUSIC FOLDER_E FOLDER_D RECORDER FOLDER_C FOLDER_B FOLDER_A Drive name WS 823 1 Folder names FLD_FM 2 Internal memory MUSIC FOLDER_E FOLDER_D FOLDER_C FOLDER_B FOLDER_A RECORDER Dri...

Страница 98: ...from the PC P 96 Macintosh 1 Connect the voice recorder to the PC P 95 When the voice recorder is connected to the Macintosh operating system it is recognized and displayed on the desktop with the mo...

Страница 99: ...ct one of the folders from Folder A to Folder E P 23 P 24 No more can be set The maximum number of index marks 99 have been written in the file Erase unneeded index marks P 43 The maximum number of te...

Страница 100: ...e played by the voice recorder P 38 Select a file No file has been selected You must select a file before you can perform the operation P 23 P 24 Same folder can t be moved copied An attempt was made...

Страница 101: ...s has been reached Select another folder P 23 P 24 WS 823 model only Speaker has been selected for Output in the FM Menu Select Earphone for Output P 81 Playback is inaudible The earphones are connect...

Страница 102: ...r Zoom Mic Select Off for Zoom Mic P 64 Missing audio file The file was recorded in a different folder Select another folder P 23 P 24 Noise during playback Objects brushed against the voice recorder...

Страница 103: ...ones provided also function as an antenna Connect the earphones when listening to the radio Earphone has been selected for Output To output the sound through the built in speaker select Speaker for Ou...

Страница 104: ...If the recorder is very dirty soak the cloth in mild soapy water and wring well Wipe the recorder with the damp cloth and then wipe it with a dry cloth s Monitor Wipe gently with a soft cloth NOTE Do...

Страница 105: ...rences that enables connection of up to three left and three right channel units Cascade connection enables the left right channel connections to be extended up to about 12 meters to capture sound fro...

Страница 106: ...ns thereof Note that Olympus will assume no liability in the event of damages lost earnings or any claims from third parties resulting from improper use of the product Trademarks and registered tradem...

Страница 107: ...ctly Voice recorder safety precautions f WARNING s Do not use the voice recorder in an atmosphere that might contain flammable or explosive gases It may cause fire or explosion s Do not attempt to dis...

Страница 108: ...ming caught on other items f CAUTION s Do not raise the volume before performing an operation Hearing damage or loss may result Batteries f DANGER s Do not place the battery near ignition sources s Do...

Страница 109: ...ttery out of the reach of infants and children The battery could be swallowed by an infant or child If swallowed go to doctor immediately s If you notice abnormal sound heat burning odor or smoke from...

Страница 110: ...luorescent lights Data loss precautions Recorded content in the internal memory and microSD card may be destroyed or lost due to reasons such as operating errors device failure or repair Also when con...

Страница 111: ...3 model 8 GB WS 822 model 4 GB WS 821 model 2 GB microSD card Supports card capacities ranging from 2 to 32 GB Some recording media memory capacity is used as a management area so the actual usable ca...

Страница 112: ...40 Hz to 20 kHz 192 kbps 2 40 Hz to 19 kHz 128 kbps 40 Hz to 17 kHz WMA format 32 kbps 40 Hz to 13 kHz 8 kbps 40 Hz to 3 kHz 1 WS 823 and WS 822 models only 2 WS 821 model only 4 When recording with...

Страница 113: ...kHz 16 bits 19 hours approx 15 hours approx MP3 format 128 kbps 21 hours approx 17 hours approx WMA format 32 kbps 21 hours approx 17 hours approx 8 kbps 24 hours approx 20 hours approx During earpho...

Страница 114: ...e figures below are guideline values 4 Linear PCM format Recording media Recording mode 44 1 kHz 16 bits Internal memory WS 823 model 8 GB 11 hours 30 minutes approx WS 822 model 4 GB 5 hours 45 minut...

Страница 115: ...microSD card 32 GB 2070 hours approx 8100 hours approx 16 GB 1030 hours approx 4030 hours approx 8 GB 515 hours approx 2010 hours approx NOTE Actual available recording times may be shorter than the...

Страница 116: ...6 kbps 1 37 hours 10 minutes approx 192 kbps 2 49 hours 30 minutes approx 128 kbps 74 hours 30 minutes approx 4 WMA format Recording mode Recording time 32 kbps 26 hours 40 minutes approx 8 kbps 148 h...

Страница 117: ...elocate the receiving antenna Increase the distance between the equipment and receiver Connect the equipment to an outlet on a circuit different from that to which the receiver is connected Consult yo...

Страница 118: ...Tel 484 896 5000 Technical Support USA 24 7 online automated help http www olympusamerica com support Phone customer support Tel 1 888 553 4448 Toll free Our phone customer support is available from...

Отзывы: