background image

E-29

En

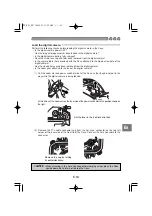
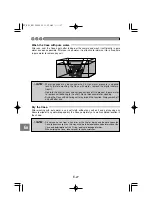
Install the O-ring.

Confirm that no foreign matter is attached, apply a thin coat of the accessory grease to the
O-ring, and fit the O-ring into the groove. At this time, confirm that the O-ring does not stick
out from the groove.

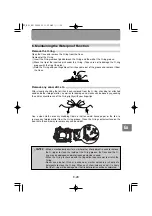
How to Apply Grease to the O-ring

1

Apply the exclusive
lubricant to each O-
ring.

Make sure that your fingers and the O-
ring are free of dirt, and squeeze about 5
mm of lubricant onto a finger. (5 mm is
the most appropriate amount.)

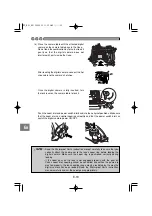
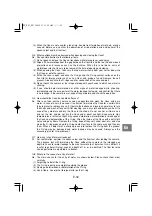
2

Spread the
lubricant all over
the O-ring.

Surround the lubricant with three fingers
and spread it over the ring. Be careful not
to use excessive force as this may
stretch the O-ring.

3

Check that the 
O-ring is free of
scratch or
unevenness.

After spreading the lubricant, check visually
and by touch that the O-ring is not scratched
and that its surface is flat. If it is damaged in
any way, replace it with a brand-new O-ring.

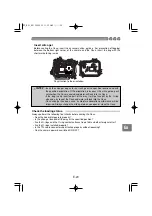
4

Apply lubricant on
the O-ring contact
surface.

Use the lubricant remaining on the
fingers to clean and lubricate the case's
contact surface.

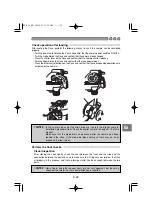
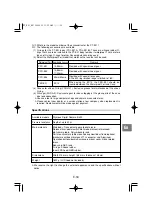
Replace consumable products.

• The O-ring is a consumable product. Independent of the number of times the Case is

used, it is recommended that the O-ring should be replaced by a new one at least once a
year.

• Deterioration of the O-ring is accelerated by the use conditions and the storage

conditions. Replace the O-ring even before a year has passed if it shows signs of
damage, cracking or loss of elasticity.

: • Always perform maintenance of the waterproof function even when the

Case has been opened to exchange the battery or the image storage during
shooting. Neglecting this maintenance may become the cause of water
leakage.

• When the Case is not to be used for a long time, remove the O-ring from

the groove to prevent deformation of the O-ring, apply a thin coat of silicone
grease, and store it in a clean plastic bag or the like.

• When drying is done with salt attached, it is likely that a function impairment

will be caused. After use, always wash off any salt.

CAUTION

Note

:

Please use original Olympus products for the silicone O-ring grease, the silica
gel, and the O-ring. These consumable products also can be purchased at an
Olympus service station.

PT̲E01̲EN  2005.5.25  11:29 AM  ページ29

Содержание PT-E01

Страница 1: ...or digital camera Caisson tanche pour l appareil photo num rique Unterwassergeh use f r Digitalkamera Carcasa submarina para la c mara digital PT E01 2005 OLYMPUS IMAGING CORP Printed in Japan PT E01...

Страница 2: ...60m 1 Jp PT E01 PT E01 JP 2005 5 25 11 27 AM 1...

Страница 3: ...2 Jp O 60m 60m 10 PT E01 JP 2005 5 25 11 27 AM 2...

Страница 4: ...1 1 O 10 3 Jp O BLM 1 1 HLD 3 PT E01 JP 2005 5 25 11 27 AM 3...

Страница 5: ...4 Jp 60m TTL PT E01 JP 2005 5 25 11 27 AM 4...

Страница 6: ...5 Jp 1 1 1 3 3 4 5 6 1 7 7 8 9 9 10 10 10 10 11 11 TTL 12 TTL 12 13 13 2 1 4 14 14 14 3 1 5 15 15 15 15 15 15 16 16 16 16 17 17 18 PT E01 JP 2005 5 25 11 27 AM 5...

Страница 7: ...6 Jp 20 20 21 22 22 22 23 4 24 24 24 24 24 24 5 25 25 26 27 27 6 28 28 28 29 29 29 TTL TTL 30 TTL 30 7 31 PT E01 31 34 PT E01 JP 2005 5 25 11 27 AM 6...

Страница 8: ...O TTL Underwater Case for digital camera Caisson tanche pour l appareil photo num rique Unterwassergeh use f r Digitalkamera Carcasa submarina para la c mara digital PT E01 PT E01 JP 2005 5 25 11 27...

Страница 9: ...TTL MENU AF AE AF OK ISO O POL E01B O POL E01A O O 8 Jp Note PT E01 JP 2005 5 25 11 27 AM 8...

Страница 10: ...9 Jp O O 2 2 O PT E01 JP 2005 5 25 11 27 AM 9...

Страница 11: ...10 Jp PT E01 JP 2005 5 25 11 27 AM 10...

Страница 12: ...11 Jp PPO E01 14 54mm AF PPO E02 14 54mm 11 22mm AF PPO E03 50mm Macro MF MF 180 PPO E03 PER E01 50mm Macro EC14 AF ON OFF ON OFF 2005 6 PT E01 JP 2005 5 25 11 27 AM 11...

Страница 13: ...12 Jp TTL TTL TTL 1 TTL 2 TTL TTL TTL 1 2 TTL TTL TTL TTL TTL O O TTL TTL TTL O P 29 TTL PT E01 JP 2005 5 25 11 27 AM 12...

Страница 14: ...13 Jp TTL 1 2 3 4 P 17 1 2 3 4 5 PT E01 JP 2005 5 25 11 27 AM 13...

Страница 15: ...14 Jp 2 O O TTL O PT E01 JP 2005 5 25 11 27 AM 14...

Страница 16: ...15 Jp 3 Note PT E01 JP 2005 5 25 11 27 AM 15...

Страница 17: ...16 Jp PT E01 E 300 1 4 2 A B 2 2 2 3 4 A A B B PT E01 JP 2005 5 25 11 27 AM 16...

Страница 18: ...17 Jp 50mm 1 2 PT E01 JP 2005 5 25 11 27 AM 17...

Страница 19: ...18 Jp OFF 1 2 TTL 5 PT E01 JP 2005 5 25 11 27 AM 18...

Страница 20: ...19 Jp Jp 3 ON OFF MENU MENU MENU PT E01 JP 2005 5 25 11 27 AM 19...

Страница 21: ...20 Jp Jp MENU MENU MENU TTL ON OFF PT E01 JP 2005 5 25 11 27 AM 20...

Страница 22: ...1 O 2 4 2 3 A A B B 21 Jp 4 2 MENU MENU MENU PT E01 JP 2005 5 25 11 27 AM 21...

Страница 23: ...22 Jp ON OFF P 15 PT E01 JP 2005 5 25 11 27 AM 22...

Страница 24: ...23 Jp 5 1 2 3 3 4 30 5 6 7 8 OK HAVE A NICE DIVE PT E01 JP 2005 5 25 11 27 AM 23...

Страница 25: ...24 Jp 4 E 300 PT E01 JP 2005 5 25 11 27 AM 24...

Страница 26: ...25 Jp 5 Note PT E01 JP 2005 5 25 11 27 AM 25...

Страница 27: ...26 Jp P 18 2 O O O O A A B B MENU MENU MENU PT E01 JP 2005 5 25 11 27 AM 26...

Страница 28: ...27 Jp PT E01 JP 2005 5 25 11 27 AM 27...

Страница 29: ...28 Jp 6 O O PT E01 JP 2005 5 25 11 27 AM 28...

Страница 30: ...29 Jp O O 1 O 5 5 2 3 O 3 O 4 1 1 Note O O PT E01 JP 2005 5 25 11 27 AM 29...

Страница 31: ...30 Jp TTL TTL TTL TTL O TTL TTL O O O O O O O 1 2 3 O O O PT E01 JP 2005 5 25 11 27 AM 30...

Страница 32: ...31 Jp 7 PT E01 Q A PT E01 E 300 PT E01 1 2 3 4 5 6 7 TTL 8 O 9 1 2 3 4 PT E01 JP 2005 5 25 11 27 AM 31...

Страница 33: ...32 Jp 1 2 3 4 O 5 6 O 1 1 2 3 4 5 O 6 7 PT E01 JP 2005 5 25 11 27 AM 32...

Страница 34: ...33 Jp 1 2 O 3 4 O 5 1 1 6 1 PT E01 1 PT E01 POL E01A POL E01B PT E01 O 2 PT E01 JP 2005 5 25 11 27 AM 33...

Страница 35: ...Jp 2 PT E01 3 O PSOLG 1 O 4 SILCA 5 5 PPO E01 14 54mm PPO E02 14 54mm 11 22mm PPO E03 50mm Macro MF 180 PER E01 EC14 EC 14 E 300 60m TTL ABS O NBR 214mm 168mm 148mm 1800g PT E01 JP 2005 5 25 11 27 AM...

Страница 36: ...0083 3 15 1 9 00 17 00 101 0052 1 3 1 Tel 03 3292 3403 060 0034 4 1 2 3 Tel 011 231 2320 981 3133 13 4 Tel 022 218 8421 460 0003 2 19 25 Tel 052 201 9571 542 0081 2 12 26 Tel 06 6252 6995 730 0013 16...

Страница 37: ...Instruction Manual Underwater Case For digital camera E 300 PT E01 En PT E01 EN 2005 5 25 11 29 AM 1...

Страница 38: ...proof Port OLYMPUS IMAGING CORP shall in no way be responsible for damage caused by water to the camera contained in the case OLYMPUS IMAGING CORP shall not pay any compensation for accidents injuries...

Страница 39: ...ations with abnormally high or abnormally low temperatures or at locations with extreme temperature changes The product may deteriorate 3 Opening and closing at locations with much sand dust or dirt m...

Страница 40: ...ut of the groove 7 This product is an airtight construction made of plastic polycarbonate When it is left for a long time in a car on a boat at the beach or at other places reaching a high temperature...

Страница 41: ...meters This product is made of polycarbonate resin with excellent impact resistance but it may be damaged by scraping against rocks etc It also may break when it hits hard objects or is dropped This...

Страница 42: ...ect the hot shoe cable E 13 How to attach or remove the camera from the camera table E 13 2 Advance Check E 14 Advance test before use E 14 Check the waterproof parts of the Case E 14 Preliminary test...

Страница 43: ...24 5 Handling After Shooting E 25 Wipe off any waterdrops E 25 Take out the digital camera E 26 Wash the Case with pure water E 27 Dry the Case E 27 6 Maintaining the Waterproof Function E 28 Remove t...

Страница 44: ...e grease Waterproof cap for the TTL cable connector Silica gel Waterproof cap maintenance adapter Pick for O ring removal Instruction manual this manual Authorized distributors list Authorized service...

Страница 45: ...n ISO button Metering button Camera table clamping lever Optional bracket mount Hot shoe cable mount with cap O ring POL E01B Loading guide rails Buckle hook Camera table O ring POL E01A Silica gel Si...

Страница 46: ...e Waterproof Port mounting thread on the Case Screw the Waterproof Port into the Case by turning it all the way clockwise Attach the hand strap Attach the hand strap to the Case Hand strap O ring grea...

Страница 47: ...the Case the knob may spin idly This is not a malfunction How to Press the Shutter When pressing the shutter lever press it gently so that there will be no movement of the camera How to Use the Mode...

Страница 48: ...Controlled Manual focus is also possible but MF ring rotation range is limited to 180 PPO E03 PER E01 50mm Macro EC14 Not Controlled Not Controlled Focusing is always AF ON OFF How to use the power s...

Страница 49: ...matter attached to the O rings inside the cap and on the TTL cable connector To secure the cap gently turn it clockwise until it stops Cap Connector Check O rings Gently turn the cap clockwise until...

Страница 50: ...ove the camera from the camera table The digital camera is loaded and clamped in the Case by means of the camera table located inside the front lid of the Case Turn the camera table clamping lever cou...

Страница 51: ...r is attached firmly and that the cap is screwed into the connector without loosening Preliminary test 1 Before loading the digital camera in the Case immerse the empty Case at depth you intend to use...

Страница 52: ...e the eyecup from the viewfinder of the digital camera before loading the digital camera in the Case Remove the filter from the digital camera If a filter is attached to the lens of the digital camera...

Страница 53: ...by unlocking buckles that are diagonally opposite to each other Unlock the first pair either A or B in the illustration on the right and then unlock the two remaining diagonally opposite buckles 2 To...

Страница 54: ...remove the camera table inside the front lid of the Case and attached it to the digital camera 1 Attach the camera table to the tripod seat on the bottom of the digital camera by means of the tripod...

Страница 55: ...o the lens of the digital camera 1 Pull the zoom dial and power switch dial out of the Case so that they do not get in the way while the digital camera is being loaded At this time set the hook lever...

Страница 56: ...n control zooming smoothly and that the power switch dial can switch the digital camera power ON OFF MENU MENU MENU Read the Waterproof Port s instruction manual carefully to ensure that you correctly...

Страница 57: ...e O rings installed properly Is the TTL cable connector cap attached properly without loosening Can the camera power be switched ON OFF Pay attention to the orientation Insert the silica gel bag as fa...

Страница 58: ...e buckles 3 Push the buckle lock unlock levers in the direction of arrows to seal the Case A A B B E 21 En Hook one pair of diagonally opposite buckles then hook the other pair MENU MENU MENU Seal the...

Страница 59: ...checks Visual Inspection After closing the case tightly check the seal between the front and rear lids and the connection between the port and case to make sure the O rings are not twisted that they...

Страница 60: ...for 30 seconds Check carefully for air bubbles Do not perform any operation yet but just observe 5 Check that no water has entered Remove the Case from the water and check that no water has accumulat...

Страница 61: ...press the shutter lever When pressing the shutter lever hold the Case securely with both hands and operate the lever gently to prevent camera shake Cautions when using the flash The E 300 s built in f...

Страница 62: ...ort is detached Please dry these areas carefully When opening the case or removing the port make sure no water from outside e g drops from your hair or the diving suit gets inside of the case and or o...

Страница 63: ...take out the digital camera A A B B MENU MENU MENU Always place the opened Case with the O ring side facing up When the Case is placed with the O ring side facing down dirt or other foreign matter ma...

Страница 64: ...ed when a high water pressure is applied locally Before washing the Case with water remove the digital camera from it Operate the shutter lever and various buttons of this product in pure water to rem...

Страница 65: ...the entire circumference of the O ring lightly with your fingertips Use a clean cloth not easily shedding fibers or cotton swab tissue paper or the like to remove any foreign matter from the O ring gr...

Страница 66: ...he case s contact surface Replace consumable products The O ring is a consumable product Independent of the number of times the Case is used it is recommended that the O ring should be replaced by a n...

Страница 67: ...nance of the TTL Connector Cap After removing the TTL connector cap from the waterproof cap be sure to clean and grease the O ring Use the waterproof cap maintenance adapter to remove the O ring unit...

Страница 68: ...his could lead to water penetration 6 Before closing the case check that the O rings sit correctly in the groove 7 Make sure that the buckles used for connection of the case and port and TTL connector...

Страница 69: ...ffective to immerse the Case for a certain time in pure water to remove any salt Operate the buttons and levers under water to turn the shafts and wash off any salt After washing use a dry cloth witho...

Страница 70: ...lication of grease does not improve the waterproof function or the permissible withstand pressure However it may facilitate attachment of sand dirt etc A thin uniform coat produces the best result 4 W...

Страница 71: ...es Remark PPO E01 14 54mm Provided with special zoom gear PPO E02 14 54mm 11 22mm Provided with special zoom gear PPO E03 50mm Macro Provided with special focus gear The MF ring rotation range is limi...

Страница 72: ...m or call our TOLL FREE NUMBER 00800 67 10 83 00 for Austria Belgium Denmark Finland France Germany Italy Luxemburg Netherlands Norway Portugal Spain Sweden Switzerland United Kingdom or request an ad...

Страница 73: ...Mode d emploi Caisson tanche Pour l appareil photo num rique E 300 PT E01 Fr PT E01 FR 2005 5 25 11 31 AM 1...

Страница 74: ...utilis en combinaison avec le port tanche disponible s par ment OLYMPUS IMAGING CORP ne saura tre tenu responsable des dommages caus s l appareil par la pr sence d eau dans le caisson OLYMPUS IMAGING...

Страница 75: ...roits avec des variations de temp ratures extr mes Le produit risque de se d t riorer 3 L ouverture et la fermeture dans des endroits avec beaucoup de sable de poussi re ou de salet risque de nuire l...

Страница 76: ...onstruction herm tique fabriqu e en plastique polycarbonate Quand il est laiss longtemps dans une voiture sur un bateau la plage ou d autres endroits atteignant une temp rature lev e ou s il est sujet...

Страница 77: ...roduit est fabriqu en r sine de polycarbonate avec une excellence r sistance aux impacts mais il risque d tre endommag en le cognant contre des rochers etc Il peut galement se casser quand il frappe d...

Страница 78: ...irer le support d appareil sur le ou du caisson F 13 2 Contr le pr liminaire du caisson F 14 Test pr liminaire avant utilisation F 14 Contr le des pi ces d tanch it du caisson F 14 Test pr liminaire F...

Страница 79: ...anipulation apr s la prise de vue F 25 Essuyer toute goutte d eau F 25 Sortir l appareil photo num rique F 26 Laver le caisson avec de l eau pure F 27 S cher le caisson F 27 6 Maintien de la fonction...

Страница 80: ...al Adaptateur d entretien du bouchon tanche Graisse silicone Sel de silice Pic pour le retrait du joint Bouchon tanche pour connecteur de c ble TTL Mode d emploi ce manuel Liste des distributeurs agr...

Страница 81: ...oom Bouchon avant Touche d affichaged informations Touche d effacement Touche de mode de qualit d image Touche de balance des blancs cran ACL Cache int rieur d cran ACL Touche de mode Flash Viseur de...

Страница 82: ...etage de monture du port tanche sur le caisson Visser le port tanche sur le caisson en tournant compl tement le port tanche dans le sens des aiguilles d une montre Mise en place de la dragonne Install...

Страница 83: ...lette Mode du caisson risque de tourner dans le vide et ce n est pas un mauvais fonctionnement Comment appuyer sur le d clencheur En appuyant sur le levier du d clencheur le presser doucement pour que...

Страница 84: ...oujours AF PPO E03 50mm Macro Non Command e MF est galement possible mais la plage de rotation de la bague MF est limit e 180 PPO E03 PER E01 50mm Macro EC14 Non Non La mise au point est toujours AF O...

Страница 85: ...joints dans le bouchon et sur le connecteur de c ble TTL Pour fixer le bouchon le tourner doucement dans le sens des aiguilles d une montre jusqu ce qu il s arr te V rifier les joints Bouchon Connecte...

Страница 86: ...irer le support d appareil sur le ou du caisson L appareil photo num rique est charg et serr dans le caisson en se servant du support d appareil situ dans le couvercle avant du caisson Tourner le levi...

Страница 87: ...sans jeu Test pr liminaire 1 Avant de charger l appareil photo num rique dans le caisson plonger le caisson vide la profondeur d eau pr vue pour confirmer qu il n y a pas de fuite d eau 2 Les princip...

Страница 88: ...oto num rique avant de charger l appareil photo dans le caisson Retirer le filtre de l appareil photo num rique Si un filtre est mont sur l objectif de l appareil photo num rique retirer le filtre ava...

Страница 89: ...du caisson en d bloquant d abord une paire de boucles oppos es en diagonale qui sont les boucles A ou B dans l illustration sur la droite puis en d bloquant la paire restante 2 Pour ouvrir une boucle...

Страница 90: ...hoto num rique dans le caisson le support d appareil l int rieur du couvercle avant du caisson doit tre retir du caisson et fix l appareil photo num rique 1 Fixer le support d appareil l crou de pied...

Страница 91: ...il photo num rique 1 Tirer sur la molette de zoom et sur la molette d interrupteur d alimentation du caisson pour qu elles ne viennent pas dans le passage pendant le chargement de l appareil photo num...

Страница 92: ...ifier que la molette de zoom peut commander le zoom sans difficult et que la molette d interrupteur d alimentation peut commuter l alimentation de l appareil photo num rique sur marche et arr t MENU M...

Страница 93: ...ou de corps trangers Les joints sont ils install s correctement Le bouchon du connecteur du c ble TTL est il fix correctement sans jeu Est il possible de commuter l alimentation de l appareil photo su...

Страница 94: ...leviers de fermeture ouverture dans le sens des fl ches pour sceller le caisson A A B B F 21 Fr Accrocher une paire de boucles oppos es en diagonale puis accrocher l autre paire MENU MENU MENU Scelle...

Страница 95: ...les finaux Inspection visuelle Apr s avoir ferm herm tiquement le caisson regardez le joint entre les couvercles avant et arri re et le raccordement entre le port et le caisson et v rifiez que les jo...

Страница 96: ...t 4 Puis immerger le caisson pendant 30 secondes Contr ler soigneusement pour des bulles d air N effectuer aucune op ration pour le moment mais simplement observer 5 V rifier qu il n y a pas d eau ent...

Страница 97: ...eur tenir fermement le caisson avec les deux mains et commander le levier doucement pour viter de faire bouger l appareil Pr cautions en utilisant le flash Le flash incorpor au E 300 ne peut pas tre u...

Страница 98: ...s avec une attention toute particuli re En ouvrant le caisson ou en retirant le port veillez ce qu aucune goutte d eau de l ext rieur provenant de vos cheveux ou de votre combinaison de plong e ne tom...

Страница 99: ...deux mains et sortir l appareil photo num rique A A B B MENU MENU MENU Toujours placer le caisson ouvert avec le c t du joint tourn vers le haut Si le caisson est plac avec le c t du joint tourn vers...

Страница 100: ...sion d eau lev e est appliqu e localement Avant de laver le caisson avec de l eau y retirer l appareil photo num rique Commander le levier de d clencheur et diverses touches de ce produit dans l eau p...

Страница 101: ...le bout des doigts Utiliser un chiffon propre qui ne perd pas facilement ses fibres du Coton Tige un mouchoir en papier ou quelque chose de similaire pour retirer tout corps tranger de la rainure du j...

Страница 102: ...surface de contact du joint sur le couvercle avant Changer les pi ces consommables Le joint est un produit consommable Ind pendamment du nombre de fois que le caisson est utilis il est recommand de ch...

Страница 103: ...nnecteur TTL Apr s retrait du bouchon tanche du connecteur TTL bien nettoyer et graisser le joint Utiliser l adaptateur d entretien du bouchon tanche pour retirer le support de joint du bouchon tanche...

Страница 104: ...re les deux couvercles du caisson et produire une fuite d eau cause d une fermeture incompl te 6 Avant de fermer le caisson v rifier que les joints sont install s correctement dans la rainure 7 S assu...

Страница 105: ...r le caisson l eau pure En cas d utilisation en mer plonger le caisson un certain temps dans l eau pure est efficace pour liminer le sel Commander les touches et leviers sous l eau pour tourner les ax...

Страница 106: ...la r sistance la pression permise Toutefois elle peut faciliter l adh rence de sable de poussi re etc Une fine couche uniforme produit le meilleur r sultat 4 Appliquer une fine couche de graisse pour...

Страница 107: ...avec un m canisme de zoom sp cial PPO E02 14 54mm 11 22mm Fourni avec un m canisme de zoom sp cial PPO E03 50mm Macro Fourni avec un m canisme de mise au point sp cial La plage de rotation de la bagu...

Страница 108: ...m or call our TOLL FREE NUMBER 00800 67 10 83 00 for Austria Belgium Denmark Finland France Germany Italy Luxemburg Netherlands Norway Portugal Spain Sweden Switzerland United Kingdom or request an ad...

Страница 109: ...Bedienungsanleitung Unterwassergeh use F r Digitalkamera E 300 PT E01 De PT E01 DE 2005 5 25 11 33 AM 1...

Страница 110: ...e in dieser Anleitung enthaltenen Angaben zur Handhabung Vorab Test Wartung Pflege und Lagerung Das Geh use muss stets zusammen mit einem gesondert erh ltlichen Objektiv Port verwendet werden Bitte be...

Страница 111: ...ten aufbewahrt werden an denen extrem hohe oder niedrige Temperaturen und oder extreme Temperaturschwankungen auftreten k nnen Andernfalls kann es zu Beeintr chtigungen am Produkt kommen 3 ffnen oder...

Страница 112: ...dieses Produkt ber einen l ngeren Zeitraum hohen Temperaturen z B in einem geschlossenen Fahrzeug oder direkter Sonneneinstrahlung z B am Strand oder hinter Glas etc oder einer starken ungleichm ig ve...

Страница 113: ...onders widerstandsf hig gegen St e und Ersch tterungen Bei der Einwirkung harter scharfkantiger oder spitzer Gegenst nde k nnen jedoch Kratzer oder Bruchsch den verursacht werden Dies gilt auch wenn d...

Страница 114: ...bringen und Entnehmen des Kameraschlittens in oder aus dem Geh use D 13 2 Check vor Benutzung des Geh uses D 14 Erster Systemcheck vor dem Gebrauch D 14 berpr fen der abdichtenden Teile des Geh uses D...

Страница 115: ...rsicht bei Blitzaufnahmen D 24 5 Behandlung nach dem Gebrauch D 25 Entfernen von Wassertropfen D 25 Entnehmen der Digitalkamera D 26 Reinigen des Geh uses mit klarem Wasser D 27 Abtrocknen des Geh use...

Страница 116: ...inwandfreien Sitz und Zustand berpr fen Siliconfett f r O Ring Wasserdichte Kappe f r den TTL Kabelanschluss 5 Silicagel Beutel Keil zum L sen des O Rings Wartungsadapter f r wasserdichte Kappe Bedien...

Страница 117: ...r Programmw hlscheibe Anschluss f r Zubeh rhalterung TTL Kabelanschluss Zoomregler Vordere Kappe Informations anzeigetaste L schtaste Speichermodus taste Wei abgleichtaste LCD Monitor Innerer LCD Mon...

Страница 118: ...Geh uses sorgf ltig mit der geeigneten Menge ein Schrauben Sie den Objektiv Port durch Drehen im Uhrzeigersinn bis zum Anschlag am Geh use fest Anbringen der Handgelenkschlaufe Bringen Sie die Handgel...

Страница 119: ...fes berschritten kann der Programmw hlknopf leerlaufen Dies ist keine Fehlfunktion Richtiges Dr cken des Ausl sers Den Ausl seknopf ruckfrei nach unten dr cken damit die Kamera bei der Aufnahme nicht...

Страница 120: ...E03 50mm Macro Nein Gesteuert ManuelleScharfstellungistgleichfalls m glich derSch rferingkannhierbei maximalumbiszu180Gradgedrehtwerden PPO E03 PER E01 50mm Macro EC14 Nein Gesteuert Die Scharfstellu...

Страница 121: ...k rper anhaften Zum Befestigen der Kappe muss diese vorsichtig im Uhrzeigersinn bis zum Anschlag gedreht werden V rifier les joints Bouchon Connecteur Drehen Sie die Kappe im Uhrzeigersinn bis zum Ans...

Страница 122: ...igersinn um eine einwandfreie Befestigung zu gew hrleisten 1 2 3 4 Anbringen und Entnehmen des Kameraschlittens in oder aus dem Geh use Zum Einschieben und festen Installieren der Digitalkamera im Geh...

Страница 123: ...hlusses einwandfrei angebracht ist und achten Sie hierbei darauf dass die Kappe einwandfrei am Anschluss festgezogen wurde Erster Systemcheck 1 Bevor Sie das Geh use mit eingesetzter Digitalkamera ver...

Страница 124: ...rokular von der Digitalkamera entfernen bevor die Digitalkamera in das Geh use eingesetzt wird Abnehmen des Objektivfilters von der Digitalkamera Ein an der Digitalkamera angebrachter Objektivfilter m...

Страница 125: ...inander entriegeln in der rechts gezeigten Abbildung Schlie hebelpaar A oder B 2 Zum Entriegeln greifen Sie mit einem Finger unter das Schlie ehebelende und heben dann den Schlie hebel vorsichtig an W...

Страница 126: ...muss der im vorderen Geh usedeckel befindliche Kameraschlitten entnommen und an der Digitalkamera befestigt werden 1 Den Kameraschlitten am Stativgewinde das sich an der Unterseite der Digitalkamera b...

Страница 127: ...racht 1 Den Zoomknopf und Hauptschalterknopf des Geh uses nach au en ziehen so dass das Einsetzen der Digitalkamera nicht behindert wird Zu diesem Zeitpunkt m ssen Sie den Greiferhebel der sich an der...

Страница 128: ...ert werden und die Digitalkamera mit dem Hauptschalter ein und ausgeschaltet werden kann MENU MENU MENU Lesen Sie die Bedienungsanleitung des gesondert erh ltlichen Objektiv Ports sorgf ltig Bringen S...

Страница 129: ...n Verschmutzungen und oder Fremdk rpern Sind die O Ringe einwandfrei angebracht Ist die TTL Kabelanschlusskappe einwandfrei festgedreht Kann die Digitalkamera ein und ausgeschaltet werden Auf die korr...

Страница 130: ...s zwei ber Kreuz angeordnete Schlie hebel einklinken 3 Die Schlie hebel in Pfeilrichtung umlegen um das Geh use wasserdicht zu verschlie en A A B B D 21 De Paarweise jeweils zwei ber Kreuz angeordnete...

Страница 131: ...de berpr fung des Geh uses Visuelle Inspektion Nach dem Schlie en des Geh uses die Dichtungsbereiche am vorderen und hinteren Geh usedeckel sowie am Objektiv Port visuell berpr fen um sicherzustellen...

Страница 132: ...nun f r 30 Sekunden eintauchen W hrend dieser Zeitspanne ausschlie lich pr fen ob Luftblasen aus dem Geh use entweichen 5 Vergewissern Sie sich dass kein Wasser eingedrungen ist Das Geh use aus dem W...

Страница 133: ...r cken des Ausl sers Zum Ausl sen muss dass Geh use beidh ndig sicher gehalten werden Den Ausl serhebel ruckfrei bewegen um Bildverwackelungen zu vermeiden Vorsicht bei Blitzaufnahmen Bei im Geh use e...

Страница 134: ...iese Bereiche besonders sorgf ltig trocknen Beim ffnen des Geh uses oder Abnehmen des Objektiv Ports unbedingt vermeiden dass Wasser von au en aus dem Haar oder vom Taucheranzug tropfendes Wasser etc...

Страница 135: ...en und entnehmen Sie die Digitalkamera A A B B MENU MENU MENU Ge ffnete Geh useh lften stets so ablegen dass der O Ring Bereich nach oben weist Wenn der O Ring Bereich nach unten weist k nnen sich Sch...

Страница 136: ...wirkung hohen Wasserdrucks Wasserschlauch etc kann das Geh use lecken Vor der Geh usereinigung mit Wasser sollte die Digitalkamera entnommen werden Bei in klarem Leitungswasser getauchtem Geh use den...

Страница 137: ...ritt tasten Sie den gesamten Ring vorsichtig mit den Fingerspitzen auf noch anhaftende Fremdk rper Risse Verh rtungen oder sonstige Sch den ab Verwenden Sie ein sauberes fusselfreies Tuch oder ein Wat...

Страница 138: ...en Geh usedeckel zu s ubern und einzufetten Austausch von Verschlei teilen O Ringe unterliegen Verschlei erscheinungen und sind als Ersatzteil erh ltlich Unabh ngig von der Gebrauchsh ufigkeit des Geh...

Страница 139: ...Nach dem Abtrennen der TTL Anschlusskappe von der wasserdichten Kappe muss der O Ring ges ubert und eingefettet werden Verwenden Sie den Wartungsadapter um das O Ring Modul von der wasserdichten Kappe...

Страница 140: ...jeweils einwandfrei in der Ringnut sitzen 7 Vergewissern Sie sich dass die Schlie en des Objektiv Ports sowie die TTL Kabelanschlusskappe einwandfrei verriegelt bzw geschlossen sind 8 Vergewissern Sie...

Страница 141: ...n den beweglichen Teilen abgesp lt wird Nach dem Abwaschen des Geh uses zum Abtrocknen ein sauberes weiches und fusselfreies Tuch verwenden Das Geh use hierauf zum vollst ndigen Trocknen an einen gut...

Страница 142: ...O Ring Eine leichte gleichm ige Beschichtung ergibt die besten Resultate 4 Tragen Sie eine gleichm ig d nne Schicht des zum Geh use mitgelieferten Schmiermittels f r O Ringe auf die Schraubgewinde wi...

Страница 143: ...Geeignetes Objektiv Erl uterung PPO E01 14 54mm Wird mit speziell geeignetem Zoomgetriebe geliefert PPO E02 14 54mm 11 22mm Wird mit speziell geeignetem Zoomgetriebe geliefert PPO E03 50mm Macro Wird...

Страница 144: ...om or call our TOLL FREE NUMBER 00800 67 10 83 00 for Austria Belgium Denmark Finland France Germany Italy Luxemburg Netherlands Norway Portugal Spain Sweden Switzerland United Kingdom or request an a...

Страница 145: ...Manual de instrucciones Carcasa submarina Para la c mara digital E 300 PT E01 Sp PT E01 SP 2005 5 25 11 35 AM 1...

Страница 146: ...asumir ninguna responsabilidad por los da os que el agua pueda causar a la c mara que alberga la caja OLYMPUS IMAGING CORP no abonar indemnizaci n alguna por accidentes da os personales o materiales q...

Страница 147: ...con cambios extremos de temperatura El producto se puede deteriorar 3 La apertura o cierre en lugares con mucha arena polvo o suciedad puede afectar la caracter stica de impermeabilidad y causar una f...

Страница 148: ...la junta t rica no se haya salido de la ranura 7 Este producto es de construcci n herm tica y est hecho de pl stico policarbonato Cuando se deja por un per odo de tiempo prolongado en un auto en una...

Страница 149: ...n m s de 60 m de profundidad Este producto est hecho de resina de policarbonato de excelente resistencia a los impactos pero puede resultar da ado si se lo raspa contra rocas etc Asimismo se puede rom...

Страница 150: ...zapata de conexi n S 13 C mo fijar o retirar la mesa de la c mara hacia o desde la carcasa S 13 2 Verificacion anticipada de la caja S 14 Prueba anticipada antes del uso S 14 Comprobando las partes he...

Страница 151: ...a el flash S 24 5 Manipulaci n despu s de la toma fotogr fica S 25 Limpie secando toda vestigio de agua S 25 Saque la c mara digital S 26 Lave la caja con agua pura S 27 Seque la caja S 27 6 Mantenien...

Страница 152: ...Silicagel U a de extracci n para retirar la junta t rica Tapa herm tica para el conector de cable TTL Adaptador de mantenimiento de tapa herm tica Manual de instrucciones este manual Lista des distri...

Страница 153: ...aci n Bot n de borrado Bot n de modo de calidad de imagen Bot n de equilibrio de blanco Monitor de LCD Parasol interior de LCD Bot n de modo de flash Visor de toma Bot n MENU Bot n de ejecuci n Perill...

Страница 154: ...taje del puerto herm tico de la carcasa Enrosque el puerto herm tico dentro de la carcasa girando el puerto herm tico en toda su extensi n hacia la derecha Coloque la correa de mano Coloque la correa...

Страница 155: ...perilla de modo de la carcasa puede quedar girando libremente esto no es una falla de funcionamiento C mo presionar el disparador Cuando presiona la palanca del disparador presione suavemente de mane...

Страница 156: ...AF PPO E03 Macro de 50 mm No Controlado Tambi n es posible el enfoque manual MF pero la gama de rotaci n del aro MF est limitado a 180 PPO E03 PER E01 Macro de 50 mm EC14 No No El enfoque es siempre...

Страница 157: ...extra as fijadas a la junta t rica dentro de la tapa sobre el conector del cable TTL Para asegurar la tapa gire suavemente la tapa hacia la derecha hasta que se pare Tapa Conector Compruebe las juntas...

Страница 158: ...te 1 2 3 4 C mo fijar o retirar la mesa de la c mara hacia o desde la carcasa La c mara digital est colocada y fijada dentro de la carcasa mediante la mesa de la c mara ubicada dentro de la tapa delan...

Страница 159: ...y que la tapa est enroscada dentro del conector sin flojedad Prueba previa 1 Antes de colocar la c mara digital en la carcasa sumerja la carcasa vac a a la profundidad de agua prevista para confirmar...

Страница 160: ...a c mara digital antes de colocar la c mara digital dentro de la carcasa Retirando el filtro desde la c mara digital Si un filtro se encuentra fijado al objetivo de la c mara digital retire el filtro...

Страница 161: ...illas opuestas diagonalmente ya sea las hebillas A o B en la ilustraci n de la derecha y luego desbloquee el par restante de las hebillas opuestas diagonalmente 2 Para abrir la hebilla enganche con su...

Страница 162: ...o de la tapa delantera de la carcasa debe ser retirada desde la carcasa y fijada a la c mara digital 1 Fije el cable de la c mara al asiento del tr pode en la parte inferior de la c mara digital media...

Страница 163: ...digital 1 Tire de la perilla del zoom y perilla del interruptor de alimentaci n de la carcasa de manera que no entorpezcan en el camino durante la colocaci n de la c mara digital En este momento ajust...

Страница 164: ...lla del zoom puede controlar el enfoque con el zoom sin dificultades y que la perilla del interruptor de alimentaci n pueda encender y apagar ON OFF la alimentaci n de la c mara MENU MENU MENU Lea det...

Страница 165: ...encuentran las juntas t ricas colocadas apropiadamente Se encuentra la tapa del conector del cable TTL fijada sin ninguna flojedad Se encuentra la alimentaci n de la c mara libre de ser encendida y ap...

Страница 166: ...diagonalmente 3 Incline las palancas de bloqueo desbloqueo en la direcci n de las flechas para sellar la carcasa A A B B S 21 Sp Enganche un par de hebillas opuestas diagonalmente y luego enganche el...

Страница 167: ...Realice las verificaciones finales Inspecci n visual Despu s de cerrar la caja firmemente compruebe el sellado entre las tapas delantera y trasera y la conexi n entre el puerto y la caja para asegura...

Страница 168: ...a Hay algo de agua adentro 4 Luego sumerja la caja durante 30 segundos Verifique cuidadosamente por si hay burbujas de aire 5 Verifique que no haya ingresado agua Retire la caja del agua y verifique n...

Страница 169: ...Cuando presiona la palanca del disparador sostenga la carcasa seguramente con ambas manos y opera la palanca suavemente para evitar de que la c mara se sacuda Precauciones cuando se utiliza el flash...

Страница 170: ...e abre o se retira el puerto Seque particularmente estas reas cuidadosamente Cuando abre la caja quitando el puerto aseg rese de que no ingrese agua desde el exterior por ejemplo que caiga de su pelo...

Страница 171: ...B B MENU MENU MENU Coloque siempre la carcasa abierta con el lado de la junta t rica dirigida hacia arriba Cuando la carcasa se coloca con la junta t rica dirigida hacia abajo pueden fijarse suciedad...

Страница 172: ...cuando se aplica localmente una muy alta presi n de agua Antes de lavar la caja con agua retire la c mara digital de la misma Opere la palanca del disparador y los variados botones de este producto e...

Страница 173: ...hacerse por apretar la circunferencia entera de la junta t rica ligeramente con sus dedos Utilice un pa o limpio sin fibras adheridas o palillo algodonado papel de limpieza tissue o similares para re...

Страница 174: ...cto de la junta t rica en la tapa delantera Reemplace las partes consumibles La junta t rica es un producto consumible Independiente del n mero de veces que se use la caja se recomienda que la junta t...

Страница 175: ...ctor TTL desde la tapa herm tica aseg rese de limpiar y engrasar la junta t rica Utilice el adaptador de mantenimiento de tapa herm tica para retirar la unidad de junta t rica desde la tapa herm tica...

Страница 176: ...se filtre agua debido a un cierre deficiente 6 Antes de cerrar la caja compruebe que las juntas t ricas se asientan correctamente en la ranura 7 Aseg rese que las hebillas usadas para la conexi n de l...

Страница 177: ...o como sea posible y lave la caja con agua pura En caso de usarse en el oc ano es efectivo sumergir la caja durante un cierto tiempo en agua pura para quitar toda sal Opere los botones y palancas bajo...

Страница 178: ...Una aplicaci n excesiva de grasa no mejora la funci n de hermeticidad al agua ni la presi n soportada permisible Sin embargo puede facilitar la fijaci n de arena suciedad etc Una capa delgada y unifo...

Страница 179: ...anaje del zoom especial PPO E03 50mm Macro Provisto con el engranaje de enfoque especial La gama de rotaci n del aro MF est limitado a 180 PER E01 EC14 Cuando se utiliza el EC14 la PER E01 debe ser in...

Страница 180: ...m or call our TOLL FREE NUMBER 00800 67 10 83 00 for Austria Belgium Denmark Finland France Germany Italy Luxemburg Netherlands Norway Portugal Spain Sweden Switzerland United Kingdom or request an ad...

Страница 181: ...Cs bJPMM...

Страница 182: ...Cs 0 12345 SM livjmrp fj dfkd lom K livjmrp fj dfkd lom K 01 mqJbMN C 1...

Страница 183: ...Cs NK OK 01 PK QK RK SK lJ NK livjmrp fj dfkd lomK OK 0 PK QK SM SM 012 RK 0 SK TK lJ UK VK lJ NMK C 2...

Страница 184: ...Cs N 0 _ijJN 0 12345 eiaJP 0123456 NK lJ OK lJ PK lJ lJ lJ QK lJ lJ RK lJ lJ SK lJ lJ lJ TK 0 1 0123456 UK lJ VK NMK 0 lJ C 3...

Страница 185: ...Cs SM 0 lJ qqi C 01234567 C livjmrp fj dfkd lom K livjmrp fj dfkd lom K lJ lJ livjmrp fj dfkd lom K C 4...

Страница 186: ...KKKKKKKKKKKK JNN KKKKKKKKKKKKKKKKKKKKKKKKKKKKKKKKKKKKKKKKKKKKKKKKKKKKKKKKKKKKKKKKKKKKKKKKKKKKKKKKKKKKKKKK JNN qqi KKKKKKKKKKKKKKKKKKKKKKKKKKKKKKKKKKKKKKKKKKKKKKKKKKKKKKKKKKKKKKKKKKKKKKKKKKKKKKKK JNO q...

Страница 187: ...KKKKKKKKKKKKK JOQ RK KKKKKKKKKKKKKKKKKKKKKKKKKKKKKKKKKKKKKKKKKKKKKKKKKKKKKKKKKKKKKKKKKKKKKKKKKKKKKKKKKKKKKK JOR KKKKKKKKKKKKKKKKKKKKKKKKKKKKKKKKKKKKKKKKKKKKKKKKKKKKKKKKKKKKKKKKKKKKKKKKKKKKKKKKKKKKKKKK...

Страница 188: ...Cs NK C 7 lJ qqi lJ...

Страница 189: ...Cs 1 2 3 4 5 6 7 8 9 0 qqi 0 1 01 _ c b c lh fpl C 8 lJ mliJbMN_ lJ mliJbMN lJ lJ...

Страница 190: ...Cs C 0 C lJ lJ C C C 0 01234 56789 C C C 9 lJ...

Страница 191: ...Cs C 0 1 C C C C C C C C C 012 C C C C 10...

Страница 192: ...Cs 0 C C C 0 C mmlJbMN mmlJbMO mmlJbMP mmlJbMP HmboJbMN NQJRQ NQJRQ NNJOO RM j RM j Hb NQ c c jc jc NUM c 01 C C C C C 11 OMMR S...

Страница 193: ...Cs qqi qqi qqi 0 1 qqi qqi qqi lJ 2 1 qqi 3 qqi 4 2 1 qqi qqi qqi qqi qqi qqi qqi lJ JOV qqi C 12 lJ...

Страница 194: ...Cs 0123456 C C C C C qqi 0 1 C 1 2 3 4 012 34 C C C C NT C C 0 1 C C C 13 1 2 3 4 5...

Страница 195: ...Cs OK 0123 4567 01234 5 NK lJ OK lJ PK qqi lJ NK OK lJ lJ lJ lJ lJ lJ lJ 0123 456789 0123 45 C 14...

Страница 196: ...Cs PK C C C C C C 01 C C C C C 0 C C C C C C 15...

Страница 197: ...Cs mqJbMN bJPMM C C N Q O C _ O O C O C P Q C C 16 A A B B...

Страница 198: ...Cs C 17 C 012345 6789 C RM C C 012 3 N C O C C...

Страница 199: ...Cs C 18 lcc 01 23456 N 0123 456 C C R C O qqi C C...

Страница 200: ...Cs P 0123450166789 01234 01 01 23 456789 012 3456 78 MENU MENU MENU MENU C 19...

Страница 201: ...Cs MENU MENU MENU 01 234506 C C C C 0 lJ C 01234 C C lJ C lJ C C qqi C C C 20...

Страница 202: ...Cs A A B B MENU MENU MENU N C lJ C O Q O C P C O Q C C C 21...

Страница 203: ...Cs lJ C C C C C C C JNS C C C C C C C 22...

Страница 204: ...Cs R N O P lJ P P Q PM R S P T U C 23...

Страница 205: ...Cs QK C C C C bJPMM C C 0 C C C 24...

Страница 206: ...Cs RK 012 012345 6 0123 012 C 25...

Страница 207: ...Cs C JNU lJ C lJ lJ C C C C O C C C 26 A A B B MENU MENU MENU...

Страница 208: ...Cs lJ 01234 56 78 9 0 0123456789 C 27...

Страница 209: ...Cs SK lJ lJ lJ 1 lJ lJ lJ 2 lJ lJ 3 lJ lJ lJ lJ 0 lJ lJ lJ lJ lJ lJ lJ lJ lJ C 28...

Страница 210: ...Cs lJ lJ lJ lJ lJ lJ lJ lJ lJ lJ N lJ R R O P lJ lJ P Q 0 0123 lJ lJ lJ C 29...

Страница 211: ...Cs lJ qqi qqi qqi qqi 01 lJ lJ qqi qqi lJ lJ lJ lJ lJ lJ lJ lJ lJ C 30 1 2 3...

Страница 212: ...Cs TK mqJbMN N N mqJbMN bJPMM O mqJbMN O 0 P 01 P ENF EOF EPF C EQF ERF C C ESF lJ C ETF qqi C EUF lJ C EVF C C Q Q ENF lJ EOF E F 01234 E F E F E F EPF E F E F E F EQF C 31...

Страница 213: ...Cs R R ENF EOF 01 EPF 0123 EQF lJ lJ ERF ESF S S 012 0 012 lJ lJ lJ lJ lJ lJ lJ lJ lJ T T 01 N U U ENF lJ EOF lJ EPF lJ EQF lJ ERF lJ lJ ESF ETF 012345 C 32...

Страница 214: ...lJ C lJ C EPF lJ lJ lJ 0 EQF 0 1 lJ C ERF lJ ESF lJ lJ NM NM ENF NN NN 0 NO mqJbMN NO ENF mqJbMN lJ mliJbMN I mliJbMN_ mqJbMN lJ ClJ O C lJ C EOF mqJbMN I C mmlJbMN mmlJbMO mmlJbMP mboJbMN NQJRQ NQJRQ...

Страница 215: ...Cs EPF lJ mplidJN lJ EQF pfi JR R lJ 012 C 34 bJPMM SM L L L L L L L L Lqqi L L _p lJ ONQ NSU NQU NUMM...

Страница 216: ...3934 Enquiry Hotline 1800 OLYMPUS 1800 659 6787 Suite D 10 P1 Level 10 Plaza Mont Kiara 2 Jalan 1 70C Mont Kiara 50480 Kuala Lumpur Malaysia Tel 603 6203 3882 Fax 603 6203 3885 31 Gilby Road Mt Waverl...

Страница 217: ...Kr E 300...

Страница 218: ...Kr OLYMPUS IMAGING CORP OLYMPUS IMAGING CORP 60m OLYMPUS IMAGING CORP OLYMPUS IMAGING CORP PT E01 K 1...

Страница 219: ...Kr 1 2 3 4 5 6 O 1 OLYMPUS IMAGING CORP 2 3 4 60m 60m 5 6 7 O 8 9 O 10 K 2...

Страница 220: ...Kr BLM 1 HLD 3 1 O 2 O 3 O 4 O O 5 O O 6 O O O 7 8 O 9 10 O K 3...

Страница 221: ...Kr 60m O TTL O O OLYMPUS IMAGING CORP OLYMPUS IMAGING CORP K 4...

Страница 222: ...r K 1 K 1 K 1 K 3 K 3 K 4 K 5 6 1 K 7 K 7 K 8 K 9 K 9 K 10 K 10 K 10 K 10 K 11 K 11 TTL K 12 TTL K 12 K 13 K 13 2 K 14 K 14 K 14 K 14 3 K 1 5 K 15 K 15 K 15 K 15 K 15 K 15 K 16 K 16 K 16 K 16 K 17 K 5...

Страница 223: ...Kr K 17 K 18 K 20 K 20 K 21 K 22 K 22 K 22 K 23 4 K 24 K 24 K 24 K 24 K 24 K 24 5 K 25 K 25 K 26 K 27 K 27 6 K 28 O K 28 K 28 O K 29 O K 29 K 29 TTL TTL K 30 TTL K 30 7 K 31 PT E01 K 31 K 34 K 6...

Страница 224: ...Kr 1 O O TTL K 7...

Страница 225: ...Kr 1 2 3 4 5 6 7 8 9 0 TTL LCD LCD _ AF AE AF OK ISO K 8 O POL EO1B O POL E01A O O...

Страница 226: ...Kr O O O 2 2 K 9...

Страница 227: ...Kr LCD K 10...

Страница 228: ...Kr PPO E01 PPO E02 PPO E03 PPO E03 PER E01 14 54mm 14 54mm 11 22mm 50mm Macro 50mm Macro EC14 AF AF MF MF 180 AF 2005 6 ON OFF K 11 ON OFF...

Страница 229: ...Kr TTL TTL TTL O TTL TTL TTL O 1 2 TTL 3 4 TTL 2 1 TTL TTL TTL TTL TTL TTL TTL O 29 TTL K 12...

Страница 230: ...Kr TTL 1 2 3 4 1 2 3 4 5 17 K 13...

Страница 231: ...Kr 2 1 O 2 0 3 TTL O 1 2 O O O O 0 O O O K 14...

Страница 232: ...Kr 3 LCD Note K 15...

Страница 233: ...Kr A A B B PT E01 E 300 1 4 2 A B 2 2 2 3 4 K 16...

Страница 234: ...Kr K 17 50mm 1 2...

Страница 235: ...Kr K 18 OFF 1 2 TTL 5...

Страница 236: ...Kr 3 ON OFF MENU MENU MENU MENU K 19...

Страница 237: ...Kr O O TTL ON OFF O K 20 MENU MENU MENU...

Страница 238: ...Kr 1 0 2 4 2 3 2 2 4 K 21 A A B B MENU MENU MENU...

Страница 239: ...Kr ON OFF K 15 O K 22...

Страница 240: ...Kr 5 1 2 3 O 3 3 4 30 5 6 3 7 8 K 23...

Страница 241: ...Kr 4 LCD E 300 K 24...

Страница 242: ...Kr 5 Note K 25...

Страница 243: ...Kr 18 O O O O 2 K 26 A A B B MENU MENU MENU...

Страница 244: ...Kr O K 27...

Страница 245: ...Kr 6 O O O 1 O O O 2 O O 3 O O O O O O O O O O O O O O O K 28...

Страница 246: ...Kr O O O O O 1 O 1 1 O 5mm 5mm 2 3 O 3 O 4 O O O O K 29...

Страница 247: ...Kr TTL TTL TTL TTL O O O O O O TTL TTL O O O O O 1 2 3 K 30...

Страница 248: ...Kr 7 PT E01 1 1 PT E01 E 300 2 PT E01 2 3 3 1 2 3 4 5 6 O 7 TTL 8 O 9 4 4 1 O O 2 a b c d 3 a b c K 31...

Страница 249: ...Kr 4 5 5 1 2 3 4 O O 5 6 6 6 O O O O O O 7 7 1m 8 8 1 O 2 O K 32...

Страница 250: ...Kr 3 O 4 O 5 O O 6 7 9 O 9 1 O O 2 O O 3 O O O 4 O 5 O 1 6 O O 10 10 1 11 11 3 K 33...

Страница 251: ...O POL E01A POL E01B PT E01 0 O 2 O 2 PT E01 3 O PSOLG 1 O 4 SILCA 5 5 O K 34 CAMEDIA E 300 60m TTL ABS O LCD 214mm X 168mm X 148mm 1800g PPO E01 PPO E02 PPO E03 PER E01 14 54mm 14 54mm 11 22 mm 50mm...

Страница 252: ...or digital camera Caisson tanche pour l appareil photo num rique Unterwassergeh use f r Digitalkamera Carcasa submarina para la c mara digital PT E01 2005 OLYMPUS IMAGING CORP Printed in Japan PT E01...

Отзывы: