background image

23

Use

5 Use

5.1 Safety information for use

WARNING

Risk of injury to the patient

There is a risk of an electric shock when the endoscopic 

equipment is inserted into the patient and the remote end of the 

light-guide cable comes in contact with the mains power.


• Always connect the endoscopic equipment before inserting the 

endoscope into the patient.

CAUTION

Risk of injury to the patient

Light sources emit large amounts of energy. As a result the 

connectors of the endoscopic equipment and the distal end of the 

endoscope become hot. There is a risk of: 

 -

thermal injury to the patient’s tissue (e.g., from prolonged 

exposure to the intense illumination in cavities with small 

lumens, or if the distal end of the endoscope is placed into 

close proximity to the tissue).

 - burns to the patient’s or user’s skin.

 -

burns or thermal damage to surgical equipment (e.g., surgical 

drapes, plastic materials).


• Do not place the endoscopic equipment on the patient’s skin, 

on flammable materials, or on heat-sensitive materials.


• Set the output power of the light source to the minimum level 

that is necessary for a sufficient illumination of the target area. 

Avoid prolonged exposure to intense illumination.


• Switch off the light source or set the light source to standby 

mode whenever the light source is not in use.

CAUTION

Risk of injury to the patient

Light sources emit large amounts of energy. As a result, the 

temperatures in front of the light emission surface increase.  

There is a risk of thermal injury to the patient’s tissue.

Содержание OES ELITE

Страница 1: ...INSTRUCTIONS FOR USE TELESCOPE WA2P400A WA2T400A WA2T412A WA2T430A WA2T470A WA2T412P WA2T430P WA2T470P WA2T43WA ...

Страница 2: ......

Страница 3: ...General warnings and cautions 9 3 Product description 12 3 1 Scope of delivery 12 3 2 Telescope 12 3 3 Protective tube 16 3 4 Symbols 17 3 5 Warranty 18 4 Preparation 19 4 1 Safety information for preparation 19 4 2 Inspection 19 4 3 Assembly and connection 21 5 Use 23 5 1 Safety information for use 23 5 2 Procedure 24 6 After use 25 6 1 Removal and disassembly 25 6 2 Attaching the telescope to th...

Страница 4: ... disinfection 33 7 5 Automated cleaning and disinfection 33 7 6 Maintenance 34 7 7 Sterilization 34 8 Repair shipment and disposal 39 8 1 Repair 39 8 2 Shipment 39 8 3 Disposal 40 9 Compatible equipment 41 10 Technical data 45 10 1 General dimensions 45 10 2 Dimensions for reprocessing 46 10 3 Specifications 46 10 4 Ambient conditions 46 ...

Страница 5: ...g the procedure Use the instructions in this document if the instructions differ from the System Guide Endoscopy If the required instructions for use are missing immediately contact an Olympus representative Keep the instructions for use in a safe accessible location 1 2 Signal words The following signal words are used throughout this document WARNING Indicates a potentially hazardous situation wh...

Страница 6: ... symbol indicates additional helpful information 1 A numeration indicates a sequence of actions 2 Bullet points indicate individual actions or different options for action Dashes indicate the listing of data options or objects 1 Numbers with right parenthesis name elements in illustrations 1 4 Trademarks STERRAD NXTM Cidex OPA are trademarks of their respective owner 1 5 Manufacturer Olympus Winte...

Страница 7: ...430A WA2T470A WA2T43WA In urology Cystoscopy Resectoscopy Urethrotomy In gynecology Hysteroscopy Resectoscopy In otorhinolaryngology Laryngeal pharyngeal and tracheal surgery Do not use for any other purposes Telescope WA2T412P WA2T430P WA2T470P In urology Photodynamic diagnosis PDD Cystoscopy Resectoscopy Do not use for any other purposes Protective tube WA2P400A Protective tube to protect OES EL...

Страница 8: ... procedures Reprocessing Reprocessing of the product may only be performed by qualified hygiene personnel Repair Repair of the product may only be performed by trained qualified servicing personnel that has been authorized by Olympus Otherwise Olympus cannot be held responsible for the safety and performance of the product 2 4 Environment of use Medical use This product is only intended to be used...

Страница 9: ...structions in the System Guide Endoscopy In case of conflicting information follow the dangers warnings cautions and instructions in this document WARNING Risk of injury to the patient and or the user The use of a damaged product or of a product with improper functioning may cause an electric shock mechanical injury infection and or thermal injury Before each use observe the instructions in the se...

Страница 10: ...hen using light sources with noninsulated light guide connectors Only use light sources or light guide cables that meet at least the same requirements of applied part classification For the applied part classification refer to the respective instructions for use WARNING Risk of injury to the patient There is a risk of injury to the patient due to malfunction of the equipment Always have spare equi...

Страница 11: ...sing endoscopic equipment in combination with laser equipment Use suitable protection measures e g filters protective goggles NOTICE Risk of damage to the product The endoscope is a precise optical device Careless handling may damage the endoscope Always handle the endoscope with care Do not hold the endoscope by the distal end only Do not bend the insertion tube Always store and transport the end...

Страница 12: ...0A Instructions for use System Guide Endoscopy WA2P400A Protective tube Access information sheet 3 2 Telescope A telescope is a rigid endoscope An image relay system of rod lenses transmits the endoscopic image A bundle of optical fibers transmits light from an external light source to illuminate the endoscopic image A PDD telescope is designed for endoscopic diagnosis especially photodynamic diag...

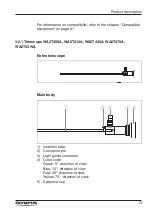
Страница 13: ...pment on page 41 3 2 1 Telescope WA2T400A WA2T412A WA2T430A WA2T470A WA2T43WA Entire telescope Main body 1 Insertion tube 2 Connector pin 3 Light guide connector 4 Color code Green 0 direction of view Blue 12 direction of view Red 30 direction of view Yellow 70 direction of view 5 Eyepiece cup ...

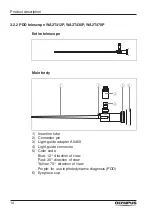
Страница 14: ...70P Entire telescope Main body 1 Insertion tube 2 Connector pin 3 Light guide adapter A0460 4 Light guide connector 5 Color code Blue 12 direction of view Red 30 direction of view Yellow 70 direction of view Purple for use in photodynamic diagnosis PDD 6 Eyepiece cup ...

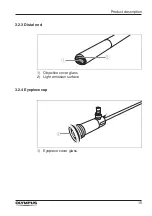
Страница 15: ...15 Product description 3 2 3 Distal end 1 Objective cover glass 2 Light emission surface 3 2 4 Eyepiece cup 1 Eyepiece cover glass ...

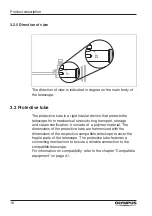
Страница 16: ...ress during transport storage and steam sterilization It is made of a polymer material The dimensions of the protective tube are harmonized with the dimensions of the respective compatible telescope to cover the fragile parts of the telescope The protective tube features a connecting mechanism to ensure a reliable connection to the compatible telescope For information on compatibility refer to the...

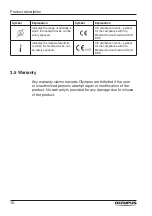
Страница 17: ... Serial number In combination with a high resolution camera head and monitor a high resolution image can be displayed Quantity of content Storage conditions Manufacturer Transport conditions Date of manufacture Green Dot symbol for dual recycling system Caution consult accompanying documents Indicates a recovery recyclable package or package material Consult instructions for use Federal USA law re...

Страница 18: ...vice Directive 93 42 EEC Indicates the temperature limits to which the medical device can be safely exposed CE certification mark symbol for the compliance with the Medical Device Directive 93 42 EEC 3 5 Warranty Any warranty claims towards Olympus are forfeited if the user or unauthorized persons attempt repair or modification of the product No warranty is provided for any damage due to misuse of...

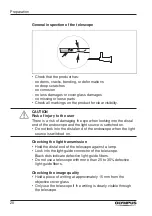
Страница 19: ...each use inspect the product as described in the section Inspection on page 19 Do not use a damaged product WARNING Risk of injury to the patient If the light guide cable is not properly connected to the endoscope or the light source the endoscopic image may suddenly disappear during the procedure This may lead to mechanical injury to the patient Properly connect the adapters to the light guide ca...

Страница 20: ...e endoscope and the light source is switched on Do not look into the distal end of the endoscope when the light source is switched on Checking the light transmission Hold the distal end of the telescope against a lamp Look into the light guide connector of the telescope Black dots indicate defective light guide fibers Do not use a telescope with more than 25 to 30 defective light guide fibers Chec...

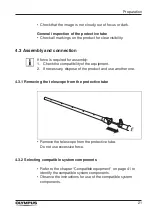
Страница 21: ...eck the compatibility of the equipment 2 If necessary dispose of the product and use another one 4 3 1 Removing the telescope from the protective tube Remove the telescope from the protective tube Do not use excessive force 4 3 2 Selecting compatible system components Refer to the chapter Compatible equipment on page 41 to identify the compatible system components Observe the instructions for use ...

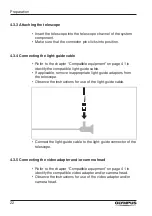
Страница 22: ...e compatible light guide cable If applicable remove inappropriate light guide adapters from the telescope Observe the instructions for use of the light guide cable Connect the light guide cable to the light guide connector of the telescope 4 3 5 Connecting the video adapter and or camera head Refer to the chapter Compatible equipment on page 41 to identify the compatible video adapter and or camer...

Страница 23: ... cavities with small lumens or if the distal end of the endoscope is placed into close proximity to the tissue burns to the patient s or user s skin burns or thermal damage to surgical equipment e g surgical drapes plastic materials Do not place the endoscopic equipment on the patient s skin on flammable materials or on heat sensitive materials Set the output power of the light source to the minim...

Страница 24: ...r The light guide connector on the endoscope becomes hot There is a risk of burns if the endoscope is held by hand for a longer period Avoid touching the light guide connector when holding the endoscope NOTICE Risk of damage to the product If activated laser equipment touches the energized endoscope the energized endoscope may be damaged Only ignite when the laser emission part is visible on the e...

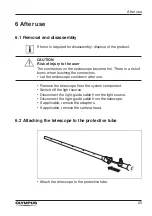
Страница 25: ...s when touching the connectors Let the endoscope cool down after use Remove the telescope from the system component Switch off the light source Disconnect the light guide cable from the light source Disconnect the light guide cable from the telescope If applicable remove the adapters If applicable remove the camera head 6 2 Attaching the telescope to the protective tube Attach the telescope to the...

Страница 26: ...the clamping piece Do not use excessive force 6 3 Preparation for reprocessing at the point of use Immediately after use bring the product to the reprocessing area Reprocess the product according to the instructions in this document and the System Guide Endoscopy ...

Страница 27: ... instrument trays and or protective tubes for automated cleaning and disinfection the detergent may not come in contact with all parts of the endoscope Ineffective cleaning and disinfection may lead to infection of the patient Do not use plastic instrument trays and or protective tubes for automated cleaning and disinfection of the endoscope CAUTION Risk of injury to the patient Performing a STERR...

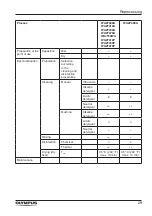
Страница 28: ...efficacy and or material compatibility of the reprocessing methods listed in the table have been validated or verified with this product For detailed information on validated reprocessing methods refer to the instructions following the table For detailed information on reprocessing methods refer to the System Guide Endoscopy Method validated for microbiological efficacy and verified for material c...

Страница 29: ...Decontamination Preparation Selection according to the cleaning and disinfection procedures Cleaning Manual Ultrasonic Alkaline detergent Acidic detergent Neutral detergent Machine Alkaline detergent Acidic detergent o o Neutral detergent Rinsing Disinfection Chemical o o Thermal Drying dry heat Tmax 95 C 203 F max 10 min 95 C 203 F max 10 min Maintenance ...

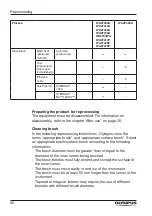
Страница 30: ...eaning brush In the following reprocessing instructions Olympus uses the terms appropriate brush and appropriate surface brush Select an appropriate brush surface brush according to the following information The brush diameter must be greater than or equal to the diameter of the inner lumen being brushed The brush bristles must fully extend and contact the surface of the inner lumen The brush must...

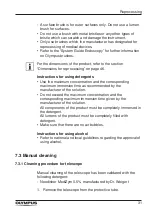
Страница 31: ...e corresponding maximum immersion time as recommended by the manufacturer of the solution Do not exceed the maximum concentration and the corresponding maximum immersion time given by the manufacturer of the solution All components of the product must be completely immersed in the detergent All lumens of the product must be completely filled with detergent Make sure that there are no air bubbles I...

Страница 32: ...ast 10 ml 7 Thoroughly rinse the product with deionized water using a cleaning pistol or other rinse device for at least 30 s The cleaning pistol or other rinse device must be suitable for cleaning medical devices and deliver a minimum pressure of 1 bar 14 5 psi 8 Dry the product 7 3 2 Cleaning procedure for protective tube Manual cleaning of the protective tube has been validated with the followi...

Страница 33: ... Johnson Ensure that all parts are covered 4 Soak the telescope in Cidex OPA Solution for the time recommended by the manufacturer of the solution but for at least 12 minutes 5 Remove the telescope from the solution 6 Immerse the telescope in sterile water according to the instruction of the manufacturer of the solution but at least for 1 minute with 8 liters of sterile water 7 Repeat the rinsing ...

Страница 34: ...er cleaning The product must be visually clean If there are any signs of debris repeat the cleaning process Check that the product has no dents cracks bending or deformations Check all markings on the product for clear visibility Even products designed to be reused have a limited service life A number of factors connected with handling and some reprocessing methods may lead to increased wear of th...

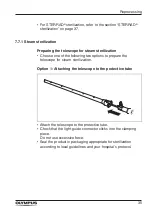
Страница 35: ...he following two options to prepare the telescope for steam sterilization Option 1 Attaching the telescope to the protective tube Attach the telescope to the protective tube Check that the light guide connector clicks into the clamping piece Do not use excessive force Seal the product in packaging appropriate for sterilization according to local guidelines and your hospital s protocol ...

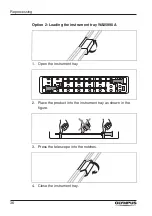
Страница 36: ...sing Option 2 Loading the instrument tray WA05990A 1 Open the instrument tray 2 Place the product into the instrument tray as shown in the figure 3 Press the telescope into the notches 4 Close the instrument tray ...

Страница 37: ...ed with steam sterilization only 7 7 2 STERRAD sterilization CAUTION Risk of injury to the patient Performing a STERRAD sterilization with the endoscope in the plastic instrument tray and or protective tube may lead to residues on the endoscope There is a risk of an allergic reaction to the patient When sterilizing the endoscope in the plastic instrument tray and or protective tube do not use STER...

Страница 38: ...s Different STERRAD systems with different cycles exist in the market The information provided on STERRAD in this document applies to the following cycles STERRAD 100S short cycle and long cycle STERRAD NX standard cycle and advanced cycle STERRAD 100NX standard cycle and express cycle ...

Страница 39: ...r the servicing personnel Sending used products to Olympus represents a risk of infection for the personnel Olympus is entitled to refuse soiled or contaminated products for reasons of safety Reprocess the product before sending in If reprocessing will damage the product completely clean the product as thoroughly as possible and mark it accordingly Use the original cardboard packaging for the tran...

Страница 40: ...40 Repair shipment and disposal 8 3 Disposal When disposing of the product or any of its components follow all applicable national and local laws and guidelines ...

Страница 41: ...me hot Only use endoscopes and light guide cables with the appropriate combination of the maximum insertion portion width and fiber bundle diameter For the appropriate maximum insertion portion width refer to the chapter Technical data on page 45 For the appropriate fiber bundle diameter refer to the respective instructions for use of the light guide cable Use the instructions in this document if ...

Страница 42: ...WA2T400A A2230 WA2T412A WA2T412P WA2T430A WA2T430P A2760 A2761 A2749 A2750 A2751 A2264 A2964 A20700A A2283 WA22830A A20710A A20718A A2752 A2753 A2754 A2755 A2757 A22060A A22061A A22063A A22065A WA22060B A2255 A2256 A2257 A2261 A3661 A3550 A2262 A2263 A2264 A2962 A2963 A2965 A2966 A2967 WA22061B WA22066A WA22067A WA22366A WA22367A A42091A A22091A A4723 A4727 A2231 WA03200A A93200A Storz A0460 Wolf ...

Страница 43: ...977A A20978A A2976 A2977 WA2T470A WA2T43WA A2282 A2297 A20713A A4760 A4761 A47610A A4764 A4765 A4678 A4679 A4766 A20719A A2271 A2273 A2275A A2279 A2291 A2280 A2290 A2971 A2972 A2975 A20971A A20972A A20975A WA22820A WA22850A OTV S7ProH HD L08E OTV S7 1D L08E OTV S7ProH HD 10E CH 190 XZ E WA2T470P ...

Страница 44: ...44 Compatible equipment WA2T400A WA2T412A WA2T430A WA2T470A WA2P400A WA05990A WA2T412P WA2T430P WA2T470P WA2T43WA ...

Страница 45: ... WA2T470A 284 0 mm WA2T43WA 283 3 mm WA2T412P 280 0 mm WA2T430P 282 2 mm WA2T470P 284 0 mm Maximum insertion portion width WA2T400A WA2T412A WA2T430A WA2T470A WA2T43WA WA2T412P WA2T430P WA2T470P 4 05 mm 10 1 2 Protective tube WA2P400A L1 Length 305 mm D1 Inner diameter 1 5 0 mm D2 Inner diameter 2 10 0 mm D3 Inner diameter 3 17 3 mm D1 D2 D3 L1 ...

Страница 46: ...tube WA2P400A L1 Length 305 mm D1 Inner diameter 1 5 0 mm D2 Inner diameter 2 10 0 mm D3 Inner diameter 3 17 3 mm 10 3 Specifications Direction of view WA2T400A 0 WA2T412A 12 WA2T430A 30 WA2T470A 70 WA2T43WA 30 WA2T412P 12 WA2T430P 30 WA2T470P 70 10 4 Ambient conditions Operating conditions Ambient temperature 10 to 40 C 50 to 104 F Relative humidity 30 to 85 Atmospheric pressure 700 to 1060 hPa D...

Страница 47: ...47 Technical data Storage conditions Temperature 10 to 40 C 50 to 104 F Relative humidity 30 to 85 Transport conditions Temperature 40 to 70 C 40 to 158 F Relative humidity 10 to 95 ...

Страница 48: ......

Страница 49: ......

Страница 50: ......

Страница 51: ......

Страница 52: ...W7091700_06 2017 01 20 en Copyright 2017 Olympus Winter Ibe GmbH ...

Отзывы: