background image

2

26

EN

Pla

yb

ac

k

101 

/ 133

INSERT SPEED

INDEX

MIKE

00 

M  

05 

s

 27

 M

  58

s

QP

DICT

Ni

101 

/ 133

INSERT SPEED

INDEX

MIKE

00 

M  

07 

s

Volume 15

QP

DICT

Ni

2

1

3

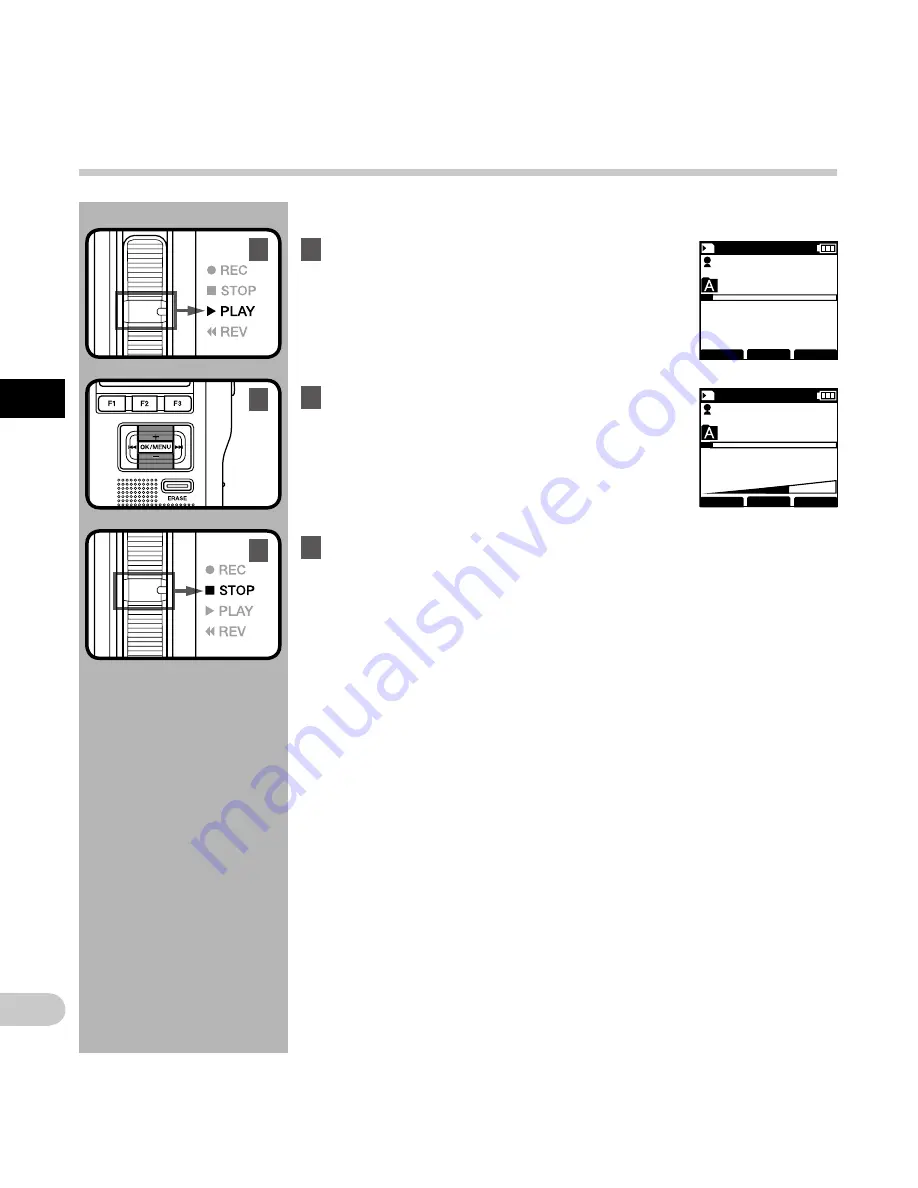
You can playback a file starting from any point.


1

  Select the file, then move the slide 

switch to the 

PLAY

 (

`

) position to start 

playback.

•  The green status indicator light will turn on.


2

  Press the 

+

 or 

 button to adjust the 

volume.

•  The volume can be adjusted within a range 

from [

00

] to [

30

].


3

  Move the slide switch to the 

STOP

 (

4

position at any point you want to stop 

the playback.

Playback

Содержание DS-5500

Страница 1: ...gital Voice Recorder Please read these instructions for information about using the product correctly and safely Keep the instructions handy for future reference To ensure successful recordings we rec...

Страница 2: ...o data loss incurred by a defect of the product repair performed by the third party other than Olympus or an Olympus authorized service station or any other reason is excluded Trademarks and registere...

Страница 3: ...rding monitor 25 Playback 26 Erasing 28 Erasing files 28 Partially erasing a file 29 Using the hold function 31 3 Advanced operations Selecting folders and files 32 Displaying file information 32 Devi...

Страница 4: ...the recorder in the places listed below no matter if in use or storage Places where temperatures and or humidity are high or go through extreme changes Direct sunlight beaches locked cars or near oth...

Страница 5: ...ccidentally being injured by the moving parts of the recorder Do not disassemble repair or modify the unit yourself Use SD SDHC memory cards only Never use other types of cards If you accidentally ins...

Страница 6: ...Danger The battery should never be exposed to flame heated short circuited or disassembled Never heat or incinerate battery Take precautions when carrying or storing batteries to prevent them from co...

Страница 7: ...een used for a long period Rechargeable batteries have limited lifetime When the operating time becomes shorter even if the rechargeable battery is fully charged replace it with a new one Dispose of t...

Страница 8: ...l when using the AC adapter such as abnormal noise heat smoke or a burning odor 1do not touch any of the exposed parts 2immediately disconnect the power supply plug from the power outlet and 3call you...

Страница 9: ...rder is compatible with USB 2 0 enabling fast data transfer to a computer s Five folders and up to 200 files per folder for a maximum of 1 000 recordings P 20 When using ODMS Olympus Dictation Managem...

Страница 10: ...5POWER HOLD switch 6ERASE button 7EAR Earphone jack 8MIC Microphone jack 9Status indicator light 0Display LCD panel Volume button Fast Forward 9 button OK MENU button Programmable smart F1 F2 F3 butt...

Страница 11: ...meter indicator 6Button guide display 7Microphone sensitivity 8Record mode 9Current file number 0Battery type Total number of recorded files in the folder Playback position bar indicator Current play...

Страница 12: ...ttended for a long time P 13 Battery indicator The battery indicator on the display will decrease as the battery loses power SCAN EXIT Battery Ni MH Alkaline Selecting battery type When the recorder i...

Страница 13: ...order After loading the Ni MH rechargeable batteries into the recorder you can charge them by connecting the USB cable to the recorder or by using the docking station in combination with the USB cable...

Страница 14: ...Optional is set for USB Connect P 39 Charging the batteries via the USB cable connection may not be successful depending on the power capacity of the USB port in your PC Use the AC adapter instead Do...

Страница 15: ...chargeable batteries are chemical products Battery efficiency may vary even when operating within the recommended temperature range This is an inherent nature of these products Recommended temperature...

Страница 16: ...the recorder via the docking station Always turn off the recorder before you connect power Detecting abnormal voltage If the recorder detects a DC power voltage outside the allowed voltage range 4 6 5...

Страница 17: ...t your Olympus reseller where you purchased the product Notes When initializing formatting a card confirm that no necessary data is stored on the memory card beforehand Initialization completely erase...

Страница 18: ...omatically display the format menu options P 42 Use only cards formatted with the recorder P 42 Never remove the card while the recorder is operating as this may damage the data After pushing the card...

Страница 19: ...the 9 or 0 button to select the item to set Setting time and date Time Date OK MENU button button 9 0 button F1 F2 F3 button Select the item from the hour minute year month and day with a flashing po...

Страница 20: ...ing the procedure below 1 While the recorder is in stop mode press the OK MENU button 2 Press the 9 or 0 button to select Device Menu tab You can change the menu display by moving the settings tab cur...

Страница 21: ...and deletes part of the previously recorded file starting from the chosen position P 22 Insert The recorded file will be inserted in the middle of the previously recorded file starting from the chosen...

Страница 22: ...recorded When you press the F2 DISPLY button during recording you can change the screen displays 3 Move the slide switch to the STOP 4 position to stop recording If you want to append additional reco...

Страница 23: ...will be erased 1 Select and play the file you want to overwrite Stop the playback at the point you want to start overwriting 2 Move the slide switch to the REC s position to start overwriting The red...

Страница 24: ...playing the file press the F1 INSERT button to insert an additional recording Insert Rec will appear on the display 3 Move the slide switch to the REC s position to start inserting the additional rec...

Страница 25: ...o monitor your recording by listening to it even while the recording is in progress In order to do so insert the earphone plug into the earphone jack and use the or buttons to control the volume level...

Страница 26: ...a file starting from any point 1 Select the file then move the slide switch to the PLAY position to start playback The green status indicator light will turn on 2 Press the or button to adjust the vo...

Страница 27: ...ayback Playback at normal speed Slow Play slow playback Playback speed slows down 50 and Slow play will be displayed Fast Play fast playback Playback speed becomes faster 50 and Fast play will be disp...

Страница 28: ...ill start Erase Done is displayed when the file is erased File numbers will be reassigned automatically A selected file can be erased from a folder Also all files in a folder can be erased simultaneou...

Страница 29: ...p In case of a Verbal comment P 33 before the end of the file that point will be set automatically as the ending point of the partial erase If you press the F1 button playback will skip back B Skip an...

Страница 30: ...rase is complete Notes If the ERASE button is not pressed within 8 seconds after the Start point and End point are alternately displayed the recorder will revert to stop status An erased file cannot b...

Страница 31: ...e hold mode During the hold mode all button operations are locked Notes If any button is pressed during the hold mode current date and time is displayed for approximately 2 seconds If the POWER HOLD s...

Страница 32: ...press the F1 FOLDER button The folder list screen will be displayed 2 Press the or F1 FOLDER button to select the folder then press the OK MENU button a Current file number b Total number of recorded...

Страница 33: ...ext one over to the right Repeat steps 1 and 2 to enter all four digits Pressing the ERASE button at any time will erase the last entry and move the cursor to the previous entry to the left 3 After al...

Страница 34: ...egistered up to a maximum of 16 characters Setting the Work Type Up to 20 Work Types can be registered and uploaded to the recorder using the ODMS software Each Work Type can have up to 10 optional it...

Страница 35: ...and hold the F1 VERBAL button Data recorded while pressing the F1 VERBAL button will be recorded as Verbal Comment Locating a Verbal Comment 2 When playing back a file press and hold the 9 or 0 butto...

Страница 36: ...ll start flashing Locating an index mark 2 While playing back a file press and hold the 9 or 0 button The recorder stops for 1 second when it reaches the index mark Clearing an index mark 1 Select a f...

Страница 37: ...ckly set it You can set each menu item as follows 1 While the recorder is in stop mode press the OK MENU button The menu will appear on the display 3 Press the or button to move to the item you want t...

Страница 38: ...complete the setting You will be informed that the settings have been established via the screen Menu list File Menu Priority Pending File Lock Work Type Rec Menu Mic Sense Rec Mode VCVA LCD Sound Men...

Страница 39: ...Control Voice Actuator VCVA starts recording automatically and stops when the volume drops below the threshold level 1 Select On 2 Move the slide switch to the REC s position to start recording File M...

Страница 40: ...able may vary depending on the country region where the product is purchased Adjust the start stop actuation level While the recorder is in recording mode press the 9 or 0 button to adjust the actuati...

Страница 41: ...ly storage class Reset Settings You can reset the menu settings to their default values Start The menu settings will be reset Cancel The reset will be canceled Device Menu Memory Select You can switch...

Страница 42: ...The Option Item name input screen will be displayed When inputting or editing an Option Item name only characters recognized by the ODMS software can be used a Input name display area b Keyboard windo...

Страница 43: ...ition can be moved up to the first character button The Input position changes from lighting to flashing The cursor is lit on the 0 string within the Keyboard window and makes character selection avai...

Страница 44: ...non Olympus devices or cards that are not recognized by the recorder must be formatted before they can be used with the recorder 1 Select Format at the Device Menu screen then press the OK MENU butto...

Страница 45: ...matting the memory will erase all the stored data including locked files When an unformatted card is inserted the format menu will be displayed automatically Locked SD cards cannot be initialized Memo...

Страница 46: ...he lower part of LCD in the Recording mode Level Meter Author ID File Name Work Type Recording Time LED Color You can select the color of LED during recording and playback OFF Red Green Blue Orange Ye...

Страница 47: ...gure various settings related to the recording and recorded files DSS Format Select the recording format DSS Pro DSS Classic Record function Select the recording mode Overwrite Append Insert File down...

Страница 48: ...gnition text editing with audio playback for efficient transcription ODMS only Make sure that your computer meets the minimum requirements listed below Please check with your system administrator or y...

Страница 49: ...or more Drive CD ROM CD R CD RW DVD ROM drive Browser Macintosh Safari 3 0 4 or later mozilla Firefox 3 6 20 or later ODMS and DSS Player software Display 1024 x 768 pixels or more 32 000 colors or m...

Страница 50: ...hen connected to a PC the built in memory and SD card will be recognized by the PC as separate removable disk drives Notes NEVER remove the card or disconnect the USB cable while the status indicator...

Страница 51: ...ly remove USB Mass Storage Device The drive letter will differ depending on the PC being used 2 Confirm that the status indicator light turns off before disconnecting the USB cable Macintosh 1 Drag an...

Страница 52: ...arks that are no longer required P 34 Verbal Comment Full The maximum number of Verbal comments has been reached max 32 Verbal comments per file Erase unnecessary Verbal comments P 33 Folder Full The...

Страница 53: ...her folder P 30 The file is locked Unlock the file from the file menu P 37 The SD card is locked Unlock the SD card No playback tone heard The earphone is connected Unplug the earphones to use the int...

Страница 54: ...rase unnecessary verbal comments P 33 Cannot find the recorded file Wrong recording media or folder Switch to the correct recording media or folder P 20 P 30 P 39 Cannot find the transferred files The...

Страница 55: ...used to record sound at a distance while minimizing surrounding noise s PC transcription kit AS 5500 The AS 5500 transcription kit provides you with a Foot Switch a headset and ODMS and DSS Player so...

Страница 56: ...0 Hz to 7 000 Hz SP 200 Hz to 5 000 Hz Specifications and design are subject to change without notice Battery life is measured by Olympus It varies greatly according to the conditions of use Guide to...

Страница 57: ...OLYMPUS IMAGING AMERICA INC Address 3500 Corporate Parkway P O Box 610 Center Valley PA 18034 0610 U S A Telephone Number 1 888 553 4448 This device Complies with Part 15 of the FCC Rules Operation is...

Страница 58: ...way P O Box 610 Center Valley PA 18034 0610 U S A Tel 1 888 553 4448 http www olympusamerica com OLYMPUS EUROPA HOLDING GMBH Premises Goods delivery Wendenstrasse 14 18 20097 Hamburg Germany Tel 49 0...

Отзывы: