background image

59

9

Resoluci

ó

n de fallos

Resolución de fallos

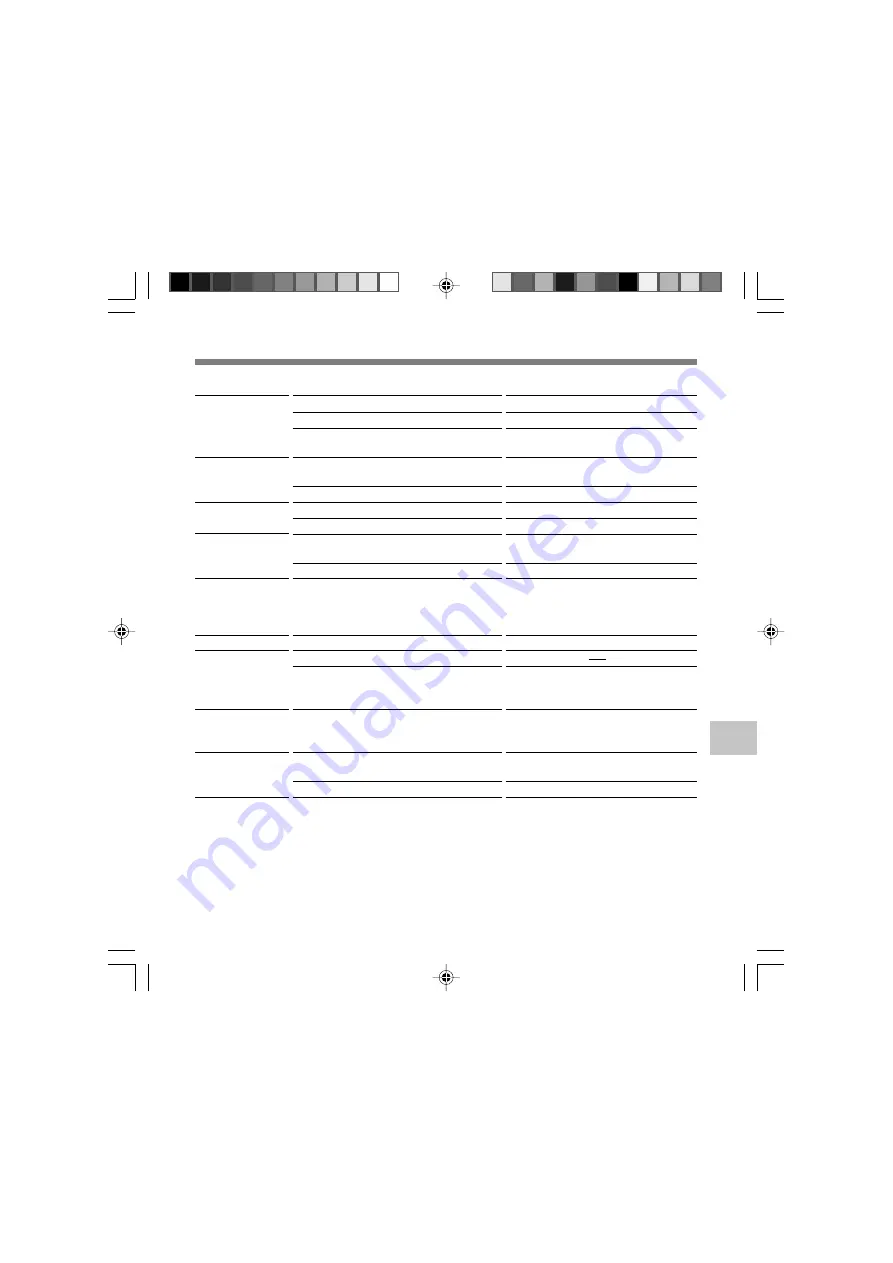
Causa probable

Las baterías no están bien cargadas.

Las baterías están agotadas.

La grabadora está en el modo HOLD.

La grabadora está en el modo HOLD.

Las baterías están agotadas.

Poca memoria interna restante.

Ha llegado al máximo número de archivos.

Hay un auricular conectado.

El botón VOL está ajustado a 0.

El salto atrás automático se encuentra ajustado
en “1 SEC SKIP” o “2 SEC SKIP”.

El archivo está bloqueado.

Se movió la grabadora durante la grabación.

La grabadora estaba cerca de un teléfono
celular o luz fluorescente durante la
grabación o reproducción.

La sensibilidad del micrófono es
demasiado baja.

Ha llegado al máximo número de marcas
índice (16).

El archivo está bloqueado.

Síntoma

No aparece nada
en la pantalla

No puede ponerse
en marcha

No puede grabar

No se escucha el
tono de
reproducción

No realiza el salto
regresivo con el
intervalo de salto
especificado.

No puede borrar

Se escucha un
ruido durante la
reproducción

El nivel de
grabación está
muy bajo

No puede colocar
marcas índice

Acción

Verifique que la polaridad es la correcta.

Cambie por baterías nuevas (

 P.11).

Libere el HOLD de la grabadora
(

 P.12).

Libere el HOLD de la grabadora
(

 P.12).

Cambie por baterías nuevas (

 P.11).

Borre los archivos innecesarios (

 P.31).

Compruebe otra carpeta.

Desconecte los auriculares y use los
altavoces internos.

Ajuste el botón VOL.

Ajuste el salto atrás automático en “OFF”
desde la configuración del menú.

Desbloquee el archivo.

Aleje la grabadora.

Cambie la sensibilidad del micrófono
al modo CONFERENCE y pruebe
nuevamente (

 P.22).

Borre las marcas índice no necesarias
(

 P.35).

Desbloquee el archivo.

Содержание DS-2

Страница 1: ...purchasing an Olympus Digital Voice Recorder Please read these instructions for information about using the product correctly and safely Keep the instructions handy for future reference To ensure successful recordings we recommend that you test the record function and volume before use EN EN FR ES ...

Страница 2: ...cording Recording 17 Recording Modes REC MODE 19 Using the Variable Control Voice Actuator VCVA 20 Microphone Sensitivity MIC SENSE 22 4 About Playback Playing 23 Repeat Playback 28 Noise Cancel Function 30 5 Other functions Erasing 31 Index Marks 35 LCD Display Information 37 Formatting the Recorder FORMAT 39 6 Preparation Before Using DSS Player Using DSS Player Software 41 Operating Environment...

Страница 3: ... 52 7 DSS Player Expanded Functions Upgrade Function 54 8 Other Practical Use Methods Using as External Memory of the Computer 56 9 Other Information Alarm Message List 57 Troubleshooting 59 Accessories optional 61 Specifications 62 Technical Assistance and Support 63 ...

Страница 4: ...below Power Supply 12 Menu Setting Method 16 Recording from External Microphone or Other Devices 26 Timer Recording TIMER REC 28 Listening While Audio is Recorded Recording Monitor 32 Changing the Playback Speed PLAY SPEED 39 Continuous Playback ALL PLAY 41 Auto Backspace Review BACK SPACE 44 Skip Interval Setting SKIP SPACE 45 Alarm Playback Function ALARM 48 Locking Files LOCK 55 LCD Contrast Ad...

Страница 5: ...r dust Do not use organic solvents such as alcohol and lacquer thinner to clean the unit Do not place the recorder on top of or near electric appliances such as TVs or refrigerators Avoid recording or playing back near cellular phones or other wireless equipment as they may cause interference and noise If you experience noise move to another place or move the recorder further away from such equipm...

Страница 6: ...ngs are made The displayed available recording time and recorded time are approximate indications You may assign your own names to folders This product is equipped with the following features Connect the cradle and the USB connection cable to this recorder and high speed data transfer to a computer can be performed P 47 This recorder can also be utilized as external memory of a computer P 56 By co...

Страница 7: ...be able to quickly find the recording you want to hear The playback speed can be controlled as preferred Fast forward and rewind are possible at a set interval Comes with DSS Player software P 41 If you transfer voice files recorded with the recorder to a PC you can easily play back organize and edit the files If you connect the recorder to a computer you can use it as a USB microphone or USB spea...

Страница 8: ...he voice Meetings discussions where voices of more than one person can be recorded Conferences lectures where the surrounding noise can be recorded Main Features IBM PC AT and ViaVoice are the trademarks or registered trademarks of International Business Machines Corporation Microsoft Windows and Windows Media are registered trademarks of Microsoft Corporation Apple Macintosh iMac Mac and PowerMac...

Страница 9: ...button 6 ERASE button 7 VOL button 8 VOL button 9 FF Fast Forward button 0 PLAY button REW Rewind button STOP button REC Record button Display LCD panel Record Play indicator lamp Built in speaker HOLD switch EAR Earphone jack Strap Hole Battery cover Cradle attachment point PC USB terminal Identification of Parts Identification of Parts ...

Страница 10: ...g display 4 Alarm indicator 5 Microphone sensitivity display 6 Stereo display 7 Record mode indicator 8 Current file number 9 Total number of recorded files in the folder 0 Erase lock indicator Repeat play indicator Character Information display Identification of Parts Identification of Parts Display LCD Panel ...

Страница 11: ...pus can be used for the recorder P 61 Notes Be sure to stop the recorder before replacing the batteries Unloading the batteries while the recorder is in use may corrupt the file If you are recording into a file and the batteries run out you will lose your currently recorded file because the file header will not be able to close It is crucial to change the batteries once you see only one Hash mark ...

Страница 12: ...ch is moved to hold in the stop status At this time if any button is pressed the clock display will flash for about 2 seconds but will not operate If the switch is moved to hold during playback or recording the playback recording status will stay and cannot be operated When playback has ended and the recording has ended due the remaining memory being used up it will be in the stop state The alarm ...

Страница 13: ...U SET button Accepts a choice and moves on to the next item 2 button Alters a choice 3 button Alters a choice PLAY button Switching the data displayed 1Set the hour 1 Press the 3 button or 2 button to set the hour 2 Press the MENU SET button to accept the hour You can choose between 12 and 24 hour display by pressing the PLAY button while setting the hour and minute Example 5 45 P M 5 45 PM 17 45 ...

Страница 14: ...5Y Initial setting 14D 1M 2005Y 2005Y 1M 14D 4Set the month 1 Press the 3 button or 2 button to set the month 2 Press the MENU SET button to accept the month 5Set the date 1 Press the 3 button or 2 button to set the date 2 Press the MENU SET button to accept the date 1Press the 3 or 2 button in the sub menu screen and select the TIME DATE See P 16 regarding the sub menu 2Press the MENU SET button ...

Страница 15: ...that point The set contents of the timer recording will be set and goes to OFF The recorder will stop if you leave it idle for 3 minutes during a menu setup operation when a selected item is not applied P 19 P 22 P 16 P 20 Switches to the sub menu Playback Speed Setting Screen Menu List Press and hold the MENU SET button for 1 second or longer Press the 3 or 2 button Press the MENU SET button Init...

Страница 16: ...int The recorder will stop if you leave it idle for 3 minutes during a sub menu setup operation when a selected item is not applied Sub Menu Time Date setting In order of hour minute year month and day Switches to the main menu LCD contrast adjustment Folder naming Assigning file comments Menu List Press the 3 or 2 button Press the MENU SET button Initial setting Menu List ...

Страница 17: ...ossible only when set to stereo HQ and stereo SP mode Recording 3 About Recording 1Press the FOLDER button to choose a folder The folder name is displayed a Total number of recorded files in the folder b Current file number c Current folder 2Press the REC button to start recording The record play indicator lamp glows red Turn the built in stereo microphone in the direction to be recorded The displ...

Страница 18: ... A beep will sound when remaining recording time reaches 60 seconds 30 seconds and 10 seconds while recording MEMORY FULL or FOLDER FULL will be displayed when the memory or folder capacity is full Delete any unnecessary files before recording any further P 31 or transfer voice files to your computer using DSS Player Software DSS format in SP and LP mode recording and WMA format in stereo HQ and s...

Страница 19: ...g HQ high quality sound recording SP standard recording and LP long term recording Recording Modes REC MODE 1Press and hold the MENU SET button for 1 second or longer REC MODE will be displayed on the screen P 15 2Press the MENU SET button The recording mode setup process begins 3Press the 3 or 2 button to choose from STEREO HQ STEREO SP HQ SP and LP 4Press the MENU SET button to complete the setu...

Страница 20: ... in normal mode 5Press the MENU SET button to complete the setup screen 6Press the STOP button to close the main menu When ON is selected a VCVA indication will be displayed on the screen When the microphone senses that sounds have reached a preset threshold volume level the built in Variable Control Voice Actuator VCVA starts recording automatically and stops when the volume drops below the thres...

Страница 21: ...s lower than the preset threshold sound level recording automatically stops after 1 sec approximately and STANDBY flashes on the display The record play indicator lamp glows when recording starts and flashes when recording pauses Adjust the start stop actuation level Press the FF or REW button to adjust the pause sound level during recording The VCVA level can be set to any of 15 different values ...

Страница 22: ...IC SENSE 1Press and hold the MENU SET button for 1 second or longer The main menu opens P 15 2Press the 3 or 2 button to choose MIC SENSE 3Press the MENU SET button The microphone sensitivity setup process begins 4Press the 3 or 2 button to choose between CONFERENCE and DICTATION CONFERENCE High sensitivity mode that records sounds in all directions DICTATION Low sensitivity mode suited for dictat...

Страница 23: ...ss the PLAY button to start playback The record play indicator lamp glows green a Current playback time b Total recording time of the file being played 4Press the VOL or VOL button to select the proper sound volume The display shows the volume level You can choose between 0 to 30 5Press the STOP button at any point you want to stop the playback Resume playback by pressing PLAY button again 3 1 4 2...

Страница 24: ...asily with the FF or REW button When it returns to the stop position with the FF or the REW button PREVIOUS STOP POINT will be displayed in the display And the file playback and stopping changes the end position and memorize the stop position as new end position End Position File A Head Position File B Head Position File C Head Position Cuing is possible Cuing is possible Cuing is possible Cuing i...

Страница 25: ... during playback fast playback or slow playback The next file is cued and playback starts at the original speed 5 Press the REW button during playback fast playback or slow playback The file being played is cued and playback starts at the original speed 5 Press the REW button 2 times during playback for fast playback or slow playback The previous file is cued and playback starts at the original sp...

Страница 26: ...al setting 5 When the index mark is shown in the middle of a file playback starts at the position of the index mark 6 When the skip interval is set at other than file skip in the menu setting 7 When playback was set to OFF previously in the menu setting 8 When the index mark is shown before the set time the playback will start in the position of the index mark 9 If both of the skip interval and th...

Страница 27: ... REW button when the previous playback is set to ON The nearest of the set time interval or index mark or only the return time of the previous playback will start the playback in reverse skip Set the file skip in the skip interval or press the REW button when the previous playback is set to OFF The playback will start in reverse skip either at the nearest last file start position or the index mark...

Страница 28: ... and press the PLAY button File playback begins 2Press the REPEAT button briefly at the point you want to start Repeat Playback REPEAT END flashes until you designate the end point Even while REPEAT END is flashing changing the playback speed fast forward rewind and cue P 25 can be executed the same as during normal playback and it can be advanced quickly to the end position Also when it reaches t...

Страница 29: ...t file in the folder The playback speed index mark insertion removal and noise cancellation can be set during continuous playback as well as normal playback 4Cancel the continuous playback function Pressing the REPEAT button briefly will return to the normal playback Pressing the STOP button will cancel the continuous playback function and stop the playback Note To use this function briefly press ...

Страница 30: ...in the following rotation OFF LOW HIGH If the Noise Cancel level is set to LOW or HIGH the level setting is displayed for 5 seconds when a file is played back To change the Noise Cancel level setting press the MENU SET button while the level setting is displayed Notes If you set it to LOW or HIGH the display flashes the Noise Cancel level for about 5 seconds when a file is played back If you set N...

Страница 31: ...tions 1Press the FOLDER button to choose a folder 2Press the FF or REW button to choose the file you want to erase a File to be erased 3Press the ERASE button CANCEL is flashing 4Press the 3 button to choose the START START is flashing When the 2 button is pressed it will return to the flashing display of CANCEL ...

Страница 32: ...tically Erasing Notes An erased file cannot be restored The file set to erase lock will not be erased If operation is not executed for 8 seconds during the setting it will return to the stop status Completion of erasing may take 10 seconds Never do anything during this period because data may be corrupted Removing or setting batteries is not permissible whether or not the batteries are set in the ...

Страница 33: ... files 1Press the FOLDER button to choose the folder you want to erase all files a Folder from which to erase files 2Press the ERASE button for 3 seconds or longer CANCEL is flashing 3Press the 3 button to choose the START START is flashing When the 2 button is pressed it will return to the flashing display of CANCEL ...

Страница 34: ...rder 4 Erasing Notes An erased file cannot be restored The file set to erase lock will not be erased If operation is not executed for 8 seconds during the setting it will return to the stop status Completion of erasing may take 10 seconds Never do anything during this period because data may be corrupted Battery removal setting removal are not permissible whether or not the battery is set in the r...

Страница 35: ... while playing a file The recorder stops for 1 second when it reaches the index mark Clearing an Index Mark 3Locate the index mark you want to clear 4Press the ERASE button while the index number appears for approximately 2 seconds on the display The index mark is erased Index marks can be placed in a file during recording or playback to provide and quick and easy way of keeping track of important...

Страница 36: ... to appear on the display Index marks cannot be set or cleared in a locked file In case of WMA files index marks can only be placed in files recorded with Olympus recorders If the REW button is pressed in the set status of 1 SEC SKIP or 2 SEC SKIP in the previous playback it will reverse skip for only the set time Erasing ...

Страница 37: ...as recorded 6 Current time and date Shows the current time and date During playback the TIME DATE or the counter appears 5 Memory remaining Shows remaining recording time 4 File comment Shows comment added to a file If there is no comment will appear If a comment contains many characters it will scroll horizontally to display the complete comment 1Press the DISPLAY button The LCD display views wil...

Страница 38: ...isplays in Waiting if it has not reached to the VCVA start level The display of the audio input level is different depending on stereo recording or monaural recording 2 Remaining memory bars Displays the remaining time available for recording in bar mode and count down mode LCD Display Information Display in the monaural recording Display in the stereo recording mode Display in the monaural record...

Страница 39: ... CANCEL 7Press the MENU SET button After DATA WILL BE CLEARED turns on for about 2 seconds CANCEL will flash 1 3 5 7 2 4 6 Formatting the Recorder FORMAT Formatting the Recorder FORMAT If you format the recorder all function settings will return to their defaults All files stored in the recorder will be deleted If you have important files that you want to save connect the recorder to a computer an...

Страница 40: ...gain Formatting begins and an indicator flashes on the display FORMAT DONE displays when formatting ends Notes Never format the recorder from a PC When the recorder is formatted all the stored data including locked files are erased After formatting the first file name is 0001 While formatting do not remove the batteries It may take 10 seconds or more for the erasing to end Formatting the Recorder ...

Страница 41: ...by file management tools such as Explorer attached to Microsoft Windows and Finder attached to Mac OS are different from the folder names settable with the recorder or DSS player If folders or files stored on the recorder are moved or renamed by using a file management tool such as Explorer or Finder the order of files may be changed or files may become unrecognizable Data can be written or upload...

Страница 42: ...56 colors or more One free port Earphone output or speakers The mouse or similar to a pointing device Environment where the Internet can be utilized PC Operating System CPU RAM Hard drive space Drive Sound card Browser Display USB port Audio I O terminals Others Power Mac G3 233 MHz class processor or faster iMac iBook eMac Power Mac PowerBook The computer must support a standard USB port If recor...

Страница 43: ...the included Software CD Applications included with DSS Player DSS Player Recorded voice files can be downloaded to the PC for complete file management and playback solution Acrobat Reader is installed on your PC It is required to view the accompanying manual in PDF format Be sure to confirm the following before installation Exit all running applications Eject the floppy disk if you are using one ...

Страница 44: ...terms of the Licensing Agreement You must accept the terms of the Licensing Agreement to install DSS Player If you accept them click Yes 7Select where to install DSS Player This lets you specify the folder in which to install DSS Player Click Browse to find the desired installation folder To accept the default folder click Next Note If the installation folder does not exist a confirmation dialog b...

Страница 45: ...DSS Player for the serial number After the input has ended click OK to complete the registration Installing Software 1Insert DSS Player into the CD ROM drive 2Double click CD icon Double click the desired language to select it 3Double click the following icon 4Click Continue when the DSS Player opening screen appears 5Confirm your acceptance of the terms of the Licensing Agreement You must accept ...

Страница 46: ...press F1 on the keyboard Macintosh While DSS Player is running choose DSS Player Help from the Help menu Search by Contents 1Once the Online Help screen appears click the Contents tab 2Double click the icon of the desired topic heading The title of the topic is displayed 3Double click the icon of the desired topic An explanation of the topic is displayed Search by Key word 1Once the Online Help sc...

Страница 47: ...e mark to match the mark of the recorder connection port STORAGE REMOTE is displayed on recorder if the USB cable is connected Connecting to Your PC Be sure to finish installing DSS Player before connecting the recorder Windows Macintosh When the recorder is connected and My Computer is opened a removable disk drive is displayed If Add New Hardware Wizard appears cancel the wizard by pressing the ...

Страница 48: ...f any other company s cable is used it will be the cause trouble Also please do not connect this dedicated cable to any other company s product Disconnecting from Your PC 1Click the on the task bar located at the lower right corner of the screen Click Safely Remove Hardware It will read Stop USB Disk Drive for Windows Me The drive letter will differ depending on the PC being used 2Disconnect the U...

Страница 49: ...supplied from the USB cable Refer to the user s manual for your PC regarding the USB port or USB hub on your PC Be sure that you connect the USB cable either directly to the USB port on your PC or the self power AC adapter connection USB hub Be sure to push the cable connector all the way in Otherwise the recorder may not operate properly Release the HOLD switch Connecting to Your PC ...

Страница 50: ...SB connection cable to the cradle Connect the mark of the USB connection cable facing up to match the mark of the cradle connection port 3Make sure that the recorder is in the Stop mode and place it in the cradle STORAGE REMOTE is displayed on recorder if the USB cable is connected PC I F Connecting to Your PC Connecting to your PC using the cradle ...

Страница 51: ...USB connection cable from the cradle Notes When connecting this recorder with the computer and utilize DSS Player in the menu setting of this recorder set the USB class to the MASS STORAGE class If connected by AUDIO CLASS this recorder will not be recognized as a removable disk drive Be sure that you connect the USB cable either directly to the USB port on your PC or the self power AC adapter con...

Страница 52: ...ayed by dialog 2Click the of the DSS Player Version 6 The check mark on DSS Player Version 6 disappears For automatic start select and click DSS Player to reinstate again Windows 3 2 2 Running DSS Player Running DSS Player Manual start 1Start Windows 2Click the start button select All Programs then Olympus DSS Player 3Click Olympus DSS Player Note You cannot run more than one DSS Player program or...

Страница 53: ...o automatic start function Running DSS Player To start open the DSS Player folder created upon installation and double click the icon When it starts for the first time after installation user information needs to be registered Please see P 45 for details ...

Страница 54: ...r can be utilized Purchase and Upgrade To purchase DSS Player Plus and upgrading from DSS Player is operated in the following procedures Plus Windows Macintosh 1Start the DSS Player Please see P 52 for the starting method 2Click the button or select Purchase a new license for DSS Player Plus in the Help menu The web browser will start and the purchase site of the DSS Player Plus will be displayed ...

Страница 55: ...yer will be upgraded to DSS Player Plus Upgrading to DSS Player Plus When upgraded the title of the main menu changes to DSS Player Plus Also you can confirm the upgrade by selecting About DSS Player from the Help menu on the tool bar In the About DSS Player window the DSS Player Plus should be displayed Notes To purchase the license number it requires an environment where the Internet can be util...

Страница 56: ... 2Connecting the recorder to your PC For the connection procedure refer to Connecting to Your PC using the USB cable P 47 3Open the Explorer or Finder window The recorder will appear as a removable drive icon 4Copy the data While the data are being written or copied the record play indicator lamp on the recorder will flash Before disconnecting the recorder from your PC refer to Disconnecting from ...

Страница 57: ...e comments into the voice files recorded with the recorder or IC recorders from Olympus only This is a malfunction so go to the store where you purchased the recorder or an Olympus service station for repair Explanation Battery power is getting low Tried to delete a locked file The file is full of index marks maximum of 16 marks Tried to incorporate WMA file index marks into the music files or the...

Страница 58: ...uble in the internal memory No remaining internal memory There is no remaining memory for recording with reserved time This time start end have set as same No files were found in the folder There was an error while formatting the recorder s memory Tried to create or store a file that has same name as a file in the folder System error detected in the recorder Meaning Trouble in the internal memory ...

Страница 59: ... SEC SKIP or 2 SEC SKIP The file is locked The recorder was shaken during recording The recorder was placed near a cell phone or fluorescent lamp while recording or during playback The microphone sensitivity is too low The maximum number of index marks 16 has been reached The file is locked Action Verify polarity is correct Replace with new batteries P 11 Release the recorder from HOLD P 12 Releas...

Страница 60: ...ble cause Wrong folder The noise cancellation function is set at LOW or HIGH The setting of the USB class is AUDIO CLASS Action Switch to the right folder Set the noise cancellation function to OFF or return to normal playback P 30 Set the USB Class to MASS STORAGE in the menu setting of this recorder Troubleshooting Troubleshooting ...

Страница 61: ...ble Battery Charger BU 400 Europe only Charger for AA batteries 1 to 4 or 1 to 2 AAA batteries Ni MH Rechargeable Battery BR401 High efficiency rechargeable long life batteries Connecting cord KA333 Use to connect the microphone jack of this unit to a radio or other sound source Plug adapter PA3 A mini plug adapter to connect 2 5 mm mini plug devices such as microphone to the recorder 3 5 mm mini ...

Страница 62: ...hours Stereo Approx 11 hours Monaural Ni MH Rechargeable Battery BR 401 life Recording Approx 12 hours Stereo Approx 14 hours Monaural Playback Approx 8 hours Stereo Approx 9 hours Monaural Recording medium Internal memory 64 MB Speaker Built in ø23 mm round dynamic speaker MIC jack ø3 5 mm mini jack impedance 2kΩ or more EAR jack ø3 5 mm mini jack impedance 8Ω or more Maximum working output 3 V D...

Страница 63: ... in the U S and Canada distec olympus com Technical Hotline Number in Europe Toll free number 00800 67 10 83 00 available for Austria Belgium Denmark Finland France Germany Italy Luxemburg Netherlands Norway Portugal Spain Sweden Switzerland United Kingdom Charged numbers for the Rest of Europe 49 180 567 1083 49 40 23773 899 User Support E mail address in Europe dss support olympus europa com Tec...

Страница 64: ......

Страница 65: ...numérique Lisez ce mode d emploi pour les informations concernant l emploi correct et sûr de l appareil Conservez le à portée de la main pour toute référence ultérieure Nous vous recommandons de tester la fonction d enregistrement et le volume avant l utilisation pour obtenir de bons enregistrements FR ...

Страница 66: ...EC MODE 19 Utilisation d un VCVA Variable Control Voice Actuator 20 Sensibilité du microphone MIC SENSE 22 4 A propos de la lecture Lecture 23 Lecture à répétition 28 Fonction de suppression du bruit 30 5 Autres fonctions Effacement 31 Marques index 35 Informations de l écran ACL 37 Formatage de l enregistreur FORMAT 39 6 Préparation avant d utiliser le DSS Player Utilisation du logiciel DSS Playe...

Страница 67: ...ction de mise à jour 54 8 Autres méthodes d utilisation pratique Utilisation comme mémoire externe de l ordinateur 56 9 Autres informations Liste des messages d alarme 57 Dépannage 59 Accessoires options 61 Spécifications 62 Assistance technique et soutien 63 ...

Страница 68: ...egistrement à partir d un microphone externe ou d autres dispositifs 26 Enregistrement programmé TIMER REC 28 Ecoute pendant l enregistrement audio contrôle de l enregistrement 32 Modification de la vitesse de lecture PLAY SPEED 39 Lecture continue ALL PLAY 41 Retour Arrière Automatique BACK SPACE 44 Réglage de l intervalle de saut SKIP SPACE 45 Fonction de lecture d alarme ALARM 48 Verrouillage d...

Страница 69: ... nettoyer l appareil Ne placez pas l enregistreur sur ou près d un autre appareil électrique tel que téléviseur ou réfrigérateur Evitez d effectuer un enregistrement ou une lecture près d un téléphone cellulaire ou de tout autre appareil sans fil car ils risquent de provoquer des interférences et des parasites En cas de parasites installez vous ailleurs ou éloignez davantage l enregistreur de ces ...

Страница 70: ...ent disponible affiché et le temps enregistré donnent une indication approximative Vous pouvez assigner vos propres noms aux dossiers Ce produits possède les caractéristiques suivantes Connectez le support et le câble de connexion USB à cet enregistreur et vous pourrez effectuer un transfert rapide de données vers un ordinateur P 47 Ce enregistreur peut aussi servir de mémoire externe pour un ordi...

Страница 71: ...ment ou la lecture vous pouvez par la suite trouver rapidement l enregistrement que vous souhaitez écouter La vitesse de lecture peut être contrôlée comme vous le souhaitez L avance rapide et le rembobinage sont possibles pendant une durée déterminée Livré avec le logiciel DSS Player P 41 Si vous transférez des fichiers audio enregistrés avec l enregistreur vers un PC vous pouvez facilement lire o...

Страница 72: ...ions où plus d une voix de personne peut être enregistrée Conférences exposés où le bruit ambiant peut être enregistré Caractéristiques principales IBM PC AT et ViaVoice sont des marques déposées ou des marques commerciales de International Business Machines Corporation Microsoft Windows et Windows Media des marques de fabrique déposées par Microsoft Corporation Apple Macintosh iMac Mac et PowerMa...

Страница 73: ... 8 Touche VOL 9 Touche FF avance rapide 0 Touche PLAY Touche REW recul rapide Touche STOP Touche REC enregistrement Affichage panneau LCD Témoin d enregistrement lecture Haut parleur intégré Commutateur HOLD Prise EAR écouteur Trous de courroie Couvercle du logement piles Point de fixation du support Terminal PC USB Identification des éléments Identification des éléments ...

Страница 74: ...teur de sensibilité du microphone 6 Affichage stéréo 7 Indicateur de mode d enregistrement 8 Numéro du fichier actuel 9 Nombre total de fichiers enregistrés dans le dossier 0 Affichage de verrouillage Affichage de répétition Affichage des informations en caractères Identification des éléments Identification des éléments Affichage panneau LCD ...

Страница 75: ...registreur P 61 Remarques Vous devez arrêter l enregistreur avant de remplacer les piles Le fait de décharger les batteries lorsque l enregistreur fonctionne peut corrompre les fichiers Si les piles sont épuisées pendant que vous enregistrez un fichier vous perdrez votre fichier actuel parce que l en tête du fichier ne pourra pas se fermer Il est donc de toute première importance que vous remplaci...

Страница 76: ...é sur hold en état d arrêt A ce moment si vous appuyez sur n importe quelle touche l affichage de l horloge clignote pendant 2 secondes environ mais ne fonctionne pas Si le commutateur est déplacé sur hold pendant la lecture ou l enregistrement l état de la lecture ou l enregistrement restera fixe et ne pourra pas être modifié Lorsque la lecture ou l enregistrement se sont arrêtés parce que la mém...

Страница 77: ...E DATE Touche STOP Quitte le menu Touche MENU SET accepte un choix et passe à l article suivant Touche 2 modifie un choix Touche 3 modifie un choix Touche PLAY commuter sur l affichage des données 1Réglage de l heure 1 Appuyez sur la touche 3 ou 2 pour régler l heure 2 Appuyez sur la touche MENU SET pour accepter le choix Vous pouvez choisir l affichage de 12 heures ou de 24 heures en appuyant sur...

Страница 78: ...glage du mois 1 Appuyez sur la touche 3 ou 2 pour régler le mois 2 Appuyez sur la touche MENU SET pour accepter le choix 5Réglage de la date 1 Appuyez sur la touche 3 ou 2 pour régler la date 2 Appuyez sur la touche MENU SET pour accepter le choix 1Appuyez sur la touche 3 ou 2 sur l écran du menu secondaire puis sélectionnez TIME DATE Voir P 16 à propos du menu secondaire 2Appuyez sur la touche ME...

Страница 79: ...appliqués Le contenu de l enregistrement programmé se règle et s éteint OFF L enregistreur s arrêtera si vous le laissez inactif pendant 3 minutes pendant une opération de réglage de menu quand un article sélectionné n est pas appliqué P 19 P 22 P 16 P 20 Maintenez la touche MENU SET pressée 1 seconde au moins Appuyez sur la touche 3 ou 2 Appuyez sur la touche MENU SET Réglage initial Bascule vers...

Страница 80: ...us le laissez inactif pendant 3 minutes pendant une opération de réglage de menu quand un article sélectionné n est pas appliqué Menu secondaire Appuyez sur la touche 3 ou 2 Appuyez sur la touche MENU SET Réglage initial Réglage de l heure date Dans l ordre des heures minutes année mois et jour Bascule vers le menu principal Ajustement du contraste de l écran ACL Assignation d un nom de dossier As...

Страница 81: ...o HQ et Stereo SP sont réglés Enregistrement 3 A propos de l enregistrement 1Appuyez sur la touche FOLDER pour choisir un dossier Le nom du dossier s affiche a Nombre total de fichiers enregistrés dans le dossier b Numéro du fichier actuel c Dossier actuel 2Appuyez sur la touche REC pour démarrer l enregistrement Le témoin d enregistrement lecture s allume en rouge Tournez le microphone stéréo int...

Страница 82: ...rement lecture s allumer Un bip retentira quand le temps restant atteint 60 secondes 30 secondes et 10 secondes pendant l enregistrement MEMORY FULL ou FOLDER FULL s affichent lorsque la mémoire ou le fichier sont saturés Effacez les fichiers inutiles avant de continuer à enregistrer P 31 ou transférez les fichiers vocaux sur votre ordinateur à l aide du logiciel DSS Player Format DSS dans les mod...

Страница 83: ... HQ enregistrement sonore de haute qualité SP enregistrement standard et LP enregistrement longue durée Modes d enregistrement REC MODE 1Maintenez la touche MENU SET pressée 1 seconde au moins REC MODE est affiché à l écran P 15 2Appuyez sur la touche MENU SET Le processus de réglage du mode d enregistrement commence 3Appuyez sur la touche 3 ou 2 pour choisir STEREO HQ STEREO SP HQ SP ou LP 4Appuy...

Страница 84: ...tion d un VCVA Variable Control Voice Actuator 1Maintenez la touche MENU SET pressée 1 seconde au moins Le menu principal s ouvre P 15 2Appuyez sur la touche 3 ou 2 pour choisir VCVA 3Appuyez sur la touche MENU SET La procédure de configuration VCVA commence 4Appuyez sur la touche 3 ou 2 pour choisir ON ou OFF ON Enregistrement dans le mode VCVA OFF L enregistrement se poursuit dans le mode normal...

Страница 85: ...rement s arrête automatiquement après 1 seconde environ et l affichage STANDBY clignote sur l écran Le témoin d enregistrement lecture s allume quand l enregistrement démarre et clignote en cas de pause d enregistrement Ajustement du niveau d activation de démarrage arrêt Appuyez sur la touche FF ou REW pour régler le niveau sonore de la pause pendant l enregistrement Vouspouvezréglerleniveaudedéc...

Страница 86: ...SENSE 1Maintenez la touche MENU SET pressée 1 seconde au moins Le menu principal s ouvre P 15 2Appuyez sur la touche 3 ou 2 pour choisir MIC SENSE 3Appuyez sur la touche MENU SET La procédure de réglage de sensibilité du microphone démarre 4Appuyez sur la touche 3 ou 2 pour choisir CONFERENCE ou DICTATION CONFERENCE Mode haute sensibilité qui enregistre les sons dans toutes les directions DICTATIO...

Страница 87: ... démarrer la lecture Le témoin d enregistrement lecture s allume en vert a Temps de lecture actuel b Temps d enregistrement total du fichier en cours de lecture 4Appuyez sur les touches VOL ou VOL pour choisir le volume sonore qui convient L affichage montre le niveau du volume Vous pouvez choisir de 0 à 30 5Appuyez sur la touche STOP au point où vous souhaitez arrêter la lecture Reprenez la lectu...

Страница 88: ...sque vous revenez en position d arrêt avec la touche FF ou REW PREVIOUS STOP POINT s affiche à l écran Et la lecture d un fichier et l arrêt modifient la position de fin et mémorisent la position d arrêt comme nouvelle position de fin Position de fin Position de tête du fichier A Position de tête du fichier B Position de tête du fichier C Le repérage est possible Le repérage est possible Le repéra...

Страница 89: ...nt la lecture lecture rapide ou lecture lente Le fichier suivant est repéré et la lecture démarre à la vitesse d origine 5 Appuyez sur la touche REW pendant la lecture lecture rapide ou lecture lente Le fichier à lire est repéré et la lecture démarre à la vitesse d origine 5 Appuyez 2 fois sur la touche REW pendant la lecture pour une lecture rapide ou lente Le fichier précédent est repéré et la l...

Страница 90: ... la marque d index est affichée au milieu d un fichier la lecture commence à la position de la marque d index 6 Lorsque l intervalle de saut est réglé sur une position différente de saut de fichier dans les paramètres du menu 7 Lorsque la lecture a auparavant été réglée sur OFF dans les paramètres du menu 8 Lorsque la marque d index est affichée devant l heure réglée la lecture commence à la posit...

Страница 91: ...EW lorsque la lecture précédente est réglée sur ON Ce qui se présente en premier l intervalle de temps réglé ou la marque d index ou uniquement l heure de retour de la lecture précédente déclenchera la lecture en saut arrière Réglez le saut de fichier dans intervalle de saut ou appuyez sur la touche REW lorsque la lecture précédente est réglée sur OFF La lecture commence en saut arrière soit à la ...

Страница 92: ...uyez sur la touche PLAY La lecture débute 2Appuyez brièvement sur la touche REPEAT pour spécifier le moment du début de lecture à répétition REPEAT END clignote jusqu à ce que vous ayez spécifié le moment de la fin de la lecture à répétition Tout comme pendant la lecture normale et même lorsque REPEAT END clignote vous pouvez effectuer un changement de vitesse de lecture une avance rapide rembobin...

Страница 93: ...itesse de lecture l insertion retrait d une marque d index et la suppression de bruit peuvent être réglées pendant une lecture en continu aussi bien que pendant une lecture normale 4Annulation de la lecture en continue Le fait d appuyez brièvement sur la touche REPEAT revient à la lecture normale Le fait d appuyez sur la touche STOP annule la fonction de lecture en continu REPEAT et arrête la lect...

Страница 94: ...nt OFF LOW HIGH Si le niveau de suppression de bruit est réglé sur LOW ou HIGH le réglage du niveau s affiche pendant 5 secondes lors de la lecture d un fichier Pour changer le réglage du niveau de suppression de bruit appuyez sur la touche MENU SET pendant l affichage du réglage du niveau Remarques Si vous le réglez sur LOW ou HIGH le niveau de suppression du bruit clignote environ 5 secondes lor...

Страница 95: ...nctions 1Appuyez sur la touche FOLDER pour choisir un dossier 2Appuyez sur la touche FF ou REW pour choisir le fichier à effacer a Fichier à effacer 3Appuyez sur la touche ERASE CANCEL clignote 4Appuyez sur la touche 3 pour choisir START START clignote Lorsque vous appuyez sur la touche 2 il revient à l affichage clignotant de CANCEL ...

Страница 96: ...cement Remarques Un fichier effacé ne peut pas être rétabli Un fichier réglé sur verrouillage d effacement ne sera pas effacé Si l opération n est pas effectuée dans les 8 secondes que dure le réglage il revient à l état d arrêt L effacement peut prendre 10 secondes Ne faites rien pendant cette période car des données pourraient être corrompues Le retrait ou la mise en place des piles n est pas au...

Страница 97: ...llés 1Appuyez sur la touche FOLDER pour choisir le dossier dont vous souhaitez effacer tous les fichiers a Dossier dont les fichiers doivent être effacés 2Appuyez au moins 3 secondes sur la touche ERASE CANCEL clignote 3Appuyez sur la touche 3 pour choisir START START clignote Lorsque vous appuyez sur la touche 2 il revient à l affichage clignotant de CANCEL ...

Страница 98: ... Remarques Un fichier effacé ne peut pas être rétabli Un fichier réglé sur verrouillage d effacement ne sera pas effacé Si l opération n est pas effectuée dans les 8 secondes que dure le réglage il revient à l état d arrêt L effacement peut prendre 10 secondes Ne faites rien pendant cette période car des données pourraient être corrompues Le retrait ou la mise en place des piles n est pas autorisé...

Страница 99: ...nt l enregistrement ou la lecture pour poser une marque index Un numéro d index s affiche à l écran Repérage d une marque index 2Maintenez la touche FF ou REW pressée pendant la lecture du fichier L enregistreur s arrête 1 seconde lorsqu il arrive à une marque index Effacement d une marque index 3Repérez la marque index que vous souhaitez effacer 4Appuyez environ 2 secondes sur la touche ERASE pen...

Страница 100: ... peuvent pas être posées ou effacées dans un fichier verrouillé Dans le cas des fichiers WMA vous ne pouvez appliquer des marques d index qu à des fichiers enregistrés avec des enregistreurs Olympus Si vous appuyez sur la touche REW dans l état configuré 1 SEC SKIP ou 2 SEC SKIP lors de la lecture précédente le saut se fera en arrière uniquement pour la durée réglée Marques index ...

Страница 101: ...heure d enregistrement du fichier 6 Heure et date actuelles Affiche l heure et la date actuelles Lors de la lecture TIME DATE ou le compteur s affichent 5 Mémoire libre Affiche la durée d enregistrement disponible 4 Commentaire de fichier Affiche les commentaires ajoutés à un fichier S il n y a pas de commentaire s affiche Si le commentaire comprend un grand nombre de caractères il défile horizont...

Страница 102: ... graphique Affichage Waiting s il n a pas atteint le niveau de déclenchement du VCVA L affichage du niveau d entrée audio est différent selon que l enregistrement est stéréo ou mono 2 Barres de mémoire libre Afficheladuréed enregistrement disponible sous forme d un graphique à barres et un compte à rebours Informations de l écran ACL Affichage en enregistrement mono Affichage en mode d enregistrem...

Страница 103: ...T Une fois que DATA WILL BE CLEARD s affiche pendant environ 2 secondes CANCEL clignote 1 3 5 7 2 4 6 Formatage de l enregistreur FORMAT Formatage de l enregistreur FORMAT Si vous formatez l enregistreur tous les réglages des fonctions reviennent à leur valeur par défaut Tous les fichiers enregistrés dans l appareil s effacent Si vous avez des fichiers importants que vous souhaitez conserver conne...

Страница 104: ...e et l indicateur clignote sur l affichage FORMAT DONE s affiche à la fin du formatage Remarques Ne formatez jamais l enregistreur à partir d un ordinateur Lorsque l enregistreur est formaté toutes les données stockées y compris les fichiers protégés sont effacées Après le formatage le premier nom de fichier est 0001 Pendant le formatage ne retirez pas les piles L effacement complet peut prendre j...

Страница 105: ...isquent de ne pas avoir été transférées correctement Ne formatez pas la carte mémoire de l enregistreur sur un ordinateur L initialisation ne s effectue pas correctement sur un ordinateur Pour l initialisation veuillez vous reporter aux instructions de l écran de menu de l enregistreur P 16 Les noms de dossiers répertoires affichés par des gestionnaires de fichiers tels qu Explorer fourni avec Mic...

Страница 106: ...ort libre sortie écouteur ou hauts parleurs La souris ou un dispositif de pointage similaire Environnement où vous pouvez utiliser l Internet PC Système d exploitation CPU RAM Espace disque dur Lecteur Carte son Navigateur Affichage Port USB Terminaux audio E S Autres Processeur de classe Power Mac G3 233 MHz ou supérieur iMac iBook eMac Power Mac PowerBook L ordinateurdoitpouvoir supporter un por...

Страница 107: ...iciel DSS Player qui se trouve sur le CD de logiciels fourni Applications incluses dans DSS Player DSS Player Avec l enregistreur vous pouvez transférer le son vers un ordinateur le lire ou le gérer Acrobat Reader est installé sur votre ordinateur Il est indispensable pour lire le manuel joint au format PDF Préparatifs de l installation Quittez toutes les applications en cours Si vous êtes en trai...

Страница 108: ...DSS Player vous devez accepter les termes du contrat de licence Si vous les acceptez cliquez sur Oui 7Sélectionner le dossier où le DSS Player devra être installé Spécifiez ici le dossier dans lequel vous souhaitez installer le DSS Player Cliquez sur Parcourir pour rechercher le dossier d installation souhaité Pour accepter le dossier proposé par défaut cliquez sur Suivant Remarque Si le dossier d...

Страница 109: ...de série Une fois que la saisie est terminée cliquez sur OK pour terminer l enregistrement Installation du logiciel 1Insérer le CD ROM DSS Player dans le lecteur de CD ROM 2Double cliquez sur l icône CD Double cliquez sur la langue souhaitée 3Double cliquez sur l icône suivante 4Cliquez sur Continuer lorsque l écran d ouverture du DSS Player s affiche 5Confirmation de l acceptation des termes du c...

Страница 110: ...ouche F1 du clavier Macintosh Lorsque le DSS Player est en marche choisissez DSS Player Aide dans le menu Aide Recherche dans la liste des rubriques 1Lorsquelafenêtredel Aideenligneestaffichée cliquez sur l onglet Table des Matières 2Cliquez deux fois sur le symbole de la rubrique qui vous intéresse Le titre de la rubrique est affiché 3Cliquez deux fois sur le symbole de la rubrique qui vous intér...

Страница 111: ...nregistreur STORAGE REMOTE s affiche sur l enregistreur si le câble USB est branché Connecter l enregistreur à votre PC Veillez à ce que l installation du DSS Player soit terminée avant de connecter l enregistreur à votre PC Connecter l enregistreur à votre PC Windows Macintosh Lorsque l enregistreur est connecté et que Poste de travail est ouvert un disque dur amovible est affiché Si Assistant Mi...

Страница 112: ...re entreprise cela entraînera des problèmes aussi ne l utilisez pas De même veuillez ne pas connecter ce câble dédié à un produit d une entreprise Déconnecter l enregistreur de votre PC 1Cliquez sur le de la barre de tâches située dans le coin inférieur droit de l écran Cliquez sur Retirer le périphérique en toute sécurité Pour Windows Me Arrêter Disque USB Lecteur s affiche La lettre du lecteur s...

Страница 113: ... par le câble USB Voir le manuel de votre PC pour de plus amples détails sur le connecteur USB ou le hub USB de votre PC Veillez à connecter le câble USB soit directement au port USB de votre PC soit au hub USB avec alimentation séparée connexion adaptateur AC Assurez vous que le câble est inséré à fond Sinon l enregistreur ne pourra pas fonctionner correctement Libérez le commutateur HOLD Connect...

Страница 114: ...le câble de connexion USB au support Connectez en faisant correspondre le symbole du câble de connexion au symbole du port de connexion du support 3Assurez vous que l enregistreur est en mode Stop et mettez le dans le support STORAGE REMOTE s affiche sur l enregistreur si le câble USB est branché Connecter l enregistreur à votre PC Connexion à votre PC avec le support PC I F ...

Страница 115: ...ble de connexion du support Remarques Lorsque vous connectez cet enregistreur au PC et utilisez le DSS Player dans le réglage de menu de cet enregistreur configurez la classe USB sur MASS STORAGE S il est connecté en AUDIO CLASS cet enregistreur ne sera pas reconnu comme lecteur de disque amovible Veillez à connecter le câble USB soit directement au port USB de votre PC soit au hub USB avec alimen...

Страница 116: ... DSS Player Version 6 La marque de sélection de DSS Player Version 6 disparaît Pour revenir à un démarrage automatique cliquez de nouveau de manière à faire réapparaître la marque de sélection Windows 3 2 2 2 Mise en marche du DSS Player Mise en marche du DSS Player Démarrage manuel 1Démarrez Windows 2Cliquez sur démarrer choisissez Tous les programmes puis sélectionnez Olympus DSS Player 3Cliquez...

Страница 117: ...que Pour démarrer ouvrez le dossier DSS Player créé après l installation et double cliquez sur l icône Lorsqu il démarre pour la première fois après l installation il faut enregistrer les informations concernant l utilisateur Veuillez voir la page P 45 pour plus de détails Mise en marche du DSS Player ...

Страница 118: ...r acheter DSS Player Plus et faire une mise à jour à partir de DSS Player effectuez la procédure suivante Fonction de mise à jour Plus Windows Macintosh 7 Fonctions étendues de DSS Player 1Démarrez le DSS Player Veuillez voir P 52 pour la méthode de démarrage 2Cliquez sur le bouton ou sélectionnez Acheter une nouvelle licence de DSS Player Plus dans le menu Aide Le navigateur Internet démarre et l...

Страница 119: ... jour en DSS Player Plus Mise à jour vers DSS Player Plus Lorsque la mise à jour est effectuée le titre du menu principal devient DSS Player Plus Vous pouvez aussi confirmer la mise à jour en sélectionnant Au sujet du DSS Player dans le menu Aide de la barre d outils Dans la fenêtre d information de version DSS Player Plus doit s afficher Fonction de mise à jour 3 Remarques Pour acheter le numéro ...

Страница 120: ...C Pour des informations détaillées veuillez vous reporter à la rubrique Connexion à votre PC avec le câble de connexion USB P 47 3Ouvrez la fenêtre de l Explorateur ou Finder L enregistreur est affiché comme icône de support amovible 4Copiez les données Pendant l écriture ou la copie des données le témoin d enregistrement de lecture de l enregistreur clignote Lorsque vous déconnectez l enregistreu...

Страница 121: ...hier Vous ne pouvez incorporer des commentaires que dans des fichiers audio enregistrés par l enregistreur ou des enregistreurs à base de circuits intégrés Olympus Ceci est une anomalie Allez au magasin où vous avez acheté l enregistreur ou à un service après vente Olympus pour le faire réparer Explication Les piles s affaiblissent Le fichier verrouillé ne peut pas être effacé Aucun fichier n est ...

Страница 122: ...er Explication Problème de la mémoire interne La mémoire interne est saturée Il ne reste pas de mémoire libre pour enregistrer la durée réservée Les heures de début arrêt sont identiques Aucun fichier n est trouvé dans le dossier Il s est produit une erreur pendant le formatage de la mémoire de l enregistreur Tentative de création ou d enregistrement de fichier portant un nom de fichier qui existe...

Страница 123: ...ur 1 SEC SKIP ou 2 SEC SKIP Le fichier est verrouillé L enregistreur a été secoué pendant l enregistrement L enregistreur a été placé près d un téléphone cellulaire ou d une lampe fluorescente pendant l enregistrement ou la lecture La sensibilité du microphone est trop faible Le nombre max de marques index 16 a été atteint Le fichier est verrouillé Mesure Vérifiez les polarités Remplacez les par d...

Страница 124: ...bable Dossier erroné La fonction de suppression de bruit est réglée sur LOW ou HIGH Le configuration de la classe USB est AUDIO CLASS Mesure Passez au dossier qui convient Réglez la fonction de suppression de bruit sur OFF ou revenez à la lecture normale P 30 Configurez la classe USB sur MASS STORAGE dans les paramètres de menu de cet enregistreur Dépannage Dépannage ...

Страница 125: ... de 1 à 4 piles AA R6 or 1 ou 2 piles AAA R03 à la fois en le branchant sur n importe quelle prise secteur pour appareil électro ménager n importe où dans le monde Batterie Ni MH rechargeable BR401 Batteries rechargeables à haute efficacité et longue durée de vie Cordon de raccordement KA333 Connecte la prise microphone de cet appareil à une radio ou une autre source sonore Adaptateur de prise PA3...

Страница 126: ...o stéréo Durée de vie d une batterie Ni MH rechargeable BR 401 Enregistrement Environ 12 h Stéréo Environ 14 h Mono stéréo Lecture Environ 8 h Stéréo Environ 9 h Mono stéréo Support d enregistrement Mémoire interne 64 MO Haut parleur Dynamique rond ø23 mm intégré Prise MIC Prise mini jack ø3 5 mm impédance MIC 2KΩ ou plus Prise EAR Prise mini jack ø3 5 mm impédance EAR 8 Ω ou plus Puissance de tra...

Страница 127: ... de soutien aux Etats Unis et au Canada distec olympus com Numéro de ligne directe en Europe Numéro d appel gratuit 00800 67 10 83 00 disponible en Allemagne Autriche Belgique Danemark Finlande France Norvège Italie Luxembourg Pays Bas Royaume Uni Portugal Espagne Suède Suisse Numéros payants pour le reste de l Europe 49 180 567 1083 49 40 23773 899 Adresse électronique de soutien en Europe dss su...

Страница 128: ......

Страница 129: ...gital Voice Recorder Lea estas instrucciones para información sobre el uso correcto de este producto y para su seguridad Guarde estas instrucciones en un lugar a mano para su referencia en el futuro Para tener éxito en las grabaciones se recomienda hacer un ensayo previo de la función de grabación y su volumen ...

Страница 130: ...erca de la Grabación Grabación 17 Modos de grabación REC MODE 19 Uso de la activación por voz de control variable VCVA 20 Sensibilidad del micrófono MIC SENSE 22 4 Acerca de la Reproducción Reproducción 23 Reproducción Repetida 28 Función Cancelar Ruido 30 5 Otras funciones Borrado 31 Marcas índice 35 Información en la pantalla LCD 37 Formateando la grabadora FORMAT 39 6 Preparativos antes de util...

Страница 131: ...r 52 7 Funciones ampliadas de DSS Player Función de Actualización 54 8 Otros Métodos Prácticos de Uso Uso como Memoria Externa del Ordenador 56 9 Otra información Lista de mensajes de alarma 57 Resolución de fallos 59 Accesorios opcional 61 Especificaciones 62 Asistencia y ayuda técnica 63 ...

Страница 132: ...16 Grabación con un micrófono Externo u otros Dispositivos 26 Grabación con temporizador TIMER REC 28 Para escuchar mientras está grabando el audio monitor de grabación 32 Cambio de la velocidad de reproducción PLAY SPEED 39 Reproducción Continua ALL PLAY 41 Salto Atrás Automático BACK SPACE 44 Ajuste del Intervalo de Salto SKIP SPACE 45 Función de reproducción de alarma ALARM 48 Bloqueo de archiv...

Страница 133: ...s tales como alcohol y diluyente de barniz para limpiar la unidad No coloque la grabadora sobre o cerca de aparatos eléctricos tales como televisores o frigoríficos Evite la grabación o reproducción cerca de teléfonos celulares u otro equipo inalámbrico ya que puede producir interferencias y ruido Si siente ruido mueva a otro lugar o mueva el grabador más allá de ese equipo Evite la arena y la suc...

Страница 134: ... producto posee las siguientes características Conectando la base y el cable de conexión USB a esta grabadora se podrán transferir datos a un ordenador a alta velocidad P 47 Esta grabadora también puede utilizarse como memoria externa de un ordenador P 56 Conectando el ordenador con el cable USB se pueden guardar imágenes datos de texto etc y transportarlos Posee una gran pantalla retroiluminada y...

Страница 135: ...te una grabación o reproducción luego podrá encontrar rápidamente la grabación que desea escuchar La velocidad de reproducción se puede controlar según su preferencia Se pueden ajustar intervalos para el avance rápido y rebobinado Se presenta con el software DSS Player P 41 Si transfiere los archivos de voz grabados con la grabadora a un ordenador puede reproducirlos organizarlos y editarlos con f...

Страница 136: ...a tener dificultad con el proceso de reconocimiento la voz Reuniones debates donde se graban muchas voces Conferencias clases donde se graba el ruido ambiente Características principales IBM PC AT y ViaVoice son marcas o marcas registradas de International Business Machines Corporation Microsoft Windows y Windows Media marcas registradas de Microsoft Corporation Apple Macintosh iMac Mac y PowerMac...

Страница 137: ...L 9 Botón FF avance rápido 0 Botón PLAY reproducción Botón REW rebobinado Botón STOP parada Botón REC grabación Pantalla panel de cristal líquido Piloto de grabación reproducción Altavoz integrado Interruptor HOLD retención Toma de EAR auricular Orificios para la correa Tapa de la batería Punto de conexión del soporte Terminal PC USB Identificación de las piezas Identificación de las piezas ...

Страница 138: ... con temporizador 4 Marca de alarma 5 Información sensibilidad del micrófono 6 Marca estéreo 7 Marca del modo de grabación 8 Número del archivo actual 9 Número total de archivos grabados en la carpeta 0 Marca de bloqueo del borrado Marca de repetición y de reproducción Pantalla de información de caracteres Pantalla panel de cristal líquido ...

Страница 139: ... también utilizar una batería opcional Ni MH recargable de Olympus para la grabadora P 61 Notas Antes de reemplazar las baterías asegúrese de parar la grabación El remover las baterías mientras la grabadora se encuentra en uso podría corromper los datos Si está grabando en un archivo y se agotan las pilas se perderá el archivo grabado previamente porque no se podrá cerrar el encabezado del archivo...

Страница 140: ...stá parada la pantalla destellará En ese momento si se pulsa cualquier botón el reloj destellará durante aproximadamente 2 segundos pero no operará Si se desliza el interruptor hacia la posición HOLD durante la reproducción o grabación la reproducción grabación continuará Cuando haya finalizado la reproducción y la grabación haya terminado debido a que se utilizó toda la memoria restante la grabad...

Страница 141: ... hora fecha TIME DATE Ajuste de la hora fecha TIME DATE Botón STOP Sale del menú Botón MENU SET acepta una selección y pasa al siguiente ítem Botón 2 cambia una selección Botón 3 cambia una selección Botón PLAY cambia los datos mostrados 1Ajuste la hora 1 Pulse el botón 3 o 2 para ajustar la hora 2 Pulse el botón MENU SET para aceptar la hora Es posible seleccionar entre visualización de 12 ó 24 h...

Страница 142: ...14D 1M 2005Y 2005Y 1M 14D 4Ajuste el mes 1 Pulse el botón 3 o 2 para ajustar el mes 2 Pulse el botón MENU SET para aceptar el mes 5Ajuste la fecha 1 Pulse el botón 3 o 2 para ajustar la fecha 2 Pulse el botón MENU SET para aceptar la fecha 1Pulse el botón 3 o 2 en la pantalla del submenú y seleccione TIME DATE Vea las P 16 acerca del submenú 2Pulse el botón MENU SET Aparece la pantalla de la hora ...

Страница 143: ...nidos ajustados de la grabación con temporizador se ajustarán y luego se apagará La grabadora se detendrá si deja la grabadora sin funcionar durante 3 minutos durante el proceso de ajuste de un punto del menú en caso de no aplicar el ítem seleccionado P 19 P 22 P 16 P 20 Se traslada al submenú Pantalla de Ajuste de la Velocidad de Reproducción Mantenga pulsado el botón MENU SET durante 1 segundo o...

Страница 144: ...se detendrá si deja la grabadora sin funcionar durante 3 minutos durante el proceso de ajuste de un punto del menú en caso de no aplicar el ítem seleccionado Submenú Ajuste de la hora fecha En el orden de hora minuto año mes y día Se traslada al menú principal Ajuste de contraste de LCD Nombre de carpeta Asignación de comentarios de archivo Pulse el botón 3 o 2 Pulse el botón MENU SET Ajuste inici...

Страница 145: ...do el modo está ajustado en Stereo HQ y stereo SP Grabación 3 Acerca de la Grabación 1Pulse el botón FOLDER para seleccionar una carpeta Aparece el nombre de la carpeta a Número total de archivos grabados en la carpeta b Número del archivo actual c Carpeta actual 2Pulse el botón REC para empezar a grabar La lámpara indicadora de grabación reproducción se enciende de color rojo Dirija el micrófono ...

Страница 146: ...n reproducción esté encendida Sonará un timbre cuando el tiempo de grabación restante llega a 60 segundos 30 segundos y 10 segundos durante la grabación Cuando la capacidad de la memoria o de la carpeta está llena en la pantalla aparecerá MEMORY FULL o FOLDER FULL Antes de continuar grabando borre los archivos P 31 o transfiera archivos de voz a su ordenador usando el software DSS Player Formato D...

Страница 147: ...bación estéreo normal HQ grabación en sonido de alta calidad SP grabación estándar y LP grabación larga duración Modos de grabación REC MODE 1Mantenga pulsado el botón MENU SET durante 1 segundo o más En la pantalla aparece REC MODE P 15 2Pulse el botón MENU SET Empieza el proceso de ajuste del modo de grabación 3Pulse el botón 3 o 2 para elegir entre STEREO HQ STEREO SP HQ SP y LP 4Pulse el botón...

Страница 148: ...tón MENU SET para terminar la pantalla de ajuste 6Pulse el botón STOP para cerrar el menú principal Cuando se selecciona ON en la pantalla aparecerá la indicación VCVA Uso de la activación por voz de control variable VCVA Cuando el micrófono detecta que los sonidos han alcanzado un nivel de volumen predeterminado la activación por voz de control variable VCVA empieza a grabar automáticamente y se ...

Страница 149: ...grabaciónentrademodo automático en una pausa después de 1 segundo aproximadamente y destella STANDBY en la pantalla El piloto de grabación reproducción se enciende cuando empieza la grabación y destella cuando se hace una pausa de grabación Ajustar el nivel de activación comenzar parar Presione el botón FF o el botón REW para ajustar el nivel de sonido de la pausa durante la grabación El nivel de ...

Страница 150: ... MIC SENSE 1Mantenga pulsado el botón MENU SET durante 1 segundo o más Se abre el menú principal P 15 2Pulse el botón 3 o 2 para seleccionar MIC SENSE 3Pulse el botón MENU SET Comienza el proceso de configuración de la sensibilidad del micrófono 4Pulse el botón 3 o 2 para elegir entre CONFERENCE y DICTATION CONFERENCE Modo de alta sensibilidad que graba los sonidos de todas las direcciones DICTATI...

Страница 151: ... piloto de grabación reproducción se enciende en verde a Tiempo de reproducción actual b Tiempo de reproducción total del archivo que se está reproduciendo 4Presione el botón VOL o el botón VOL para elegir el volumen de sonido adecuado El nivel de volumen se visualiza en la pantalla Se puede elegir entre 0 a 30 5Pulse el botón STOP en cualquier punto en que desee parar la reproducción Para reanuda...

Страница 152: ... REW Cuando regrese a la posición de parada se visualiza PREVIOUS STOP POINT en la pantalla La reproducción y detención del archivo cambia la posición final y memoriza la posición de parada como una nueva Nota Se cancelará la posición final de la reproducción si se realiza una grabación conexión a un ordenador cambio de carpetas borrado de archivos y extracción de pilas Posición final Posición Ini...

Страница 153: ...o la reproducción lenta Se extrae el siguiente archivo y la reproducción comienza a la velocidad original 5 Presione el botón REW durante la reproducción normal la reproducción rápida o la reproducción lenta Se da entrada al archivo que se está reproduciendo y la reproducción comienza a la velocidad original 5 Pulse dos veces el botón REW durante la reproducción para la reproducción rápida o repro...

Страница 154: ...do la marca índice se encuentra en el medio de un archivo la reproducción comienza en la posición de la marca índice 6 Cuando el intervalo de salto no se encuentra ajustado en salto de archivo en la configuración de menú 7 Cuando la reproducción había sido previamente ajustada en OFF en la configuración del menú P 44 8 Cuando hay una marca índice antes del tiempo ajustado la reproducción comenzará...

Страница 155: ... botón REW cuando la reproducción anterior está ajustada en ON El intervalo de tiempo o la marca índice más próximo o sólo el tiempo de regreso a la reproducción anterior comenzará la reproducción en salto regresivo Ajuste el salto de archivo en el intervalo de salto o pulse el botón REW cuando la reproducción anterior está ajustada en OFF La reproducción comenzará en salto regresivo ya sea desde ...

Страница 156: ...idad de reproducción avance rápido rebobinado e indicación CUE P 25 pueden realizarse como en la reproducción normal y se puede avanzar rápidamente a la posición final Asimismo cuando llega al final del archivo que se convertirá en la posición final comenzará la reproducción repetida Reproducción Repetida Esta función permite realizar reproducciones repetidas de una parte del archivo que se está r...

Страница 157: ...al del último archivo de la carpeta Se puede realizar el ajuste de la velocidad de reproducción de inserción eliminación de marcas índice y de la función cancelar ruido durante la reproducción repetida así como durante la reproducción normal 4Cancelación de la Reproducción Continua Si pulsa brevemente el botón REPEAT regresará a la reproducción normal Si pulse el botón STOP cancelará la reproducci...

Страница 158: ... OFF LOW HIGH Si se ajusta el nivel de Cancelar Ruido en LOW o HIGH se visualizará el ajuste del nivel por 5 segundos cuando se reproduce un archivo Para cambiar el ajuste del nivel de Cancelar Ruido pulse el botón MENU SET mientras se visualiza el ajuste del nivel Notas Si se configura en LOW o HIGH en la pantalla destella el nivel Cancelar Ruido durante 5 segundos cuando se está reproduciendo un...

Страница 159: ... FOLDER para seleccionar una carpeta 2Pulse el botón FF o REW para seleccionar el archivo que desea borrar a Archivo que se desea borrar 3Pulse el botón ERASE CANCEL se encuentra destellando 4Pulse el botón 3 para seleccionar START START se encuentra destellando Cuando se pulsa el botón 2 regresará a la visualización de CANCEL destellando ...

Страница 160: ...uede recuperar un archivo borrado El archivo que se encuentre bloqueado no se podrá borrar Si la operación no se ejecuta en 8 segundos durante el ajuste regresará al estado de parada El borrado se completará en aproximadamente 10 segundos No se puede realizar ninguna operación durante este lapso porque los datos pueden corromperse Sin importar que las pilas estén o no colocadas en la grabadora baj...

Страница 161: ...Pulse el botón FOLDER para seleccionar la carpeta de la que desea borrar todos los archivos a Carpeta de donde se desean borrar archivos 2Pulse el botón ERASE durante 3 segundos o más CANCEL se encuentra destellando 3Pulse el botón 3 para seleccionar START START se encuentra destellando Cuando se pulsa el botón 2 regresará a la visualizaciónde CANCEL parpadeando ...

Страница 162: ... puede recuperar un archivo borrado El archivo que se encuentre bloqueado no se podrá borrar Si la operación no se ejecuta en 8 segundos durante el ajuste regresará al estado de parada El borrado se completará en aproximadamente 10 segundos No se puede realizar ninguna operación durante este lapso porque los datos pueden corromperse Sin importar que las pilas estén o no colocadas en la grabadora b...

Страница 163: ...ón para ajustar una marca índice En la pantalla aparece un número de índice Localizando una marca índice 2Mantenga pulsado el botón FF o REW mientras reproduce un archivo La grabadora para durante 1 segundo cuando llega a la marca índice Borrado de una marca índice 3Localice la marca índice que desea borrar 4Pulse el botón ERASE durante unos 2 segundos mientras aparece el número índice en la panta...

Страница 164: ...cas índice no pueden ajustarse o borrarse en un archivo bloqueado Con respecto a los archivos WMA las marcas de índice solo pueden ser asignadas a archivos que han sido grabados con grabadoras Olympus Si se pulsa el botón REW con el ajuste de 1 SEC SKIP o 2 SEC SKIP de la reproducción anterior el salto regresivo se realizará por el tiempo ajustado Marcas índice ...

Страница 165: ... hora Muestra la hora en que se grabó el archivo 6 Hora y fecha actual Muestralahoraylafechaactual Durante la reproducción aparecenyasea TIME DATE o el contador 5 Memoria restante Muestra el tiempo de grabación restante 4 Comentario de archivo Muestra el comentario añadido a un archivo Si no hay comentario aparecerá Si un comentario contiene muchos caracteres se deslizará horizontalmente para visu...

Страница 166: ...arece Waiting si no ha alcanzado el nivel de inicio de la VCVA La visualización del nivel de entrada de audio diferirá dependiendo si se trata de una grabación estéreo o mono 2 Barras de memoria restante Se visualiza el tiempo restante disponible para grabar en modo de barra y en modo de cuenta regresiva Información en la pantalla LCD Marca del modo de grabación mono Marca del modo de grabación es...

Страница 167: ...T Después de que DATA WILL BE CLEARED aparece por 2 segundos CANCEL destellará en la pantalla 1 3 5 7 2 4 6 Formateando la grabadora FORMAT Formateando la grabadora FORMAT Si se formatea la grabadora toda la configuración de funciones vuelven a su configuración predeterminada Se borrarán todos los archivos almacenados en la grabadora Si usted tiene archivos importantes que desea conservar conecte ...

Страница 168: ...mateo empieza y destella un indicador en la pantalla Aparece FORMAT DONE cuando termina el formateo Notas Nunca formatee la grabadora desde un ordenador Cuando se formatea la grabadora se borran todos los datos almacenados incluidos los archivos bloqueados Después de formatear el nombre del primer archivo es 0001 No extraiga las pilas durante el proceso de formateo Puede demorarse 10 segundos o má...

Страница 169: ... nombres de las carpetas que se asignan por medio de la grabadora o DSS Player Si se borran archivos o carpetas almacenados en la grabadora utilizando una herramienta de administración de archivos como Explorer o Finder es posible que cambie el orden de los archivos o que los archivos se vuelvan irreconocibles Observe que es posible escribir o leer datos en la grabadora aunque el atributo de la un...

Страница 170: ...a auricular o altavoces Mouse o un dispositivo de puntero Entorno en el que se pueda utilizar Internet PC Sistema operativo CPU RAM Espacio en el disco duro Unidad Tarjeta de sonido Navegador Pantalla Puerto USB Terminales de entrada salida de audio Otros Power Mac G3 de la clase de procesador 233MHz o superior iMac iBook eMac Power Mac PowerBook El ordenador debe tener un puerto USB estándar Si g...

Страница 171: ...ncorporadas en DSS Player DSS Player El sonido puede ser transferido de la grabadora al ordenador para ser reproducido o administrado Acrobat Reader está instalado en su ordenador Se requiere visualizar el manual adjunto en formato PDF Cerciórese de haber hecho lo siguiente antes de proceder a realizar la instalación Cierre todas las aplicaciones que esté ejecutando Si está usando un disquete expú...

Страница 172: ...rtienequeaceptar lascondicionesdelAcuerdodelicencia Si acepta dicho acuerdo haga clic en Sí 7Elija dónde desea instalar DSS Player Esto le permite especificar la carpeta en la que desea instalar DSS Player Haga clic en Examinar parabuscarlacarpetadonde instalará el programa Para aceptar la carpetapordefecto hagaclicen Siguiente Nota Si la carpeta donde desea hacer la instalación no existe aparece ...

Страница 173: ...S Player Luego de ingresar los datos haga clic en OK para completar la registración Instalación de programas informáticos 1Inserte DSS Player en la unidad CD ROM 2Haga clic doble en el icono CD Haga clic doble en el idioma que desee para elegirlo 3Haga clic dos veces en el siguiente icono 4Haga clic en Continuar cuando aparezca la pantalla de presentación de DSS Player 5Confirme su aceptación del ...

Страница 174: ...o ejecute DSS Player elija DSS Player Ayuda en el menú Ayuda Búsqueda en el contenido 1Cuando se abra la ventana de la Ayuda en línea haga clic en la pestaña de Contenido 2Haga clic doble en el icono del título correspondiente al tema que busca Aparece el título del tema 3Haga clic doble en el icono del tema que busca Aparece la explicación del tema Búsqueda en el índice 1Cuando se abre la ventana...

Страница 175: ...botón Cancelar y luego instale DSS Player Si el ordenador está conectado a Mac OS aparece un icono con la leyenda Untitled sin nombre 1Libere el interruptor HOLD 2Conecte el cable USB al puerto USB o hub USB de su ordenador 3Corrobore que la grabadora se encuentre detenida y conecte el cable USB al puerto de conexión que se encuentra en la base de la grabadora Por favor conecte el cable de conexió...

Страница 176: ... podría ocasionar algún problema Por otro lado no conecte este cable dedicado en productos de otras compañías Desconexión de su PC 1Haga clic en en la barra de tareas ubicada en el extremo inferior derecho de la pantalla Haga clic en Quitar hardware con seguridad Se leerá Stop USB Disk Drive en el caso de Windows Me La letra de la unidad diferirá según el ordenador que esté utilizando 2Desconecte ...

Страница 177: ...éase en el manual de usuario de su ordenador la información referente al puerto USB o a la boca de conexión de USB en su PC Asegúrese de conectar el cable USB directamente en el puerto USB de su ordenador o bien en la boca de conexión de USB con suministro de corriente independiente conexión para el adaptador de CA Asegúrese de conectar correctamente el cable pues de lo contrario la grabadora quiz...

Страница 178: ...onecte el cable de conexión USB con la marca hacia arriba para que coincida con la marca del puerto de conexión de la base 3Asegúrese de que la grabadora se encuentre en el modo de Parada y colóquela en la base Cuando se conecta el cable USB se visualiza STORAGE REMOTE en la pantalla de la grabadora PC I F Conexión a su PC Conexión a su ordenador usando el soporte ...

Страница 179: ...as Cuando conecta la grabadora al ordenador y utiliza DSS Player ajuste la clase USB a MASS STORAGE en la configuración del menú de la grabadora Si se encuentra en AUDIO CLASS cuando realiza la conexión la grabadora no será reconocida como unidad de disco removible Asegúrese de conectar el cable USB directamente en el puerto USB de su ordenador o bien en la boca de conexión de USB con suministro d...

Страница 180: ...nfiguración se visualizará en un diálogo 2Haga clic en donde dice DSS Player Versión 6 La marca en DSS Player Versión 6 desaparece Para arranque automático haga clic de nuevo para colocar la marca Windows 3 2 2 2 Ejecutar DSS Player Ejecutar DSS Player Arranque manual 1Arranque Windows 2Haga clic en Inicio apunte en Todos los Programas y elija Olympus DSS Player 3Haga clic en Olympus DSS Player No...

Страница 181: ...urante la instalación y haga doble clic en el icono Cuando se inicia por primera vez después de la instalación es necesario registrar los datos del usuario Por favor vea la P 45 para más detalles Nota La versión para Mac de DSS Player no cuenta con la función de inicialización automática ...

Страница 182: ...Actualización Para adquirir DSS Player Plus y actualizar DSS Player hay que realizar el siguiente procedimiento 1Inicialice DSS Player Por favor vea la P 54 para consultar cómo inicializar el programa 2Haga clic en el botón o seleccione Comprar una licencia nueva para DSS Player Plus en el menú Ayuda Se abrirá el navegador de Internet y se visualizará el sitio de compra de DSS Player Plus Por favo...

Страница 183: ...SS Player Plus Una vez realizada la actualización el título del menú principal cambia a DSS Player Plus Además podrá confirmar la actualización seleccionando Acerca de DSS Player en el menú Ayuda en la barra de herramientas En la ventana donde se Acerca de DSS Player deberá aparecer DSS Player Plus Función de Actualización 3 Notas Para adquirir el número de licencia se requiere un entorno que cuen...

Страница 184: ...partado Conexión a su ordenador usando el cable de conexión USB P 47 verá el modo de realizar la conexión 3Abra la ventana del Explorer o Finder La grabadora aparecerá como un elemento intercambiable 4Copie los datos Mientras los datos se graban o copian el piloto de grabación reproducción de la grabadora parpadeará Antes de desconectar la grabadora de su ordenador véase Desconexión de su PC P 48 ...

Страница 185: ...badora o a un servicio Olympus para repararla Explicación La carga en la batería se está agotando Intentó borrar un archivo bloqueado El archivo está lleno con marcas índice máximo de 16 marcas Se ha tratado de incorporar marcas índice de archivo WMA en archivos de música o en archivos que no han sido grabados con la grabadora La carpeta está llena de archivos máximo de 199 archivos La carpeta de ...

Страница 186: ...R Acción Esto es un fallo por tanto diríjase a la tienda donde adquirió la grabadora o a un servicio Olympus para repararla Borre los archivos innecesarios P 31 Reajuste seleccionado YES o NO Si se selecciona NO reajuste nuevamente después de borrar el archivo innecesario y de asegurar la memoria restante necesaria Ajuste nuevamente el inicio fin Seleccione otra carpeta Reformatear la memoria P 39...

Страница 187: ...tá bloqueado Síntoma No aparece nada en la pantalla No puede ponerse en marcha No puede grabar No se escucha el tono de reproducción No realiza el salto regresivo con el intervalo de salto especificado No puede borrar Se escucha un ruido durante la reproducción El nivel de grabación está muy bajo No puede colocar marcas índice Acción Verifique que la polaridad es la correcta Cambie por baterías nu...

Страница 188: ...ntoma No puede encontrar un archivo grabado La velocidad de reproducción no cambia No se puede conectar al ordenador cuando utiliza la base Acción Cambie a la carpeta correcta Ajuste la función de cancelación de ruido en OFF o regrese a la reproducción normal P 30 Ajuste la Clase USB en MASS STORAGE en la configuración de menú de la grabadora Resolución de fallos ...

Страница 189: ...0 Sólo Europa Puede recargar simultáneamente de 1 a 4 baterías AA R6 y 1 o 2 baterías AAA R03 utilizando energía doméstica de cualquier lugar en el mundo Batería recargable Ni MH BR401 Baterías de alta eficiencia y larga vida útil Cable de conexión KA333 Use para conectar la toma de micrófono de esta unidad a una radio u otra fuente de sonido Adaptador de enchufe PA3 Un adaptador que conecta equip...

Страница 190: ...mente Mono Vida útil de la pila recargable Ni MH BR 401 Grabación 12 horas aproximadamente Estéreo 14 horas aproximadamente Mono Reproducción 8 horas aproximadamente Estéreo 9 horas aproximadamente Mono Método de grabación Memoria integrada 64 MB Altavoz Altavoz dinámico redondo de ø23 mm integrado Toma de MIC Toma miniatura de ø3 5 mm impedancia 2kΩ o más Toma de EAR Toma miniatura de ø3 5 mm imp...

Страница 191: ...cliente en los EE UU y Canadá distec olympus com Número gratuito del servicio permanente de ayuda técnica en Europa 00800 67 10 83 00 Disponible paraAustria Bélgica Dinamarca Finlandia Francia Alemania Italia Luxemburgo Países Bajos Noruega Portugal España Suecia Suiza y el Reino Unido Números de pago en el resto de Europa 49 180 567 1083 49 40 23773 899 Dirección de correo electrónico para atenci...

Страница 192: ...oes not exceed the Class B limits for radio noise emissions from digital apparatus as set out in the Radio Interference Regulations of the Canadian Department of Communications Cet apparail numerique ne depasse pas limits de Categorie B pour les emissions de gruit radio emanant d appareils numeriques tel que prevu dans les Reglements sur l Interference Radio du Department Canadian des Communicatio...

Отзывы: