background image

42

3

S

hoot

ing ba

sics

3 Shooting basics

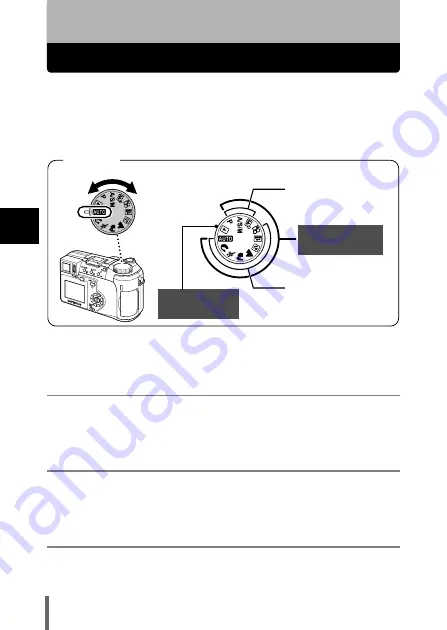
Shooting modes

The shooting modes include modes where the optimal settings for the 
situation are automatically selected, and modes where you can select the 
settings best suited to the shooting conditions and the effect you wish to 
achieve.
You can change the shooting mode before and after turning the camera on.

Situation-related modes

h

 Full-auto shooting

Allows you to take still pictures using no special functions or manual 
adjustments. The camera sets the optimal focusing and exposure. This is the 
simplest of all shooting modes.

i

 Portrait shooting

Suitable for taking a portrait-style shot of a person. This mode features an in-
focus subject against a blurred background. The camera automatically sets 
the optimal shooting conditions.

j

 Sports shooting

Suitable for capturing fast-moving action (such as sports) without blur. Even 
a fast-moving subject will be clear and sharp, as if it is not moving, enabling 

Setting-related modes

Shooting modes

Situation-related modes

Playback mode 

g

P.116

Mode dial

Содержание C-750 - 4MP Digital Camera

Страница 1: ...FERENCE MANUAL Click Here Explanation of digital camera functions and operating instructions Explanation of how to download images between your digital camera and PC DIGITAL CAMERA PC CONNECTION OPERATION MANUAL CAMERA OPERATION MANUAL ...

Страница 2: ... a longer service life Keep this manual in a safe place for future reference We recommend that you take test shots to get accustomed to your camera before taking important photographs In the interest of continually improving products Olympus reserves the right to update or modify information contained in this manual DIGITAL CAMERA C 750 Ultra Zoom REFERENCE MANUAL ...

Страница 3: ...complies with the European requirements for safety health environment and customer protection CE mark cameras are intended for sales in Europe For customers in USA Declaration of Conformity Model Number C 750 Ultra Zoom Trade Name OLYMPUS Responsible Party Olympus America Inc Address 2 Corporate Center Drive Melville New York 11747 3157 U S A Telephone Number 631 844 5000 Tested To Comply With FCC...

Страница 4: ... quality and exposure Useful functions Print setting Miscellaneous For playing back and editing pictures Settings that make the camera easier to operate Printing pictures Troubleshooting and other information Contents Names of parts P 4 P 10 P 17 P 32 P 42 P 55 P 67 P 99 P 116 P 137 P 163 P 174 Playback Basic Photography Introduction of the camera s functions Specifications Glossary of terms P 195...

Страница 5: ...AC adapter 20 Inserting a card 22 Card basics 22 Removing the card 23 Power on off 24 Startup Shutdown screen 25 If the card is not recognized card check 25 Selecting a language 26 Setting the date and time 28 Adjusting the viewfinder 30 Holding the camera 31 2 Using the menus 32 About the menus 32 How to use the menus 33 Shortcut menus 35 Mode Menus 37 3 Shooting basics 42 Shooting modes 42 Takin...

Страница 6: ... the external flash 63 Using commercially available external flashes 65 Compatible commercially available external flashes 66 5 Advanced shooting 67 A S M mode 67 Aperture priority shooting 68 Shutter priority shooting 69 Manual shooting 70 Using My Mode 71 Focusing applications 72 AF MODE Changing the focus range 72 FULLTIME AF A reliable time saving way to focus 73 AF AREA Changing the position ...

Страница 7: ...s 94 FUNCTION Adding special effects to pictures 96 Recording sound with still pictures 97 Recording sound with movies 98 6 Adjusting the image quality and exposure 99 Record mode 99 Selecting a record mode 101 3 2 Resolution 103 ENLARGE SIZE 103 ISO sensitivity 104 Exposure compensation 105 White balance 106 Auto white balance 106 Preset white balance 107 One touch white balance 107 White balance...

Страница 8: ...8 Picture rotation 129 Recording sound 130 Editing still pictures 131 Resizing 131 Trimming 132 Protecting pictures 134 Erasing pictures 135 Single frame erase 135 All frame erase 136 8 Useful functions 137 ALL RESET Saving the camera s settings 137 CUSTOM BUTTON 139 Setting the custom button 140 Using the custom button 141 SHORT CUT 142 Setting the shortcut menu 143 Using the shortcut menu 144 MY...

Страница 9: ... MAPPING 160 Measurement units 161 VIDEO OUT Video output selection 162 9 Print setting 163 How to print pictures 163 All frame reservation 165 Single frame reservation 167 Trimming 170 Resetting print reservation data 172 10 Miscellaneous 174 Error codes 174 Troubleshooting 175 List of menus 182 List of factory default settings 188 Modes and Shooting Functions 191 Camera maintenance 194 Specifica...

Страница 10: ...n factors which may lead to a malfunction or operational problems Also warns of operations that should be absolutely avoided Useful information and hints that will help you get the most out of your camera Reference pages describing details or associated information Note ...

Страница 11: ...te control lamp Remote control receiver gP 86 87 Hot shoe gP 63 Microphone gP 97 98 130 DC IN jack gP 20 Flash gP 55 A V OUT jack MONO gP 128 USB connector Connector cover gP 20 128 Mode dial gP 42 Shutter button gP 46 Zoom lever W T GU gP 53 118 119 Speaker gP 156 ...

Страница 12: ...rd access lamp gP 46 Arrow pad acbd gP 32 OK Menu button e gP 32 Monitor gP 12 46 Flash mode button gP 55 Macro Spot button gP 79 84 Diopter adjustment dial gP 30 Self timer Remote control button Z gP 86 87 Protect button 0 gP 134 Rotation button y gP 129 Flash lever gP 55 Battery compartment cover gP 18 Battery compartment lock gP 18 Tripod socket Erase button S gP 135 ...

Страница 13: ...ovie Item Indications Ref Page 1 Shooting modes P A S M N o m L K J I s P 42 2 Shutter speed 16 1 1000 P 69 3 Aperture value F2 8 F8 0 P 68 4 Exposure compensation Exposure differential 2 0 2 0 3 0 3 0 P 105 P 70 5 Battery check e f P 15 6 Green lamp P 47 7 Flash stand by Camera movement warning Flash charge Lights Blinks P 57 8 Macro mode Super macro mode Manual focus MF P 84 P 85 P 77 9 Noise re...

Страница 14: ...288 1712 1280 960 640 480 320 240 etc P 100 17 AF target mark P 46 18 Number of storable still pictures Seconds remaining 30 36 P 100 P 51 19 AE lock AE memory B C P 82 20 Spot metering n P 79 21 ISO ISO 50 ISO 100 ISO 200 ISO 400 P 104 22 White Balance 5 3 1 w x y V P 106 23 White balance compensation B1 B7 R1 R7 P 109 24 Saturation T 5 5 P 112 25 Sharpness N 5 5 P 110 26 Contrast J 5 5 P 111 27 ...

Страница 15: ... TIFF SHQ HQ SQ1 SQ2 P 99 6 Resolution 2288 1712 1280 960 640 480 320 240 etc P 100 7 Aperture value F2 8 F8 0 P 68 8 Shutter speed 16 1 1000 P 69 9 Exposure compensation 2 0 2 0 P 105 10 White Balance WB AUTO 5 3 1 w V P 106 11 ISO ISO 50 ISO 100 ISO 200 ISO 400 P 104 12 Date and time 03 06 17 15 30 P 28 13 File number Frame number Playing time total recording time FILE 100 0030 30 0 20 P 159 SQ1...

Страница 16: ...isplayed during movie recording z z z zBattery check If the remaining battery power is low the battery check indication changes as follows when the camera is turned on or while the camera is in use Note F2 8 F2 8 1600 1200 1600 1200 SQ1 SQ1 Battery check Memory gauge Before shooting Gauge is off No more pictures can be taken Fully lit Wait until the gauge returns to the status on the left to take ...

Страница 17: ...ffer from the actual page in this manual Follow the arrows to perform menu operations For details on operating procedures see How to use the menus P 33 Set the mode dial to any of the marks shown here This represents the arrow pad Only arrows applicable to the operation are shown ...

Страница 18: ... end of the strap back through the ring and stopper as indicated by the arrows Adjust the strap to the desired length 5 Pull the strap through the stopper B to make sure it is fastened securely 6 Attach the strap to the other eyelet following steps 3 to 5 Be careful with the strap when you carry the camera as it can easily catch on stray objects causing injury or damage Attach the strap correctly ...

Страница 19: ...our finger to slide the cover Do not use your fingernail as this could result in injury 4 Insert the batteries making sure that they are correctly oriented as shown in the illustration When using rechargeable AA R6 batteries charge them before use When using AA R6 batteries When using CR V3 lithium battery packs The correct way to insert the AA R6 batteries is indicated on the bottom of the camera...

Страница 20: ...urely 6 Slide the battery compartment lock from to If the camera is left for about 1 hour with the batteries removed some of the internal settings may revert to the factory default settings C D Note The amount of power consumed varies considerably depending on the operations performed on the digital camera If you use exhausted batteries or alkaline batteries the camera may turn off without display...

Страница 21: ...alkaline batteries When you need batteries in a hurry you can use AA R6 alkaline batteries which are easy to obtain anywhere However the number of pictures that you can take may vary considerably depending on the battery manufacturer shooting conditions etc When taking pictures use the viewfinder and turn off the monitor whenever possible to save power z z z zAC adapter An AC adapter is useful for...

Страница 22: ... batteries may vary according to the type of battery manufacturer shooting conditions etc Power is consumed continuously during the conditions described below This could shorten the life of the batteries When the monitor is turned on When the monitor is in the playback mode for an extended period of time Repeated zoom adjustments Repeated auto focus by depressing the shutter button halfway When th...

Страница 23: ...n a PC c Index area You can write down the card s contents d Contact area Comes into contact with the camera s signal read contacts Compatible cards xD Picture Card 16 256MB This camera may not recognize a non Olympus card or a card that was formatted on another device such as a PC etc Before use be sure to format the card on this camera g CARD SETUP Formatting Cards P 148 1 Make sure the camera i...

Страница 24: ...til it clicks Removing the card 1 Push the card all the way in to unlock it then let it return slowly The card is ejected a short way and then stops Hold the card straight and pull it out Do not press on the card with hard or pointed items such as ballpoint pens Never open the card cover or remove the card or the batteries while the camera is turned on Doing so could destroy the data stored on the...

Страница 25: ...he mode dial is set to q the camera turns on in the playback mode and the monitor turns on 3 To turn the camera off press the power switch again TIPS To save battery power the camera automatically enters the sleep mode and stops the operation after about 3 minutes of non operation The camera activates again as soon as you operate the shutter button or zoom lever The sleep time interval can be set ...

Страница 26: ...ard is formatted Monitor indication Corrective action q NO CARD There is no card in the camera or the card is not inserted properly Insert a card If a card is already inserted remove it and insert it again correctly The card cannot record play back or erase pictures Format the card or replace it with a new one Press ac to select POWER OFF then press e Replace the card with a new one Format the car...

Страница 27: ...he area where you purchased this camera 1 Set the mode dial to P and press the power switch to turn the camera on 2 Press e The top menu is displayed 3 Press d on the arrow pad to select MODE MENU 4 Press ac to select the SETUP tab then press d Arrow pad OK button Mode dial Power switch WB DRIVE MODE MENU Top menu CARD SEtUP CAM PIC ALL RESEt ON ON ENGLISH ENGLISH ON ON 3 MIN 3 MIN SLEEP REC VIEW ...

Страница 28: ...ss ac to select a language then press e 7 Press e again to exit the menu 8 To turn the camera off press the power switch CAM PIC CARD SEtUP ON ON 3 MIN 3 MIN SLEEP REC VIEW PW ON OFF SEtUP ALL RESEt ON ON ENGLISH ENGLISH ENGLISH DEUtSCH SELECt GO FRANCAIS ESPAÑOL Power switch e button ...

Страница 29: ...4 Press ac to select the SETUP tab then press d 5 Press ac to select X then press d The green frame moves to the selected item Arrow pad OK button Mode dial Power switch Top menu WB DRIVE MODE MENU CARD SEtUP CAM PIC ALL RESEt ON ON ENGLISH ENGLISH ON ON 3 MIN 3 MIN SLEEP REC VIEW PW ON OFF SEtUP SETUP tab CARD SEtUP FILE NAME MY MODE SEtUP CAM PIC 03 01 01 03 01 01 00 00 00 00 RESEt RESEt PIXEL M...

Страница 30: ...e is displayed in the 24 hour format Consequently 2 p m is displayed as 14 00 9 Press e For a more accurate setting press e when the time signal hits 00 seconds The clock starts when you press the button 10 To turn the camera off press the power switch The current settings are retained even when the power is turned off unless they are readjusted The date and time settings will be canceled if the c...

Страница 31: ...person using the camera 1 Set the mode dial to h and press the power switch The camera and the viewfinder turn on 2 While looking through the viewfinder slowly turn the diopter adjustment dial 3 Turn the dial until the AF target mark can be seen clearly Power switch Mode dial Diopter adjustment dial Viewfinder 2288 1712 2288 1712 AF target mark ...

Страница 32: ...es in the vertical position hold the camera so that the flash is higher than the lens Keep your fingers and the strap away from the lens and flash Clear pictures cannot be obtained if the camera moves as the shutter button is pressed Hold the camera correctly and press the shutter button gently Horizontal grip Vertical grip Top view Do not hold this part of the lens Note ...

Страница 33: ...Kt HI Take you directly to the setting screens Display operational buttons at the bottom of the screen The functions registered in the shortcut menus can also be accessed from the MODE MENU The shortcut menus can be replaced in modes other than hnq g Setting the shortcut menu P 143 Lets you access the menu selections to set the ISO sharpness etc Categorizes the settings into 4 tabs Press ac to sel...

Страница 34: ... OFF SEtUP 1Press e to display the top menu Press d Top menu CAMERA tab PICTURE tab CARD tab SETUP tab 2Press ac to select a tab then press d Press b to return to the tab selection screen continued overleaf CARD SEt PIC CAMERA DRIVE ISO A S M SLOW SLOW1 SLOW1 CARD SEt CAM PICtURE HQ HQ WB AUtO AUtO SHARPNESS CONtRASt Arrow pad OK Menu button a c a c a c d d b continued overleaf ...

Страница 35: ... RESET Saving the camera s settings P 137 CARD SEt PIC CAMERA DRIVE ISO SLOW AUtO 200 400 50 100 A S M CARD SEt PIC CAMERA DRIVE ISO SLOW A S M AUtO 200 400 50 100 4Press acto select a setting Press e to complete setting Press e again to exit the menu and return to shooting status The green frame moves to the selected item b or e 3Press ac to select an item then press d To return to select an item...

Страница 36: ... sequential shooting and BKT auto bracketing P 89 Extends the maximum optical zoom making possible up to approx 40x zoom P 54 Sets the image quality and resolution Still picture TIFF SHQ HQ SQ1 SQ2 Movie HQ SQ P 99 Sets the appropriate white balance according to the light source P 106 Sets the date and time P 28 Formats a card P 148 DRIVE CARD SEtUP WB DRIVE MODE MENU WB DIGItAL ZOOM MODE MENU DRI...

Страница 37: ...e shortcut menu P 143 Still picture Movie Runs through all saved pictures one after another P 121 MOVIE PLAYBACK Plays back movies P 122 INDEX Creates an index picture of a movie in 9 frames P 124 EDIT Edits a movie P 126 Displays all the shooting information on the monitor P 150 Displays a histogram showing the luminance distribution of still pictures P 114 INFO MODE MENU INFO MODE MENU MOVIE PLA...

Страница 38: ...r priority shooting and M Manual shooting P 67 r1 2 3 4 Selects a mode to be activated when taking pictures in r mode P 71 w Adjusts the amount of light emitted by the flash P 62 SLOW Selects from SLOW1 1st curtain HSLOW1 1st curtain with red eye reduction and SLOW2 2nd curtain when the flash mode is set to SLOW slow synchronization P 61 NOISE REDUCTION Reduces the noise that affects pictures duri...

Страница 39: ...ts to pictures BLACK WHITE SEPIA WHITE BOARD BLACK BOARD P 96 AF AREA Changes the position of the AF target mark using the arrow pad P 74 INFO Selects whether to display all the information such as shutter speed and white balance or only the minimum information P 150 u Displays a histogram showing the luminance distribution of still pictures P 114 R still pictures Sound can be recorded when taking...

Страница 40: ...ettings which are activated in the r mode P 145 FILE NAME Changes how file names are assigned P 159 PIXEL MAPPING Checks the CCD and image processing functions for errors P 160 s Adjusts the brightness of the monitor or viewfinder P 151 X Sets the date and time P 28 m ft Sets the measurement unit m ft used during manual focus P 161 VIDEO OUT Selects NTSC or PAL according to your TV s video signal ...

Страница 41: ...CARD tab CARD SETUP Erases all image data stored on the card or format the card P 136 148 SETUP tab ALL RESET Selects whether to keep the current camera settings when you turn off the power P 137 W Selects a language for on screen display P 26 PW ON OFF SETUP Sets the picture and sound that come on when the power is turned on and off P 157 SCREEN SETUP Registers a stored picture for use as the pic...

Страница 42: ...ype TV video signal types differ depending on the region P 162 G Selects the number of frames in the index display P 120 8 Sets the beep sound used for button operations and warnings and adjusts the volume P 154 VOLUME Adjusts the sound volume during playback Also adjusts the volume of the sound selected in PW ON OFF SETUP P 156 ...

Страница 43: ...l pictures using no special functions or manual adjustments The camera sets the optimal focusing and exposure This is the simplest of all shooting modes i Portrait shooting Suitable for taking a portrait style shot of a person This mode features an in focus subject against a blurred background The camera automatically sets the optimal shooting conditions j Sports shooting Suitable for capturing fa...

Страница 44: ...ry The camera automatically sets the optimal shooting conditions m Night Scene shooting Suitable for shooting pictures in the evening or at night The camera sets a slower shutter speed than is used in normal shooting For example if you take a picture of a street at night in h mode the lack of brightness will result in a dark picture with the background underexposed and without details In the Night...

Страница 45: ...r speed automatically By decreasing the aperture value F number the camera will focus within a smaller range producing a picture with a blurred background Increasing the value forces the camera to focus over a wider range in the forward and backward directions resulting in increased depth of field in which both the subject and the background are in focus g Aperture priority shooting P 68 S Shutter...

Страница 46: ... for retrieving by this mode g MY MODE SETUP P 145 g Using My Mode P 71 n Movie record Allows you to record movies The camera sets the aperture and shutter speed automatically Even if the subject moves during recording or the distance to the subject changes correct focusing and exposure are maintained continuously If R is set to ON soud is recorded at the same time g Recording movies P 51 The avai...

Страница 47: ... i j k l m o r p P and press the power switch g Power on off P 24 The viewfinder turns on 2 Decide the composition of the picture Mode dial Shutter button Mode dial Card access lamp Power switch Power switch f button Flash lever To shoot using the monitor press f to turn the monitor on F2 8 F2 8 1600 1200 1600 1200 SQ1 SQ1 AF target mark ...

Страница 48: ... the way fully The camera takes the picture The card access lamp blinks while the picture is stored on the card TIPS The subject cannot be focused on g If correct focus cannot be obtained P 49 The green lamp blinks You are too close to the subject Take the picture at least 7 cm 2 8 wide angle 1 2 m 3 9 ft telephoto away from the subject If you use the super macro mode you can take pictures as clos...

Страница 49: ...appear on the image in the viewfinder or monitor This does not affect recorded pictures To check the area the camera is focusing on If you press f while pressing the shutter button halfway the area you are focusing on is enlarged Pressing f once more returns the size to normal This function is not available in the digital zoom range g DIGITAL ZOOM Using the digital zoom P 54 Press the shutter butt...

Страница 50: ...era at an object about the same distance away as the subject 2 Press the shutter button halfway until the green lamp lights When the focus and exposure are locked the green lamp lights The AF target mark moves to the focused position When the green lamp blinks the focus and exposure are not locked Release your finger from the shutter button re position your subject and press the shutter button hal...

Страница 51: ...focus lock recompose your shot and then take the picture If the subject has no vertical lines hold the camera vertically and focus the camera using the focus lock function by pressing the shutter button halfway then return the camera to the horizontal position while keeping the button pressed halfway and take the picture If the subject still cannot be focused on use the manual focus g Manual focus...

Страница 52: ...ver to enlarge your subject 3 Press the shutter button fully to start recording You can adjust the zoom during movie recording The card access lamp blinks while the movie is stored on the card During movie recording N lights red 4 Press the shutter button again to stop recording When the remaining recording time has been used up recording stops automatically When there is space in the card memory ...

Страница 53: ...ring movie recording To use the zoom during recording set DIGITAL ZOOM to ON g DIGITAL ZOOM Using the digital zoom P 54 In n mode the flash and manual focus MF cannot be used Note Recording will continue until the card is full unless stopped by pressing the shutter button A long recorded movie cannot be edited P 124 If a single movie recording uses up all of the card s memory create space on the c...

Страница 54: ...um of approximately 40x by combining the optical zoom with the digital zoom During movie recording the digital zoom magnification is 2 5x Camera movement is likely to occur at higher magnifications Stabilize the camera with a tripod etc to avoid camera movement Using the optical zoom 1 Push or pull the zoom lever Mode dial Zoom lever Wide angle Push the zoom lever toward W to zoom out Telephoto Pu...

Страница 55: ...d T The white area of the zoom indicator indicates the optical zoom If the digital zoom is set to ON a red area appears on the zoom indicator When you reach the limit of the optical zoom the digital zoom is enabled Pictures taken with the digital zoom may appear grainy Mode dial Arrow pad OK button Zoom lever Mode dial F2 8 F2 8 1600 1200 1600 1200 SQ1 SQ1 The cursor moves up and down on the zoom ...

Страница 56: ...d 2 Set the flash mode by repeatedly pressing The flash mode changes in the sequence shown below when all modes are available If no operation is performed for about 3 seconds the flash mode is set and the mode selector screen is automatically exited To prevent the flash from firing press down on the top of the flash to retract it Mode dial c d Shutter button Flash mode button SLOW Auto Auto flash ...

Страница 57: ... 0 ft to 14 8 ft T max Approx 1 2 m to 3 5 m 3 9 ft to 11 5 ft Function restrictions according to mode F2 8 F2 8 1600 1200 1600 1200 SQ1 SQ1 mark 9 Available Not available Factory default setting The factory default settings and available modes vary depending on the selected mode Mode h i j k l m o r p P Flash mode A S M Auto 9 9 9 9 9 9 9 9 9 9 9 9 9 9 SLOW1 9 9 9 9 9 SLOW2 9 9 9 9 9 HSLOW1 9 9 9...

Страница 58: ...zoom magnification is increased the camera will increase the locked shutter speed accordingly The flash does not fire in the following situations In the movie record mode during auto bracketing during super macro shooting when FUNCTION is set to WHITE BOARD BLACK BOARD and during Panorama shooting The flash may not give you the optimum result in macro mode especially with wide angle shooting Check...

Страница 59: ...nomenon After the pre flashes it takes about 1 second before the shutter is released Hold the camera firmly to avoid camera movement Effectiveness may be limited if the subject is not looking directly at the pre flashes or if the shooting range is too far Individual physical characteristics may also limit effectiveness z z z zFill in flash The flash fires regardless of the available light This mod...

Страница 60: ...flash is designed for slow shutter speeds Normally when shooting with a flash shutter speeds cannot go below a certain level to prevent camera movement But when shooting a night scene background fast shutter speeds can make the background too dark Slow synchronization flash allows both a slow shutter speed for the background and a flash for the subject Since the shutter speed is slow make sure you...

Страница 61: ...A S m mode 4 sec 1st curtain with red eye reduction HSLOW1 This mode is for when you want to use slow synchronization yet also reduce the red eye phenomenon For instance when shooting a person against a brightly lit night background A normal flash might make the person s eyes red but 1st curtain with red eye reduction lets you capture the background correctly and reduce the red eye phenomenon at t...

Страница 62: ...1 In the top menu select MODE MENU Æ Æ Æ Æ CAMERA Æ Æ Æ Æ SLOW Æ Æ Æ Æ SLOW1 HSLOW SLOW2 and press e g How to use the menus P 33 Press e again to exit the menu Mode dial Arrow pad OK button CARD SEt PIC CAMERA DRIVE ISO A S M SLOW SLO W2 SLO W1 SLOW ...

Страница 63: ...ge of 2 0 in 1 3 EV steps 1 In the top menu select MODE MENU Æ Æ Æ Æ CAMERA Æ Æ Æ Æ w and press d g How to use the menus P 33 2 Press ac to select a setting a Light emission is increased by 1 3EV each time you press the button EV Exposure Value c Light emission is decreased by 1 3 EV each time you press the button Press e again to exit the menu The flash adjustment effect may not be sufficient if ...

Страница 64: ... the arrow and attach the external flash For instructions on how to attach the flash refer to the manual for the external flash Keep the shoe cover in a safe place to prevent it getting lost and replace it on the camera when you have finished using the external flash 2 Turn on the external flash When using the FL 20 set the mode dial to TTL AUTO When using the FL 40 the external flash begins commu...

Страница 65: ...64 External flash optional 4 Flash 3 Press to set the flash mode g Flash shooting P 55 If close up pictures are overexposed try using the built in flash by itself Note ...

Страница 66: ...ed and aperture g Manual shooting P 70 Remember that a slow shutter speed can produce blurred images For the best results we recommend that you set the shutter speed from 1 200 to 1 300 seconds 3 Turn on the external flash Be sure to attach the flash to the camera before turning the flash on 4 Set the mode that automatically controls the amount of light emitted by the external flash Also set the I...

Страница 67: ...ditions it is possible that the correct exposure may not be obtained anyway In such a case adjust the auto F value or ISO value on the external flash unit or calculate the distance in the manual mode and use it that way Generally however the auto F value and ISO value can only be adjusted 1 step and beyond that exposure compensation cannot be made Exposure compensation in the camera is made invali...

Страница 68: ...shooting mode to be used when the mode dial is set to p 1 In the top menu select MODE MENU Æ CAMERA Æ A S M Æ A S or M and press e g How to use the menus P 33 Press e again to exit the menu Mode dial Arrow pad OK button CARD SEt PIC CAMERA DRIVE ISO A S M SLOW M S A ...

Страница 69: ...in green the setting will provide optimum exposure Aperture range Toward W f2 8 to f8 0 Toward T f3 7 to f8 0 When the flash is set to the auto flash mode the shutter speed is fixed at 1 30 sec in the maximum wide angle or 1 320 sec in the maximum telephoto and will not go slower Mode dial ac Aperture value appears The image is overexposed Press a to increase the aperture value appears The image i...

Страница 70: ...ake the following steps When the shutter speed is displayed in green the setting will provide optimum exposure Shutter speed range 1 to 1 1000 sec Shutter speeds that can be set differ according to the flash setting Mode dial ac Shutter speed appears The image is overexposed Press a to set a faster shutter speed appears The image is underexposed Press c to set a slower shutter speed 1 50 1600 1200...

Страница 71: ...utter speed compared to the exposure level considered optimal by the camera is displayed If the exposure differential appears in red it indicates that the exposure differential is less than 3 0 EV or more than 3 0 EV When you press x the screen on the right appears with the bar indicating current exposure settings Aperture value f2 8 to f8 0 W f3 7 to f8 0 T Shutter speed 16 to 1 1000 sec To avoid...

Страница 72: ...eate and save up to 4 different patterns g MY MODE SETUP P 145 1 In the top menu select MODE MENU Æ CAMERA Æ MY MODE Æ MY MODE 1 to MY MODE 4 and press e g How to use the menus P 33 Press e again to exit the menu Only the settings in MY MODE 1 have already been saved You cannot select MY MODE 2 to MY MODE 4 if no settings have been saved in them g MY MODE SETUP P 145 Although the settings you are ...

Страница 73: ...center of the screen focusing is possible SPOT Focus selection is based on the subject within the AF target mark 1 In the top menu select MODE MENU Æ CAMERA Æ AF MODE Æ iESP or SPOT and press e g How to use the menus P 33 Press e again to exit the menu In h and n mode the AF MODE is fixed at iESP and cannot be changed Mode dial Arrow pad OK button CARD SEt PIC CAMERA NOISE REDUCtION MULtI MEtERING...

Страница 74: ...ton halfway When ON is selected the focusing time is reduced letting you take successive snapshots 1 In the top menu select MODE MENU Æ CAMERA Æ FULLTIME AF Æ ON and press e g How to use the menus P 33 Press e again to exit the menu Battery life is reduced when FULLTIME AF is used Mode dial Arrow pad OK button CARD SEt PIC CAMERA NOISE REDUCtION MULtI MEtERING DIGItAL ZOOM FULLtIME AF AF MODE OFF ...

Страница 75: ... and press d 3 Use the arrow pad to move the AF target mark to the area you want to focus on The AF target mark at the center of the screen can be moved vertically or horizontally 4 Take the picture To restore the AF target mark to its original position at the center press e Press e again to exit AF target mark selection mode AF AREA is not available when the digital zoom is set to ON The location...

Страница 76: ...arget mark on the subject you want to focus on and press x The focus is locked and the AF LOCK mark is displayed To reset the AF LOCK press x again to cancel the AF LOCK Each time you press x AF LOCK is alternately engaged and canceled 3 Press the shutter button fully When x is pressed When focus is locked Mode dial x AEL Custom button Shutter button F2 8 F2 8 1600 1200 1600 1200 SQ1 SQ1 AF LOCK F...

Страница 77: ... Æ Do not operate any of the buttons or the mode dial after performing AF LOCK AF LOCK will be canceled Æ The camera had emerged from sleep mode or the power was turned off The focus may be compromised by operating the zoom after setting the AF LOCK Complete zoom operations before setting the AF LOCK AF LOCK is not available when a menu is displayed on the screen Exit the menu g How to use the men...

Страница 78: ...ion the area you are focusing on is enlarged This lets you check whether the focus is in the right position The distance indicator on the left of the monitor is for reference only When the indicator is moved to less than 2 m 6 6 ft the display automatically switches to the 7 cm 2 8 to 2 m 6 6 ft display 3 Hold down e for more than 1 second to save the setting MF is displayed in red on the monitor ...

Страница 79: ...ocus lock 1 Position the AF target mark on a subject at the desired distance and press the shutter button halfway 2 Keeping the shutter button half pressed press e The distance indicator is displayed MF is selected and the focus is locked at the same distance as when you performed focus lock Even if you move the cursor to the top of the distance indicator focusing is not possible at Æ Adjust the c...

Страница 80: ...xposure regardless of the background light gP 79 Multi metering Meters the brightness of the subject at up to 8 different points to set the optimal exposure based on the average brightness This method is useful with a high contrast subject gP 80 Spot metering 1 Select n or by repeatedly pressing If no operation is performed for about 3 seconds the selected mode is set and the mode selector screen ...

Страница 81: ...In the top menu select MODE MENU Æ CAMERA Æ MULTI METERING Æ ON and press e g How to use the menus P 33 Press e again to exit the menu 4 Position the AF target mark on the area you want to meter and press x The brightness is metered at up to 8 different points Multi metering bar appears Brightness meter readings are ignored after the 9th reading To perform metering again press x for more than 1 se...

Страница 82: ...r Ex When metering 2 points pressing x twice The aperture and shutter speed as calculated from the average values obtained by metering at 2 points These values are recalculated every time another metering point is added The average for the 2 metering points The average is always shown at the center of the bar Indicates how much the present exposure you are metering differs from the average exposur...

Страница 83: ...value exposure temporarily Next compose your shot again with the sun in the frame and take the picture 1 When using the camera in the p mode AE lock is not available in the M mode Set to any mode except M g A S M mode P 67 If a function other than AE lock is registered on x set AE lock to the button g Setting the custom button P 140 2 Compose the picture where you want to lock the metered value ex...

Страница 84: ...x for more than 1 second C appears While C is displayed the exposure is saved Press x again to cancel the AE memory AE lock was canceled Æ Do not operate any of the buttons or the mode dial after performing AE lock Doing so will cancel AE lock Æ The camera had emerged from sleep mode or the power was turned off AE lock is not available when multi metering is enabled Turn multi metering off g MULTI...

Страница 85: ...ill the entire frame with your subject If the center of the frame within the AF target mark is metered when you are close to the subject and you shoot with the optimal exposure the picture will turn out well spot metering macro mode P 79 1 Select or by repeatedly pressing The selected mode is set If no operation is performed for 3 seconds the mode selector screen is automatically exited You cannot...

Страница 86: ...U Æ CAMERA Æ Æ ON and press e g How to use the menus P 33 Press e again to exit the menu TIPS The subject is in shadow Æ When taking pictures close to the subject shadows may become conspicuous and the auto focus may not be able to maintain correct focus If this happens use the manual focus g Manual focus P 77 During super macro shooting zoom is not available During super macro shooting the built ...

Страница 87: ...utter button fully to take the picture Pressing the shutter button halfway locks the focus and exposure The self timer remote control lamp lights for approximately 10 seconds then starts blinking After blinking for approximately 2 seconds the picture is taken To stop shooting while in n mode press the shutter button fully again To cancel the self timer press Z The self timer mode is automatically ...

Страница 88: ...tedly pressing Z If no operation is performed for about 3 seconds the selected mode is set and the mode selector screen is automatically exited You can operate the zoom on the camera using the remote control device gP 88 3 Press the shutter button on the remote control device The focus and exposure are locked The self timer remote control lamp blinks for about 2 seconds before taking the picture M...

Страница 89: ...r on the camera For zooming press the W or T button on the remote control device During operation the self timer remote control lamp blinks How to cancel the remote control mode Æ The remote control mode is not canceled automatically after shooting Perform step 2 and set the mode to OFF If the remote control receiver is exposed to strong light the effective signal distance may be reduced or shooti...

Страница 90: ... balance are locked at the first frame Approx 8 frames at 1 3 frames sec in HQ mode i Pictures can be taken at a faster speed than normal sequential shooting The sequential shooting speed varies depending on the record mode setting 2 frames at 1 8 frames sec k Focus is individually locked for each frame The AF sequential shooting speed is slower than for normal sequential shooting BKT g Auto brack...

Страница 91: ...with exposure compensation than by using the exposure setting considered optimal by the camera When auto bracketing is set the exposure is changed automatically for each frame when you start shooting The exposure differential and number of frames can be selected in the menus The focus and white balance are locked at the first frame Ex When BKT is set to 1 0 3 1 In the top menu select MODE MENU Æ C...

Страница 92: ...SHQ record mode is set to ENLARGE SIZE When NOISE REDUCTION is set to ON The built in flash and external flash do not fire in BKT mode If there is not enough space available on the card for the number of frames you have set during auto bracketing you cannot continue shooting If the battery power is low and the battery check blinks during sequential shooting shooting stops and the camera starts sav...

Страница 93: ...the top menu select MODE MENU Æ CAMERA Æ PANORAMA and press d g How to use the menus P 33 The PANORAMA mode is set 2 Use the arrow pad to choose at which edge you want to connect the pictures d The next picture is connected at the right edge b The next picture is connected at the left edge a The next picture is connected at the top c The next picture is connected at the bottom Mode dial Arrow pad ...

Страница 94: ...to use SQ mode for panorama shooting During panorama shooting the flash and sequential shooting are not available Images are saved in JPEG format when panorama shooting is done in the TIFF mode The size of the image does not change If the mode dial is operated during panorama shooting the camera cancels the panorama mode and returns to normal shooting The camera itself cannot connect panorama pict...

Страница 95: ...s d g How to use the menus P 33 The 2 IN 1 picture mode is set 2 Take the first shot The subject will be positioned on the left in the combined picture 3 Take the second shot The subject will be positioned on the right in the combined picture The BUSY bar is displayed during processing After the image is saved the camera returns to the mode menu Picture when played back Mode dial Arrow pad OK butt...

Страница 96: ...d sequential shooting modes are not available To cancel the 2 IN 1 picture mode after the first shot has been taken press e The first shot will not be saved Operating the mode dial will exit 2 IN 1 picture mode If the camera enters sleep mode after the first shot 2 IN 1 picture mode will be canceled Note ...

Страница 97: ...black background emphasized to make them easier to read 1 In the top menu select MODE MENU Æ CAMERA Æ FUNCTION then select a mode and press e g How to use the menus P 33 WHITE BOARD and BLACK BOARD are not available in n mode Press e again to exit the menu TIPS Letters do not show clearly with WHITE BOARD or BLACK BOARD Æ Use exposure compensation g Exposure compensation P 105 When WHITE BLACK BOA...

Страница 98: ...press e g How to use the menus P 33 Press e again to exit the menu 2 When recording starts turn the camera microphone towards the source of the sound you want to record The BUSY bar is displayed during recording TIPS H appears on all still pictures and movies that have recorded sound During playback sound is output from the speaker The volume can be adjusted g VOLUME Playback Volume P 156 Sound ca...

Страница 99: ...tions shutter movement etc Sound can be recorded while shooting a movie 1 In the top menu select MODE MENU Æ CAMERA Æ R Æ ON and press e g How to use the menus P 33 2 Recording starts at the same time as shooting When R is set to ON the optical zoom position is locked during movie recording If you wish to use the zoom during movie recording set DIGITAL ZOOM to ON If R is set to OFF you can use bot...

Страница 100: ...Selecting lets you print the entire image without losing its borders almost the same image size as that used by photo labs Clearer Normal Larger Smaller SHQ A high quality mode using the JPEG format Because the compression rate is very low high quality can be maintained Selecting lets you print the entire image without losing its borders almost the same image size as that used by photo labs The EN...

Страница 101: ...6 3 1600 1200 5 1280 960 8 1024 768 13 640 480 33 SHQ 2288 1712 Low compression JPEG 11 11 2288 1520 12 12 ENLARGE SIZE 3200 2400 5 5 HQ 2288 1712 NORMAL 31 32 2288 1520 34 36 ENLARGE SIZE 3200 2400 16 16 SQ1 2048 1536 HIGH 17 17 NORMAL 39 40 1600 1200 HIGH 22 22 NORMAL 60 64 1280 960 HIGH 33 34 NORMAL 90 99 SQ2 1024 768 HIGH 51 53 NORMAL 132 153 640 480 HIGH 117 132 NORMAL 248 331 Record mode Res...

Страница 102: ...nnected the movie recording time will differ from the time listed in the Movie Record Modes table Selecting a record mode 1 In the top menu select MODE MENU Æ Æ Æ Æ PICTURE Æ Æ Æ Æ K and press d g How to use the menus P 33 If K is displayed on the top menu as a shortcut menu press the arrow pad in the same direction as the arrow shown next to K g SHORT CUT P 142 In the top menu press b to select K...

Страница 103: ...ure size on a computer screen When a picture is transferred to a computer the size of the picture on the computer screen varies depending on the computer s monitor setting For instance a picture taken in 1024 768 resolution is the same size as the screen if you set the picture to 1x when the monitor setting is 1024 768 However if the monitor setting is over 1024 768 such as 1280 1024 the picture o...

Страница 104: ...ENLARGE SIZE When ENLARGE SIZE is selected the actual 4 million pixels used by this camera can be increased to the equivalent of approx 8 million pixels 3200 2400 This allows you to make quality prints in larger sizes such as A3 297 mm 420 mm 11 7 16 5 However file sizes also become larger ENLARGE SIZE can be selected in the SHQ or HQ mode ENLARGE SIZE is not available in the h or n mode If the SH...

Страница 105: ...he top menu select MODE MENU Æ Æ Æ Æ CAMERA Æ Æ Æ Æ ISO then choose the most suitable ISO sensitivity and press e g How to use the menus P 33 AUTO is not available in p mode Press e again to exit the menu Higher ISO settings produce more electrical noise ISO is standardized based on the sensitivity of normal camera film The scale is approximate When ISO is set to AUTO and you are shooting in dark ...

Страница 106: ...elect a setting Adjust toward Press d to adjust up to 2 0 in 1 3 steps Adjust toward Press b to adjust up to 2 0 in 1 3 steps TIPS Often bright subjects such as snow will turn out darker than their natural colors Adjusting toward makes these subjects closer to their real shades For the same reason adjust toward when shooting dark subjects You can set the aperture by pressing b d in M mode g Manual...

Страница 107: ...press d g How to use the menus P 33 If WB is displayed on the top menu as a shortcut menu press the arrow pad in the same direction as the arrow shown next to WB g SHORT CUT P 142 2 Press ac to select AUTO PRESET or V according to the shooting conditions AUTO Press e Press e again to exit the menu PRESET Press d to display the next selection screen g Preset white balance P 107 V Press d to display...

Страница 108: ...te fluorescent lamp 4 200K This type of lamp is generally used in offices etc The color temperature values K are approximate They are not an accurate indication of color TIPS You can also preview different color tones by trying the different PRESET WB settings under the actual light source and checking the result on the monitor One touch white balance This function is useful when you need a more p...

Страница 109: ...rrect setting may not be obtained if the light reflected by the paper is too bright or too dark White balance may not be effective under some special light sources After setting a white balance other than AUTO play back the picture and check the colors on the monitor When the flash is fired with a white balance setting other than AUTO colors may appear different in the resulting picture from the c...

Страница 110: ...d g How to use the menus P 33 The white balance adjustment indicator appears on the screen 2 The color becomes bluer each time you press a and redder each time you press c depending on the original white balance conditions Press e to save your adjustment The white balance can be adjusted in 7 increments in both red and blue directions After saving the adjustment press e again to exit the menu Mode...

Страница 111: ... a The image contours are emphasized making the image appear sharper and more vivid Use this setting when you want to print pictures To reduce the sharpness Press c The image contours are softened Use this setting when you want to edit images on a PC When you have finished setting the sharpness press e Press e again to exit the menu If you adjust the sharpness too far toward noise may become consp...

Страница 112: ...How to use the menus P 33 2 Press ac to adjust the contrast between 5 and 5 To increase the contrast Press a The light and dark areas are defined more clearly making the image look crisper To reduce the contrast Press c The light and dark areas become less defined giving the image a softer impression Use this setting when you want to edit images on a PC When you have finished setting the contrast ...

Страница 113: ... and press d g How to use the menus P 33 2 Press ac to adjust the saturation between 5 and 5 To increase the saturation Press a Colors become darker and more intense To reduce the saturation Press c Colors become lighter When you have finished setting the saturation press e Press e again to exit the menu Mode dial Arrow pad OK button CARD SEt CAM PICtURE SAtURAtION ...

Страница 114: ...ss e g How to use the menus P 33 Press e again to exit the menu Noise reduction is always enabled in the m mode When noise reduction is set to ON the camera implements noise reducing processes after each shot to produce clearer images However shooting time is approximately twice as long as usual During this time the next shot cannot be taken When noise reduction is set to ON sequential shooting j ...

Страница 115: ...e brightness and contrast of recorded pictures The histogram display can be set separately for shooting mode and playback mode Ex When a histogram is displayed in P mode When the image is bright When the image is dark F2 8 F2 8 SQ1 SQ1 The part indicated in green in the histogram shows the luminance distribution within the AF target mark F2 8 F2 8 SQ1 SQ1 F2 8 F2 8 SQ1 SQ1 If the peak fills too mu...

Страница 116: ... normal playback screen press e again to display the top menu and press c The histogram is not displayed in the following situations even if histogram display is set to ON During M mode panorama shooting 2 IN 1 shooting and multi metering The histogram displayed during shooting may differ from the histogram displayed during playback A histogram may not appear when you play back pictures shot on an...

Страница 117: ... picture taken Single frame playback 2 Use the arrow pad to play back other pictures If the camera is not used for over 3 minutes the camera enters the sleep mode and the monitor turns off Mode dial Power switch Mode dial Arrow pad Displays the next picture Displays the previous picture Jumps to the picture 10 frames back Jumps to the picture 10 frames ahead Note ...

Страница 118: ...ing results and resume shooting quickly Functions available in normal playback mode are also available in QUICK VIEW 1 Press f twice quickly double click while in the shooting mode The camera immediately enters the playback mode and displays the last picture taken Single frame playback 2 Press the shutter button halfway to return to the shooting mode Mode dial Shutter button ...

Страница 119: ...l the zoom lever toward T U Each time you pull the zoom lever the picture is enlarged gradually By using the arrow pad while the enlarged picture is displayed you can shift the picture in the desired direction enabling you to view a different portion To return the picture to the original size 1x push the zoom lever toward W Pictures cannot be stored in an enlarged state Mode dial Zoom lever Note ...

Страница 120: ...the single frame playback mode push the zoom lever toward W G Use the arrow pad to select the picture b Moves to the previous frame d Moves to the next frame a Jumps to the previous index display the frames before the top left frame c Jumps to the next index display the frames following the bottom right frame To return to the single frame playback pull the zoom lever toward T Mode dial Zoom lever ...

Страница 121: ...n lets you select the number of pictures in an index display from 4 9 and 16 1 In the top menu select MODE MENU Æ Æ Æ Æ SETUP Æ Æ Æ Æ G Æ Æ Æ Æ 4 9 or 16 and press e Press e again to exit the menu g How to use the menus P 33 Mode dial Arrow pad OK button PLAY EDIt CARD SEtUP ...

Страница 122: ...p menu 2 Press a to start the slideshow 3 Press e to stop the slideshow The slideshow will not stop until you cancel it by pressing e You are recommended to use the optional AC adapter when running a slideshow for a long period of time If batteries are used the camera will enter the sleep mode after about 30 minutes and stop the slideshow automatically Mode dial e button a button INFO MODE MENU No...

Страница 123: ...ACK then press e The movie is played back When playback ends the display automatically returns to the beginning of the movie Fast forward fast rewind functions are available during playback d Fast forward Each press switches the speed between 1 2 and 20 b Fast rewind Each press switches the speed between 1 2 and 20 Mode dial Arrow pad OK button n mark MOVIE PLAY INFO MODE MENU CANCEL GO SELECt MOV...

Страница 124: ...movie can be played continuously by holding the button down b Displays the previous frame The movie can be played continuously in reverse by holding the button down e Displays the MOVIE PLAYBACK menu TIPS Movies can also be played back in the shooting mode using QUICK VIEW g QUICK VIEW P 117 The card access lamp blinks while the camera is reading the movie from the card Reading of movies may take ...

Страница 125: ...ayed as an index to show the movie at a glance Indexes can be stored on the card as a still picture EDIT This function lets you erase parts of the movie that you do not want 1 Use the arrow pad to select a picture with n 2 In the top menu select MOVIE PLAY then choose each item g How to use the menus P 33 Select INDEX gP 124 Select EDIT gP 126 INDEX Creating an index 3 Press ac to select INDEX the...

Страница 126: ...rame of the index and press e 6 Press ac to select OK then press e The 9 frames extracted from the movie appear as an index display then the camera returns to the playback mode The index is stored as a new picture If you want to select different frames select RESET and press e and repeat the procedure from Step 4 To quit the editing function select CANCEL and press e TIPS The index is stored as a ...

Страница 127: ...e arrow pad to select the first frame of the part you want to keep and press e a Jumps to the first frame of the movie c Jumps to the last frame of the movie d Displays the next frame The movie can be played continuously by holding the button down b Displays the previous frame The movie can be played continuously in reverse by holding the button down 5 As in Step 4 use the arrow pad to select the ...

Страница 128: ... then press e NEW FILE Stores the edited movie as a new movie OVERWRITE Stores the edited movie with the same name as the original The original movie is not stored The edited movie is stored and the screen returns to the playback mode You cannot edit movies with sound which were taken with another digital camera You cannot select NEW FILE if there is insufficient memory space on the card GO SELECt...

Страница 129: ...played on the TV Use the arrow pad to select the picture you want to display The close up playback index display and slideshow functions can also be used on a TV screen TIPS You are recommended to use the optional AC adapter when using the camera with a TV Make sure that the camera s video output signal type is the same as the TV s video signal type g VIDEO OUT Video output selection P 162 The cam...

Страница 130: ...function lets you turn such pictures 90 degrees counterclockwise or clockwise so that they are displayed vertically 1 In the single frame playback mode press y Each pressing rotates the image in the following sequence 90 degrees counterclockwise 90 degrees clockwise and back to the original The following pictures cannot be rotated Movies protected pictures pictures that have been edited on a PC an...

Страница 131: ...phone toward the sound you want to record and press e to start recording The BUSY bar is displayed during recording To obtain the optimum sound the microphone should be placed no farther than 1 m 3 3 ft away from the subject If you re record the sound the original sound is erased You may not be able to record sound when there is insufficient card memory the CARD FULL message is displayed Sound rec...

Страница 132: ...n choose each item g How to use the menus P 33 Select Q gP 131 Select P gP 132 Resizing 3 Select Q then press d 4 Press ac to select the picture size then press e The BUSY bar is displayed during resizing After the image is saved the camera returns to the playback mode To quit the resizing function select CANCEL then press e Resizing is not possible in the following cases Movies pictures that have...

Страница 133: ...tal to vertical and vice versa when the maximum or minimum size is reached 6 Press e 7 Press ac to select OK then press e The BUSY bar is displayed during trimming After the image is saved the camera returns to the playback mode The trimmed picture is stored as a separate picture from the original If you want to trim the picture again select RESET and press e and repeat the procedure from Step 5 T...

Страница 134: ...ry space on the card or when the picture was taken with the record mode set to ENLARGE SIZE It may not be possible to trim pictures taken with another camera If pictures recorded in 3 2 are trimmed the image proportions are changed to the standard 4 3 aspect ratio If a trimmed picture is printed out it may appear grainy Note ...

Страница 135: ...me all frame erase function 1 Use the arrow pad to display the picture you want to protect g Viewing still pictures P 116 2 Press 0 To cancel protection press 0 again Protected pictures cannot be erased by the single frame all frame erase function but they are all erased by formatting Mode dial Arrow pad OK button 0 Protect button Displayed when a picture is protected Note ...

Страница 136: ...ctures cannot be restored Check each picture before erasing to avoid accidentally erasing pictures you want to keep g Protecting pictures P 134 Single frame erase 1 Use the arrow pad to display the picture you want to erase g Viewing still pictures P 116 2 Press S The S ERASE screen is displayed 3 Press ac to select YES then press e The picture is erased and the menu is closed Note Mode dial Arrow...

Страница 137: ...lect MODE MENU Æ Æ Æ Æ CARD Æ Æ Æ Æ CARD SETUP and press d g How to use the menus P 33 2 Press ac to select R ALL ERASE then press e 3 Press ac to select YES then press e All the pictures are erased Mode dial Arrow pad OK button CARD SEtUP ALL ERASE CANCEL GO SELECt FORMAt YES CAUtION ERASING ALL SELECt GO ALL ERASE NO ...

Страница 138: ...g mode this setting applies to all the other modes both shooting and playback ON All settings are returned to the factory default settings after the power is turned off OFF The settings made before the power is turned off are saved 1 In the top menu select MODE MENU Æ Æ Æ Æ SETUP Æ Æ Æ Æ ALL RESET Æ Æ Æ Æ OFF or ON and press e g How to use the menus P 33 Press e again to exit the menu My Mode sett...

Страница 139: ... 0 P 105 R still pictures OFF P 97 FLASH MODE AUTO P 55 R movie OFF P 98 w 0 P 62 OFF P 85 AF MF AF P 77 FUNCTION OFF P 96 OFF P 79 84 INFO OFF P 150 Z OFF P 86 87 u OFF P 114 LCD OFF K HQ P 99 OPTICAL ZOOM WIDE P 53 WB AUTO P 106 DRIVE o P 89 0 P 109 BKT 1 3 pictures P 90 SHARPNESS 0 P 110 ISO AUTO 50 P 104 CONTRAST 0 P 111 A S M A P 67 SATURATION 0 P 112 SLOW SLOW1 P 61 TIFF SHQ HQ 2288 1712 P 1...

Страница 140: ...enu Available functions Settings Ref Page AE LOCK factory default setting P 82 AF LOCK P 75 DRIVE o j i k BKT P 89 ISO AUTO 50 100 200 400 P 104 A S M A S M P 67 SLOW SLOW1 HSLOW1 SLOW2 P 61 NOISE REDUCTION OFF ON P 113 DIGITAL ZOOM OFF ON P 54 FULLTIME AF OFF ON P 73 AF MODE iESP SPOT P 72 OFF ON P 85 FUNCTION OFF BLACK WHITE SEPIA WHITE BOARD BLACK BOARD P 96 INFO OFF ON P 150 u OFF ON P 114 K T...

Страница 141: ... In the top menu select MODE MENU Æ Æ Æ Æ SETUP Æ Æ Æ Æ CUSTOM BUTTON and press d g How to use the menus P 33 2 Press ac to select a function then press d Press e again to exit the menu Mode dial Arrow pad OK button GO SELECt CUStOM BUttON AE LOCK ISO DRIVE AF LOCK ...

Страница 142: ...ustom button TIPS When ISO is set to the custom button but you want to use AE lock The AE lock function cannot be used when a different function is set to the custom button Reset AE lock to the custom button by following Setting the custom button P 140 You cannot set the custom button separately in each time Mode dial x AEL Custom button Set by repeatedly pressing the button Note ...

Страница 143: ...ef Page Functions that can be set in the shortcut menu Ref Page DRIVE P 89 PANORAMA P 92 ISO P 104 2 IN 1 P 94 A S M P 67 FUNCTION P 96 r1 2 3 4 P 71 AF AREA P 74 w P 62 INFO P 150 SLOW P 61 u P 114 NOISE REDUCTION P 113 K P 99 MULTI METERING P 80 WB P 106 DIGITAL ZOOM P 54 P 109 FULLTIME AF P 73 SHARPNESS P 110 AF MODE P 72 CONTRAST P 111 P 85 SATURATION P 112 R still pictures P 97 Top menu WB DR...

Страница 144: ... menu select MODE MENU Æ Æ Æ Æ SETUP Æ Æ Æ Æ SHORT CUT and press d g How to use the menus P 33 2 Press ac to select A B or C then press d 3 Press ac to select a function then press e The shortcut menu is set Press e again to exit the menu MODE MENU Mode dial Arrow pad OK button GO SELECt SHORt CUt DRIVE DRIVE WB WB GO SELECt SHORt CUt DRIVE ISO A S M 1 2 3 4 ...

Страница 145: ...ortcut menu you have set appears on the top menu 2 Press ab or c to select the shortcut menu The monitor jumps directly to the setting screen for that function Ex When is set in shortcut menu A You cannot set the custom button separately in each mode Mode dial Arrow pad OK button ISO AF MODE MODE MENU Press e ISO AF MODE MODE MENU Top menu Pressing a takes you directly to screen GO ADJUSt Note ...

Страница 146: ...mm 50 mm 100 mm 200 mm and 380 mm these numbers are based on the focal length of a 35 mm camera Functions that can be set in MY MODE Default setting Ref Page Functions that can be set in MY MODE Default setting Ref Page P A S M S Prg P P 44 FULLTIME AF OFF P 73 F No F 2 8 P 68 AF MODE iESP P 72 SHUTTER 1 1000 P 69 OFF P 85 F 0 0 P 105 PANORAMA OFF P 92 LCD 1 OFF 2 IN 1 OFF P 94 ZOOM 2 38 mm FUNCTI...

Страница 147: ...ves settings one by one The MY MODE SETUP screen appears 3 Select a MY MODE number Press ac to select MY MODE number from 1 to 4 then press e z z z zWhen selecting PRESENT in Step 2 4 Press ac to select SET then press e The current camera settings are saved in the selected MY MODE Mode dial Arrow pad OK button PLAY EDIt CARD SEtUP PRESENt RESEt CUStOM PIXEL MAPPING FILE NAME MY MODE SEtUP CANCEL G...

Страница 148: ...e setting then press e The setting is saved You can also change the other custom settings 5 When you have made all the settings you want press e The screen displayed in Step 2 appears Press e again to exit the menu Although the settings you are using can be saved the zoom position you are currently using may not be saved The zoom position will be the closest of the 5 zoom settings in MY MODE to th...

Страница 149: ...ictures are erased when the card is formatted Make sure that you save or transfer important data to a PC before formatting a card 1 In the top menu select MODE MENU Æ Æ Æ Æ CARD Æ Æ Æ Æ CARD SETUP and press d g How to use the menus P 33 The I FORMAT screen is displayed In the top menu press d to select CARD SETUP In the top menu select MODE MENU Æ Æ Æ Æ CARD Æ Æ Æ Æ CARD SETUP and press d Press ac...

Страница 150: ...then press e The BUSY bar is displayed and the card is formatted Never do the following during formatting as they may cause the card to malfunction Open the card cover Remove the battery Connect or disconnect the AC adapter NO CAUtION ERASING ALL SELECt GO FORMAt YES BUSY Note ...

Страница 151: ... press e g How to use the menus P 33 Pressing b in the top menu displays the full amount of shooting information on the monitor ON To turn INFO off press e to display the top menu and press b again Ex Playback mode If the picture has been taken with a different camera setting INFO to ON in q mode may still not display all the information If u is set the histogram is displayed regardless of whether...

Страница 152: ... top menu select MODE MENU Æ Æ Æ Æ SETUP Æ Æ Æ Æ s and press d g How to use the menus P 33 2 Press ac to adjust the brightness while looking in the monitor or viewfinder and when you have set the desired level press e Pressing a brightens the monitor or viewfinder and pressing c darkens it Press e again to exit the menu Mode dial Arrow pad OK button ADJUSt GO ...

Страница 153: ... taken Pressing the shutter button halfway during Rec View lets you resume shooting immediately OFF The picture being recorded to the card is not displayed This is useful when you want to prepare for your next shot while the previous picture is being recorded 1 In the top menu select MODE MENU Æ Æ Æ Æ SETUP Æ Æ Æ Æ REC VIEW Æ Æ Æ Æ OFF or ON and press e g How to use the menus P 33 Press e again to...

Страница 154: ... select MODE MENU Æ Æ Æ Æ SETUP Æ Æ Æ Æ SLEEP Æ Æ Æ Æ 30 SEC 1 MIN 3 MIN 5 MIN or 10 MIN and press e g How to use the menus P 33 Press e again to exit the menu The sleep mode is not activated when using the AC adapter In q mode the sleep mode is activated after 3 minutes regardless of the setting and the monitor turns off If a slideshow lasts more than 30 minutes the camera automatically enters th...

Страница 155: ...re 1 for the kind of sound and LOW for the volume You can turn the sound off completely by setting OFF 1 In the top menu select MODE MENU Æ Æ Æ Æ SETUP Æ Æ Æ Æ 8 and press d g How to use the menus P 33 2 Select 1 or 2 and press d Then select LOW or HIGH and press e To turn off the beep sound select OFF and press e Press e again to exit the menu Mode dial Arrow pad OK button OFF LOW HIGH GO SELECt ...

Страница 156: ... of sound and LOW for the volume You can turn the sound off completely by setting OFF 1 In the top menu select MODE MENU Æ Æ Æ Æ SETUP Æ Æ Æ Æ SHUTTER SOUND and press d g How to use the menus P 33 2 Select 1 or 2 and press d Then select LOW or HIGH and press e To turn off the shutter sound select OFF and press e Press e again to exit the menu Mode dial Arrow pad OK button SHUttER SOUND OFF LOW HIG...

Страница 157: ... the power is turned on or off There are 5 levels to choose from 1 In the top menu select MODE MENU Æ Æ Æ Æ SETUP Æ Æ Æ Æ VOLUME and press d g How to use the menus P 33 2 Press ac to set the volume then press e Press e again to exit the menu Mode dial Arrow pad OK button PLAY EDIt CARD SEtUP VOLUME VOLUME VIDEO OUt VIDEO OUt Selecting this level will mute the sound completely ...

Страница 158: ...b OFF No picture is displayed 1 Factory default setting 2 Selects a picture already registered If there is no picture registered nothing is displayed when the power is turned on or off 3 Press ac to select SOUND then press d Press ac to select OFF or ON then press b OFF There is no startup shutdown sound ON Factory default setting The volume level is the same as that set for the playback volume g ...

Страница 159: ...EXISTING screen is displayed asking if you want to cancel the currently registered picture and register a new one To register a new picture select RESET and press e If you select KEEP the screen returns to the menu 2 Select the picture you want to register using the arrow pad and press e 3 Press ac to select OK then press e The picture is registered and the screen returns to the menu Press e again...

Страница 160: ...d the file number returns to No 0001 This method is useful when grouping files on separate cards AUTO Even if a new card is inserted the folder number and file number are retained from the previous card so the same file number is not used on different cards This helps you to manage multiple cards This method is useful when you want to manage all your files with sequential numbers 1 In the top menu...

Страница 161: ...heck and adjust the CCD and image processing functions It is not necessary to operate this function frequently Approximately once a year is recommended Wait a few minutes after the monitor is used or continuous shots are taken to allow for proper performance of the Pixel Mapping function 1 In the top menu select MODE MENU Æ Æ Æ Æ SETUP Æ Æ Æ Æ PIXEL MAPPING and press d g How to use the menus P 33 ...

Страница 162: ...et in the manual focus mode m At long ranges the camera measures in meters and at shorts ranges in centimeters ft At long ranges the camera measures in feet and at short ranges in inches 1 In the top menu select MODE MENU Æ Æ Æ Æ SETUP Æ Æ Æ Æ m ft Æ Æ Æ Æ m or ft and press e g How to use the menus P 33 Press e again to exit the menu Note Measurement units Mode dial Arrow pad OK button ...

Страница 163: ...orded pictures properly on the TV 1 In the top menu select MODE MENU Æ Æ Æ Æ SETUP Æ Æ Æ Æ VIDEO OUT Æ Æ Æ Æ NTSC or PAL and press e g How to use the menus P 33 Press e again to exit the menu The factory default setting varies depending on the area where you purchased this camera TIPS TV video signal types main regions Check the video signal type before using the camera NTSC Japan Taiwan Korea Nor...

Страница 164: ...d out at home on a personal DPOF compatible printer z z z zPrinting on an Olympus CAMEDIA P 400 or P 200 digital printer Printing is possible directly from a card containing print reservation data without using a PC For more details refer to the printer s instruction manual The xD Picture Card cannot be inserted directly into the printer Use the card adapter sold separately z z z zTransferring pic...

Страница 165: ...his camera Make changes using the original device If a card contains DPOF reservations set by another device entering reservations using this camera may overwrite the previous reservations You may not be able to enter print reservations if there is insufficient memory space available on the card The CARD FULL message is displayed You can print up to 999 images from one card using the DPOF reservat...

Страница 166: ...u cannot make the print reservation for pictures with n 2 Press The PRINT ORDER screen appears Press ac to select U then press e If print reservation data is already stored on the card the PRINT ORDER SETTING screen appears giving you the choice of resetting the data or keeping it 3 Press ac to select x number of prints or X date time then press d Mode dial Arrow pad OK button Print button EXIt GO...

Страница 167: ... z zSet the date time printing data Press ac to select NO DATE or TIME then press e NO The pictures are printed without the date and time DATE All the pictures are printed with the shooting date TIME All the pictures are printed with the shooting time After completing all the print reservations press e to return to the playback screen EXIt GO SELECt 0 EXIt GO SELECt NO DAtE tIME Select x Select X ...

Страница 168: ...make the print reservation for pictures with n 2 Press The PRINT ORDER screen appears Press ac to select then press e If data is already stored on the card the PRINT ORDER SETTING screen appears giving you the choice of resetting the data or keeping it 3 Select the frame you want to print using the arrow pad and press e Mode dial Arrow pad OK button Print button EXIt GO SELECt PRINt ORDER GO SELEC...

Страница 169: ...t x number of prints X date time or P trimming then press d 6 Perform each setting z z z zSet the number of prints Press ac to set the number of prints then press e a Increases the number c Decreases the number z z z zSet the date time printing data Press ac to select NO DATE or TIME then press e NO The pictures are printed without the date and time DATE All the pictures with print reservation are...

Страница 170: ...press e to complete the reservations The screen in Step 3 is restored and appears on the displayed picture 8 Press e to display the single frame reservation menu 9 Press b to select END The PRINT ORDER screen appears 10 Press b repeatedly until the playback screen appears GO SELECt SQ1 SQ1 SQ1 SQ1 2 2 MORE END CANCEL SINGLE PRINt ...

Страница 171: ... If trimming has already been set the P screen appears Press ac to select RESET then press e 2 Use the arrow pad and zoom lever to decide the trimming position and size Press acbd to move the trimming frame Use the zoom lever to decide the trimming size The trimming frame changes from horizontal to vertical and vice versa when the maximum or minimum size is reached 3 Press e Mode dial GO SELECt RE...

Страница 172: ...y until the playback screen appears The size of the printed picture varies depending on the printer settings If the trimmed picture size is small printing magnification increases accordingly resulting in a printed picture with lower resolution For best results with trimmed pictures you are recommended to use the TIFF SHQ or HQ mode The original picture is not trimmed If your printer does not have ...

Страница 173: ...on data is already stored on the card the PRINT ORDER SETTING screen appears 3 To reset all print reservation data press ac to select RESET then press e Press b to return to the playback screen To reset only the print reservation data for the frames that you do not need press ac to select KEEP then press e If there is no print reservation data stored on the card the PRINT ORDER SETTING screen does...

Страница 174: ...frame reservation menu is displayed 6 Press c to select CANCEL Print reservation is canceled and the screen in step 5 is restored 7 If you are finished resetting print reservation data press e to display the single frame reservation menu Press b 8 Press b repeatedly until the playback screen appears GO SELECt SQ1 SQ1 SQ1 SQ1 2 2 MORE END CANCEL SINGLE PRINt ...

Страница 175: ... recorded image has been protected read only on a PC Download the image to a PC and cancel the read only setting q CARD FULL The card is full No more pictures movies or information such as print reservation can be recorded Replace the card or erase unwanted pictures Before erasing download important images to a PC L NO PICTURE There are no pictures on the card The card contains no pictures Record ...

Страница 176: ...a will not operate while it is connected to a PC Condensation When it is cold outside the water vapor in the air is rapidly cooled and turns to droplets of water Condensation occurs when the camera is suddenly taken from a cold place into a warm room No picture is taken when the shutter button is pressed The camera is in the playback mode Set the mode dial to any position except q P 42 The flash h...

Страница 177: ...vie mode The flash does not fire in the movie mode Set a different shooting mode P 51 FUNCTION is set to BLACK WHITE BOARD The flash does not fire in the BLACK WHITE BOARD mode P 96 Super macro mode is set The flash does not fire in the super macro mode Set the super macro mode to OFF P 85 Panorama mode is set The flash does not fire in the panorama mode Cancel the panorama mode P 92 The viewfinde...

Страница 178: ...the shooting mode Press f twice quickly or set the mode dial to q P 116 117 There are no pictures on the card NO PICTURE appears on the monitor Record pictures There is a problem with the card Refer to Error codes P 174 The camera is connected to a TV The monitor does not function when the AV cable is connected to the camera P 128 The date recorded with the image data is wrong The date time is not...

Страница 179: ...s turned off ALL RESET is set to ON Select the SETUP tab in the mode menu and set ALL RESET to OFF P 137 No picture is displayed on the TV when connected to the camera The video output signal is incorrect Set the video output signal according to the region where used P 162 The TV video signal setting is incorrect Set the TV to the video input mode P 128 ...

Страница 180: ...e the flash pop up P 55 The subject was too small and was backlit Set the flash to fill in mode or use the spot metering mode P 55 79 The sequential shooting mode was used Higher shutter speeds are used when the sequential shooting mode is selected which may result in pictures that are darker than usual Select o in the DRIVE menu P 89 When shooting a bright subject such as a landscape the picture ...

Страница 181: ... commercially available blower blush and then wipe with a lens cleaner to remove dust Mold may form on the lens surface if the lens is left dirty P 194 The picture was out of focus even though the green lamp was lit Focus the camera on an object at the same distance as the intended subject using the focus lock function before composing your shot P 49 Halation produces unnatural colors in the pictu...

Страница 182: ...d in a cold environment Battery performance deteriorates in low temperatures Keep the camera warm by putting it inside your coat or clothing The camera misread the remaining battery power When the power consumption fluctuates greatly the camera may turn off without displaying the low battery warning Replace with new batteries P 15 ...

Страница 183: ...182 10 Miscellaneous List of menus z z z zh mode Top menu Setting Ref Page DRIVE o j i k P 89 K SHQ 2288 1712 HQ 2288 1712 SQ1 1280 960 SQ2 640 480 P 99 X P 28 CARD SETUP YES NO P 148 ...

Страница 184: ... REDUCTION 4 OFF ON P 113 MULTI METERING 5 OFF ON P 80 DIGITAL ZOOM 6 OFF ON P 54 FULLTIME AF OFF ON P 73 AF MODE iESP SPOT P 72 6 OFF ON P 85 PANORAMA 7 P 92 2 IN 1 P 94 FUNCTION OFF BLACK WHITE SEPIA WHITE BOARD BLACK BOARD P 96 AF AREA P 74 INFO OFF ON P 150 u 5 OFF ON P 114 R still pictures OFF ON P 97 PICTURE K TIFF SHQ HQ SQ1 SQ2 P 99 WB AUTO PRESET V P 106 7 7 P 109 SHARPNESS 5 5 P 110 CONT...

Страница 185: ... mode Top menu Tab Function Setting Ref Page MODE MENU SETUP ALL RESET 8 OFF ON P 137 W ENGLISH FRANCAIS DEUTSCH ESPAÑOL P 26 PW ON OFF SETUP OFF 1 2 P 157 REC VIEW OFF ON P 152 SLEEP 30 SEC 1 MIN 3 MIN 5 MIN 10 MIN P 153 MY MODE SETUP PRESENT RESET CUSTOM P 145 FILE NAME RESET AUTO P 159 PIXEL MAPPING P 160 s P 151 X P 28 m ft m ft P 161 VIDEO OUT NTSC PAL P 162 SHORT CUT A B C P 142 CUSTOM BUTTO...

Страница 186: ...E SEPIA P 96 R OFF ON P 98 PICTURE 7 7 P 109 SHARPNESS 5 5 P 110 CONTRAST 5 5 P 111 SATURATION 5 5 P 112 CARD CARD SETUP YES NO P 148 SETUP ALL RESET OFF ON P 137 W ENGLISH FRANCAIS DEUTSCH ESPAÑOL P 26 PW ON OFF SETUP OFF 1 2 P 157 FILE NAME RESET AUTO P 159 PIXEL MAPPING P 160 s P 151 X P 28 VIDEO OUT NTSC PAL P 162 8 OFF 1 2 P 154 DIGITAL ZOOM OFF ON P 54 K HQ SQ P 99 WB AUTO PRESET V P 106 ...

Страница 187: ... EDIT Q 640 480 320 240 CANCEL P 131 P NEW FILE CANCEL P 132 CARD CARD SETUP ALL ERASE FORMAT P 136 148 SETUP ALL RESET OFF ON P 137 W ENGLISH FRANCAIS DEUTSCH ESPAÑOL P 26 PW ON OFF SETUP OFF 1 2 P 157 SCREEN SETUP P 158 s P 151 X P 28 VIDEO OUT NTSC PAL P 162 G 4 9 16 P 120 8 OFF 1 2 P 154 VOLUME P 156 m P 121 INFO P 150 u P 114 ...

Страница 188: ...ASE FORMAT P 136 148 SETUP ALL RESET OFF ON P 137 W ENGLISH FRANCAIS DEUTSCH ESPAÑOL P 26 PW ON OFF SETUP OFF 1 2 P 157 s P 151 X P 28 VIDEO OUT NTSC PAL P 162 G 4 9 16 P 120 8 OFF 1 2 P 154 VOLUME P 156 MOVIE PLAY MOVIE PLAYBACK PLAYBACK FRAMEBYFRAME EXIT P 122 INDEX OK RESET CANCEL P 124 EDIT OK RESET CANCEL P 126 INFO P 150 ...

Страница 189: ...1 1000 ZOOM WIDE LCD OFF F 0 0 FLASH AUTO S M SLOW1 n OFF AF MF AF Z OFF DRIVE o BKT 1 EV 3 ISO AUTO A S M 50 p A r1 2 3 4 MY MODE 1 w 0 SLOW SLOW1 NOISE REDUCTION OFF m fixed on ON MULTI METERING OFF DIGITAL ZOOM OFF FULLTIME AF OFF n ON AF MODE iESP n fixed on iESP OFF PANORAMA OFF 2 IN 1 OFF FUNCTION OFF AF AREA CENTER INFO OFF u OFF K HQ 2288 1712 n 320 240 ...

Страница 190: ...1712 SHQ 2288 1712 HQ 2288 1712 SQ1 1280 960 NORMAL SQ2 640 480 NORMAL WB AUTO 0 SHARPNESS 0 CONTRAST 0 SATURATION 0 REC VIEW ON SLEEP 3 MIN FILE NAME RESET m ft m SHORT CUT A DRIVE B K C WB CUSTOM BUTTON AE LOCK SHUTTER SOUND 1 LOW R still pictures OFF R movies OFF ...

Страница 191: ...laneous z z z zPlayback mode z z z zOthers Settings differ according to the region where the camera is sold INFO OFF u OFF 0 OFF y 0 OFF G 9 R OFF VOLUME 3 ALL RESET ON W ENGLISH PW ON OFF SETUP 1 s NORMAL X Y M D 2003 01 01 00 00 VIDEO OUT 8 1 LOW ...

Страница 192: ...ry depending on the modes set in the MY MODE SETUP menu Mode h ijk lmo p P n Function A S M p 9 Zoom 9 DIGITAL ZOOM 9 1 AF MODE 9 FULLTIME AF 9 AF AREA 9 Manual focus 9 FLASH MODE AUTO 9 9 9 9 9 9 SLOW1 9 HSLOW 9 9 SLOW2 9 9 w 9 SLOW 9 n 9 MULTI METERING 9 9 AEL 9 AF LOCK 9 9 9 1 Y 9 ...

Страница 193: ...1 9 2 IN 1 9 FUNCTION BLACK WHITE 9 SEPIA 9 WHITE BOARD 9 BLACK BOARD 9 R 9 R movie 9 K 9 ISO 9 F 9 9 WB 9 9 SHARPNESS 9 CONTRAST 9 SATURATION 9 NOISE REDUCTION 9 INFO 9 u 9 9 ALL RESET 9 3 W 9 PW ON OFF SETUP 9 REC VIEW 9 SLEEP 9 MY MODE SETUP 9 Mode h ijk lmo p P n Function A S M ...

Страница 194: ...vailable Not available 1 Cannot be selected in o mode 2 Cannot be selected in m mode 3 Cannot be selected in r mode FILE NAME 9 PIXEL MAPPING 9 s 9 X 9 m ft 9 VIDEO OUT 9 SHORT CUT 9 CUSTOM BUTTON 9 8 9 SHUTTER SOUND 9 Mode h ijk lmo p P n Function A S M ...

Страница 195: ...ak the cloth in mild soapy water and wring well Wipe the camera with the damp cloth and then dry it with a dry cloth If you have used the camera at the beach use a cloth soaked in clean water and well wrung Monitor and viewfinder Wipe gently with a soft cloth Lens Blow dust off the lens with a commercially available blower then wipe gently with a lens cleaning paper Card Wipe gently with a soft dr...

Страница 196: ...els TIFF SQ2 1024 768 pixels TIFF SQ2 640 480 pixels TIFF SQ2 No of storable pictures When using a 32 MB card Without sound Approx 2 frames TIFF 2288 1712 Approx 11 frames SHQ 2288 1712 Approx 32 frames HQ 2288 1712 Approx 99 frames SQ1 1280 960 NORMAL Approx 331 frames SQ2 640 480 NORMAL No of effective pixels 4 000 000 pixels Image pickup device 1 2 5 CCD solid state image pickup 4 220 000 pixel...

Страница 197: ...F operation 20 C to 60 C 4 F to 140 F storage Humidity 30 to 90 operation 10 to 90 storage Power supply 2 CR V3 lithium battery packs or 4 AA R6 alkaline batteries lithium batteries NiMH batteries or NiCd batteries AC adapter optional Manganese zinc carbon batteries cannot be used Dimensions 107 5 mm W 66 mm H 68 mm D 4 2 2 6 2 7 excluding protrusions Weight 305 g 0 7 lb without batteries or card ...

Страница 198: ... and the sharper the background Aperture is measured in f stops Larger aperture values indicate smaller apertures and smaller aperture values indicate larger apertures CCD Charge Coupled Device This converts light passing through the lens into electrical signals On this camera light is picked up and converted into RGB signals to build a single image Contrast Detection Method This is used to measur...

Страница 199: ...d in the CCD to create the image EV Exposure Value A system for measuring exposure EV0 is when the aperture is at F1 and the shutter speed is 1 second The EV then increases by 1 each time the aperture increases by one F stop or the shutter speed increases by one increment EV can also be used to indicate brightness and ISO settings Exposure The amount of light used to capture an image The exposure ...

Страница 200: ... shot Pixels A pixel is the smallest unit dot used to make up an image Clear large sized printed images require millions of pixels Ring Flash A flash unit that uses a circular xenon fluorescent tube as its light source It is used for taking close ups S Shutter Priority Mode Also called Shutter Priority AE mode The user selects the shutter speed and the camera automatically varies the aperture so t...

Страница 201: ... The taking Lens System To help adjust exposure a light receptor built into the camera directly measures the light passing through the lens TTL AUTO For use with an external flash Light emitted by the flash is measured by the light receptor in the camera as it passes through the lens A signal is then sent to adjust the external flash intensity ...

Страница 202: ...t cover 11 18 Battery compartment lock 11 18 Beep sound 8 154 BKT 90 BLACK WHITE 96 BLACK BOARD 96 C Camera movement warning 57 Card 22 Card access lamp 11 46 Card check 25 Card cover 11 22 CARD SETUP 148 Close up playback U 118 Cloudy day 3 107 Connector cover 10 128 CONTRAST 111 CUSTOM BUTTON 139 D Date time setting X 28 DC IN jack 10 20 DIGITAL ZOOM 54 Diopter adjustment dial 30 DPOF 163 DRIVE ...

Страница 203: ...dscape shooting l 43 Landscape Portrait shooting k 43 Language setting W 26 Lens 10 Lens cap 17 Lens cap string 17 Lithium battery pack 20 M Macro spot button 79 84 Macro mode shooting 84 Manual focus 77 Manual shooting M 45 70 Measurement units m ft 161 Memory gauge 15 Metering n 79 Microphone 10 97 130 Mode 42 Mode dial 42 MODE MENU 32 Monitor 46 116 Monitor brightness adjustment s 151 Monitor b...

Страница 204: ...ontrol 87 Remote control Receiver 10 87 Resizing Q 131 Resolution 100 Rotation button y 129 S SATURATION 112 SCREEN SETUP 158 Seconds remaining 51 Self portrait shooting o 43 Self timer Y 86 Self timer Remote control button Z 11 86 87 Self timer Remote control lamp 10 86 87 SEPIA 96 Sequential shooting j 89 SHARPNESS 110 Shooting mode 12 Shooting mode menu 42 SHORT CUT 142 SHQ 99 Shutter button 10...

Страница 205: ...socket 11 Troubleshooting 175 Tungsten light 1 107 Two in one pictures 2 IN 1 94 U USB connector 10 V VIDEO OUT 162 Viewfinder 11 30 VOLUME 156 W White balance WB 106 White balance adjustment 109 WHITE BOARD 96 X xD Picture Card 22 Z Zoom lever 54 118 119 ...

Страница 206: ...urg Germany Tel 49 0 40 23 77 30 49 0 40 23 77 33 Letters Postfach 10 49 08 20034 Hamburg Germany European Technical Customer Support Please visit our homepage http www olympus europa com or call our TOLL FREE NUMBER 00800 67 10 83 00 for Austria Belgium Denmark Finland France Germany Italy Luxemburg Netherlands Norway Portugal Spain Sweden Switzerland United Kingdom Please note some mobile phone ...

Страница 207: ...era Thank you for purchasing an Olympus digital camera This manual provides instructions on how to install the USB driver To ensure correct installation refer only to these installation procedures DIGITAL CAMERA PERSONAL COMPUTER DIGITAL CAMERA PC CONNECTION OPERATION MANUAL ...

Страница 208: ...re its accuracy However if you find any errors or incomplete information please contact your local Olympus representative It is prohibited by copyright laws to duplicate in part or in whole the information contained in this manual except for personal use Reproduction without permission of the copyright owner is prohibited The PC screens shown in this manual may differ slightly from the actual disp...

Страница 209: ...3 Macintosh Windows INDEX Flowchart 4 Identifying the OS 6 Windows 98 Me 2000 XP 8 Macintosh OS 9 X 23 Downloading image files using other OS For other OS users 31 ...

Страница 210: ...c Windows 95 NT 4 0 Windows 98 98 SE upgrade from Windows 95 Mac OS 8 6 or lower except Mac OS 8 6 equipped with USB MASS Storage Support 1 3 5 installed at the factory Data transfer is not guaranteed on a home built PC system or PCs with no factory installed OS Identifying the OS p 6 Windows 98 98 SE Second Edition Windows Me 2000 XP MacOS 9 0 9 1 OS X For OS 8 6 see below Installing the USB driv...

Страница 211: ...the AC adapter disconnect the camera from the computer and make sure that the camera is turned off To avoid computer malfunctions do not turn off the camera when the camera is connected to a computer If the camera is connected to the computer via a USB hub operation may not be stable if there are any compatibility problems between the computer and the hub In such cases do not use the hub and conne...

Страница 212: ... your desktop When the My computer icon is not on your desktop click Control Panel from the Start menu 2 Double click the Control Panel icon 3 Double click the System icon The way the file icons inside the folder appear may vary depending on your version of Windows If you don t see the icon you are looking for click on view all Control Panel options on the left of the window ...

Страница 213: ...lose the window If your OS is Windows 98 98 SE proceed to Installing the USB driver for Windows 98 p 9 Users running Windows Me 2000 XP p 11 Users running other OS p 31 Mac OS Macintosh Select About This Computer from the Apple menu on the menu bar A window appears with the name of the computer s OS Confirm that the OS is OS 9 0 9 1 or OS X Users running Mac OS 9 X p 23 Users running other OS p 31...

Страница 214: ...e camera the camera will turn off in the middle of the operation and this could destroy image files data If you are using batteries make sure that there is sufficient remaining battery power Installing the USB driver for Windows 98 When using Windows 98 98 SE 9 Connecting the camera to the computer 11 Confirming the computer recognizes the camera 14 Confirming the USB driver is installed 15 Downlo...

Страница 215: ...nnecting the camera to the computer p 11 1 Insert the provided software CD into your CD ROM drive 2 The Olympus Windows Installer should automatically launch Click USB Driver If the USB driver is already installed in your computer this option will not appear This option will not appear if you are using Windows Me 2000 XP If the installer is not automatically launched select Run on the Start menu a...

Страница 216: ...k Continue The installation of the USB driver will start 4 Click OK to restart your computer and the installation is complete 5 When the computer has restarted installation is complete If the Olympus Windows Installer screen appears click Close and remove the CD ROM from the CD ROM drive ...

Страница 217: ...B cable to the USB connector on the camera The location of the USB connector or multi connector varies depending on the camera model Refer to the camera manual for details The location of the USB port varies depending on the computer For details refer to your computer s manual Look for this mark USB port Terminal Camera with a USB connector USB port Computer USB connector USB cable Smaller termina...

Страница 218: ...monitor button When the camera is turned on the lamp on the right of the viewfinder lights up Camera with a mode Set the mode dial to If the camera has a power switch as well as a mode dial turn the power switch to ON Camera with a mode Camera setup connection mode Set the mode dial to to turn the camera on Lens barrier Lamp monitor button Mode dial Mode dial Power switch Mode dial Power switch ...

Страница 219: ...ows XP You can download image files from the camera easily Select Copy pictures to folder on my computer using Microsoft Scanner and Camera Wizard then follow the on screen instructions You may also select take no action to bypass the Microsoft Scanner and Camera Wizard You may then use a more advanced image viewing editing program such as Olympus CAMEDIA Master software For detailed instructions ...

Страница 220: ... be other Removable Disk icons for other devices such as a removable media drive or USB SmartMedia Reader Writer In this case the digital camera is recognized as another Removable Disk If you cannot find the icon the camera and computer are not connected properly Turn the camera off disconnect the camera from the computer and connect again or proceed to Confirming the USB driver is installed p 15 ...

Страница 221: ...le Disk follow the procedure below to check whether the USB driver has been fully installed 1 Open My Computer and double click the Control Panel icon For users running Windows XP open Control Panel from the Start menu 2 Double click the System icon 3 The System window will appear Click the Device Manager tab ...

Страница 222: ...and start again Users running Windows 98 98 SE start again from Confirming the USB driver is installed and Users running Window Me 2000 XP start from Connecting the camera to the computer If the USB driver was successfully installed you can find the following in the Device Manager the name of the camera you have connected listed under Disk drives OLYMPUS Digital Camera listed as one of the items i...

Страница 223: ...d as a Removable Disk 3 Double click the Dcim folder If an error message appears when you double click the icon there may be a problem with one of the following the camera s power source the AC adapter is not properly connected or the battery power is low Make sure that the AC adapter is correctly connected or that the batteries are not running low the card there is no card in the camera or there ...

Страница 224: ...the My Documents icon The camera automatically assigns folder names and file names according to the following rules Serial numbers of image files run from 0001 to 9999 Serial numbers of folders run from 100 to 999 When file number 9999 is reached a new folder is created and assigned the next number Months January through September are expressed by the numbers 1 through 9 October by the letter A No...

Страница 225: ...age files downloaded to your computer The files will be opened in the default image viewer of the operating system If you want to view the image a different size or process it you will need to open the image with software that supports JPEG or TIFF images files such as Paint Shop Pro Photoshop or CAMEDIA Master software The lamp on the right of the viewfinder or the card access lamp blinks while t...

Страница 226: ...f the viewfinder or the card access lamp is not blinking Some camera models have either a lamp on the right of the viewfinder or a card access lamp and the location varies depending on the model Refer to your camera s reference manual 2 Double click the My Computer icon and right click the Removable Disk to display the menu 3 Click Eject on the menu Lamp Card access lamp ...

Страница 227: ...B cable from the camera 6 Remove the USB cable from your computer Windows Me 2000 XP 1 Make sure that the lamp on the right of the viewfinder or the card access lamp is not blinking Some camera models have either a lamp on the right of the viewfinder or a card access lamp and the location varies depending on the model Refer to your camera s reference manual Lamp Lamp ...

Страница 228: ...ars 3 Click on the message The Unplug or Eject Hardware window appears 4 When a message appears click OK 5 Remove the USB cable from the camera 6 Remove the USB cable from your computer If the window returns the following message when you click Unplug or Eject Hardware first make sure that no image data is being downloaded from the camera and then remove the USB cable ...

Страница 229: ...mage files data If you are using batteries make sure that there is sufficient remaining battery power If you are running Mac OS X the connection to the computer and downloading the image data are verified Restrictions such as the following may occur due to the OS The image file properties are not displayed correctly Images in the camera cannot be opened without first downloading them etc For more ...

Страница 230: ...onnector or multi connector varies depending on the camera model Refer to the camera manual for details The location of the USB port varies depending on the computer For details refer to your computer s manual Look for this mark Terminal USB port Camera with a USB connector USB port Computer USB connector USB cable Smaller terminal Rectangular terminal Camera with a multi connector USB cable Small...

Страница 231: ... power switch to ON Camera with a mode Camera setup connection mode Set the mode dial to to turn the camera on 4 The computer recognizes the camera as a new device The computer recognizes the camera automatically and an Untitled icon appears on the desktop If you cannot find this icon turn off the camera and connect again Mac OS X When the computer has recognized the camera the Apple Image Capture...

Страница 232: ...rror message appears when you double click the icon there may be a problem with one of the following the camera s power source the AC adapter is not properly connected or the battery power is low the card there is no card in the camera or there is a problem with the card Check that you can play back pictures on the monitor of your camera the USB cable the camera is not properly connected to the co...

Страница 233: ...e names according to the following rules Serial numbers of image files run from 0001 to 9999 Serial numbers of folders run from 100 to 999 When file number 9999 is reached a new folder is created and assigned the next number Months January through September are expressed by the numbers 1 through 9 October by the letter A November by B and December by C Folder name Example File name Example Serial ...

Страница 234: ...iles in the Hard Disk folder The files will be opened in the default image viewer of the operating system If you want to view the image a different size or process it you will need to open the image with software that supports JPEG or TIFF images files such as Paint Shop Pro Photoshop or CAMEDIA Master software The lamp on the right of the viewfinder or the card access lamp blinks while the image ...

Страница 235: ... Capture software dialog appears 1 From the Download To menu select a destination folder 2 To download all images click Download All To selectively download images click Download Some and highlight the desired images The images are transferred from the camera to your computer If you are operating Mac OS X and you want to download images using the same procedure as for Mac OS 9 select File Close an...

Страница 236: ...viewfinder or the card access lamp is not blinking 2 Drag the untitled icon on the desktop to Trash 3 Make sure that the lamp on the right of the viewfinder or the card access lamp is not blinking 4 Remove the USB cable from the camera 5 Remove the USB cable from your computer Lamp Card access lamp Lamp ...

Страница 237: ...rd slot Consult your nearest Olympus representative Is your OS one of the following Windows 98 Windows 2000 Windows Me Windows XP Mac OS 9 X Yes No No Yes Connect the camera directly to your computer using the provided USB cable Use the optional USB reader writer Certain card readers may not be compatible with Mac OS X Check the Olympus website for the most up to date compatibility information Use...

Страница 238: ...urg Germany Tel 49 0 40 23 77 30 49 0 40 23 77 33 Letters Postfach 10 49 08 20034 Hamburg Germany European Technical Customer Support Please visit our homepage http www olympus europa com or call our TOLL FREE NUMBER 00800 67 10 83 00 for Austria Belgium Denmark Finland France Germany Italy Luxemburg Netherlands Norway Portugal Spain Sweden Switzerland United Kingdom Please note some mobile phone ...

Страница 239: ...om z In the interest of continually improving products Olympus reserves the right to update or modify information contained in this manual DIGITAL CAMERA MANUAL FOR DIRECT PRINTING Manual outlining new features added to the camera with firmware update C 750 Ultra Zoom ...

Страница 240: ...e Manual that originally provided with your camera What is PictBridge It is the standard for connecting digital cameras and printers of different makers and printing out pictures directly Indications used in this manual Important information on factors which may lead to a malfunction or operational problems Also warns of operations that should be absolutely avoided Useful information and hints tha...

Страница 241: ...t printing function 6 2 Direct printing 7 Using the direct printing function 7 Connecting the camera to a printer 8 Printing pictures 9 PRINT mode MULTI PRINT mode 9 ALL PRINT mode 13 ALL INDEX mode PRINT ORDER mode 15 Trim the picture 17 Exiting direct printing 19 If an error code is displayed 20 Troubleshooting 21 ...

Страница 242: ...display on the web site s firmware update page only ENGLISH is displayed It is not possible to switch to other languages see below Before updating Menu List P 184 to 187 After updating Top menu Tab Function Setting MODE MENU SETUP ENGLISH FRANCAIS DEUTSCH ESPAÑOL Top menu Tab Function Setting MODE MENU SETUP ENGLISH ...

Страница 243: ... the other end of the USB cable into the camera s USB connector 4 Press the power switch to turn the camera on 5 The selection screen for the USB connection shown right is displayed on the monitor Press ac to select PC and press e 6 The computer recognizes the camera as a new device When you connect the camera to the computer for the first time the computer automatically recognizes the camera Clic...

Страница 244: ...ures can be printed directly from the camera By connecting the camera directly to a printer that supports PictBridge with the USB cable you can print pictures stored on the card inside the camera without a need to use a computer For details of printing instructions see Direct printing gP 7 ...

Страница 245: ... directly STANDARD All printers that support PictBridge have standard print settings Selecting STANDARD on the settings screens g P 10 to 15 images are printed according to the default settings See the instruction manual for your printer for its standard settings or inquire with the printer manufacturers TIPS For details of printing paper types ink cassettes etc refer to the printer s instruction ...

Страница 246: ... the camera s USB connector 3 Press the power switch to turn the camera on The monitor turns on and the selection screen for the USB connection is displayed 4 Press ac to select PRINT then press e ONE MOMENT is displayed and the camera and printer are connected The PRINT MODE SELECT screen is displayed on the monitor Make the print settings on the camera s monitor g Go to Printing pictures P 9 If ...

Страница 247: ...yout format g PRINT mode MULTI PRINT mode P 9 ALL INDEX Prints an index of all the pictures stored on the card g ALL INDEX mode PRINT ORDER mode P 15 PRINT ORDER Prints the pictures according to the print reservation data on the card If no print reservations P 163 have been made this option is not available g ALL INDEX mode PRINT ORDER mode P 15 This option may not be available depending on the ty...

Страница 248: ... set in Step 2 and the capabilities of your printer 5 Press bd to select the picture you want to print Turn the zoom lever toward W to display the pictures in index format You can then select the pictures you want to print from the index 6 Select the print reservation method SINGLE PRINT Makes a single frame print reservation for the selected picture according to standard settings MORE Sets the nu...

Страница 249: ...printer Items outside the capability of the printer are not available Sets the number of prints You can select up to 10 prints DATE If you select WITH pictures are printed with the date and time FILE NAME If you select WITH pictures are printed with the file name P Crops part of a recorded picture so that only the enlarged section is printed g Trim the picture P 17 DATE and FILE NAME are not avail...

Страница 250: ...res Press ac to select OK or CANCEL then press e OK Printing starts CANCEL The settings are canceled and the monitor returns to the PRINT MODE SELECT screen When printing is finished the monitor returns to the PRINT MODE SELECT screen g Exiting direct printing P 19 zTo cancel printing Pressing e during print data transfer displays the screen for selecting whether to continue or cancel printing To ...

Страница 251: ...page The print size settings screen is displayed 4 Press ac to select the item you want to set then press d Press ac to select the item then press e If PRINT INFO cannot be set with your printer go to Step 6 The available options vary depending on the type of printer Items outside the capability of the printer are not available Only one print of each image can be made at a time DATE If you select ...

Страница 252: ...een When printing is finished the monitor returns to the PRINT MODE SELECT screen g Exiting direct printing P 19 zTo cancel printing Pressing e during print data transfer displays the screen for selecting whether to continue or cancel printing To cancel printing press ac to select CANCEL then press e CANCEL GO SELECt PRINt OK CANCEL TRANSFERRING screen tRANSFERRING tRANSFERRING tRANSFERRING CANCEL...

Страница 253: ...cted print mode SIZE and BODERLESS cannot be selected When the PRINT PAPER screen is not displayed SIZE and BORDERLESS are set to STANDARD Go to Step 4 3 Use ac to select framed or unframed then press e OFF The image is printed inside a blank frame ON The image is printed filling the entire page The print screen is displayed BORDERLESS is not available in ALL INDEX mode Press e and go to Step 4 GO...

Страница 254: ...ing e during print data transfer displays the screen for selecting whether to continue or cancel printing To cancel printing press ac to select CANCEL then press e In ALL INDEX mode the printer automatically selects the number of pictures per sheet etc ALL INDEX printing is only available on printers with an index function The PRINT ORDER function is only available on DPOF compatible printers CANC...

Страница 255: ...izontal to vertical and vice versa when the maximum or minimum size is reached If trimming has already been set the P screen appears Press ac to select RESET then press e 2 Press e 3 Press ac to select OK then press e OK Saves the current trimming size RESET Sets a new trimming size Repeat the procedure from Step 1 CANCEL Cancels the current trimming setting Press e to complete trimming setting an...

Страница 256: ...depending on the printer settings If the trimmed picture size is small printing magnification increases accordingly resulting in a printed picture with lower resolution For best results with close up prints you are recommended to use the TIFF SHQ or HQ mode Note ...

Страница 257: ... the camera from the printer 1 In the PRINT MODE SELECT screen select b The message is displayed 2 Press the power switch to turn the camera off 3 Remove the USB cable from the camera 4 Remove the USB cable from the printer GO SELECt EXIt TURN OFF THE POWER Power switch ...

Страница 258: ...nnect the camera and connect it again correctly NO PAPER There is no paper in the printer Load some paper in the printer NO INK The printer has run out of ink Replace the ink cartridge in the printer JAMMED The paper is jammed Remove the jammed paper SETTINGS CHANGED The printer s paper cassette has been removed or the printer has been manipulated while making settings on the camera Do not manipul...

Страница 259: ...dating the firmware take the action described below The printer fails to connect Possible cause Corrective action Ref Page PC was selected on the monitor after connecting to the printer with a USB cable Disconnect the USB cable from the camera and start again from the beginning g P 8 ...

Страница 260: ... 20097 Hamburg Germany Tel 49 40 23 77 3 0 Fax 49 40 23 07 61 Letters Postfach 10 49 08 20034 Hamburg Germany European Technical Customer Support Please visit our homepage http www olympus europa com or call our TOLL FREE NUMBER 00800 67 10 83 00 for Austria Belgium Denmark Finland France Germany Italy Luxemburg Netherlands Norway Portugal Spain Sweden Switzerland United Kingdom Please note some m...

Отзывы: