background image

Marchio CE

Plastificatrice A 235 Plus

42

Spegnimento automatico 
in caso di surriscaldamento

Spie luminose

2, Ready e Power

Tempo di raffreddamento

ca. 30 min.

Rulli

4

Alimentazione

220 - 240 V, 50 Hz, 1,15 A

Potenza assorbita

265 W

Dimensioni

380 x 160 x 36 mm

Peso

ca. 1175 g

Materiali idonei
(plastificazione a caldo)

Materiale non sensibile al calore con uno spes­
sore totale fino a 0,5 mm

Materiali idonei
(plastificazione a freddo)

Materiale sensibile al calore con uno spessore
totale fino a 0,5 mm

Marchio CE

Il marchio CE sull’apparecchio attesta la conformità del prodotto con le
Direttive europee in vigore e specifiche al prodotto. La dichiarazione di
conformità è disponibile su www.olympia-vertrieb.de.

Note sullo smaltimento

Procedere allo smaltimento dell'apparecchio esaurito consegnandolo pre­
sso un punto di raccolta istituito dalla propria società di smaltimento rifiuti
comunale. Secondo quanto previsto dalla legge sugli apparecchi elettrici ed
elettronici, i proprietari di apparecchi esauriti sono per legge tenuti alla con­

segna di tutti gli apparecchi elettrici ed elettronici presso un centro di rilievo rifiuti
in raccolta differenziata. Il simbolo riportato qui a lato indica che non è assoluta­
mente consentito smaltire l'apparecchio assieme ai normali rifiuti domestici! Smal­
tire confezioni ed imballaggi in base a quanto indicato dalle norme in vigore a li­
vello locale.

Garanzia

Caro cliente,
ci congratuliamo con Lei per aver scelto questo apparecchio. In caso di difetti la
preghiamo di ritornare l'apparecchio, completo di imballo originale e scontrino di
acquisto, al punto vendita dove è stato effettuato l'acquisto.

Содержание A 235 Plus

Страница 1: ...09 2015 A 235 Plus D Bedienungsanleitung G Operating Instructions F Mode d emploi I Istruzioni d uso n Gebruiksaanwijzing E Instrucciones de uso P Instru es de opera o C N vod k obsluze...

Страница 2: ...er t A 235 Plus 3 G Laminator A 235 Plus 13 F Plastifieuse A 235 Plus 23 I Plastificatrice A 235 Plus 33 n Lamineerapparaat A 235 Plus 43 E Aparato laminador A 235 Plus 53 P Aparelho de plastifica o A...

Страница 3: ...se Bedienungsanleitung zum Nachschlagen auf Laminierger t A 235 Plus 1 2 4 3 6 7 8 9 5 1 Ausgabeseite 2 Hebel Jam Release Folienstau beheben 3 Schalter Kalt Hei laminieren COLD HOT 4 Ein Ausschalter O...

Страница 4: ...in der bestimmungsgem en Verwendung be schriebenen Verwendung ist nicht bestimmungsgem Eigenm chtige Ver nderungen oder Umbauten sind nicht zul ssig ffnen Sie das Laminierger t in keinem Fall selbst...

Страница 5: ...e Die Ger teoberfl che w hrend des Betriebs nicht ber hren Warten Sie nach dem Betrieb einige Minuten bis sich das Ger t abgek hlt hat bevor Sie die Ger teoberfl che ber hren VORSICHT Stolpergefahr du...

Страница 6: ...en F hren Sie Laminierfolien immer mit der geschlossenen Seite voran und in ge rader Ausrichtung in die Eingabeseite des Laminierger ts ein Schneiden Sie Laminierfolien falls notwendig erst nach dem L...

Страница 7: ...auf die Position ON und den Schalter Kalt Hei laminieren auf die Position HOT Die rote Leuchtanzeige POWER leuchtet 4 Der Antriebsmotor f r die Walzen l uft an Nach etwa 3 4 Minuten ist die optimale B...

Страница 8: ...anschlie en 2 Schlie en Sie das Stromkabel an eine zug ngliche Steckdose an 3 Schalten Sie den Ein Ausschalter auf die Position ON und den Schalter Kalt Hei laminieren auf die Position COLD Die Leucht...

Страница 9: ...EADY erl schen 2 Dr cken und halten Sie den Hebel f r die Funktion Jam Release auf der Ger ter ckseite nach unten Die Laminierfolie wird freigegeben VORSICHT Verbrennungsgefahr durch hei e Ger teoberf...

Страница 10: ...sich das Laminierergebnis nicht so darstellt wie erwartet 1 Schalten Sie den Ein Ausschalter auf die Position ON und den Schalter Kalt Hei laminieren auf die Position HOT Warten Sie etwa 3 4 Minuten b...

Страница 11: ...esch digt Verwenden Sie ausschlie lich Laminierfo lien die den Angaben in den Technischen Daten entsprechen Beachten Sie die maximale Gesamtdicke des laminierten Materials und der La minierfolie Lamin...

Страница 12: ...Sammelstelle Ihres kommunalen Entsorgungstr gers Nach dem Elektro und Elektronikger te gesetz sind Besitzer von Altger ten gesetzlich verpflichtet alte Elektro und Elektronikger te einer getrennten Ab...

Страница 13: ...manual nearby for future reference Laminator A 235 Plus 1 2 4 3 6 7 8 9 5 1 Output side 2 Jam release lever for clearing foil jams 3 Cold Hot laminating switch COLD HOT 4 On Off switch ON OFF 5 POWER...

Страница 14: ...t permitted Never open the laminator yourself or attempt to perform repairs yourself Technical Modifications This instruction manual serves purely for information purposes Its content is not part of a...

Страница 15: ...t a few minutes after laminating until the machine has cooled down before you touch it CAUTION Danger of tripping due to incorrectly laid cable Lay cables in such a way that nobody can trip over them...

Страница 16: ...or uneven materials Always feed laminating foils into the laminator insertion slot with the closed side first and in a straight position If necessary only cut laminating foils after laminating Please...

Страница 17: ...e COLD HOT lamination switch to HOT The red POWER indicator lamp lights up 4 The drive motor for the rollers starts up The optimal operating temperature is reached after approx 3 4 minutes and the gre...

Страница 18: ...ket 3 Switch the ON OFF switch to ON and the COLD HOT lamination switch to COLD The POWER and READY indicator lamps light up 4 The drive motor for the rollers starts up The laminator is ready for oper...

Страница 19: ...d hold the Jam Release lever on the rear of the machine downwards This releases the laminating foil CAUTION Danger of burns due to hot machine surface During hot laminating the machine surface heats u...

Страница 20: ...N Danger of burns due to hot machine surface During hot laminating the machine surface heats up Do not touch the machine surface during laminating operation 2 Fold a sheet of paper and feed it into th...

Страница 21: ...he laminator to warm up longer Technical Data Laminating system Hot roller Laminating temperature COLD Room temperature max 35 C HOT 97 105 C Laminating width max 230 mm Lamination thickness max 0 5 m...

Страница 22: ...s According to laws on the disposal of electronic and electrical devices owners are obliged to dispose of old elec tronic and electrical devices in a separate waste container The adjacent symbol indic...

Страница 23: ...n de pouvoir le consulter en cas de besoin Plastifieuse A 235 Plus 1 2 4 3 6 7 8 9 5 1 C t sortie 2 Levier Jam Release d blocage de bourrage 3 Interrupteur plastification froid chaud COLD HOT 4 Interr...

Страница 24: ...dans les donn es techniques Toute utilisation autre que celle d crite au point Utilisation conforme son usage est consid r e comme non conforme son usage Des modifications ou changements effectu s d...

Страница 25: ...ation chaud Ne pas toucher celle ci pendant le fonctionnement de l appareil Apr s la plastification attendre quelques minutes jusqu ce que l appareil se soit refroidi avant d en toucher sa surface ATT...

Страница 26: ...espace est suffisamment a r Ne plastifiez aucun document en m tal humide ou irr gulier Ins rez les pochettes toujours du c t soud et tout droit dans l introducteur Si n cessaire d coupez les pochettes...

Страница 27: ...standard facile d acc s 3 Positionnez l interrupteur Marche Arr t sur ON et l interrupteur plastification froid chaud sur HOT Le voyant rouge POWER s allume 4 Le moteur d entra nement des rouleaux d m...

Страница 28: ...c ble lectrique sur une prise de courant standard facile d acc s 3 Positionnez l interrupteur Marche Arr t sur ON et l interrupteur plastification froid chaud sur COLD Les voyants POWER et READY s all...

Страница 29: ...le levier plac au dos de l appareil et maintenez le appuy pour la fonction Jam Release Vous pouvez retirer la pochette ATTENTION Risque de br lure d la surface br lante d appareils La surface de l ap...

Страница 30: ...de plastification n est pas comme vous le souhaitez 1 Positionnez l interrupteur Marche Arr t sur ON et l interrupteur plastification froid chaud sur HOT Attendez env 3 4 minutes que la plastifieuse...

Страница 31: ...ristiques men tionn es dans les donn es techniques Observez l paisseur totale maximale du document plastifier et de la pochette Plastifiez cette pochette une nouvelle fois pour am liorer le r sultat...

Страница 32: ...site www olympia vertrieb de Remarques relatives son limination Si vous ne voulez plus vous servir de votre appareil veuillez l apporter au centre de collecte de l organisme d limination des d chets...

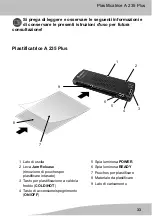
Страница 33: ...azione Plastificatrice A 235 Plus 1 2 4 3 6 7 8 9 5 1 Lato di uscita 2 Leva Jam Release rimozione di pouches per plastificare intasate 3 Tasto per plastificazione a caldo a freddo COLD HOT 4 Tasto di...

Страница 34: ...nto descritto considerato non conforme agli usi previsti Non sono consentite modifiche o trasformazioni non autorizzate Non aprire per nessuna ragione la plastificatrice autonomamente e non svolgere r...

Страница 35: ...aldo la superficie dell apparecchio si surri scalda Evitare il contatto con la superficie dell apparecchio durante l esercizio Attendere dopo l esercizio alcuni minuti che l apparecchio si raffreddi p...

Страница 36: ...gnati o con superficie irregolare Introdurre la pouches per plastificare sempre con il lato chiuso per primo e con orientamento rettilineo sul lato di caricamento della plastificatrice Se occorre tagl...

Страница 37: ...gnimento in posizione ON e il tasto per plasti ficazione a caldo a freddo in posizione HOT La spia rossa POWER accesa 4 Il motorino dei rulli si mette in moto Dopo circa 3 4 minuti l apparecchio rag g...

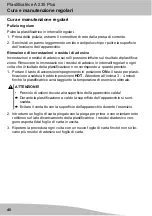
Страница 38: ...senza lasciare residui 1 Poggiare la plastificatrice in modo stabile su una superficie piana orizzontale Assicurarsi che il tasto di accensione spegnimento si trovi in posizione OFF prima di collegare...

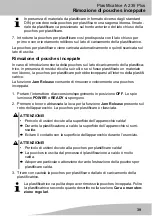
Страница 39: ...ice La funzione Jam Release consente di rimuovere velocemente una pouches inceppata 1 Portare l interruttore di accensione spegnimento in posizione OFF Le spie luminose POWER e READY si spengono 2 Pre...

Страница 40: ...e a quanto previsto 1 Portare il tasto di accensione spegnimento in posizione ON e il tasto per plasti ficazione a caldo a freddo in posizione HOT Attendere all incirca 3 4 minuti finch la plastificat...

Страница 41: ...o danneggiato Utilizzare soltanto pouches per plastifi care del tipo indicato nelle Specifiche tec niche Osservare lo spessore totale massimo del materiale da plastificare e della pouches utilizzata S...

Страница 42: ...maltimento Procedere allo smaltimento dell apparecchio esaurito consegnandolo pre sso un punto di raccolta istituito dalla propria societ di smaltimento rifiuti comunale Secondo quanto previsto dalla...

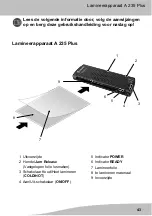
Страница 43: ...bruikshandleiding voor naslag op Lamineerapparaat A 235 Plus 1 2 4 3 6 7 8 9 5 1 Uitvoerzijde 2 Hendel Jam Release Vastgelopen folie losmaken 3 Schakelaar Koud Heet lamineren COLD HOT 4 Aan Uit schake...

Страница 44: ...in het beoogd gebruik beschreven is niet toegestaan Ei genmachtige wijzigingen of ombouw zijn niet toegestaan Open het lamineerapparaat in geen geval zelf en probeer het niet zelf te repare ren Techn...

Страница 45: ...ns het heet lamineren wordt het oppervlak van het apparaat heet Het oppervlak van het apparaat tijdens gebruik niet aanraken Wacht na het gebruik enkele minuten totdat het apparaat is afgekoeld voorda...

Страница 46: ...etalen natte of oneffen materialen Voer lamineerfolie altijd met de gesloten zijde naar voren en recht in de in voerzijde in het lamineerapparaat in Snij lamineerfolie indien nodig pas na het laminere...

Страница 47: ...e schakelaar Koud heet lamine ren in de stand HOT De rode indicator POWER brandt continu 4 De aandrijfmotor voor de walsen begint te draaien Na ongeveer 3 4 minuten is de optimale gebruikstemperatuur...

Страница 48: ...bereikbaar stopcontact 3 Zet de Aan Uit schakelaar in de stand ON en de schakelaar Koud heet lamine ren in de stand COLD De indicatoren POWER en READY gaan aan 4 De aandrijfmotor voor de walsen begint...

Страница 49: ...chterkant van het appa raat naar beneden en houd hem vast De lamineerfolie komt vrij VOORZICHTIG Gevaar voor brandletsel door heet oppervlak van het apparaat Tijdens het heet lamineren wordt het opper...

Страница 50: ...ozen en tel kens wanneer het lamineerresultaat niet zo is als verwacht 1 Zet de Aan Uit schakelaar in de stand ON en de schakelaar Koud heet lamine ren in de stand HOT Wacht ongeveer 3 4 minuten totda...

Страница 51: ...alleen lamineerfolie die overeen komt met de specificaties in de Techni sche gegevens Houd rekening met de maximale totale dikte van het gelamineerde materiaal en van de lamineerfolie Lamineer dezelfd...

Страница 52: ...ng vindt u op www olympia vertrieb de Gescheiden inzameling Als u het toestel wilt afvoeren brengt u het naar het inzamelingspunt in uw gemeente Volgens de wet op elektrische en elektronische apparate...

Страница 53: ...rato laminador A 235 Plus 1 2 4 3 6 7 8 9 5 1 Lado de salida 2 Palanca Jam Release eliminar un atasco de pel cula trans parente 3 Interruptor para laminaci n en fr o caliente COLD HOT 4 Activador desa...

Страница 54: ...o conforme al objetivo previsto Se proh be expresamente cualquier modificaci n o transformaci n En ning n caso abra el aparato laminador por su cuenta y tampoco intente reali zar reparaciones Modifica...

Страница 55: ...se debe entrar en contacto con la superficie del aparato durante el servicio Espere despu s del servicio algunos minutos hasta que el apa rato se haya enfriado antes de entrar en contacto con la super...

Страница 56: ...sparentes de laminaci n siempre con el lado ce rrado orientado hacia delante y en alineaci n recta a trav s del lado de entrada del aparato laminador No corte las pel culas transparentes de laminaci n...

Страница 57: ...n OFF antes de conectar el aparato laminador a una toma de corriente 2 Conecte el cable de corriente del aparato laminador a una caja de enchufe f cilmente accesible 3 Ponga el activador desactivador...

Страница 58: ...utom ticamente para volver a salir por el lado de salida Laminaci n en fr o Durante la laminaci n en fr o se recubre la pel cula transparente de laminaci n con un pegamento especial A diferencia de la...

Страница 59: ...ce rrado orientado hacia delante y en alineaci n recta a trav s del lado de entrada del aparato laminador La pel cula transparente de laminaci n se arrastra autom ticamente para volver a salir por el...

Страница 60: ...so de lamina ci n en caliente est muy caliente Proceda con especial precauci n cuando retire la pel cula transparente de laminaci n caliente 3 Retire la pel cula transparente de laminaci n con cuidado...

Страница 61: ...de laminaci n no sea el esperado 1 Ponga el activador desactivador en la posici n ON y el interruptor para lamina ci n en fr o caliente en la posici n HOT Espere unos 3 4 minutos hasta que el aparato...

Страница 62: ...nsparente es ondulada o el ma terial laminado ha sufrido da os Utilice exclusivamente pel culas transpa rentes de laminaci n que cumplan las in dicaciones de los datos t cnicos Tenga en cuenta el m xi...

Страница 63: ...ente para este producto Encontrar la declaraci n de conformidad en www olympia vertrieb de Advertencias acerca de la eliminaci n Si desea eliminar su aparato ll velo al punto de recogida del correspon...

Страница 64: ...consulta Aparelho de plastifica o A 235 Plus 1 2 4 3 6 7 8 9 5 1 Lado de sa da 2 Alavanca Jam Release Resolver congestionamento de pel cula 3 Bot o Plastificar a frio quente COLD HOT 4 Interruptor de...

Страница 65: ...rita na utiliza o conforme a finalidade n o conforme finalidade N o s o permitidas altera es ou remodela es por conta pr pria N o abra jamais o aparelho de plastifica o e n o efetue tentativas de repa...

Страница 66: ...fica o a quente a superf cie do aparelho aquece N o tocar na superf cie do aparelho durante o uso Ap s a utiliza o espere alguns minutos at que o aparelho arrefe a antes de tocar na superf cie do apar...

Страница 67: ...s Introduza sempre as pel cula de plastificar com o lado fechado em primeiro lugar e em orienta o linear no lado de entrada do aparelho de plastifica o Caso necess rio corte a pel cula de plastificar...

Страница 68: ...erruptor para ligar desligar na posi o ON e o bot o para plas tificar a frio quente na posi o HOT O indicador luminoso vermelho POWER acende se 4 O motor de arranque para os cilindros iniciado Ap s ap...

Страница 69: ...os 1 Coloque o aparelho de plastifica o de forma est vel sobre uma superf cie regular e horizontal Verifique se o bot o para ligar desligar est na posi o OFF antes de ligar o aparelho de plastifica o...

Страница 70: ...icar podem congestionar se no aparelho de plastifica o A fun o Jam Release ajuda lhe a remover um congestionamento de pel cula de forma r pida 1 Coloque o interruptor para ligar desligar na posi o OFF...

Страница 71: ...re que o resultado da plastifica o n o seja o esperado 1 Coloque o interruptor para ligar desligar na posi o ON e o bot o para plas tificar a frio quente na posi o HOT Espere aproximadamente 3 4 minut...

Страница 72: ...icado Utilize somente pel culas de plastificar que estejam de acordo com as indica es dos dados t cnicos Tenha em conta a espessura m xima dos materiais a serem plastificados e das pel culas de plasti...

Страница 73: ...er lida em www olympia vertrieb de Considera es relativas elimina o do produto Se quiser eliminar o seu aparelho leve o at um centro de reciclagem local De acordo com a legisla o relativa reciclagem o...

Страница 74: ...chovejte k op tovn mu pou it Lamin tor A 235 Plus 1 2 4 3 6 7 8 9 5 1 V stupn strana 2 P ka Jam Release odstran n nakupen f lie 3 Sp na laminov n za studena tepla COLD HOT 4 Zap na vyp na ON OFF 5 Sv...

Страница 75: ...n zm n nebo p estaven nen p pustn V dn m p pad lamin tor sami neotv rejte a neprov d jte vlastn pokusy o opravy Technick zm ny Tento n vod k obsluze slou pro informaci Jeho obsah nen smluvn m p edm te...

Страница 76: ...te Ne se budete dot kat povrchu p stroje vy kejte po provozu n kolik minut dokud p stroj nevy chladne UPOZORN N Nebezpe klop tnut v d sledku neodborn polo en ch kabel Kabely pokl dejte tak aby o n nik...

Страница 77: ...nujte kovov vlhk nebo nerovn materi ly Laminovac f lie v dy ve te zav enou stranou vp ed a rovn do vstupn strany lamin toru Pokud je to nutn laminovac f lie p ed laminov n m nejd ve p ist ihn te Uv do...

Страница 78: ...e do polohy ON a sp na laminov n za studena tepla do polohy HOT Sv t erven sv teln indik tor POWER 4 Hnac motor posouvac ch v le k se rozb hne Asi po 3 4 minut ch je do sa ena optim ln provozn teplota...

Страница 79: ...OFF 2 Zapojte s ov kabel do snadno dostupn standardn z suvky 3 Zap na vyp na p epn te do polohy ON a sp na laminov n za studena tepla do polohy COLD Sv t sv teln indik tory POWER a READY 4 Hnac motor...

Страница 80: ...a READY 2 Stiskn te a posu te p ku pro funkci Jam Release na zadn stran p stroje dol Laminovac f lie se vysune UPOZORN N Riziko pop len v d sledku hork ho povrchu p stroje Povrch p stroje je b hem la...

Страница 81: ...ech a v dy kdy v sledek laminov n nespl uje o ek v n 1 Zap na vyp na p epn te do polohy ON a sp na laminov n za studena tepla do polohy HOT Vy kejte zhruba 3 4 minut dokud lamin tor nedos hne opti m l...

Страница 82: ...ov daj daj m v technick ch da j ch Dodr uje maxim ln celkovou tlou ku la minovan ho materi lu a laminovac f lie Zopakujte postup laminov n s tout f li abyste dos hli lep ho v sledku Dbejte na to abyst...

Страница 83: ...www olympia vertrieb de Pokyny k likvidaci Chcete li v p stroj zlikvidovat dodejte jej do sb rny va eho komun ln ho za zen pro likvidaci odpadu Podle z kona o elektrick ch a elektronick ch p stroj ch...

Страница 84: ......
Отзывы: