background image

3-8

Basic Operation

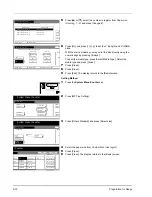
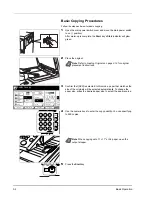
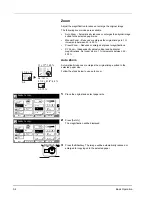
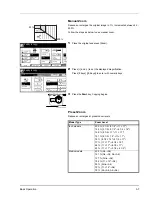
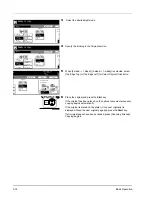
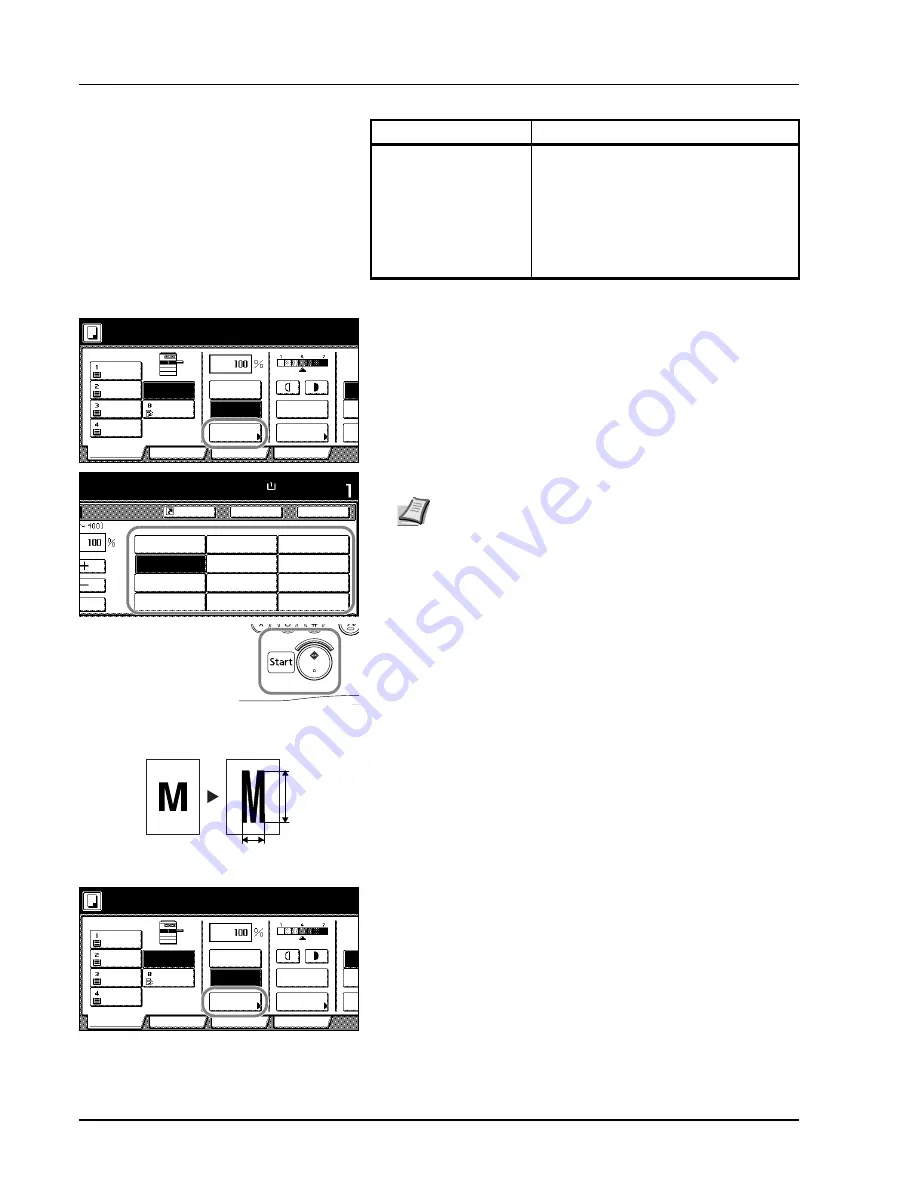
Follow the steps as below to use preset zoom.

1

Place the original and press [Zoom]. 

2

Select the zoom level.

3

Press the 

Start

 key. Copying begins. 

XY Zoom

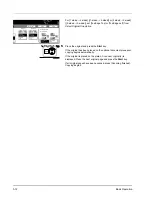
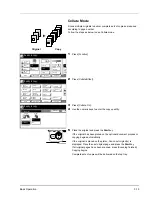
Select vertical and horizontal magnifications individually. Set zoom level 
in 1 % increments between 25 - 400 %. 

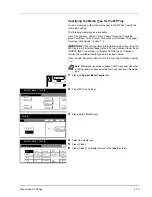
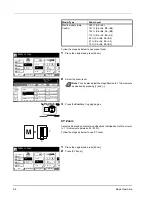
Follow the steps as below to use XY zoom.

1

Place the original and press [Zoom]. 

2

Press [XY Zoom]. 

Metric models (Asia 
Pacific)

200 % (A5

J

A3)

141 % (A4

J

A3, B5

J

B4)

122 % (A4

J

B4, A5

J

B5)

115 % (B4

J

A3, B5

J

A4)

86 % (A3

J

B4, A4

J

B5)

81 % (B4

J

A4, B5

J

A5)

70 % (A3

J

A4, B4

J

B5)

Model Type

Zoom Level

Program

Function

User choice

Basic

11×8½"

Plain
11×17"

Color
11×8½"

Plain
8½×11"

Plain

MP Tray

Plain

APS

Auto %

Zoom

100%

Density

Auto

Stap

Stap

Left

Off

Ready to copy.

Density

Back

Close

Auto %

Set

100%

400%

200%

keys

Shortcut

11×8½"

Paper Size

100%

y.

5½×8½"

J

11×17"

154%

129%

121%

78%

5½×8½"

J

8½×14"

8½×11"

J

11×17"

8½×14"

J

11×17"

8½×14"

J

8½×11"

77%

64%

50%

25%

11×17"

J

8½×14"

11×17"

J

8½×11"

11×17"

J

5½×8½"

Note

You can also adjust the magnification in 1 % increments 

as desired by pressing [+] and [–].

Y

X

Program

Function

User choice

Basic

11×8½"

Plain
11×17"

Color
11×8½"

Plain
8½×11"

Plain

MP Tray

Plain

APS

Auto %

Zoom

100%

Density

Auto

Stap

Stap

Left

Off

Ready to copy.

Density

Содержание d-Copia 2500

Страница 1: ...d Copia 2500 d Copia 3000 Cod 541503en GB...

Страница 2: ...he following actions which could compromise the conformity attested to above as well as the characteristics of the product incorrect electrical power supply incorrect installation incorrect or imprope...

Страница 3: ...settings Quick Start Guide Lists and briefly describes the copy functions of the machine Note This Operation Guide contains information that corresponds to using both the inch and metric versions of t...

Страница 4: ...The z symbol indicates that the related section includes information on actions which must be performed Specifics of the required action are indicated inside the symbol Please contact your service rep...

Страница 5: ...3 10 Split Mode 3 13 Collate Mode 3 15 Interrupt Copy 3 16 Low Power Mode 3 17 Sleep Mode 3 17 4 Optional Equipment 4 1 Overview of Optional Equipment 4 2 Document Processor 4 3 Paper Feeder 4 3 Built...

Страница 6: ...etting burned Do not incinerate toner and toner container Dangerous sparks may cause burn Moving parts inside May cause personal injury Do not touch moving parts High temperature inside Do not touch p...

Страница 7: ...achine cool and facilitate changing of parts and maintenance allow access space as shown below Leave adequate space especially around the rear cover to allow air to be properly ventilated out of the m...

Страница 8: ...with a voltage other than that specified Avoid multiple connections in the same outlet These types of situations present a danger of fire or electrical shock Plug the power cord securely into the outl...

Страница 9: ...hock Turn the main power switch off position immediately be absolutely certain to remove the power plug from the outlet and then contact your service representative If anything harmful paper clips wat...

Страница 10: ...hose specified herein may result in hazardous radiation exposure Do not look directly at the light from the scanning lamp as it may cause your eyes to feel tired or painful Cautions when handling cons...

Страница 11: ...od of time remove the paper from the cassette and the MP tray multi purpose tray return it to its original package and reseal it Don t store the unit in a place exposed to Direct sunlight High or rapi...

Страница 12: ...provides information on the following topics Legal Information x Regarding Tradenames x Energy Saving Control Function xi Automatic 2 Sided Copy Function xi Recycled Paper xi Energy Star ENERGY STAR P...

Страница 13: ...r part of this giude any copyrightable subject must contain the same copyright notice as the material from which the copying is done Legal Restriction On Copying It may be prohibited to copy copyright...

Страница 14: ...f Mode The device automatically enters Off Mode when 9 minutes have passed since the device was last used The amount of time of no activity that must pass before Off Mode is activated may be lengthene...

Страница 15: ...ation of the product by user no radiation can leak from the machine This machine is classified as Class 1 laser product under IEC 60825 Caution Performance of procedures other than those specified in...

Страница 16: ...8 EEC and 1995 5 EC We declare under our sole responsibility that the product to which this declaration relates is in conformity with the following specifications EN55024 EN55022 Class B EN61000 3 2 E...

Страница 17: ...6 Troubleshooting Explains how to handle error messages paper jams and other problems Appendix Explains how to enter text describes the media types that can be used with the machine and lists the mac...

Страница 18: ...zontal orientation is indicated by an additional R character Set direction Indicated size a a The size of original paper that can be used depends on the function and source tray For further details re...

Страница 19: ...Part Names 1 1 1 Part Names This chapter identifies machine parts and operation panel keys Body 1 2 Operation Panel 1 5 Touch Panel 1 6...

Страница 20: ...Names Body 1 Original Cover Option 2 Platen 3 Original Size Indicator Plates 4 Left Cover 1 5 Left Cover 1 Lever 6 Left Cover 2 7 Clip Holder 8 Operation Panel 9 Cassette 1 10 Cassette 2 1 2 3 4 7 8...

Страница 21: ...rt Names 1 3 11 Toner Container 12 Toner Container Stopper 13 Main Charger 14 Waste Toner Box 15 Cleaning Brush 16 Green Knob A1 17 Paper Feed Unit A2 18 Paper Feed Unit Cover A3 12 11 14 13 15 16 17...

Страница 22: ...er 20 Paper Width Guide 21 Paper Width Adjusting Tab 22 Paper Length Guide 23 Carrying Handles 24 Top Tray 25 Output Stopper 26 Paper Width Guide 27 Main Power Switch 28 MP Tray multi purpose tray 27...

Страница 23: ...r 10 Logout Key 11 Interrupt Key Indicator 12 Energy Saver Key Indicator 13 Power Key Indicator 14 Main Power Indicator 15 Touch Panel 16 Numeric Keys 17 Reset Key 18 Stop Clear Key 19 Start Key Indic...

Страница 24: ...Erase Margin Left Program Function User choice Basic Duplex Combine Original Booklet Cover Border Original Size Margin Centering Collate Offset Page 100 Sheet Image Erase 11 8 Paper Size Set 4 in 1 B...

Страница 25: ...he MP Tray 2 4 Loading Envelopes 2 6 Setting Media Type and Paper Size for the Cassettes and MP Tray 2 7 Specifying Paper Size for the Cassettes 2 7 Specifying the Media Type for the Cassettes 2 8 Spe...

Страница 26: ...n cause problems Seal any remaining paper after loading in the MP tray or cassettes back in the paper storage bag If the machine is not going to be used for a prolonged period protect paper from humid...

Страница 27: ...ecify Thick paper for Specifying the Media Type for the Cassettes on page 2 8 If the media type setting is wrong paper jams and deterioration of copy quality may occur Note Do not pull out more than o...

Страница 28: ...nvelope C5 Comm 10 Monarch Youkei 4 Youkei 2 20 sheets IMPORTANT Before loading the paper be sure that it is not curled or folded Paper that is curled or folded may cause paper jams Ensure that the lo...

Страница 29: ...as transparencies or thick paper select the media type by referring to Specifying the Media Type for the MP Tray on page 2 13 IMPORTANT Keep the side that was closest the package seal facing up Curle...

Страница 30: ...e face up and the flap positioned opposite to the entrance Acceptable Envelope Size Monarch 3 7 8 7 1 2 Comm 10 4 1 8 9 1 2 Envelope DL 110 220 mm Envelope C5 162 229 mm Executive 7 1 4 10 1 2 Comm 9...

Страница 31: ...matically detect the paper size set to Auto Detection and select either Centimeter or Inch units The following paper sizes are available 11 17 8 1 2 14 11 8 1 2 8 1 2 11 5 1 2 8 1 2 8 1 2 13 1 2 8 1 2...

Страница 32: ...splayed 4 Press S or T select the cassette you wish to set the media type from Media Type Cassette 1 Media Type Cassette 4 and press Change Auto A5 A4 Standard A3 A4 Paper size Cassette 1 Select paper...

Страница 33: ...d Letterhead High Custom 4 Prepunched Vellum Rough Quality Thick paper Setting method Unit Paper size Auto Detect Inch 11 17 8 1 2 14 11 8 1 2 8 1 2 11 5 1 2 8 1 2 Centimeter A3 B4 A4 A4R B5 B5R A5R B...

Страница 34: ...m Menu Default Copy Language Job Default Machine MP Tray Orig Size Register Report Print Setting Accoun MP Tray Setting Auto Bac System Menu Counter Size Entry Others Standard Paper Size Media Pla Cen...

Страница 35: ...for the 25 cpm model and 3000 for the 30 cpm model If the correct management code has been entered the Machine Default screen will be displayed 4 Press S or T to select Store Paper Size for MPT and p...

Страница 36: ...n Store Paper Size for MPT 1111 16 169 16 Change Default menu Paper size User reg 1 Paper size User reg 2 Paper size User reg 3 Paper size User reg 4 Setting mode 1111 16 169 16 1111 16 169 16 1111 16...

Страница 37: ...the MP tray to print received faxes refer to Turning Manual Paper Feed ON OFF MP Tray setting in Chapter 6 of the fax kit Operation Guide the available media types are as shown below Plain Rough Recyc...

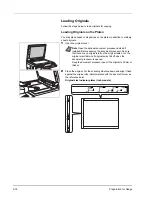
Страница 38: ...edown and align it flush against the original size indicator plates with the back left corner as the reference point Original size indicator plates Inch models Note Open the optional document processo...

Страница 39: ...re scanned Part Names of the Document Processor 1 Original placement indicator 2 Top cover 3 Original width guides 4 Original table IMPORTANT Do not push the original cover forcefully when you close i...

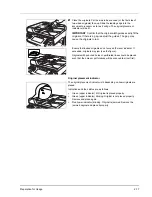
Страница 40: ...ginals with folds Straighten the folds before loading Failure to do so may cause the originals to jam Originals bound with clips or staples Remove the clips or staples and straighten curls wrinkles or...

Страница 41: ...aced such that the holes or perforations will be scanned last not first Original placement indicator The original placement indicator is lit depending on how originals are placed Indications and their...

Страница 42: ...he touch panel display will change to that language Model Type Language Inch models English French Fran ais Spanish Espa ol Japanese Portuguese Portugu s Metric models English German Deutsch French Fr...

Страница 43: ...3 4 Adjusting Density 3 5 Zoom 3 6 Auto Zoom 3 6 Manual Zoom 3 7 Preset Zoom 3 7 XY Zoom 3 8 Duplex Mode 3 10 One sided to Two sided 3 10 Two sided to Two sided 3 10 Book to Two sided 3 10 Split Mode...

Страница 44: ...e originals will be selected automatically To change the paper size press the desired paper size to select the paper source 4 Use the numeric keys to enter the copy quantity You can specify up to 999...

Страница 45: ...ng off the main power switch Press the Power key on the operation panel and after verifying the Power indicator has gone off switch off the main power switch If the optional fax kit is installed when...

Страница 46: ...riginals with large amounts of text P Program Function User choice Basic 11 8 Plain 11 17 Color 11 8 Plain 8 11 Plain MP Tray Plain APS Auto Zoom 100 Density Auto Stap Stap Left Off Ready to copy Dens...

Страница 47: ...to use Auto Density The machine determines a suitable density for copying To change the density from Auto to Manual press the density adjustment key 3 Press the Start key Copying begins Program Funct...

Страница 48: ...ly reduces or enlarges the original image suited to the selected paper size Follow the steps below to use auto zoom 1 Place the original and select paper size 2 Press Auto The magnification will be di...

Страница 49: ...r choice Basic 11 8 Plain 11 17 Color 11 8 Plain 8 11 Plain MP Tray Plain APS Auto Zoom 100 Density Auto Stap Stap Left Off Ready to copy Density Ba Zoom Standard XY Zoom Auto 100 400 200 keys Shortcu...

Страница 50: ...JB5 81 B4JA4 B5JA5 70 A3JA4 B4JB5 Model Type Zoom Level Program Function User choice Basic 11 8 Plain 11 17 Color 11 8 Plain 8 11 Plain MP Tray Plain APS Auto Zoom 100 Density Auto Stap Stap Left Off...

Страница 51: ...4 Under Select Original Orientation select Top Edge Top or Top Edge Left 5 Press the Start key Copying begins Ba Sele Orie To Zoom Shortcut Standard XY Zoom X Y keys keys Ready to copy Zoom To Set Bac...

Страница 52: ...s of the copied document are in the same orientation if pages are flipped upward B Two sided to Two sided Produces two sided copies from two sided originals Book to Two sided Produces two sided copies...

Страница 53: ...uplex Margin Centering Collate Offset Original Size Page Combine Ready to copy Selection Image Erase Ba Shortcut Finishing Duplex Sele Orie 2 sided mode Binding Binding Left Right Top 1 sided 2 sided...

Страница 54: ...he optional document processor copying begins automatically If the original is placed on the platen Scan next original s is displayed Place the next original page and press the Start key If all origin...

Страница 55: ...acing pages are copied from left to right Binding Right Originals with facing pages are copied from right to left Follow the steps as below to use Split mode 1 Press Function 2 Press Duplex 2 1 1 2 Or...

Страница 56: ...e next original page and press the Start key If all original pages have been scanned press Scanning finished Copying begins Ba Shortcut To Duplex Sele Orie Ready to copy Original Binding Binding 1 sid...

Страница 57: ...ace the next original page and press the Start key If all original pages have been scanned press Scanning finished Copying begins Complete sets of copies will be delivered on the top tray 3 2 1 3 2 1...

Страница 58: ...eps as below to use interrupt copying 1 Press the Interrupt key Interrupt Mode OK will be displayed 2 Temporarily remove and set aside the original pages of the current job 3 Place the original for th...

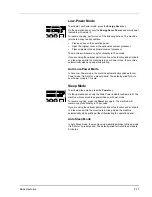
Страница 59: ...tarts printing Auto Low Power Mode In Auto Low Power mode the machine automatically switches to Low Power mode if left idle for a preset period The default period for Auto Low Power mode is 1 minute S...

Страница 60: ...3 18 Basic Operation...

Страница 61: ...ment available for the machine Overview of Optional Equipment 4 2 Document Processor 4 3 Paper Feeder 4 3 Built in Finisher 4 3 Adding Staples 4 4 Clearing Staple Jams 4 5 Document Finisher 4 6 Job Se...

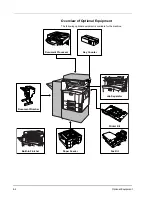
Страница 62: ...uipment Overview of Optional Equipment The following optional equipment is available for the machine Key Counter Document Finisher Document Processor Job Separator Paper Feeder Fax Kit Built in Finish...

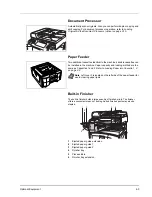
Страница 63: ...e Paper capacity and loading method are the same as Cassettes 1 and 2 Refer to Loading Paper into Cassette 1 2 on page 2 2 Built in Finisher The built in finisher holds a large quantity of finished pr...

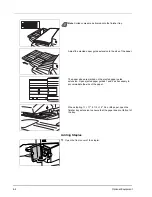
Страница 64: ...the ejected paper guide extension to the size of the paper The paper sizes are marked on the ejected paper guide extension Open ejected paper guides 1 and 2 as necessary to accommodate the size of the...

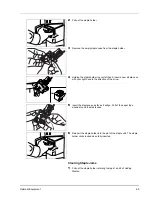
Страница 65: ...aple case with your right hand in the direction of the arrow 5 Insert the staple case as far as it will go Pull of the paper tape wound around the staple case 6 Reinsert the staple holder into the slo...

Страница 66: ...s a convenient means of sorting Sorted finished copies may also be stapled For further details refer to the Document Finisher Operation Guide Job Separator Separate paper according to output tray for...

Страница 67: ...efer to the Printer Kit Operation Guide Note To ensure that paper is delivered to the job separator select the output destination or change the default setting For details refer to Chapter 1 Selecting...

Страница 68: ...4 8 Optional Equipment Fax Kit Install the fax kit to use the machine as a fax as well For further details refer to the Fax Kit Operation Guide...

Страница 69: ...is chapter describes cleaning and toner replacement Cleaning 5 2 Original Cover Document Processor and Platen 5 2 Slit Glass 5 2 Separator 5 3 Transfer Roller 5 4 Main Charger 5 5 Toner Container and...

Страница 70: ...if the slit glass requires cleaning After cleaning press End 1 Remove the cloth from the cleaning cloth compartment 2 Open the document processor and wipe slit glass A CAUTION For safety always unplug...

Страница 71: ...he best possible print quality clean the machine as described below on a regular basis once a month 1 Open the front cover 2 Remove cleaning brush blue colored 3 Pull up left cover 1 lever and open le...

Страница 72: ...described below on a regular basis once a month 1 Open the front cover 2 Remove cleaning brush blue colored 3 Pull up left cover 1 lever and open left cover 1 4 Run the brush from side to side along t...

Страница 73: ...main charger 1 Open the front cover 2 Remove the waste toner box 3 Clean the main charger as described in steps 6 to 11 in Toner Container and Waste Toner Box Replacement on page 5 7 4 Install the was...

Страница 74: ...ser Setting Accounting System Menu Counter User adjustment refresh Drum System Menu Cleaning Charger in charger 2 Clean the main charger 3 After cleaning install the waste toner box Close the front co...

Страница 75: ...as instructed below Dirty parts may deteriorate output quality 1 Open the front cover 2 Remove the waste toner box 3 Peel the sticker off the waste toner box and remove the cap CAUTION Do not attempt...

Страница 76: ...n push it back in Repeat 2 or 3 times 7 Hold the main charger to the right and pull out about 5 cm 8 Take the grid cleaner provided out of its bag and remove the cap CAUTION Do not attempt to incinera...

Страница 77: ...pad on the grid cleaner Repeat 2 or 3 times 11With the main charger pulled out about 5 cm 2 inches remove the grid cleaner Then push the main charger back in fully applying pressure in the direction...

Страница 78: ...fer roller as shown rotating by the gear at the end to remove any soiling 17After cleaning replace the cleaning brush and close left cover 1 18Push the toner container stopper to the right and pull ou...

Страница 79: ...of the container 5 or more times Then turn the container the other way up and again tap the top of the container 5 or more times 22Then shake the toner container up and down 5 or more times Again turn...

Страница 80: ...r or dry cloth 29Put the filter back in place and close the MP tray 30Close the front cover 31When Replaced the toner container appears press Yes 32When Cleaned the main charger appears press Yes 33Ad...

Страница 81: ...Jams 6 8 Jam Location Indicators 6 8 Paper Jam Precautions 6 9 Cassette 1 6 9 Cassette 2 6 10 Optional Cassettes 3 and 4 6 11 MP Tray 6 12 Inside the Left Covers 1 2 and 3 6 12 Duplex Unit 6 13 Duplex...

Страница 82: ...ace them face down and align them with the original size indicator plates page 2 14 Place originals face up in the optional document processor page 2 15 Is the machine installed beneath fluorescent li...

Страница 83: ...type Is it in good condition Remove the paper from the cassette turn it over and reload it page 2 2 Is the paper curled folded or wrinkled Replace the paper with new paper page 2 2 Are there any loose...

Страница 84: ...securely pushed into the machine Pull out the paper feeder and securely push it all the way into the machine page 6 11 Add paper in cassette Add paper cassette Is the indicated cassette out of paper L...

Страница 85: ...of media Refer to the optionalDocument Finisher Operation Guide Cannot staple this size Cannot staple this paper size Is stapling available for the size of the loaded paper Change the paper size page...

Страница 86: ...ner container securely installed Open the front cover and pull the toner container out Shake the container well and set back in place page 5 7 Clean the main charger Have you cleaned the main charger...

Страница 87: ...it re displayed after opening and closing the front cover turning off and on the main power switch and plugging out and plugging in the power plug in the power outlet Make a note of this message C fol...

Страница 88: ...t the cassette and close the cover and remove any paper that 1 Open left cover 1 of the m JAM 00 A D G E E K I J J J H F B C C F A D G E E K I F B C C F Paper misfeed 2 Open cassette 1 3 Remove the pa...

Страница 89: ...fed out again Do not return this paper to the document finisher tray Cassette 1 Follow the steps below to clear paper jams in cassette 1 1 Pull up left cover 1 lever and open left cover 1 2 Remove the...

Страница 90: ...every loose scrap from inside the machine 5 Push cassette 1 securely back in place 6 Press the indicated position to close left cover 1 Cassette 2 Follow the steps below to clear paper jams in casset...

Страница 91: ...cover 2 Optional Cassettes 3 and 4 Follow the steps below to clear paper jams in cassettes 3 or 4 when using the optional paper feeder 1 Open left cover 3 2 Remove the jammed paper If the paper tears...

Страница 92: ...r is jammed inside pull the paper toward you to remove Inside the Left Covers 1 2 and 3 Follow the steps below to clear paper jams inside left cover 1 2 or 3 option 1 Open the left cover where paper i...

Страница 93: ...1 lever and open left cover 1 2 Remove the jammed paper 3 Lift up the duplex unit and remove the jammed paper 4 Press the indicated position to close left cover 1 Duplex Unit and Cassette 1 Follow th...

Страница 94: ...and remove the jammed paper If the paper tears remove every loose scrap from inside the machine 5 Push cassette 1 securely back in place 6 Press the indicated position to close left cover 1 Paper Feed...

Страница 95: ...f the paper tears remove every loose scrap from inside the machine 3 Open the front cover 4 Turn the lower green knob A1 clockwise 5 Remove the jammed paper If you cannot remove the paper proceed with...

Страница 96: ...ose the front cover 9 Press the indicated position to close left cover 1 Optional Built in Finisher Follow the steps below to clear paper jams in the optional built in finisher 1 Remove any paper left...

Страница 97: ...g 6 17 5 Press the indicated position to close left cover 1 6 Reattach the output tray 7 Turn the dial to lower the finisher process tray 8 Remove any paper from the tray 9 Push the tray upward back i...

Страница 98: ...document processor top cover 3 Remove the jammed original 4 Lift up the paper feed unit A 5 Remove the jammed original If the original tears remove every loose scrap from inside the machine 6 Remove...

Страница 99: ...below to clear paper jams in the optional job separator 1 If jammed paper can be seen through the paper output slot pull it out toward you If the paper tears remove every loose scrap from inside the...

Страница 100: ...6 20 Troubleshooting...

Страница 101: ...d with the machine and lists the machine specifications Entering Characters on Touch Panel 7 2 Paper 7 5 Specifications 7 6 Body 7 6 Document Processor option 7 8 Paper Feeder option 7 8 Document Fini...

Страница 102: ...enter the numeric and symbols 5 Space Press this key to enter a space 6 AllDel Press this key to delete all characters entered 7 Press these keys to move the cursor left and right 8 Del prev Press th...

Страница 103: ...acters entered 8 Press these keys to move the cursor left and right 9 Del prev Press this key to delete the character to the left of the cursor 10 Stop Press this key to return to the previous screen...

Страница 104: ...press End Name to display End Capital Stop Letter Symbol 1 Space Char Limit 32 including AllDel Del prev Symbol 2 Name to display End Capital Stop Letter Symbol 1 Space Char Limit 32 including AllDel...

Страница 105: ...ported types Supported paper sizes No of sheets Plain paper 45 to 200 g m Recycled paper 45 to 200 g m Colored paper 45 to 200 g m 11 17 8 1 2 14 11 8 1 2 8 1 2 11 5 1 2 8 1 2 8 1 2 13 Oficio II 8 1 2...

Страница 106: ...tte 1 2 Maximum 11 17 A3 Duplex 11 17 A3 Minimum 5 1 2 8 1 2 A5R Duplex 5 1 2 8 1 2 A5R MP Tray Maximum 11 17 A3 Minimum 5 1 2 8 1 2 A6R Zoom Level Manual mode 25 to 400 1 increments Auto mode Preset...

Страница 107: ...Maximum 80 000 pages 100 000 pages Operating Environment Temperature 10 to 32 5 C 50 to 90 5 F Humidity 15 to 80 Altitude 2 500 m 8 202 ft maximum Brightness 1 500 lux maximum Dimension W D H 22 7 16...

Страница 108: ...mensions W D H 22 19 3 16 5 3 16 559 487 131 mm Weight 15 4 lb or less 7 kg or less Item Description Paper Supply Method Friction Feed No Sheets 500 80 g m 2 cassettes Paper Weight 60 to 120 g m Media...

Страница 109: ...0 sheets 11 8 1 2 8 1 2 11 A4 A4R B5 16K 30 sheets Dimensions W D H 22 20 11 16 36 1 16 558 526 916 mm Weight Approx 55 lb Approx 25 kg Item Description Number of Trays 1 tray Paper Weight 60 to 105 g...

Страница 110: ...L wad 66 5 dB A L wad Power consumption During copying with full optional equipment 1360 wh During standby 160 W or less During the Low Power mode 60 W or less Recovery time from Low Power mode 10 se...

Страница 111: ...image quality 3 4 Split mode 3 13 Zoom 3 6 Copying speed 7 6 D Document finisher 4 6 Paper jams 6 19 Specifications 7 9 Document processor 4 3 Cleaning 5 2 Loading originals 2 16 Paper jams 6 18 Part...

Страница 112: ...a type 2 8 2 13 Specifying the paper size 2 7 2 9 Paper feeder 4 3 Loading paper 2 2 Paper jams 6 11 Specifications 7 8 Specifying the media type 2 8 Specifying the paper size 2 7 Paper feed unit 1 3...

Страница 113: ...Index 3 Transfer roller Cleaning 5 4 W Warm up 3 2 Waste toner box 1 3 Replacement 5 7 Z Zoom Auto zoom 3 6 Manual zoom 3 6 3 7 Preset zoom 3 6 3 7 XY zoom 3 6 3 8...

Страница 114: ...Index 4...

Страница 115: ...you need and the instructions for handling the waste correctly for example location and times of the waste collection centres etc b When you purchase a new device of ours give a used device similar t...

Отзывы: