KIT B0872
ENGLISH
EN - 7
1 - INSTALLATION
1.1 - MODE OF INSTALLATION
The following descriptions on the various phases of assembly and the corresponding drawings refer to a
version of the machine with connections to the left.
The descriptions for the assembly operations of the machines with connections to the right are the same.
Only the figures must be considered as shown specularly.
1.2 - OPENING THE UNIT (Fig.2a-2b)
a.
Raise the lid (1a) and undo the screw (1b).
b.
Slightly move the side panel (1) rightwards and raise it.
c.
Raise the lid (2a) and undo the screw (2b).
d.
Slightly move the side panel (2) leftwards and raise it.
1.3 - ASSEMBLY AND CONNECTIONS
a
. Undo the screws (3a) (fig.3).
b
. Remove the cover (3b) of the box (3) (fig.3).
c
. Wedge in the locks (4) in the specific slots (5) located on the side of the appliance (fig.4).
d
. Secure the box (3) to the appliance by means of the two screws (6) (fig.4).
e
. Connect the ground cable to the appliance structure using the supplied screw (x) and the washer (y)
(minimum force for screwing is 4 N) (fig.5).
f.
Connect the power cord to the terminal block and fix it in the specific strain relief.
g
. Remount the cover (3b) of the box (3) and tighten the screws (3a) (fig.6).
h
. Insert the control panel (7) in the seat positioned in the upper part of the fan coil/fan radiator, then secure
it to the side part by means of the two supplied screws (7a) (fig.7).
i
. If the control must be installed on the left side of the machine, repeat the steps from point “
a
” to point “
i
”,
but move the support (7b) as indicated in figure 7 instead.
Once the connection operations and possible configuration are complete, close the electric panel by means
of the previously removed screws.
Reposition the front panel taking care to connect the connector of the display.
Secure the front panel by means of the screws, then power the machine.
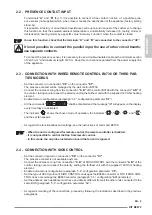
2 - ELECTRICAL CONNECTION
Before carrying out any electrical connection, make sure that power supply is disconnected
by the units and that the systems to which the equipment must connect are compliant with the
current standards.
In case you want to proceed with installation without plug, proceed as described below:
- Use a cable with a minimum section of 3G 0,75
- Use a ground cable at least 20 mm longer than the active wires.
- Connect the ground connection wires to the corresponding terminal.
- Pull the wires to make sure they are connected correctly, then stop them with the specific cable tie.
For correct dimensioning of the guards, please refer to voltage and current consumption indicated on the
label located on the unit.
The appliance connection MUST respect the European and national standards
and MUST be protected by a 30 mA differential switch.
Содержание B0872
Страница 2: ......
Страница 7: ......
Страница 9: ...3 3 3a 3 3a 3b 4 4 3 5 6 6 5 y x 6 3a 3 3b 3a 3b...
Страница 10: ...180 7 7a 7b 7b 7b 7 8...
Страница 166: ...EL 2 3 13 TIMER 18 3 13 a timer 18 3 13 b timer 18 3 14 18 3 15 LED 19 3 16 20 4 20 5 21...
Страница 167: ...KIT B0872 EL 3 0 0 1 0 2 0 2 a...
Страница 168: ...EL 4 0 3 1 OLIMPIA SPLENDID 2 3 4 5 6...
Страница 169: ...KIT B0872 EL 5 7 8 9 OLIMPIA SPLENDID 10 11 12 13 A 14 15 16 17 18 19...
Страница 170: ...EL 6 20 OLIMPIA SLPENDID 21 22 23 24 25 26 27 28 29 70 C 30 OLIMPIA SPLENDID 2014 35 EU 2014 30 EU RoHS 2011 65 CE...
Страница 175: ...KIT B0872 EL 11 3 3 TV 3 3 a 27 27 27 3 3 b 1 5V AAA 27 3 4 stand by T2 T1 5 T1 T1 CF bU Ad Fa Po co CF T2 T2 3...
Страница 178: ...EL 14 3 5 3 5 a T2 2 B1 stand by 5 C AF 3 6 B1 10 A5 A5 A5 B1 2 LED LED LED LED 3 7 3 10 A5 3 2 LED LED LED LED B2 10 11...
Страница 179: ...KIT B0872 EL 15 3 8 3 2 LED LED LED LED T2 B2 10 11 B6 3 8 a T2 A4 B6 6 3 8 b T2 A3 B6 5...
Страница 182: ...6 0 H 0 h 6 0 H 3 0 H 0 h 3 0 H EL 18 3 13 TIMER 3 13 a timer B8 1 24 5 tl 3 13 b timer 9 1 24 5 tl 3 14...
Страница 185: ...KIT B0872 EL 21 5 60 2 3 silent 220 V...
Страница 186: ...EL 22 FI E2 E3 E4 E5 stand by 5 T2 T3...
Страница 187: ......
Страница 188: ...263995A...

