background image

105

4. UTILISER LA MACHINE

4.1 EMPLACEMENT DES PRINCIPAUX MANIPULATEURS

4.1

(1) 

Interrupteur d'alimentation principale 

(2) 

Désactivation du désengagement de la plaque de tonte en marche arrière

(3) 

Indicateur d'enclenchement du point mort

(4) 

Compteur horaire du moteur

(5) 

Interrupteur d'engagement de la plaque de tonte

(6) 

Indicateur d'engagement et d'abaissement de la plaque de tonte

(7) 

Levier du frein de stationnement 

(8) 

Pédale de frein

(9) 

Pédale de verrouillage du différentiel

(10) 

Levier de réglage d'élévation de la plaque de tonte

(11) 

Manette de gaz

(12) 

Levier de désengagement de la commande de déplacement

(13) 

Levier de déplacement

(14) Starter
(15)  Levier de déviation
(16) 

Leviers de commande du châssis inclinable

4.2 DESCRIPTION ET FONCTION DES MANIPULATEURS

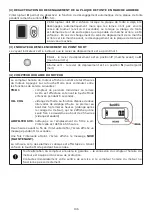
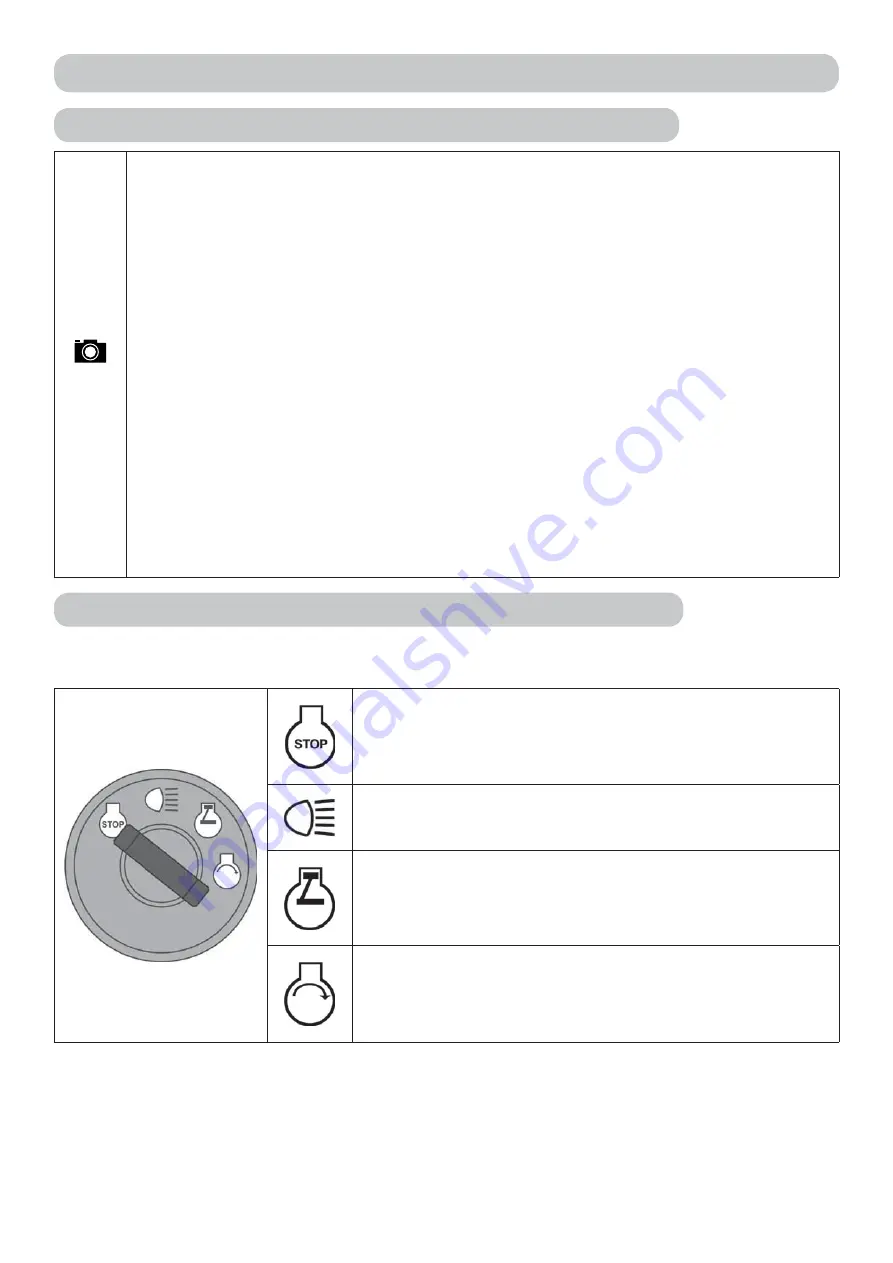
(1) INTERRUPTEUR D‘ALIMENTATION PRINCIPAL

Il sert à démarrer/arrêter le moteur. Il dispose de 4 positions :

Allumage désactivé/coupure de l‘allumage

Allumage/extinction des phares du capot

Allumage est activé, le moteur tourne.

Démarrer le moteur – position de démarrage

Содержание APACHE 92

Страница 1: ...ATOR S INSTRUCTION BOOK D BETRIBS UND WARTUNGSANLEITUNG F MANUEL D UTILISATION ET D ENTRETIEN I MANUALE USO E MANUTENZIONE NL GEBRUIKS EN ONDERHOUDSHANDLEIDING E MANUAL DE USO Y MANTENIMIENTO PL INSTR...

Страница 2: ......

Страница 3: ...F Manuel Utilisateur TRADUCTION DES INSTRUCTIONS ORIGINALES 91 I Manuale di istruzioni ISTRUZIONI ORIGINALI 131 NL Gebruikershandleiding VERTALING VAN DE OORSPRONKELIJKE INSTRUCTIES 171 E Manual de u...

Страница 4: ......

Страница 5: ...5 1 2 1 3 1 1 3 2a EMAK spa via Fermi 4 42011 Bagnolo in Piano RE ITALY...

Страница 6: ...6 1 3 2b 1 3 2c 1 3 2d...

Страница 7: ...7 3 1 3 3a 3 3b...

Страница 8: ...8 3 3c 3 3d...

Страница 9: ...9 4 1 6 3 7...

Страница 10: ...10 6 3 13 92 EVO 92 EVO 4x4 6 4...

Страница 11: ...or you have questions do not hesitate to contact one of our authorised professionally equipped service centres located all over Europe where trained and tested experts will be ready to assist you SYMB...

Страница 12: ...chine 3 Front axle with wheels including steering The front axle enables the wheels to turn The wheels are turned by the steering wheel by means of a comb mechanism The 92 EVO 4x4 machine is also equi...

Страница 13: ...rite down the serial number on the other side of the front page of this manual when handing over the machine 1 3 2 OTHER LABELS AND THEIR MEANINGS The following labels and stickers are attached to the...

Страница 14: ...se control 0 Cruise control deactivated 1 Cruise control activated Fast Slow F Travel forward N Neutral R Travel in reverse It is strictly forbidden to remove or damage labels and symbols attached to...

Страница 15: ...rward reverse km h 0 8 5 0 4 5 0 9 0 5 Mowing height mm 50 100 Mowing width mm 920 Wheel dimensions Front 16x6 5 8 16x6 5 8 Rear 20x10 0 8 20x10 0 8 Fuel tank capacity l 12 Fuel type Lead free petrol...

Страница 16: ...O 5395 1 EN ISO 5395 3 EN ISO 11201 Vibration aggregate value m s 2 according to EN ISO 5395 1 EN ISO 5395 3 seat steering wheel BS18 3000 88 4 0 23 2 38 total vibrations av according to EN 1032 vibra...

Страница 17: ...safety stickers or labels from the machine Do not stay in the vicinity of the machine or under it if it is lifted and is not sufficiently secured against falling or tipping over in the lifted positio...

Страница 18: ...using the machine in wet grass Reduced traction may lead to skidding Avoid obstacles e g sudden change in the incline of a slope trenches etc on which the machine could roll over If mowing is disengag...

Страница 19: ...ss may conceal hidden obstacles Therefore remove all foreign objects from the area where you wish to mow in advance Select such a speed so that you do not need to stop when on a hill Be very careful w...

Страница 20: ...ces the fumes of which are explosive Do not smoke during this work Never unscrew the petrol tank cap and refill with petrol while the engine is running if the engine is hot or if the machine is in a c...

Страница 21: ...and assemblies for damage that may have occurred during transport Unpack all separatelz packed assemblies and inspect them The basic package includes Riding mower Seat 2 Folding frame in the folded st...

Страница 22: ...ing the battery always disconnect the negative pole of the battery first When putting the battery into operation and when performing maintenance on it proceed according to the instructions in the user...

Страница 23: ...fuel tank opening as well as the fuel tank opening itself It is good to check the condition of the fuel lines 3 4 4 CHECKING THE AIR PRESSURE IN THE TYRES Before putting the machine into operation che...

Страница 24: ...em If you drive off the pallet without ramps there is a danger of damaging the underside of the machine particularly the mowing deck Lift the mowing deck into the transport position by pulling on the...

Страница 25: ...MAIN POWER SWITCH Serves to start up shut off the engine It has the following 4 positions Ignition off turn off the ignition Turn on turn off the headlights on the hood Ignition on the engine is runni...

Страница 26: ...nly once The second is after 25 hours standard oil change AIRFILTER SVC cleaning or changing the air filter The interval is set to 50 hours Two hours before the set interval has elapsed the display wi...

Страница 27: ...e the parking brake and the lever will automatically be released and shift to position 1 8 BRAKE PEDAL Pressing the brake pedal will slow down the riding mower Never use the brake at the same time as...

Страница 28: ...this position When travelling without mowing the lever must be set to the transport position The mulching function can be improved by using a special accessory a so called mulching set which is suppli...

Страница 29: ...r stick automatically shifts to position N 14 CHOKE For starting a cold engine CHOKE Starting a cold engine 15 BY PASS LEVER FREE MOVEMENT OF THE REAR WHEELS The by pass lever serves to disengage the...

Страница 30: ...son it loses stability and rolls on to its side Under no circumstances does the protective frame serve as safety protection feature for the operator The folding frame has 3 positions 1 Work 2 Maintena...

Страница 31: ...r is sitting on the seat of the machine After meeting the described conditions start the engine as follows a Set the mowing deck elevation adjustment lever to the transport position b Move the mowing...

Страница 32: ...ever set the position of the mowing deck and thereby the mowing height Set the mowing deck activation switch to position ACTIVATED Conditions for activating the mowing deck the driver is sitting in th...

Страница 33: ...ersing function at a speed higher than 0 3 m s approx 1 km hour In the event of intentional and controlled reversing with the mowing deck engaged it is possible to disengage this safety function by pr...

Страница 34: ...ttention when travelling on a slope Always use a lower travelling speed and regulate the travelling speed by moving the travel direction lever Only travel perpendicular to the contour i e up and down...

Страница 35: ...ass from the engine grill and from the exhaust Cleaning DRIVE V BELT Check for wear tension MOWING V BELT Check for wear tension MOTOR OIL Check the level fill up Oil change V BELT TENSIONING MECHANIS...

Страница 36: ...circuit for model 92 EVO 4x4 adjustment of the front drive axle for model 92 EVO 4x4 other problems with the hydraulic circuit for model 92 EVO 4x4 in the event of other difficulties 6 2 DAILY CHECKS...

Страница 37: ...follows Park the machine on an even surface and turn off the engine Step on the brake pedal and engage the parking brake Using the by pass lever disengage the rear wheel drive Try to push the machine...

Страница 38: ...t be in the range MIN MAX In the event of filling up the electrolyte use only distilled water A flat battery needs to be recharged as soon as possible otherwise its cells may be irreparably damaged It...

Страница 39: ...y to replace it If the spark plug is soiled or only slightly worn it is necessary to carefully clean it with a suitable wire brush copper Using a gauge measure set the distance of the electrodes User...

Страница 40: ...gear box on the rear axle and lift the rear part of the machine Insert two supports underneath the ends of the axles from the inner side of the rear wheels Lift the front part of the machine and inse...

Страница 41: ...ss catcher If the blades are merely blunt and do not exhibit any other damage then they may be sharpened After sharpening the pair of blades must be balanced Balancing will prevent vibrations of the m...

Страница 42: ...arly check the wear and tension of V belts and the tensioning mechanism The drive V belts travel and mowing are automatically tensioned by a spring and a pulley Before starting work or at least after...

Страница 43: ...specially for wheels on the rear axle this lubrication is essential for the subsequent removal of the wheel In the event that lubrication is not performed the subsequent attachment may be very difficu...

Страница 44: ...nsion pulleys guide pulleys and bearings on the mowing deck are self lubricating Before putting the machine out of service for an extended period thoroughly lubricate all places shown on the diagram N...

Страница 45: ...he set mowing height adjust if necessary Check whether the movement of the belt is not prevented by a foreign object If yes remove the foreign object Recheck all the belts Buckled or cracked pulleys m...

Страница 46: ...isation tank and fill it up if necessary There are air pockets in the hydraulic circuit drive the machine on level ground forward and back for several minutes Contact your service centre The machine l...

Страница 47: ...e consequences of defects in the machine 2 Technical personnel will undertake the necessary repairs in the minimum time possible compatible with organisational needs 3 To make any claim under the warr...

Страница 48: ...the engine for storage according to the user s manual for the operation and maintenance of the engine Lubricate all lubrication locations according to the lubrication diagram 6 4 Take out the battery...

Страница 49: ...4BS United Kingdom E Type of cutting device rotary blade Cutting width 92 cm F We confirm that this mechanical equipment defined above complies with the requirements in the above technical regulation...

Страница 50: ...gy may appear in this manual when compared with the actual product No claims can be deduced from this Print duplication publication and translation even in part must not be performed without the writt...

Страница 51: ...nicht sich an eine unserer mehr autorisierten professionell ausgestatteten Kundendienststellen in ganz Europa zu wenden wo geschulte und gepr fte Experten bereit stehen um Ihnen zu helfen IN DIESEM HA...

Страница 52: ...estehen aus den folgenden Basissektionen 1 2 1 Haube mit Stauraum Die Haube ist eine Kombination aus Kunststoff und Metallabdeckungen die den Stauraum f r die Batterie enthalten 2 Chassis mit Sto stan...

Страница 53: ...D ANDERE ETIKETTEN MIT SYMBOLEN DIE AN DER MASCHINE VERWENDET WERDEN 1 3 1 KENNZEICHNUNGSETIKETT DES PRODUKTS Jeder Aufsitzm her ist mit einem Produkt Kennzeichnungsetikett markiert das sich unter der...

Страница 54: ...Querrichtung Unbefugte Personen in sicherem Abstand halten MAX 10 o Maximale Arbeitssteigung u Etiketten auf der R ckseite der Maschine 1 3 2c Vorsicht Hei e Oberfl che Gefahr von Verbrennungen u Eti...

Страница 55: ...vorw rts r ckw rts km h 0 8 5 0 4 5 0 9 0 5 Schnitth he mm 50 100 Schnittbreite mm 920 Radabmessungen Vorne 16x6 5 8 16x6 5 8 Hinten 20x10 0 8 20x10 0 8 Fassungsverm gen des Kraftstofftanks l 12 Kraft...

Страница 56: ...ch EN ISO 5395 1 EN ISO 5395 3 EN ISO 11201 Schwingbeschleunigung Gesamtwert m s 2 gem EN ISO 5395 1 EN ISO 5395 3 Sitz Lenkrad BS18 3000 88 4 0 23 2 38 Gesamtschwingungen av gem EN 1032 Auf den Arm b...

Страница 57: ...rlichen Arbeitsbedingungen f hren und die Garantie erl schen lassen Beachten Sie alle Auflagen zur Brandsicherheit 2 4 Entfernen Sie keine Sicherheitsaufkleber oder Etiketten von der Maschine Bleiben...

Страница 58: ...n Kontakt kommen d rfen da sie sonst Sch den am M hwerk und dem Maschinenmechanismus verursachen k nnen Beim Aufprall auf einen festen Gegenstand M hwerk und Motor anhalten und ausschalten und die ges...

Страница 59: ...ximalen Neigung von 20 32 und nur in Richtung der Falllinie also nach oben oder unten eingesetzt werden Weitere Informationen 5 5 4 Bei der Richtungs nderung ist erh hte Vorsicht geboten Nicht an eine...

Страница 60: ...m geschlossenen Ort parken Seien Sie besonders aufmerksam bei der Arbeit mit Benzin l und anderen brennbaren Substanzen Diese sind sehr leicht entz ndliche Stoffe und ihre D mpfe sind explosiv Bei die...

Страница 61: ...sich unter der Haube Die Kiste 1 und die Verpackung der Maschine mit einem geeigneten Werkzeug z B Brecheisen oder Hammer usw entfernen F hren Sie eine Sichtpr fung der Maschine und Baugruppen auf Sch...

Страница 62: ...eln kann der Faltrahmen in der vertikalen Stellung eingestellt werden 3 3c d Anschlie en der Batterie ffnen Sie den Stauraum in der Haube und l sen Sie die Schrauben an den Polklemmen der Batterie Sch...

Страница 63: ...t bel fteten Ort Beim Umgang mit Kraftstoff nicht essen rauchen oder offene Flammen verwenden Zum Bef llen einen zum Nachf llen von Kraftstoff ausgelegten Trichter verwenden Sicherstellen dass beim Ta...

Страница 64: ...2 Stunden einzufahren 3 4 6 DURCHF HRUNG EINER UNDICHTIGKEITSPR FUNG AM HYDRAULIKKREISLAUF F hren Sie eine Sichtpr fung des Hydraulikkreislaufs auf lleckagen durch insbesondere an den Stellen an dene...

Страница 65: ...lbremshebel 8 Bremspedal 9 Pedal der Differentialsperre 10 H henverstellungshebel M hwerk 11 Gashebel 12 Hebel Deaktivierung der Geschwindigkeitsregelung 13 Fahrhebel 14 Choke 15 Bypass Hebel 16 Kippr...

Страница 66: ...TMR 1 Tageskilometerz hler Wird zur ckgesetzt wenn die Modus Taste 6 Sekunden lang gedr ckt wird OIL CHG lwechsel Die Funktion hat zwei lwechselintervalle Das erste erfolgt nach 5 Stunden lwechsel nac...

Страница 67: ...omatisch freigegeben und begibt sich in Stellung 1 8 BREMSPEDAL Das Dr cken des Bremspedals verlangsamt den Aufsitzm her Verwenden Sie nie die Bremse gleichzeitig mit der Fahrtrichtungsfunktion es bes...

Страница 68: ...enn Sie den M her ohne zu M hen fahren muss der Hebel in Transportstellung sein Die Mulchfunktion kann durch Verwendung eines speziellen Zubeh rs einen so genannten Mulchsatz verbessert werden der sep...

Страница 69: ...matisch in die Stellung N 14 CHOKE Zum Starten eines kalten Motors CHOKE Starten eines kalten Motors 15 LEERLAUFHEBEL FREIE BEWEGUNG DER HINTERR DER Der Leerlaufhebel dient dazu die bertragung f r den...

Страница 70: ...e Stabilit t verliert und zur Seite kippt Der Schutzrahmen darf auf keinen Fall als Sicherheits Schutzfunktion f r den Bediener dienen Der Faltrahmen hat 3 Stellungen 1 Arbeit 2 Wartung 3 Hilfsstellun...

Страница 71: ...nen Bedingungen erf llt sind starten Sie den Motor wie folgt a Stellen Sie den Hebel zur H henverstellung des M hwerks in die Transportstellung b Bringen Sie den Schalter zur Aktivierung des M hwerks...

Страница 72: ...S Stellen Sie den Gashebel in die Stellung MAX Stellen Sie mit dem Hebel f r die H henverstellung des M hwerks die Position des M hwerks und damit die Schnitth he ein Stellen Sie den Schalter f r die...

Страница 73: ...dern der Fahrtrichtung von Vorw rts zu R ckw rts ist nur nach dem Verschieben des Schalthebels in Stellung N und kurzzeitiges Belassen des Hebels in dieser Stellung m glich Wenn die Maschine nicht sti...

Страница 74: ...h in Richtung nach oben und unten aber nicht entlang der Au enlinie ber lokales unebenes Gel nde bis zu einer maximalen Neigung von 20 zu fahren Beim Arbeiten am Hang sind folgende Grunds tze zu beach...

Страница 75: ...n ELEKTRISCHER SCHALTKREIS Pr fen Sicherheitsschalter Pr fen Kabelstr nge HYDRAULIKKREIS Auf Lecks pr fen MOTORK HLUNG Gras aus Motorgitter und Auspuff entfernen Reinigen KEILRIEMEN ANTRIEB Verschlei...

Страница 76: ...des Motors Austausch von Keilriemen Entl ften des Hydraulikkreises Modell 92 EVO 4x4 Justierung der vorderen Antriebsachse Modell 92 EVO 4x4 Andere Probleme mit dem Hydraulikkreis Modell 92 EVO 4x4 Be...

Страница 77: ...vor Parken Sie die Maschine auf einer ebenen Fl che und stellen Sie den Motor ab Treten Sie auf das Bremspedal und ziehen Sie die Feststellbremse an Deaktivieren Sie mit dem Bypass Hebel den Hinterrad...

Страница 78: ...Batterieherstellers Halten Sie die Batteriekontakte sauber Wenn sich Schmutz auf ihnen sammelt oder sie rostig sind reinigen Sie sie gem den Empfehlungen des Batterieherstellers Die Unterbrechung des...

Страница 79: ...anderen Abf llen entsorgen oder es in den Abfluss auf Abfall oder auf den Boden sch tten u WARTUNG DES LUFTFILTERS Lassen Sie niemals den Motor ohne Luftfilter laufen Dies f hrt zu schnellem Motorvers...

Страница 80: ...t schaltet der Motor sofort ab das M hwerk stoppt und alle Kontrollleuchten am Armaturenbrett erl schen In diesem Fall ist es notwendig die defekte Sicherung zu finden und sie durch eine neue zu erset...

Страница 81: ...men Sie Befestigungsschraube O Ring und Messer ab Installieren Sie ein neues oder gesch rftes Messer in umgekehrter Reihenfolge Verwenden Sie neue unbenutzte M16 Sicherungsmuttern Vor dem Ersetzen des...

Страница 82: ...rfen Bauen Sie das gesch rfte Messer in umgekehrter Reihenfolge wieder ein Verwenden Sie neue unbenutzte M16 Sicherungsmuttern Vor dem Ersetzen des zweiten Messers drehen Sie den Messerhalter mit der...

Страница 83: ...berfl che schalten Sie den Motor ab und ziehen Sie den Schl ssel aus dem Z ndschloss Sichern Sie die Maschine gegen Bewegung Ersetzen Sie das Rad nicht wenn die Maschine nicht ausreichend in der angeh...

Страница 84: ...den 6 3 14 BERSICHT BER DAS DREHMOMENT DER SCHRAUBVERBINDUNGEN Lenkung Drehmoment M14 Mutter des Lenkungsbereichs 92 132 Nm M14 Muttern der Winkelstifte an der Lenkung 60 83 Nm Sicherung der Schrauben...

Страница 85: ...annrolle entfernen schmieren Drehzapfen der mittleren Vorderachse mit Schmiernippel Modell 92 EVO 4x4 ist mit selbstschmierenden Schiebeh lsen ausgestattet Winkelgelenke zur Verbindung der Zugstangen...

Страница 86: ...ggf anpassen Pr fen Sie ob die Bewegung des Riemens eventuell durch einen Fremdk rper verhindert wird Wenn ja entfernen Sie den Fremdk rper berpr fen Sie alle Riemen Verbogene oder gerissene Riemensc...

Страница 87: ...stand im Ausgleichsbeh lter und f llen Sie wenn n tig l nach Es gibt Lufteinschl sse in der hydraulischen Schaltung Maschine auf ebenem Boden einige Minuten lang vorw rts und r ckw rts fahren Kontakti...

Страница 88: ...verkauften Sachwerts nicht auf 2 Das technische Personal wird die Eingriffe im Rahmen der hierf r erforderlichen organisatorischen Ma nahmen schnellstm glich durchf hren 3 Zur Anforderung der Servicel...

Страница 89: ...und Muttern an Bereiten Sie den Motor f r die Lagerung gem Bedienungsanleitung f r den Betrieb und die Wartung des Motors vor Schmieren Sie alle Schmierstellen gem Schmierplan 6 4 Entfernen Sie die B...

Страница 90: ...fen um die Compliance aller auf den Markt gebrachten Produkte mit der technischen Dokumentation und den in den technischen Vorschriften enthalten Anforderungen zu gew hrleisten garantierter Schallleis...

Страница 91: ...ente Si quelque chose n est pas clair ou si vous avez des questions n h sitez pas contacter l un de nos centres de services quip s de mani re professionnelle o des experts qualifi s et confirm s seron...

Страница 92: ...base suivantes 1 2 1 Capot avec espace de rangement Le capot est une combinaison de couvercles en plastique et m tal qui contient l espace de rangement pour la batterie 2 Ch ssis avec pare choc Le ch...

Страница 93: ...T AUTRES TIQUETTES AVEC LES SYMBOLES UTILIS S SUR LA MACHINE 1 3 1 TIQUETTE D IDENTIFICATION DU PRODUIT Chaque tondeuse est marqu e avec une tiquette d identification du produit situ e sous le si ge P...

Страница 94: ...Tenir les personnes non autoris es une distance de s curit MAX 10 o Inclinaison maximum de travail u tiquettes l arri re de la machine 1 3 2c Attention Surface chaude Risque de br lures u tiquettes s...

Страница 95: ...8 5 0 4 5 0 9 0 5 Hauteur de coupe mm 50 100 Largeur de coupe mm 920 Dimensions des roues Avant 16x6 5 8 16x6 5 8 Arri re 20x10 0 8 20x10 0 8 Capacit r servoir d essence l 12 Type de carburant Essenc...

Страница 96: ...EN ISO 5395 1 EN ISO 5395 3 EN ISO 11201 Valeur globale des vibrations m s 2 selon EN ISO 5395 1 EN ISO 5395 3 si ge volant BS18 3000 88 4 0 23 2 38 vibrations totales av selon EN 1032 vibrations tran...

Страница 97: ...t annulera la garantie Respectez toutes les exigences li es la s curit incendie 2 4 Ne retirez pas les autocollants de s curit ou les tiquettes de la machine Ne restez pas proximit de la machine ou au...

Страница 98: ...r tez et teignez le carter de coupe et le moteur puis inspecter toute la machine notamment le m canisme de direction Si n cessaire effectuez les r parations avant de red marrer le moteur vitez dans la...

Страница 99: ...est n cessaire Ne pas changer de direction sur une pente sauf si cela est absolument n cessaire Faites attention aux trous aux racines et au terrain irr gulier Le terrain irr gulier peut faire retour...

Страница 100: ...es inflammables Il s agit de substances tr s inflammables dont les vapeurs sont explosives Ne pas fumer durant cette op ration Ne jamais d visser le bouchon du r servoir d essence et faire le plein d...

Страница 101: ...duit durant le transport D baller tous les ensembles emball s s par ment et inspectez les Le colis de base comprend Tondeuse autoport e Si ge 2 Cadre pliant en position repli e 3 Volant 4 Documentatio...

Страница 102: ...d branchement de la batterie d branchez toujours le p le n gatif de la batterie en premier Lors de la mise en marche de la batterie et lors de son entretien suivez les instructions du manuel de l util...

Страница 103: ...ir peut tre en surpression caus e par les vapeurs d essence Ins rez un entonnoir dans l orifice du r servoir de carburant et commencez verser le carburant avec le bidon Apr s le remplissage du r servo...

Страница 104: ...la palette de sorte que les roues de la machine puissent rouler dessus Si vous faites descendre la machine de la palette sans utiliser de rampes vous risquez d endommager la partie inf rieure de la m...

Страница 105: ...nnement 8 P dale de frein 9 P dale de verrouillage du diff rentiel 10 Levier de r glage d l vation de la plaque de tonte 11 Manette de gaz 12 Levier de d sengagement de la commande de d placement 13 L...

Страница 106: ...U MOTEUR Le compteur horaire du moteur affiche le nombre total d heures du moteur Appuyez sur la touche Mode pour commuter entre les fonctions de service suivantes TMR 1 compteur de parcours individue...

Страница 107: ...carter de coupe est d sactiv mais les lames tournent encore l indicateur clignote pendant 10 secondes environ 7 LEVIER DU FREIN DE STATIONNEMENT 1 2 Le frein de stationnement dispose de 2 positions En...

Страница 108: ...de coupe par rapport au sol Il poss de 4 positions de travail 50 60 75 100 mm qui correspondant une hauteur de coupe de 5 10 cm Plus le num ro de la position est lev plus la v g tation restante apr s...

Страница 109: ...t quip d une fonction de r gulateur de vitesse m canique qui est automatiquement d sactiv en appuyant sur la p dale de frein F Marche avant Le d placement du levier vers la lettre F correspond une vit...

Страница 110: ...son des exigences en quipement veuillez vous adresser un centre de service sp cialis pour faire effectuer cette op ration La machine ne doit pas tre utilis e vitesse enclench e si le levier de d rivat...

Страница 111: ...d engagement de la plaque de tonte n est pas allum Le levier de d placement est en position N neutre point mort Le conducteur est assis sur le si ge de la machine Une fois les conditions d crites resp...

Страница 112: ...u moteur 5 4 ACTIVATION ET D SACTIVATION DU CARTER DE COUPE 5 4 1 ACTIVATION DU CARTER DE COUPE D placez le levier des gaz en position MAX l aide du levier d ajustement de l l vation du carter de coup...

Страница 113: ...angement de direction de d placement avant arri re est possible uniquement apr s avoir d plac le levier de vitesse en position N et laiss le levier dans cette position pendant un court instant Si la m...

Страница 114: ...la machine c est dire que la direction vers le haut et le bas mais pas perpendiculairement la pente sur un terrain irr gulier local jusqu une inclinaison maximum de 20 Lors du travail sur une pente il...

Страница 115: ...QUE Contr le des contacts de s curit Contr le des faisceaux de c bles CIRCUIT HYDRAULIQUE V rifiez les fuites REFROIDISSEMENT DU MOTEUR liminez l herbe de la grille du moteur et de l chappement Nettoy...

Страница 116: ...e lubrification des goupilles FILTRE AIR Nettoyage Remplacement Selon la nature de l utilisation augmenter la fr quence LAMES DE COUPE V rifiez l tat et la fixation CARTER DE COUPE V rifiez l tat et l...

Страница 117: ...e pneu peut tre de 10 kPa u V RIFIEZ LE NIVEAU D HUILE DANS LE MOTEUR Stationnez la tondeuse autoport e sur une surface horizontale Ouvrez le capot et d visser le bouchon de l orifice de remplissage D...

Страница 118: ...lot de remplissage etc Avant de lavage stationnez la machine sur une surface r guli re appropri e Parties en plastique sur la machine nettoyez les l aide d une ponge et de l eau savonneuse 6 3 CONTR L...

Страница 119: ...e ne doit en aucun cas tre mise au rebut avec les autres d chets ni vers e dans les gouts les poubelles ou sur le sol u ENTRETIEN DU FILTRE AIR Ne laissez jamais le moteur tourner sans filtre air Il r...

Страница 120: ...ces de rechange 6 3 4 REMPLACEMENT D UN FUSIBLE Si un fusible est grill le moteur s teint imm diatement le carter de coupe s arr te et tous les t moins lumineux du tableau de bord s teigne Dans ce ca...

Страница 121: ...torique et la lame Installez une lame neuve ou aff t e en suivant l ordre inverse Utilisez des crous de blocage M16 neufs et jamais utilis s Avant de remettre la deuxi me lame tournez le support de l...

Страница 122: ...e en suivant l ordre inverse Utilisez des crous de blocage M16 neufs et jamais utilis s Avant de remettre la deuxi me lame tournez le support de lame de 180 manuellement 6 3 7 CARTER DE COUPE CONTR L...

Страница 123: ...T DES ROUES Avant le remplacement de l une des roues stationnez le tracteur sur une surface horizontale et rigide arr tez le moteur et retirez la cl du d marreur Immobilisez la machine Ne remplacez pa...

Страница 124: ...D ENSEMBLE DU COUPLE DE SERRAGE DES CONNEXIONS BOULONN ES Direction Couple crou M14 de segment de direction 92 132 Nm crous M14 des goupilles inclin es sur la direction 60 83 Nm Fixation des goupille...

Страница 125: ...ie de tension d monter lubrifier goupille de pivot d essieu avant central l aide d un mamelon de lubrification le mod le 92 EVO 4x4 est quip de manchon baladeur lubrifi vie articulations angulaires ra...

Страница 126: ...la hauteur de coupe r gl e et ajustez la si n cessaire V rifiez si le mouvement de la courroie n est pas entrav par un corps tranger Si c est le cas retirez le corps tranger V rifiez nouveau toutes le...

Страница 127: ...servoir d galisation et faites l appoint si n cessaire Il y a des bulles d air dans le circuit hydraulique conduisez la machine en marche avant et arri re sur un sol de niveau pendant plusieurs minute...

Страница 128: ...ossible dans les d lais conc d s par les n cessit s organisationnelles 3 Pour demander l assistance sous garantie il est n cessaire de pr senter au personnel agr le certificat de garantie ci dessous p...

Страница 129: ...les crous et les boulons Pr parez le moteur pour le stockage conform ment au manuel de l utilisateur pour l utilisation et l entretien du moteur Lubrifiez tous les points de lubrification conform ment...

Страница 130: ...mesures ont t prises pour assurer la conformit de tous les produits introduits sur march avec la documentation technique et les exigences contenues dans la r glementation technique le niveau d missio...

Страница 131: ...arimenti si rivolga senza esitazioni a uno tra i nostri centri di assistenza autorizzati dotati di tutte le idonee apparecchiature sparsi in tutta Europa La metteranno in contatto con consulenti dell...

Страница 132: ...ruppi di base 1 2 1 Cofano e vano della batteria Il cofano composto da un insieme di coperture di plastica e metallo che contengono il vano della batteria 2 Telaio con paraurti Il telaio e il paraurti...

Страница 133: ...HETTE CON I SIMBOLI UTILIZZATI SULLA MACCHINA 1 3 1 ETICHETTA DI IDENTIFICAZIONE DEL PRODOTTO Ogni trattorino tosaerba contrassegnato da un etichetta di identificazione del prodotto ubicata sotto il s...

Страница 134: ...distanza di sicurezza le persone non autorizzate MAX 10 o Max pendenza operativa u Etichette sul lato posteriore della macchina 1 3 2c Attenzione Superficie incandescente Pericolo di ustioni u Etichet...

Страница 135: ...9 0 5 Altezza di taglio mm 50 100 Larghezza di taglio mm 920 Dimensioni delle ruote Avanti 16x6 5 8 16x6 5 8 Retro 20x10 0 8 20x10 0 8 Capacit del serbatoio del carburante l 12 Tipo di carburante Ben...

Страница 136: ...SO 5395 1 EN ISO 5395 3 EN ISO 11201 Valore aggregato delle vibrazioni m s 2 secondo EN ISO 5395 1 EN ISO 5395 3 sedile volante BS18 3000 88 4 0 23 2 38 vibrazioni totali av secondo EN 1032 vibrazioni...

Страница 137: ...autorizzate possono determinare condizioni di lavoro pericolose e rendono nulla la garanzia Rispettare tutte le normative per la sicurezza antincendio 2 4 Non rimuovere dalla macchina gli adesivi e l...

Страница 138: ...a macchina Se si urta un oggetto solido occorre arrestare la macchina spegnere l elemento tagliaerba e il motore e quindi controllare l intera macchina in particolare meccanismo di sterzo Se occorre r...

Страница 139: ...zione 4x4 sulle pendenze con un gradiente massimo di 20 32 e solo verso l alto o verso il basso Per ulteriori informazioni 5 5 4 Occorre usare un estrema prudenza nell effettuare le curve Sterzare con...

Страница 140: ...hiuso Utilizzare la massima prudenza quando si lavora con benzina olio e altre sostanze infiammabili Si tratta di materiali facilmente infiammabili i cui fumi possono provocare esplosioni Non fumare d...

Страница 141: ...no Utilizzando un utensile adatto es un palanchino o un martello ecc rimuovere la cassa 1 e l imballaggio sulla macchina Ispezionare visivamente la macchina e gli assemblaggi per gli eventuali danni c...

Страница 142: ...re il vano nel cofano e allentare i bulloni sui terminali del polo della batteria Filo nero Applicare al polo positivo della batteria e fissare in posizione con il bullone Filo marrone Applicare al po...

Страница 143: ...mpimento del serbatoio Il carburante versato facilmente infiammabile Se fuoriesce carburante pulire accuratamente fino a quando sar asciutto Stoccare il carburante fuori dalla portata dei bambini Proc...

Страница 144: ...ioni per verificare che non vi siano perdite di olio Se si rilevano delle perdite informare la propria officina autorizzata 3 5 RIMOZIONE DELLA MACCHINA DAL PALLET Predisporre due scivoli d accesso e...

Страница 145: ...edale di bloccaggio del differenziale 10 Leva di regolazione del sollevamento dell elemento tagliaerba 11 Leva dell acceleratore 12 Leva di disinnesto del regolatore di velocit 13 Leva di avanzamento...

Страница 146: ...do implicito il numero totale di ore del motore Premendo il pulsante Modalit possibile passare gradualmente tra le seguenti funzioni di manutenzione TMR 1 contatore dei singoli giri Il valore viene az...

Страница 147: ...o Lampeggiante L elemento tagliaerba disattivato ma le lame stanno ancora ruotando l indicatore lampeggia per circa 10 secondi 7 LEVA DEL FRENO DI STAZIONAMENTO 1 2 La leva del freno di stazionamento...

Страница 148: ...0 75 100 mm dove l altezza di taglio corrispondente compresa tra 5 10 cm L altezza dell erba risultante dopo il taglio direttamente proporzionale al numero di posizione della leva inoltre presente 1 p...

Страница 149: ...velocit della macchina in entrambe le direzioni Nell impostazione di base munita di una funzione di controllo della velocit meccanica che viene disattivata automaticamente premendo il freno a pedale F...

Страница 150: ...ulle apparecchiature si prega di rivolgersi a un centro di assistenza specializzato per l esecuzione di questa procedura La macchina non deve essere utilizzata con il cambio non in folle se la leva di...

Страница 151: ...on acceso La leva di avanzamento in posizione N folle Il conducente seduto sul sedile della macchina Una volta soddisfatte le condizioni descritte avviare il motore come di seguito a Impostare la leva...

Страница 152: ...L ELEMENTO TAGLIAERBA Spostare la leva dell acceleratore sulla posizione MAX Utilizzare la leva di regolazione del sollevamento dell elemento tagliaerba per impostare la posizione operativa dell eleme...

Страница 153: ...cambio verso la direzione di marcia possibile operare un cambiamento di direzione in avanti indietro soltanto dopo aver spostato la leva del cambio sulla posizione N e lasciando la leva in questa pos...

Страница 154: ...in alto e in basso ma non sulla linea di contorno lavorare su un terreno locale ineguale fino a una pendenza massima di 20 Quando si lavora su pendenze occorre attenersi ai seguenti principi Prestare...

Страница 155: ...UITO IDRAULICO Controllare la tenuta RAFFREDDAMENTO DEL MOTORE Rimuovere l erba dalla griglia del motore e dal tubo di scarico Pulizia CINGHIA DI TRASMISSIONE TRAPEZOIDALE Controllare usura tensione C...

Страница 156: ...i perni FILTRO DELL ARIA Pulizia Sostituzione A seconda della natura dell uso con maggior frequenza LAME DI TAGLIO Controllare stato e fissaggio ELEMENTO TAGLIAERBA Controllare stato e fissaggio Per l...

Страница 157: ...atici posteriori 80 kPa La differenza tra uno pneumatico e l altro pu variare nella misura di 10 kPa u CONTROLLO DEL LIVELLO DELL OLIO NEL MOTORE Porre il trattorino tosaerba su una superficie piana A...

Страница 158: ...etti a sfere cuscinetti nel portalame nelle ruote o contro le parti in cui si trova olio filtro dell olio bocchettone di riempimento ecc Prima di procedere al lavaggio parcheggiare la macchina su una...

Страница 159: ...omestici e non versarlo in fognature nell immondizia o sul terreno u MANUTENZIONE DEL FILTRO DELL ARIA Non far mai funzionare il motore senza il filtro dell aria Altrimenti si rischia di usurare rapid...

Страница 160: ...4 SOSTITUZIONE DI FUSIBILI Se si brucia un fusibile il motore si spegne immediatamente l elemento tagliaerba si arresta e tutti gli indicatori del pannello degli strumenti si spengono In tale eventua...

Страница 161: ...ndo nella sequenza inversa Utilizzare nuovi dadi di bloccaggio M16 inutilizzati Prima di sostituire la seconda lama ruotare manualmente il supporto portalame di 180 Sostituire la seconda lama seguendo...

Страница 162: ...di bloccaggio M16 inutilizzati Prima di sostituire la seconda lama ruotare manualmente il supporto portalame di 180 6 3 7 ELEMENTO TAGLIAERBA CONTROLLO DELLA PULEGGIA DI TRASMISSIONE DELL ELEMENTO 6...

Страница 163: ...a ruota parcheggiare il trattore su una superficie solida e piana spegnere il motore e togliere la chiave dall accensione Bloccare la macchina per impedirne il movimento Non sostituire la ruota se la...

Страница 164: ...gravi 6 3 14 DESCRIZIONE GENERALE DELLE COPPIE DI SERRAGGIO Sterzo Torsione Dado M14 della sezione di sterzo 92 132 Nm Dadi M14 dei perni angolari sullo sterzo 60 83 Nm Fissaggio dei perni sull asse...

Страница 165: ...ore puleggia di tensionamento rimuovere lubrificare perno rotatorio centrale dell asse anteriore per mezzo di un ingrassatore il modello 92 EVO 4x4 dotato di boccole di scorrimento autolubrificanti gi...

Страница 166: ...regolarla Controllare se il movimento della cinghia sia impedito da un oggetto estraneo In tal caso rimuovere l oggetto Controllare nuovamente tutte le pulegge Le pulegge piegate o rotte possono dete...

Страница 167: ...re il livello dell olio nel serbatoio compensatore e rabboccarlo se necessario Sono presenti delle bolle d aria nel circuito idraulico far andare la macchina su un terreno piano avanti e indietro per...

Страница 168: ...il pi presto possibile nei limiti di tempo concessi da esigenze organizzative 3 Per richiedere l assistenza in garanzia necessario esibire al personale autorizzato il sotto riportato certificato di g...

Страница 169: ...ti Preparare il motore per il deposito secondo le indicazioni del manuale per l utente sul motore Lubrificare tutti i punti da oliare secondo il programma di lubrificazione 6 4 Togliere la batteria pu...

Страница 170: ...ormative tecniche ed sicura in condizioni di uso normale sono state assunti i provvedimenti per assicurare la conformit di tutti i prodotti immessi sul mercato con una documentazione tecnica e normati...

Страница 171: ...tact op met een van de meer offici le professioneel uitgeruste servicecentra die overal in Europa zijn gevestigd waar opgeleide en geteste experts klaarstaan om u te assisteren SYMBOLEN DIE IN DEZE HA...

Страница 172: ...en of als de gebruiker niet begrijpt hoe hij ze correct moet laten werken Let altijd op tijdens hun gebruik 1 2 HOOFDONDERDELEN VAN DE GAZONMAAIER Modellen van de gazonmaaier 92 EVO or 92 EVO 4x4 best...

Страница 173: ...De machine mag niet worden gebruikt in de versnelling als de by passhendel in de uitgeschakelde stand staat er is dan gevaar dat de overbrenging wordt beschadigd 1 3 PRODUCTIDENTIFICATIELABEL EN ANDE...

Страница 174: ...niet overdwars Houd onbevoegden op een veilige afstand MAX 10 o Maximale helling u Labels aan de achterzijde van de maaier 1 3 2c Voorzichtig Heet oppervlak Gevaar voor brandwonden u Labels van de he...

Страница 175: ...ruit achteruit km h 0 8 5 0 4 5 0 9 0 5 Maaihoogte mm 50 100 Maaibreedte mm 920 Wielafmetingen Voor 16x6 5 8 16x6 5 8 Achter 20x10 0 8 20x10 0 8 Capaciteit brandstoftank l 12 Brandstoftype Loodvrije b...

Страница 176: ...N ISO 5395 1 EN ISO 5395 3 EN ISO 11201 Vibratie totaalvalue m s 2 volgens EN ISO 5395 1 EN ISO 5395 3 stoel stuurwiel BS18 3000 88 4 0 23 2 38 totale vibratie av volgens EN 1032 vibratie overgedragen...

Страница 177: ...de buurt van het werkterrein van de machine Het is niet toegestaan technische modificaties aan de machine en haar accessoires Ongeautoriseerde modificaties kunnen leiden tot gevaarlijke werkcondities...

Страница 178: ...rs en voetpaden deze mogen niet in contact komen met de messen omdat dat kan leiden tot beschadiging van het maaimechanisme en het mechanisme van de machine Stop als u op een massief voorwerp botst en...

Страница 179: ...ngen Tractormaaiers kunnen worden gebruikt op hellingen van maximaal 10 17 en wanneer de 4x4 aandrijving wordt gebruikt op hellingen van maximaal 20 32 parallel aan de helling d w z omhoog en omlaag M...

Страница 180: ...voordat u de machine parkeert in een gesloten ruimte Wees extra voorzichtig met benzine olie of andere brandbare stoffen Dit zijn zeer brandbare stoffen en de dampen ervan zijn explosief Rook niet tij...

Страница 181: ...ijv een breekijzer of hamer enz de krat 1 en pak de machine uit Voer een visuele inspectie uit van de machine en de losse onderdelen en kijk naar beschadigingen die tijdens het vervoer kunnen zijn opg...

Страница 182: ...de draad vast met de bout Bruine draad Plaats deze op de pool van de accu en zet de draad vast met de bout 3 3d Wanneer u de draden anders vastzet dan hierboven wordt beschreven zal dat beschadiging v...

Страница 183: ...droog Bewaar brandstof buiten het bereik van kinderen Procedure voor het tanken van brandstof Draai de tankdop los Open de tanktop langzaam want er kan overdruk in de brandstoftank heersen die wordt v...

Страница 184: ...age ontdekt breng uw servicewerkplaats daarvan dan op de hoogte 3 5 DE MACHINE VAN DE PALLET AFRIJDEN Breng twee geschikte rijplanken in gereedheid en plaats ze naast de pallet zodat de wielen van de...

Страница 185: ...del parkeerrem 8 Rempedaal 9 Vergrendelingspedaal differentieel 10 Hendel voor de hoogteafstelling van het maaimechanisme 11 Gashendel 12 Ontkoppelingshendel cruise control 13 Rijhendel 14 Choke 15 Vr...

Страница 186: ...tor laat het totaalaantal uren zien dat de motor heeft gedraaid Door op de knop Mode te drukken kunt u geleidelijk overschakelen tussen de volgende onderhoudsfuncties TMR 1 ritteller U kunt de waarde...

Страница 187: ...DEL PARKEERREM 1 2 De hendel van de parkeerrem heeft twee posities In positie 1 is de rem niet ingeschakeld wanneer u de hendel in positie 2 hebt gezet en het rempedaal indrukt wordt de parkeerrem ing...

Страница 188: ...ortpositie staat kunt u het maaimechanisme niet inschakelen omdat in deze stand een veiligheidsschakelaar is ingebouwd Wanneer u rijdt zonder te maaien moet de hendel in de transportpositie staan De m...

Страница 189: ...van een koude motor CHOKE Een koude motor starten 15 BY PASSHENDEL VRIJE BEWEGING VAN DE ACHTERWIELEN De functie van de by passhendel is het uitschakelen van de transmissie naar de achterwielen en maa...

Страница 190: ...t Onder geen enkele omstandigheid werkt het beschermende frame als veiligheids beveiligingsfunctie voor de gebruiker Het opklapframe heeft drie posities 1 Werk 2 Onderhoud 3 Hulpfunctie voor het hante...

Страница 191: ...De rijhendel staat in de tand N Neutral Vrij De berijder zit in de stoel van de machine Start wanneer u aan de beschreven condities hebt voldaan de motor als volgt a Zet de hendel voor de hoogte afst...

Страница 192: ...chadigd kunnen raken 5 4 HET MAAIMECHANISME INSCHAKELEN EN UITSCHAKELEN 5 4 1 HET MAAIMECHANISME INSCHAKELEN Zet de gashendel in de stand MAX Stel met de hendel voor de hoogte afstelling van het maaim...

Страница 193: ...in de rijrichting U kunt de rijrichting pas wijzigen als u de versnellingshendel in de stand N hebt gezet en de hendel even in deze stand is blijven staan Als u dit doet terwijl de machine rijdt best...

Страница 194: ...llingen van maximaal 10 17 Met de machine van het model 92 EVO 4x4 kunt u omhoog en omlaag rijden maar niet dwars op de helling over lokaal ongelijk terrein met een helling van maximaal 20 Wanneer wer...

Страница 195: ...er veiligheid schakelaars Controleer kabel bundels HYDRAULISCH CIRCUIT Controleer op lekkages MOTORKOELING Verwijder gras uit het rooster van de motor en van de uitlaat Schoonmaken V SNAAR VAN DE AAND...

Страница 196: ...bruik vaker MAAIMESSEN Controleer conditie en bevestiging MAAIMECHANISME Controleer conditie en bevestiging Neem voor vervanging van alle onderdelen en voor reparaties waarvoor de machine moet worden...

Страница 197: ...80 kPa Het verschil in bandenspanning van de afzonderlijke banden mag zijn 10 KPa u CONTROLEER HET OLIEPEIL IN DE MOTOR Parkeer de tractormaaier op een horizontaal oppervlak Open de motorkap en draai...

Страница 198: ...Parkeer de machine voor u gaat wassen op een geschikte vlakke ondergrond Kunststof onderdelen van de machine reinig deze met een spons en water met een zeepoplossing 6 3 REGELMATIGE CONTROLES ONDERHOU...

Страница 199: ...olie wegdoen bij het huishoudelijk afval of de gebruikte olie door de afvoer of in de grond gieten u ONDERHOUD VAN HET LUCHTFILTER Laat de motor nooit draaien zonder een luchtfilter De motor zal dan...

Страница 200: ...Als een zekering doorslaat slaat de motor onmiddellijk af het maaimechanisme stopt en alle indicatorlampjes op het instrumentenpaneel zullen uitgaan U moet in dat geval uitzoeken welke zekering is doo...

Страница 201: ...ruik nieuwe ongebruikte M16vergrendelingsmoeren Draai voordat u het tweede mes vervangt de meshouder 180 met de hand Vervang het tweede mes volgens dezelfde procedure als die voor de vervanging van he...

Страница 202: ...Gebruik nieuwe ongebruikte M16 borgmoeren Draai voordat u het tweede mes vervangt de meshouder 180 met de hand 6 3 7 MAAIMECHANISME DE AANDRIJFPOELIE VAN HET MECHANISME CONTROLEREN 6 3 7 De poelie va...

Страница 203: ...wielen wisselt de tractor op een stevige vlakke ondergrond zet de motor uit en neem de sleutel uit het contact Zet de machine vast zodat deze niet kan rijden Wissel niet een wiel als de machine niet...

Страница 204: ...ders het risico bestaat van ernstige beschadiging 6 3 14 OVERZICHT VAN HET AANZETMOMENT VAN BEVESTIGINGEN VAN BOUTEN Stuurmechanisme Aanzetmoment M14 moer van stuurcomponent 92 132 Nm M14 moeren van d...

Страница 205: ...met een smeernippel spanwiel losnemen en smeren centrale fuseepen vooras met een smeernippel model 92 EVO 4x4 is voorzien van zelfsmerende glijkoppelingen hoekverbindingen van de stuurtrekstangen verw...

Страница 206: ...dig is Controleer of de snaar misschien in zijn bewegingen wordt belemmerd door een voorwerp Verwijder dit dan als dat het geval is Controleer alle snaren opnieuw Gedeukte of gescheurde poelies kunnen...

Страница 207: ...ng laat opkomen Controleer het oliepeil in de overlooptank en vul olie bij als dat nodig is Er zit lucht in het hydraulisch circuit rijd de machine enkele minuten heen en weer op een vlakke ondergrond...

Страница 208: ...een aanvraag tot technische assistentie onder garantie in te dienen dient u aan het bevoegde personeel het onderstaande garantiecertificaat te tonen voorzien van het stempel van de leverancier volled...

Страница 209: ...volgens de gebruikershandleiding voor de bediening en het onderhoud van de motor Smeer alle plaatsen die moeten worden gesmeerd en volg daarbij het schema voor de smering 6 4 Neem de accu uit maak de...

Страница 210: ...m naleving van alle producten die op de markt worden gebracht te garanderen met de technische documentatie en de eisen die in de techische voorschriften worden vermeld gegarandeerd emissieniveau van a...

Страница 211: ...guna disposici n no le resulta clara o tiene alguna duda no dude en ponerse en contacto con uno de los centros de servicio autorizados y equipados profesionalmente en toda Europa que contar n con expe...

Страница 212: ...o 92 EVO 4x4 constan de las siguientes secciones b sicas 1 2 1 Cubierta con espacio de almacenamiento La cubierta es un combinado de cubiertas met licas y de pl stico que incluye un espacio de almacen...

Страница 213: ...vocar da os a las transmisiones 1 3 ETIQUETA DE IDENTIFICACI N DEL PRODUCTO Y OTRAS ETIQUETAS CON S MBOLOS UTILIZADOS EN LA M QUINA 1 3 1 ETIQUETA DE IDENTIFICACI N DEL PRODUCTO Cada tractor cortac sp...

Страница 214: ...s personas no autorizadas MAX 10 o Inclinaci n de funcionamiento m xima u Etiquetas en la parte trasera de la m quina 1 3 2c Cuidado Superficie caliente Peligro de quemaduras u Etiquetas en la palanca...

Страница 215: ...4 5 0 9 0 5 Altura de corte mm 50 100 Ancho de corte mm 920 Dimensiones de la rueda frontal 16x6 5 8 16x6 5 8 trasera 20x10 0 8 20x10 0 8 Capacidad del dep sito de combustible l 12 Tipo de combustible...

Страница 216: ...EN ISO 5395 3 EN ISO 11201 Valor de vibraciones acumuladas m s 2 conforme a la norma EN ISO 5395 1 EN ISO 5395 3 asiento rueda de direcci n BS18 3000 88 4 0 23 2 38 vibraciones totales av seg n la no...

Страница 217: ...Los cambios no autorizados podr n conllevar condiciones de seguridad peligrosas y anular la garant a Cumpla todas las exigencias relativas a la seguridad antiincendios 2 4 No retire las pegatinas de...

Страница 218: ...a la plataforma de corte y al mecanismo de la m quina Si se registrase un impacto con un objeto r gido detenga y apague la plataforma de corte y el motor e inspeccione toda la m quina concretamente el...

Страница 219: ...32 y s lo en la direcci n de la l nea de ca da es decir hacia abajo V ase m s informaci n en el apartado 5 5 4 Cuando cambie de direcci n aumente su atenci n No encienda la m quina en una pendiente a...

Страница 220: ...s de aparcarlo en un lugar cerrado Preste mucha atenci n cuando trabaje con gasolina aceite y otras sustancias inflamables Estas sustancias son muy inflamables y sus humos son muy explosivos No fume d...

Страница 221: ...lo una palanca o un martillo retire la caja 1 y el paquete de la m quina Inspeccione visualmente la m quina y los ensamblajes para ver si hay da os que puedan haber sido ocasionados durante el transpo...

Страница 222: ...namiento de la cubierta y afloje los pernos de los terminales de los polos de la bater a Cable negro Coloque en el polo de la bater a y f jelo en su lugar con el perno Cable marr n Coloque en el polo...

Страница 223: ...tible derramado puede incendiarse f cilmente Si se derrama combustible s quelo completamente Guarde el combustible fuera del alcance de los ni os Procedimiento de relleno Abra la tapa del dep sito de...

Страница 224: ...s lugares en los que los elementos se conectan a las transmisiones Si descubre cualquier fuga informe a su centro de reparaci n 3 5 CONDUCIR LA M QUINA DESDE EL PALET Prepare dos rampas adecuadas y co...

Страница 225: ...de estacionamiento 8 Pedal de freno 9 Pedal de bloqueo del diferencial 10 Palanca de ajuste de altura de la plataforma de corte 11 Palanca del acelerador 12 Palanca de desactivaci n del control de cr...

Страница 226: ...ario del motor muestra impl citamente el n mero total de horas del motor Pulse el bot n de Modo para cambiar gradualmente entre las siguientes funciones de mantenimiento TMR 1 contador de trayecto ind...

Страница 227: ...segundos 7 PALANCA DEL FRENO DE ESTACIONAMIENTO 1 2 El freno de estacionamiento tiene dos posiciones En la posici n 1 el freno no est activo al cambiar a la posici n 2 mientras pulsa el pedal de freno...

Страница 228: ...ja en la posici n de transporte no es posible activar la plataforma de corte ya que el interruptor de seguridad est integrado en esta posici n Cuando se traslade sin cortar la palanca deber fijarse en...

Страница 229: ...ara arrancar un motor en fr o EST RTER Arrancar un motor en fr o 15 PALANCA DE BY PASS MOVIMIENTO LIBRE DE LAS RUEDAS TRASERAS La palanca de by pass sirve para desactivar la transmisi n de la direcci...

Страница 230: ...erda estabilidad y se caiga de lado El bastidor de protecci n no servir en ning n caso de funci n de seguridad protecci n para el operador El bastidor plegable tiene 3 posiciones 1 Trabajo 2 Mantenimi...

Страница 231: ...asta la posici n N d Mueva la palanca del acelerador hasta la m xima velocidad del motor e Tire del est rter f Arranque el motor poniendo la llave de encendido en la posici n de Arranque del motor Tra...

Страница 232: ...be sentarse en el asiento de la m quina la palanca de ajuste de la altura de la plataforma de corte no debe estar en la posici n de transporte 5 4 2 DESACTIVACI N DE LA PLATAFORMA DE CORTE Desactive l...

Страница 233: ...mismo tiempo ya que podr da ar la transmisi n El sistema est equipado con una funci n de desactivaci n autom tica de la plataforma de corte para desplazarse marcha atr s a una velocidad superior a 0 3...

Страница 234: ...siguientes instrucciones fundamentales Preste especial atenci n cuando opere en una cuesta Utilice siempre una velocidad de traslado inferior y regule la velocidad de trayecto moviendo la palanca de...

Страница 235: ...TO HIDR ULICO Comprobaci n de fugas ENFRIAMIENTO DEL MOTOR Retire el c sped de la rejilla del motor y del tubo de escape Limpieza CORREA DE DIRECCI N EN V Compruebe el desgaste la tensi n CORREA DE CO...

Страница 236: ...del tipo de uso m s frecuente CUCHILLAS DE CORTE Compruebe el estado y el apriete PLATAFORMA DE CORTE Compruebe el estado y el apriete Para la sustituci n de todas las piezas o para las reparaciones q...

Страница 237: ...s traseros 80 kPa La diferencia entre los neum ticos individuales debe ser de 10 kPa u COMPRUEBE EL NIVEL DE ACEITE DEL MOTOR Aparque el tractor cortac sped en una superficie horizontal Abra la cubier...

Страница 238: ...s en las que haya aceite filtro de aceite boquilla de aceite etc Antes de lavar la m quina ap rquela en una superficie nivelada Piezas de pl stico de la m quina limpie utilizando una esponja y con agu...

Страница 239: ...hacerse del aceite utilizado bajo ninguna circunstancia con sus otros residuos ni tirarlo por el desag e a la basura o al suelo u MANTENIMIENTO DEL FILTRO DE AIRE No deje nunca que el motor funcione s...

Страница 240: ...UN FUSIBLE Si un fusible est da ado el motor se apagar de inmediato la plataforma de corte se detendr y todas las luces de los indicadores del panel de mando se apagar n En dicho caso deber buscar el...

Страница 241: ...O y la cuchilla Instale una cuchilla nueva o afilada procediendo en orden contrario Utilice tuercas nuevas y no utilizadas de tipo M16 Antes de sustituir la segunda cuchilla gire el soporte de cuchil...

Страница 242: ...e en la plataforma de corte Instale la cuchilla afilada procediendo en orden contrario Utilice tuercas nuevas y no utilizadas de tipo M16 Antes de sustituir la segunda cuchilla gire el soporte de cuch...

Страница 243: ...una de las ruedas aparque el tractor en una superficie horizontal y r gida apague el motor y saque la llave del arranque Fije la m quina para evitar que se mueva No sustituya la rueda si la m quina no...

Страница 244: ...L DEL PAR DE APRIETE DE LAS CONEXIONES DE PERNOS Direcci n Par Tuerca M14 del segmento de direcci n 92 132 Nm Pernos M14 de las clavijas angulares de la direcci n 60 83 Nm Fijaci n de las clavijas en...

Страница 245: ...de tensionamiento retire y lubrique la clavija pivote del eje frontal central utilizando una boquilla de engrase el modelo 92 EVO 4x4 est equipado con manguitos deslizantes de auto lubricaci n las jun...

Страница 246: ...la si es necesario Compruebe que el movimiento de la correa no est obstaculizado por un objeto extra o En caso afirmativo retire el objeto extra o Vuelva a comprobar todas las correas Las poleas torci...

Страница 247: ...compensaci n y rell nelo si fuese necesario Existen bolsas de aire en el circuito hidr ulico conduzca la m quina sobre una superficie nivelada hacia delante y hacia atr s durante varios minutos P ngas...

Страница 248: ...s consecuencias de los defectos o vicios del objeto vendido 2 El personal t cnico actuar lo m s pronto posible dentro de los l mites impuestos por motivos organizativos 3 Para solicitar asistencia en...

Страница 249: ...as o gastadas y apriete todas las tuercas y pernos Prepare el motor de cara a su almacenamiento con arreglo al manual de usuario relativo al funcionamiento y al mantenimiento del motor Lubrique todos...

Страница 250: ...uro se han llevado a cabo las medidas oportunas para garantizar la conformidad de todos los productos presentados al mercado con la documentaci n t cnica y los requisitos incluidos en las normativas t...

Страница 251: ...zosta do niej do czona w przypadku sprzeda y maszyny W przypadku pyta lub niejasno ci skontaktuj si z jednym autoryzowanych doskonale wyposa onych centr w serwisowych w Europie zapewniaj cych pomoc pr...

Страница 252: ...rki 92 EVO oraz 92 EVO 4x4 sk adaj si z nast puj cych podstawowych element w 1 2 1 Maska i miejsce na przechowywanie Maska jest po czeniem element w z tworzyw sztucznych i metalu zawieraj cym miejsce...

Страница 253: ...ETYKIETY Z SYMBOLAMI ZAMIESZCZONE NA MASZYNIE 1 3 1 ETYKIETA IDENTYFIKACYJNA PRODUKTU Ka da kosiarka samojezdna jest oznaczona etykiet identyfikacyjn produktu znajduj c si pod siedzeniem kierowcy Dost...

Страница 254: ...r i w d ale nie w poprzek Nie dopuszcza w pobli e os b nieupowa nionych MAX 10 o Maksymalne nachylenie robocze u Etykiety z ty u kosiarki 1 3 2c Uwaga Gor ca powierzchnia Niebezpiecze stwo poparzenia...

Страница 255: ...zodu do ty u km h 0 8 5 0 4 5 0 9 5 Wysoko koszenia mm 50 100 Szeroko koszenia mm 920 Wymiary k Prz d 16x6 5 8 16x6 5 8 Ty 20x10 0 8 20x10 0 8 Pojemno zbiornika paliwa l 12 Typ paliwa Benzyna bezo owi...

Страница 256: ...5395 1 EN ISO 5395 3 EN ISO 11201 czna warto drga przy m s 2 dla EN ISO 5395 1 EN ISO 5395 3 siedzenie kierownica BS18 3000 88 4 0 23 2 38 ca kowita ilo drga av dla EN 1032 drgania przeniesione na ra...

Страница 257: ...ri w Wprowadzenie zmian bez zgody mo e spowodowa niebezpieczne warunki pracy oraz utrat gwarancji Nale y stosowa si do wszystkich zasad bezpiecze stwa odnosz cych si do po ar w 2 4 Nie wolno usuwa ost...

Страница 258: ...iwe nale y unika pracy na mokrej trawie Obni ona przyczepno mo e spowodowa po lizg kosiarki Nale y unika przeszk d np nag ych zmian nachylenia terenu row w itp kt re mog spowodowa przewr cenie si masz...

Страница 259: ...y teren mo e by przyczyn przewr cenia si maszyny W wysokiej trawie mog znajdowa si niewidoczne przeszkody Dlatego nale y usun wszystkie przeszkody z koszonego terenu przed rozpocz ciem pracy Nale y wy...

Страница 260: ...ysoce atwopalne a ich opary s wybuchowe Nie pali tytoniu podczas pracy Nie wolno odkr ca korka wlewu paliwa i nie wolno uzupe nia paliwa kiedy silnik jest uruchomiony b d ciep y lub je li maszyna znaj...

Страница 261: ...trolowa maszyn i jej zespo y pod k tem uszkodzenia podczas transportu Odpakowa wszystkie elementy zapakowane osobno i skontrolowa Podstawowy komplet zawiera nast puj ce elementy Kosiarka samojezdna Si...

Страница 262: ...y zawsze najpierw od czy przew d ujemnego bieguna Przy pod czaniu akumulatora i wprowadzaniu do dzia ania oraz konserwacji nale y post powa zgodnie z instrukcj obs ugi akumulatora Jednocze nie nale y...

Страница 263: ...niewa w zbiorniku mog znajdowa si opary benzyny pod ci nieniem Nale y w o y lejek do wlewu paliwa i rozpocz nalewanie paliwa z kanistra Po uzupe nieniu paliwa nale y zawsze wytrze korek oraz przestrze...

Страница 264: ...rzygotowa odpowiednie rampy i umie ci je obok palety aby maszyna mog a po nich zjecha Je li zje d anie z palety b dzie si odbywa bez ramp istnieje niebezpiecze stwo uszkodzenia maszyny od spodu a w sz...

Страница 265: ...eda hamulca 9 Peda blokady mechanizmu r nicowego 10 D wignia ustawiania podniesienia mechanizmu tn cego 11 D wignia przepustnicy 12 D wignia od czania tempomatu 13 D wignia kierunku jazdy 14 Ssanie 15...

Страница 266: ...godzin pracy silnika wskazuje ca kowit ilo godzin pracy silnika Nale y nacisn przycisk Mode Tryb aby prze cza pomi dzy nast puj cymi funkcjami TMR 1 licznik dzienny Wyzerowanie nast puje po przytrzym...

Страница 267: ...gnia hamulca postojowego posiada dwie pozycje W pozycji 1 hamulec nie jest aktywny Kiedy zostanie przestawiona na pozycj 2 gdy naci ni ty jest peda hamulca hamulec postojowy zostanie zaci gni ty Nadep...

Страница 268: ...stanie ustawiona na pozycj do transportu nie ma mo liwo ci w czenia mechanizmu tn cego poniewa pozycja ta jest wyposa ona w zabezpieczenie Podczas jazdy gdy koszenie nie jest wykonywane d wignia musi...

Страница 269: ...znie ustawia si za pozycj N 14 SSANIE Aby uruchomi zimny silnik SSANIE Uruchomienie zimnego silnia 15 D WIGNIA OD CZANIA WOLNY RUCH TYLNYCH K D wignia od czania s u y do od czania nap du tylnych k aby...

Страница 270: ...dojdzie do utraty stabilno ci i przewr cenia si maszyny na bok W adnym przypadku rama ochronna nie s u y jako zabezpieczenie ochrona operatora Sk adana rama posiada 3 pozycje 1 Pozycja robocza 2 Pozy...

Страница 271: ...silnik zgodnie z opisem poni ej a Ustawi d wigni pozycji mechanizmu tn cego na pozycj do transportu b Przestawi prze cznik mechanizmu tn cego na pozycj DEACTIVATED WY c Przestawi d wigni kierunku jazd...

Страница 272: ...zycj MAX Za pomoc d wigni regulacji wysoko ci mechanizmu tn cego ustawi wysoko koszenia Ustawi pozycj prze cznika mechanizmu koszenia na pozycj ACTIVATED W Warunki w czenia mechanizmu tn cego kierowca...

Страница 273: ...zek adni Uk ad jest wyposa ony w automatyczne od czanie mechanizmu tn cego do cofania dzia aj ce przy pr dko ci powy ej 0 3 m s oko o 1 km h W razie zamierzonego i kontrolowanego cofania z w czonym me...

Страница 274: ...dy za pomoc przestawienia d wigni kierunku jazdy Nale y zawsze je dzi prostopadle do linii konturu terenu tj w g r i w d Jazda w kierunku konturu terenu jest dozwolona pod warunkiem zachowania szczeg...

Страница 275: ...ecze stwa Kontrola wi zek przewod w UK AD HYDRAULICZNY Kontrola pod k tem wyciek w UK AD CH ODZENIA SILNIKA Usun traw z kraty wlotu powietrza do silnika i z uk adu wydechowego Czyszczenie NAP DOWY PAS...

Страница 276: ...O Kontrola smarowanie sworzni FILTR POWIETRZA Czyszczenie Wymiana W zale no ci od stylu u ytkowania maszyny cz ciej OSTRZA TN CE Kontrola stanu i zamocowania MECHANIZM TN CY Kontrola stanu i zamocowan...

Страница 277: ...a R nica ci nienia pomi dzy poszczeg lnymi oponami mo e wynosi 10 KPa u KONTROLA POZIOMU OLEJU SILNIKOWEGO Kosiark nale y umie ci na poziomej powierzchni Nale y otworzy mask i odkr ci korek wlewu olej...

Страница 278: ...myciem nale y zaparkowa maszyn na r wnej powierzchni Elementy maszyny z tworzyw sztucznych umy g bk i wod z myd em 6 3 REGULARNE KONTROLE CZYNNO CI KONSERWACYJNE I REGULACJE MASZYNY 6 3 1 AKUMULATOR P...

Страница 279: ...ni do mieci u KONSERWACJA FILTRA POWIETRZA Silnik nie mo e pracowa bez filtra powietrza Spowoduje to szybkie zu ycie silnika Konserwacj filtra powietrza nale y przeprowadzi zgodnie z instrukcjami poda...

Страница 280: ...hanizm tn cy si zatrzyma a wszystkie wska niki na panelu instrument w zgasn W takim wypadku nale y znale spalony bezpiecznik i wymieni go na nowy Nie wolno wymienia przepalonego bezpiecznika na bezpie...

Страница 281: ...ezpieczaj cej M16 Przed wymian drugiego ostrza obr ci uchwyt ostrza r k o 180 Drugie ostrze nale y wymieni wykonuj c tak sam procedur jak przy wymianie pierwszego ostrza Podczas ponownego monta u ostr...

Страница 282: ...ikow os on W celu przeprowadzenia czyszczenia kontroli i regulacji os on mo na zdj wykr caj c dwie ruby po jej bokach Przed ka dym u yciem nale y skontrolowa rub mocuj c ko a pasowego ruba powinna by...

Страница 283: ...k adni poniewa mo na j uszkodzi Nale y podnosi maszyn do czasu gdy ko o kt re ma zosta wymienione nie b dzie dotyka pod o a Nale y zdj os on z ko a Za pomoc odpowiedniego rubokr ta nale y usun pier ci...

Страница 284: ...tn cy Nakr tka M10 napinaj cego ko a pasowego 33 48 Nm Nakr tka M20 uchwytu ostrza 250 300 Nm Nakr tka M16 mocuj ca ostrze w uchwycie 150 200 Nm ruba M12x30 na kole pasowym mechanizmu tn cego 60 80 Nm...

Страница 285: ...owe napinaj ce zdemontowa nasmarowa centralny sworze obrotowy przedniej osi za pomoc smarowniczki model 92 EVO 4x4 jest wyposa ony w ko nierze samosmaruj ce z cza k towe krzy ak w uk adu kierowniczego...

Страница 286: ...est blokowany obcym przedmiotem Je li tak usun przedmiot Powt rnie skontrolowa wszystkie ko a pasowe Wygi te lub uszkodzone ko o pasowe mo e by przyczyn problem w Wymieni w razie potrzeby Sprawdzi wew...

Страница 287: ...adzie hydraulicznym znajduje si powietrze je dzi maszyn w prz d i w ty przez kilka minut Skontaktowa si z centrum serwisowym Maszyna traci moc podczas jazdy pod g r Je li maszyna pracuje pod du ym ob...

Страница 288: ...wymagania organizacyjne zawsze najszybciej jak to mo liwe 3 Aby skorzysta z naprawy gwarancyjnej k o n i e c z n e j e s t p r z e d s t a w i e n i e autoryzowanym pracownikom obs ugi p o n i s z e j...

Страница 289: ...e cz ci i dokr wszystkie poluzowane ruby i nakr tki Przygotowa silnik do przechowywania zgodnie z instrukcj obs ugi silnika Nasmarowa punkty smarowania zgodnie z diagramem smarowania 6 4 Wyj i wyczy c...

Страница 290: ...nia zosta y podj te odpowiednie kroki aby zapewni zgodno wszystkich produkt w wprowadzanych na rynek z dokumentacj oraz zarz dzeniami technicznymi gwarantowany poziom emisji mocy akustycznej LWA G wyn...

Страница 291: ......

Страница 292: ...t w hrend seiner gesamten Lebensdauer begleiten F ATTENTION Le manuel doit accompagner la machine pour toute sa vie I ATTENZIONE Questo manuale deve accompagnare la macchina durante tutta la sua vita...

Отзывы: