background image

E–50

Chapter 9: Problem Solving

Why Paper Jams Occur

Reason: 

The paper tray is overloaded.

Corrective Action: 

Do not fill the tray above the PAPER FULL mark.

Reason: 

Paper is too heavy, too light, or contains excess cotton content.

Corrective Action:

 Switch papers and use the recommended stock.

Reason: 

Paper is too moist or too dry, causing missfeeds and imaging

problems.

Corrective Action:

 Store paper in average humidity, reseal opened reams. In

areas of extreme dryness or humidity, do not leave paper in the tray over-
night.

Reason: 

Rear paper exit tray may not be fully extended.

Corrective Action:

 Check to be sure that the rear exit tray is fully extended.

Reason: 

Rear exit tray was lowered while a job was printing.

Corrective Action: 

Resend the print job after lowering the rear exit tray.

Reason: 

Paper tray was opened while paper was feeding through the duplex

feeder (optional on OKIPAGE 20).

Corrective Action: 

Remove the jammed sheet from the duplex feeder, then

reinstall the paper tray and  resend the print job.
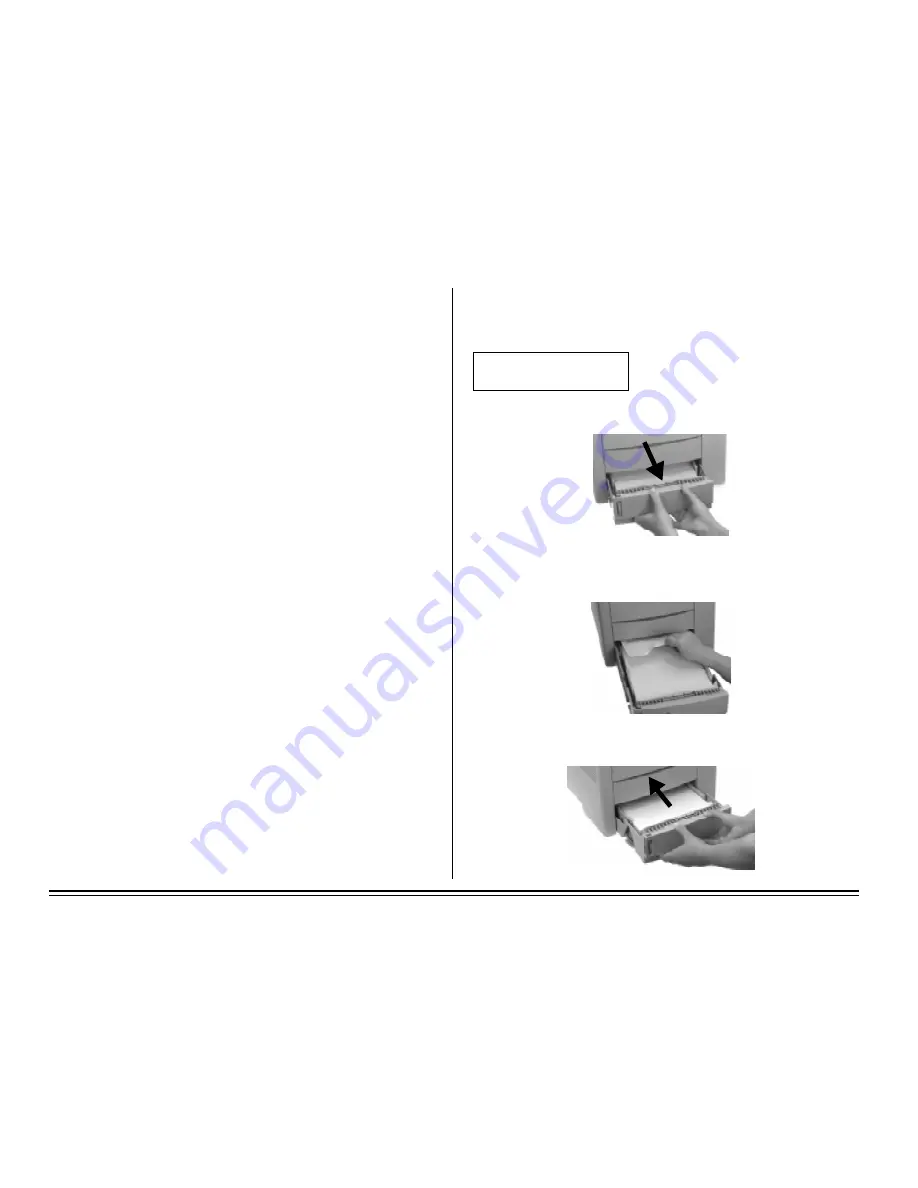
Clearing Paper Jams

Clearing a Paper Input Jam

PAPER INPUT JAM
CHECK TRAY1

1. Slide out the paper tray.

2. Remove the sheet that did not feed, then inspect the remaining sheets to

see that they are not wrinkled or stuck together.

3. Close the paper tray.

Содержание OKIPAGE 20

Страница 1: ...OKIPAGE 20 20DX User s Guide OKIDATA...

Страница 2: ...T are registered trademarks and OKILAN is a trademark of Oki Electric Industry Company Ltd OKIDATA marque d pos e de Oki Electric Industry Company Ltd marca registrada Oki Electric Industry Company Lt...

Страница 3: ...Serial Cable 11 RS232 C Serial Interface 11 Serial Mode 11 Serial Interface Pin Assignments 11 Connect to Power 12 Check the Menu Model 20DX Only 12 Print the Demo Page 12 Install the Printer Softwar...

Страница 4: ...figurations 42 Chapter 8 Maintenance 43 General Consumables Information 43 The Toner Cartridge Type 7 43 Toner Cartridge Life 43 The Image Drum Type 7 43 Image Drum Life 43 Replacing the Toner Cartrid...

Страница 5: ...t contact an electrician to have the outlet replaced Do not use an adapter to defeat the grounding The printer must be installed near a power outlet which remains easily accessible To avoid damaging t...

Страница 6: ...the standard warranty OKI On Site If you experience a malfunction of your Okidata printer and the problem can not be resolved over the phone this program offers you repair of your printer right at you...

Страница 7: ...tion which can be determined by turning the equipment off and on the user is encouraged to try to correct the interference by one or more of the following measures Reorient or relocate the receiving a...

Страница 8: ...wn expense It is the responsibility of the user to obtain the required shielded cable in order to ensure compliance of this equipment with FCC regulations Changes or modifications not expressly approv...

Страница 9: ...printer from the plastic bag 3 Lift up the corner of the protective film and peel it off the control panel The accessories As you unpack the accessories please save the packing material in the event y...

Страница 10: ...ional DuplexFeeder OKIPAGE 20DX DuplexFeeder Rear Paper Exit IEEE 1284 Parallel Interface RS232 C Serial Interface PowerCordSocket Getting to Know Your Printer Front View Control Panel FrontFeeder Top...

Страница 11: ...m cartridge Caution Be careful not to touch the image drum s shiny green sur face 3 Lift out the image drum and remove the protective paper 4 Remove the tape and shipping insert from the image drum an...

Страница 12: ...cartridge into the toner well inserting the recess in the end of the toner cartridge over the tab on the image drum 4 Lower the right side of the toner cartridge aligning the slot in the car tridge w...

Страница 13: ...only Finish Smooth non textured Copier type paper or paper with a Sheffield rating of 100 to 250 Composition 100 wood pulp or low cotton content Note Most papers have some cotton or rag content Avoid...

Страница 14: ...paper jams 3 Fan a stack of paper up to 530 sheets of 20 lb paper and place it in the tray under the tabs Do not fill above the PAPER FULL marks 4 Push the tray into the printer until it locks The Pa...

Страница 15: ...Store your paper in a static free environment Ideally store paper at a constant temperature of 70 F 21 1 C with less than 50 humidity Discard the top sheet from each ream of paper before loading it in...

Страница 16: ...use the top paper exit 1 Lift out the paper catcher and pull it toward the front of the printer until it stops 2 Flip up the extender RearPaperExit Use rear exit when printing on heavy paper envelopes...

Страница 17: ...ghten the screws Caution Be sure not to over tighten the screws this could damage the screw posts on your computer IEEE1284ParallelInterface Parallel cable requirements Cable must be shielded with twi...

Страница 18: ...a h C d n G s i s s a h C d n G s i s s a h C d n u o r g s i s s a h C 8 1 V 5 r e t n i r p m o r F h g i H c i g o L l a r e h p i r e P h g i H c i g o L l a r e h p i r e P h g i H c i g o L l a...

Страница 19: ...ial interface settings on your printer and computer must match To change printer settings enter the Level 2 menu press ON LINE to place the printer off line then press MENU 1 Menu 2 for 2 seconds unti...

Страница 20: ...nu 2 twice DUPLEX PRINTING displays 5 Make sure the second line of the display reads ON If not press the ENTER button then Reset then ENTER ON displays 6 Press ON LINE to exit the menu Print the Demo...

Страница 21: ...printer back on line Control Panel Lights The lights indicate the printer status READY Light Amber On Printer is on line ready to receive data Off Printer is off line unable to receive data initializi...

Страница 22: ...Generating a Drum Cleaning Page in Chapter 8 Press hold Clears error condition and returns printer on line Press In Menu Mode advances to the next item Also used with Recover to generate a drum cleani...

Страница 23: ...menu only when your software does not let you select features or when you are setting printer features that your software does not control Printing the Main Menus To print a list of the menu items and...

Страница 24: ...ou see the selection you want 5 Press ENTER Power Save to set a selection as the default An asterisk appears to indicate the new default setting 6 Repeat steps 3 through 5 until you have made all the...

Страница 25: ...y appears if appropriate optional accessory is installed Select paper source AUTO TRAY SWITCH OFF ON Notes ON When paper tray printer automatically switches to the optional Paper Expansion Tray if ins...

Страница 26: ...in the menu when the optional Paper Expansion Tray is installed Light to Heavy weight values are same as specified for Tray 1 TRAY 3 appears if option is installed LIGHT MEDIUM LIGHT MEDIUM MEDIUM HEA...

Страница 27: ...Nor ISO 61 Nor ISP 69 Fre ISO 84 Por ISO 85 Spa German Spanish ISO Dutch Roman Ext ISO Swedish1 ISO Swedish2 ISO Swedish3 IBM 437 IBM 850 IBM 860 IBM 863 IBM 865 PC Set1 PC Ext US PC Ext D N PC Set2 U...

Страница 28: ...SO Swedish3 UN Math UN Int l UN US PS Math PS Text Math 8 Pi Font MS Publish Win 3 0 DeskTop Win 3 1 L1 MC Text PC 852 Win 3 1 L5 Win 3 1 L2 CWI Hung PC 857 TK ISO L2 ISO L5 PC 8 TK Kamenicky Hebrew N...

Страница 29: ...after you press ENTER in step 3 press MENU 1 Menu 2 to advance to the next selection before proceeding to step 4 Summary of Level 2 Categories PRINT MODE MEMORY USAGE AUTO OPERATION DARKNESS CONTROL P...

Страница 30: ...r paper to be loaded in the Manual Feeder before cancelling the print job DARKNESS CONTROL DARKNESS 0 1 2 2 1 Notes Set print density darkness Negative values lighten print positive values darken prin...

Страница 31: ...r with earlier computers BI DIRECTION ENABLE DISABLE Notes ENABLE Select Bi directional parallel communication Compatible Nibble ECP DISABLE Bi directional communi cations are NOT supported I PRIME OF...

Страница 32: ...must press the FORM FEED Print Demo button to print the page To exit hex dump mode turn off the printer DRUM CNT RESET Note Use this to reset the drum counter after replacing and only after replacing...

Страница 33: ...lation 3RD TRAY 9 Range 1 to 16 Notes Applies only when two optional Paper Expansion Trays are installed Sets the priority of the second optional tray in the HP PCL 6 emulation FRONT 4 Range 1 to 16 N...

Страница 34: ......

Страница 35: ...down the sides and squared off flaps envelopes with v type flap are not recommended Use envelopes with a smooth even surface that are designed for laser printers no metal clasps snaps windows or self...

Страница 36: ...tory default then press ENTER e Press MENU 1 Menu 2 display reads PAPER FEED f Press Reset until the display reads FRONT TRAY then press ENTER to engage the setting an Asterisk will appear next to FRO...

Страница 37: ...er Setting up Manual Feed for StandardWeight Paper 1 In your software program a Enter the printer setup menu b Select Manual Feed c Select the paper size and orientation 2 Lower the printer s Manual F...

Страница 38: ...size d Select landscape orientation 2 Lower the rear paper exit tray and pull out the rear exit extender 3 Lower the Front Feeder 4 Flip out the manual feed tray then pivot out the extender 5 Adjust t...

Страница 39: ...ng Setting up to Print Labels 1 In your software program a Enter the printer setup menu b Select Manual Feed c Select the label sheet size 2 Lower the rear paper exit tray and pull out the rear exit e...

Страница 40: ...ur software program a Enter the printer setup menu b Select Manual Feed c Select the transparency size 2 Lower the rear paper exit tray and pull out the rear exit extender 3 Lower the Front Feeder 4 F...

Страница 41: ...ter setup menu b Select Manual Feed c Select the media size 2 Lower the rear paper exit tray and pull out the rear exit extender 3 Lower the Front Feeder 4 Flip out the tray then pivot out the extende...

Страница 42: ...n 7 Press ENTER to engage the ON selection An asterisk appears next to ON 8 Press ON LINE to exit the Menu Mode Important Paper tray size settings in your application software and in the OKIPAGE 20 So...

Страница 43: ...ter 3 Click Options 4 Select the duplex print method Long Side portrait printing Short Side landscape printing 5 Click OK 6 Click Close and send the print job Duplex Printing Windows 3 1x The duplex p...

Страница 44: ...ck Duplex 5 Select the duplex method you wish to use as the default 6 Click OK 7 Click OK Duplex Printing Windows NT 4 0 The duplex print options are in the Document Properties dialog box Example In W...

Страница 45: ...on the second line of the display then press ENTER Power Save The Typeface List prints Summary of Available Fonts Fixed Scalable Fonts Fixed spaced scalable fonts Courier and Letter Gothic are availab...

Страница 46: ...aramond Halbfett Font 26 Garamond Kursive Font 27 Garamond Kursiv Halbfett Font 28 Marigold 61 Symbol Sets Font 29 Albertus 61 Symbol Sets Albertus Font 30 Albertus Extra Bold Font 31 Arial 27 Symbol...

Страница 47: ...Code fonts can be printed easily from WORD for Windows and other Windows applications Symbol Sets Your printer provides 90 special sets of characters for technical legal and foreign language uses as...

Страница 48: ......

Страница 49: ...dditional 530 sheet paper tray If desired a second Paper Expansion Tray can be added to triple the paper capacity to 1 590 sheets Duplex Feeder P N 70033301 Converts the OKIPAGE 20 printer into an OKI...

Страница 50: ...ble RAM SIMMs are available to upgrade the printer s memory in the following sizes 4 MB SIMM Okidata Part 70028801 8 16 and 32 MB SIMMs commercially available 72 pin 60 ns FPM Non parity SIMM Configur...

Страница 51: ...toner cartridge you place in your printer will only produce between 2500 and 3500 sheets This is normal as the new image drum reservoir and developing roller system must saturate with toner Chapter 8...

Страница 52: ...e grey lock lever toward the front of the printer until it stops 3 Lift out and discard the used toner cartridge in accordance with local regulations 4 Remove the toner cartridge from the foil package...

Страница 53: ...e to light either by placing it in the light shield bag supplied with the printer or by placing a sheet of paper over it 10 Use the lens cleaner supplied in the new toner kit to clean the LED array 11...

Страница 54: ...m cartridge Avoid touching the green drum surface Be careful not to set the cartridge down on anything that might scratch the surface of the drum Keep the drum from exposure to direct sunlight and don...

Страница 55: ...ss in the end of the toner cartridge with the tab on the image drum then lower the right side of the toner cartridge aligning the slot in the end of the toner cartridge with the ridge in the image dru...

Страница 56: ...te An extra LED cleaning pad is provided with each toner cartridge Clean the LED array between toner changes if faded vertical stripes appear Generating a Drum Cleaning Page If you experience print qu...

Страница 57: ...ges affected by the jam Paper Jam Messages PAPER INPUT JAM Paper jammed as it was being fed in from the paper tray or other source PAPER FEED JAM Paper jammed somewhere between the input and the paper...

Страница 58: ...r paper exit tray may not be fully extended CorrectiveAction Check to be sure that the rear exit tray is fully extended Reason Rear exit tray was lowered while a job was printing CorrectiveAction Rese...

Страница 59: ...r Feed Jam PAPER FEED JAM CHECK TRAY1 1 Press OPEN and lift the cover 2 Lift out the image drum cartridge Careful Avoid touching the shiny green drum area and place it on a smooth flat surface Caution...

Страница 60: ...paper will not release try carefully pulling it out from inside the printer 4 Close the printer cover Clearing Duplex Feeder Paper Jams Clearing Duplex Feeder Input Jams DUPLEX INPUT JAM REMOVE THE P...

Страница 61: ...Close the printer cover Clearing Duplex Feeder Jams 1 2 DUPLEX FEED JAM1 DUPLEX FEED JAM2 REMOVE THE PAPER REMOVE THE PAPER 1 Remove the paper tray 2 Remove the jammed sheet from the back of the prin...

Страница 62: ...tions Message CHANGE DRUM Meaning Appears on second line of display to indicate that the drum is near 90 of life Change drum and reset drum counter Note If the drum counter is not reset when you repla...

Страница 63: ...write down the error number nn and contact your service provider Message ERROR CONTROLLER nn aaaaaaaa Meaning Controller error nn exception code aaaaaaaa error address Call Technical Support or a Ser...

Страница 64: ...GE 20 appears only if optional duplex feeder is installed ttttt paper tray selected Message ON LINE xxx Mmmmm ttttt Meaning Ready to receive data xxx emulation Mmmmm SIMPLEX or DUPLEX on OKIPAGE 20 ap...

Страница 65: ...rioration Message TONER LOW Meaning Appears on second line of display to indicate that toner is running out About 100 more pages can be printed after this message first appears Message TONER SENSOR Me...

Страница 66: ...each page Reason Dropout caused by using cotton bond paper in high humidity Moisture has affected paper Solution Change to a different type of paper or use a dehumidifier check toner Vertical white s...

Страница 67: ...er cartridge Reason Paper used is not designed for laser printers Solution Switch to a recommended paper Reason LED array is dirty Solution Clean LED array Bold characters and dark lines are smeared R...

Страница 68: ...thick paper Software Problems Most printer features are controlled by your software application For more information see your software documentation or contact your software vendor Here are solutions...

Страница 69: ...ents Reason Command sent is not a true printer command generally because the ESC character was not sent Solution Before sending control codes through an application make sure the ESC character can be...

Страница 70: ...er is on line Garbage prints Reason Incorrect cable configuration Also see Software Problems Solution Check cable signal continuity and length Printer freezes or displays error message when computer i...

Страница 71: ...24 hours a day seven days a week Please be sure that you are calling from a telephone close to your printer so you can describe your problem accu rately Agents can assist you with Installation of your...

Страница 72: ...809 4948 Tel 1 800 809 4948 Fax 1 609 222 5347 Canada Okidata 2735 Matheson Blvd East Unit 1 Mississauga Ontario L4W4M8 Tel 905 238 4265 Fax 905 238 4427 Purchasing Supplies Before you order know your...

Страница 73: ...rJet 5 PCL5e HP LaserJet 5 PCLXL IBM Proprinter II Epson FX Auto Emulation Switching Appendix B Specifications Typefaces Bitmap Line Printer OCR A OCR B Scalable Fixed Courier Letter Gothic Proportion...

Страница 74: ...Hz 2 Power Idle 95 watts Operating 350 watts Peak 820 watts Power Save Mode 25 watts Physical Specifications Width 14 4 inches 366 mm Depth 18 2 inches 462 mm Height 13 inches 331 mm Weight OKIPAGE 2...

Страница 75: ...her the Adobe PostScript SIMM Kit or the Flash ROM SIMM See Chapter 7 for ordering information on these accessories Installing SIMMs To install SIMMs in the printer 1 Turn the printer off 2 Unplug the...

Страница 76: ...ft to right b Insert the gold metallic contact edge of the SIMM into the socket at about a 45 angle with the notched corner of the SIMM at the bottom Push in until the gold contacts are fully inserted...

Страница 77: ...bs on the metal plate into the slots on the printer housing then swing it up into place and replace the two mounting screws 10 Replace the side panel tabs go in slots you ll need to move the cover hin...

Страница 78: ...Press the PAPER SIZE Print Menu button for 2 seconds PRINT MENU displays then the menu prints c Check the top of the menu printout to verify that the SIMMs you installed appear Page Memory Installed w...

Страница 79: ...nder this Limited Warranty contact your OKIDATA Authorized Dealer authorized third party service provider or OKIDATA A written receipt for the product showing the date of purchase dealer s name and se...

Страница 80: ...Colombia Texins S A Tel 571 218 5300 Fax 571 236 2914 Venezuela MAI de Venezuela S A Tel 782 78 11 Fax 02 781 9390 Brazil Oki Data do Brasil Ltda Tel 5511 5589 1518 5511 5584 0267 NYTEK Rua Pe Franci...

Страница 81: ...Black 5 7 by weight CAS 1333 86 4 OSHA TWA 3 5 mg m3 ACGIH TLV 3 5 mg m3 Paraffin Wax less than 3 by weight CAS 8002 74 2 OSHA TWA 2 mg m3 for total dust ACGIH TLV 2 mg m3 for total dust Amorphous Fum...

Страница 82: ...p Small Spills Remove sources of ignition Clean up spill with wet cloth Large Spills Remove sources of ignition Wear protective gear respirator rubber gloves goggles see below Clean up spill with scoo...

Страница 83: ...uage 13 Display messages 56 Display messages printer 55 57 Drum cleaning page 48 Drum counter resetting 47 Duplex feeder 41 jams 53 54 paper jams 52 Duplex printing 35 36 E ECP 10 Electrical specifica...

Страница 84: ...7 Multipurpose feeder 41 N Network card 41 Nibble 10 O OCR fonts 38 Okidata customer information center 63 representatives 63 faxable facts 63 internet home page 64 service centers 64 72 On line butto...

Страница 85: ...Specifications 65 66 electrical 66 environmental 65 general 65 paper 5 paper handling 65 physical 66 typefaces 65 Storing paper 7 Supplies purchasing 64 Symbol font 38 Symbol sets 39 T Temperature sp...

Страница 86: ...Notes...

Страница 87: ...Notes...

Страница 88: ......

Отзывы: