background image

LE810DT User’s Guide

45

Troubleshooting

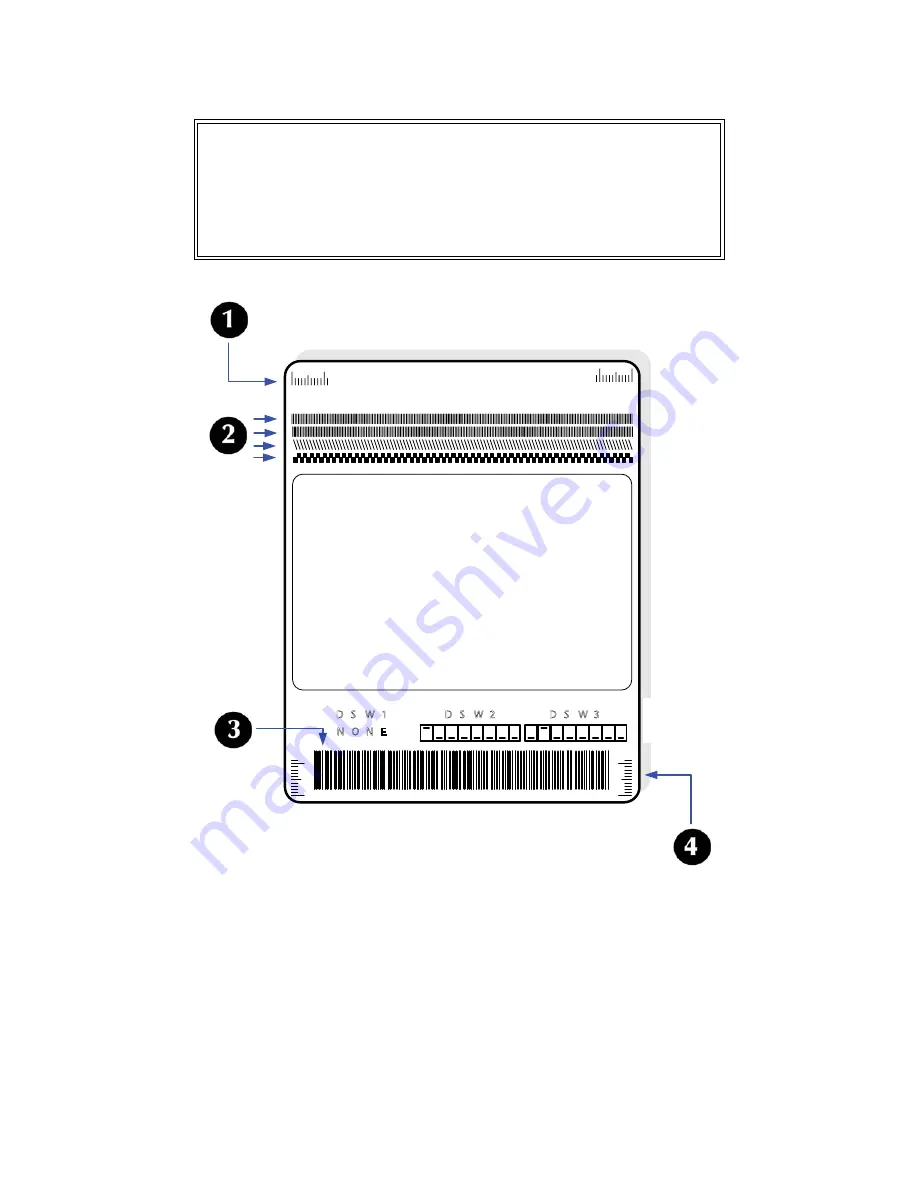
Sample Test Print Label  


1 Compare  this  scale  on  each side to ensure the print is evenly spaced 

horizontally.

2 Visually inspect these rows for voids indicating defective elements.
3 Line sharpness is determined by print speed and darkness.
4 Compare this scale on either side to ensure the print is evenly spaced vertically.

Note

The only print problem that the following sample test 

label does not display is fading of print image from one 

side of the label to the other. This type of fading is the 

result of improper print head balance.

D S W 3

D S W 2

D S W 1

N O N E

Содержание LE810DT

Страница 1: ...User s Guide 59320201 my okidata com RT322 LE810DT...

Страница 2: ...been made to make this document as accurate and helpful as possible we make no warranty of any kind expressed or implied as to the accuracy or completeness of the information contained herein The mos...

Страница 3: ...Mode 32 Dispense Mode 32 Printer Configuration 33 Basic Configuration Modes 33 Normal Mode 33 Advanced Mode 34 Counters Mode 35 Test Print Mode 36 Default Setting Mode 37 Hex Dump Mode 38 Menu Definit...

Страница 4: ...each are below Warning Provides information that if unheeded may result in personal injury Caution Provides information that if unheeded may result in equipment damage Attention Provides information t...

Страница 5: ...ter comes in several configurations which can differ by Connection ports on the back of the printer Default print mode Internal path for print media Note The appearance of your printer may differ some...

Страница 6: ...s Guide 6 Introduction Printer Components 1 Operator Panel 2 Print Assembly 3 Platen Roller 4 Dispenser Latch 5 Print Head Latch 6 Rewinder Shaft only present on some models 7 External Media Slot 8 M...

Страница 7: ...uminates or blinks red when detecting a printer error 3 LINE button Press to switch back and forth between online and offline state Press to scroll through menu options Press to initiate other special...

Страница 8: ...Cable 3 USB Cable included only on models equipped with a USB port 4 Printer front view Printer Installation Site Location Place the printer on a solid flat surface away from hazardous materials Make...

Страница 9: ...e Connection USB RS232C IEEE Models 1 Locate the interface connection ports on the back of the printer 1 USB 2 Serial RS 232C 3 IEEE Parallel 2 Connect the appropriate cable to the interface port then...

Страница 10: ...Plug a 10 100Base T Category 5 Ethernet cable not supplied into the Ethernet port on the printer and then into the computer USB Only Model 1 Locate the USB port on the back of the printer 2 Plug the...

Страница 11: ...to a 120 volt grounded power outlet 2 Turn the printer on 3 Set the interface option in the configuration menus of the operator panel Refer to the Configuration unit of this manual to configure the p...

Страница 12: ...he access plate on the back of the printer as described under Loading Media Fanfold Type Caution The media width should be equal to or just narrower than the print head Using media that does not cover...

Страница 13: ...tomatically separates from the media and is pulled back into the printer and wrapped around the rewinder shaft 2 The self adhesive label 3 without its liner moves out the front of the printer for pick...

Страница 14: ...User s Guide 14 2 Open the printer front door push down on the green dispenser latch 1 to release the door then swing it open 2 3 Open the Print Head Assembly by rotating the Head Latch 1 counter clo...

Страница 15: ...ll go then angle the label roll over it and push the roll back against the printer housing Push the Media Support Guide back in until it fits snugly against the media roll 2 5 Locate the metal Outside...

Страница 16: ...ay while you are loading the media 7 Slide the media into the print path making sure it goes under the Media Hold Down 1 and under the Sensor Assembly 2 Push it against the back of the printer Attenti...

Страница 17: ...e sensor position loosen the green Sensor Adjust Knob located on the bottom side of the Media Transport Assembly and move the sensor in inch increments or finer until the sensor error is cleared After...

Страница 18: ...inter under the Backing Drive Roller 1 11 Pull out the green tab 1 on the front of the Take Up Spindle 2 Notice the two prongs 3 on the Take Up Spindle Pull the liner through the bottom of the printer...

Страница 19: ...e Head Latch back down to close the print head then latch it in place 13 Close the front door and lower the top access cover into place Attention These covers have interlock switches and the printer w...

Страница 20: ...LE810DT User s Guide 20 Roll Type Front Exit with Liner Attached 1 Lift up the Top Access Cover...

Страница 21: ...User s Guide 21 2 Open the printer front door push down on the green dispenser latch 1 to release the door then swing it open 2 3 Open the Print Head Assembly by rotating the Head Latch 1 counter clo...

Страница 22: ...ll go then angle the label roll over it and push the roll back against the printer housing Push the Media Support Guide back in until it fits snugly against the media roll 2 5 Locate the metal Outside...

Страница 23: ...ay while you are loading the media 7 Slide the media into the print path making sure it goes under the Media Hold Down 1 and under the Sensor Assembly 2 Push it against the back of the printer Attenti...

Страница 24: ...ensor position loosen the green Sensor Adjust Knob located on the bottom side of the Media Transport Assembly and move the sensor in inch increments or finer until the sensor error is cleared After th...

Страница 25: ...e Head Latch back down to close the print head then latch it in place 11 Close the front door and lower the top access cover into place Attention These covers have interlock switches and the printer w...

Страница 26: ...LE810DT User s Guide 26 Fanfold Type 1 Lift up the Top Access Cover...

Страница 27: ...the pin holders 1 inside the printer at either end of the bracket until the pins extend from the outer housing b Carefully pull out the pins at either end of the cover plate and save them You will nee...

Страница 28: ...tack of fanfold media behind the printer and feed the first label in through the opening 4 Locate the metal Outside Media Guide 1 under the print path and slide it toward you as far as it will go MEDI...

Страница 29: ...ay while you are loading the media 6 Slide the media into the print path making sure it goes under the Media Hold Down 1 and under the Sensor Assembly 2 Push it against the back of the printer Attenti...

Страница 30: ...ensor position loosen the green Sensor Adjust Knob located on the bottom side of the Media Transport Assembly and move the sensor in inch increments or finer until the sensor error is cleared After th...

Страница 31: ...Head Latch back down to close the print head then latch it in place 10 Close the front door and lower the top access cover into place Attention These covers have interlock switches and the printer wi...

Страница 32: ...ntinuous Mode For printing bulk quantities of labels The liner remains with the label as it exits the printer The media remains in position for printing at all times A printed label is only available...

Страница 33: ...bles starting on page 39 for more information on the modes below Normal Mode For configuring print features that tend to change from job to job See page 39 USER TEST PRINT YES NO LINE NO FEED YES FEED...

Страница 34: ...ONLINE YES NO ADVANCED MODE Toggles Service Mode FEED LINE DARKNESS RANGE A B IGNORE CR LF YES NO LINE FEED Scrolls options LINE Scrolls options Yes FEED No FEED LINE POWER LINE FEED Scrolls options S...

Страница 35: ...eplacement The printer s Counter Mode allows the operator to view the accumulated measurement and also allows the print head counter to be reset to zero COUNTERS HD DSP CUT LIFE DSP COUNT CLEAR YES NO...

Страница 36: ...TEST PRINT YES NO Scrolls options YES FEED NO FEED LINE FEED LINE PRESS FEED KEY TO STOP PRINTING PRINT CONTINUE YES NO TEST PRINT MODE CONFIGURATION BARCODE HEADCHECK FACTORY FEED POWER TEST PRINT S...

Страница 37: ...uration state as received from the factory Use the printer s buttons to select and enter the required options Power printer off and then on again to exit Printer returned to default settings DEFAULT S...

Страница 38: ...ed through the use of the Hex Dump Mode Each line of the printed data is enumerated in the first column the second column contains the data in hexadecimal format and the right column contains the same...

Страница 39: ...print density equates to darker pint images PRINT SPEED 2 3 4 5 6 Permits the printer s printing speed to be established based on inches per second IPS PITCH OFFSET 00MM The label pitch is the distan...

Страница 40: ...ntal adjustment is to the left and right of the reference point respectively IGNORE CR LF YES NO Determines whether the print data code requires deletion Hexadecimal graphic data will not be deleted S...

Страница 41: ...ounters to be reset to zero or to view count in meters printed thus far COUNTERS HD LIFE Allows the selection of which counter to be viewed to reset HD Head counter LIFE Life counter HEAD COUNTER XXXM...

Страница 42: ...he only two options PRESS FEED KEY TO STOP PRINTING Is a directional screen prompting action on how to terminate print activity Press FEED to stop printing and press again to resume printing PRINT CON...

Страница 43: ...factory The selection of YES confirms the operator wants to proceed and the selection of NO allows for exit without default reset If YES is selected resetting will immediately begin Reboot the printer...

Страница 44: ...D button while turning the printer on TEST PRINT MODE appears on the display 2 Press the LINE button to scroll to your choice of CONFIGURATION BARCODE or HEADCHECK then press FEED to select it The dis...

Страница 45: ...ective elements 3 Line sharpness is determined by print speed and darkness 4 Compare this scale on either side to ensure the print is evenly spaced vertically Note The only print problem that the foll...

Страница 46: ...l of residue Removing Debris Use a soft cloth and or a pneumatic blower to remove debris from the printer This process should be performed prior to the removal of residue Warning Disconnect the power...

Страница 47: ...Guide 47 Maintenance Cleaning the Print Head and Platen 1 Turn the printer off and remove the power cable 2 Open the Top Access Cover Attention The print head should be cleaned after every other label...

Страница 48: ...s the full width of the print head 7 Check the swab for any dark coloring or adhesive If either is present run a new swab over the print head Repeat until no residue is found on the swab 8 Next clean...

Страница 49: ...2 6 Pounds 14 8 Kg Input Voltage 100 120 Volts AC 10 50 60 Hertz 5 Power Consumption Peak Time 190VA 130W Idle 24VA 16W Operating Temperature 41 to 104 F 5 to 40 C Storage Temperature 23 to 140 F 5 to...

Страница 50: ...0 100 Base T LE810 DT PAR Parallel IEEE1284 Enhanced Parallel Port LE810 DT SER Serial RS232C 9600 to 57 600 bps LE810 DT USB USB Universal Serial Bus USB Full Speed Method Direct Thermal Maximum Spee...

Страница 51: ...ar Off Media Length 0 669 to 7 01 Inches 17 178 mm Media Length with Backing Paper 0 787 to 7 13 Inches 20 181 mm Type Roll or Fan Fold I Mark or Gap Direct Thermal Thickness 0 003 to 0 010 inches 0 0...

Страница 52: ...26 dots H x 13 dots W G 60 dots H x 40 dots W H 21 dots H x 13 dots W P 20 dots H x 18 dots W Q 28 dots H x 24 dots W R 35 dots H x 31 dots W S 40 dots H x 35 dots W T 48 dots H x 42 dots W U 59 dots...

Страница 53: ...Dimensional QR Code Data Matrix Maxi Code PDF417 Synthetic Symbol Ratios 1 2 1 3 2 5 User definable bar widths Bar Height 4 to 999 dots User programmable Rotation 0 90 180 and 270 Degrees Sequential N...

Отзывы: