background image

COLOUR PRINTING > 32

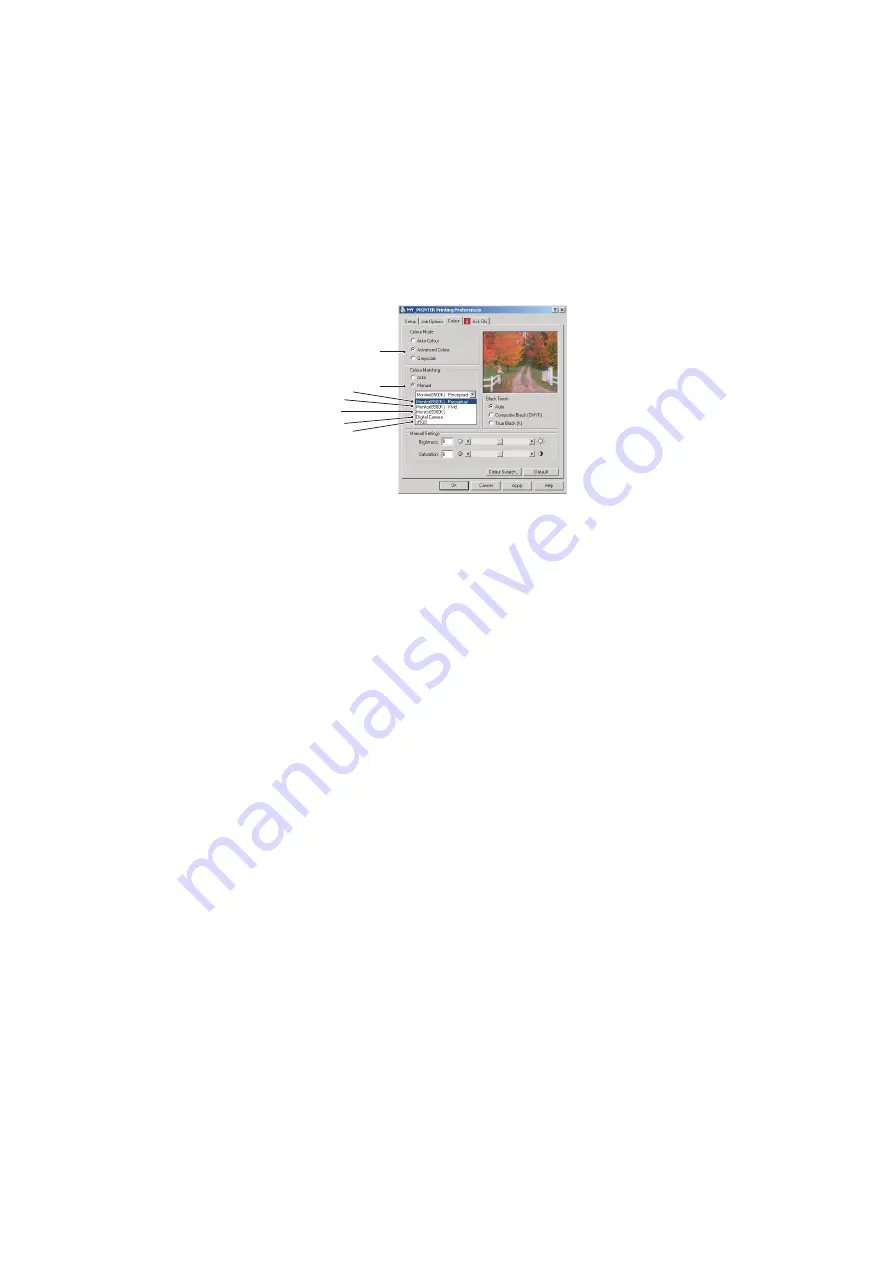
2.

Choose the 

Manual

 colour setting (2) and select from the 

following options:

(a)

Monitor (6500k) Perceptual
Optimised for printing photographs. Colours are printed 

with emphasis on saturation.

(b)

Monitor (6500k) Vivid
Optimised for printing photographs, but with even more 

saturated colours than the Monitor (6500k) Perceptual 

setting.

(c)

Monitor (9300k)
Optimised for printing graphics from applications such 

as Microsoft Office. Colours are printed with emphasis 

on Lightness. 

(d)

Digital Camera
Optimised for printing photographs taken with a digital 

camera. 
Your results will vary depending on the subject and the 

conditions under which the photograph was taken. 

(e)

sRGB
The printer will try to reproduce the sRGB colour space. 

This may be useful if colour matching from an sRGB 

input device such as a scanner or digital camera.

1

c

2

a

e

b

d

Содержание C3100

Страница 1: ...C3100 user s guide ...

Страница 2: ...nd manuals are available from the Oki Europe website http www okieurope com Copyright 2005 All rights reserved Oki and Microline are registered trademarks of Oki Electric Industry Company Ltd Energy Star is a trademark of the United States Environmental Protection Agency Hewlett Packard HP and LaserJet are registered trademarks of Hewlett Packard Company Microsoft MS DOS and Windows are registered...

Страница 3: ...ces in Windows applications 21 Setup tab 22 Job Options tab 23 Colour tab 24 Setting from Windows Control Panel 25 General tab 25 Advanced tab 26 Colour Printing 28 Factors that affect the appearance of prints 28 Tips for printing in colour 30 Printing photographic images 30 Printing from Microsoft Office applications 30 Printing specific colours e g a company logo 30 Adjusting the brightness or i...

Страница 4: ... 45 Memory menu 45 System adjustment menu 46 Maintenance menu 46 Usage menu 46 Printing settings 47 Changing the display language 48 Replacing consumable items 49 Consumable order details 50 Toner cartridge replacement 51 Image drum replacement 58 Replacing the belt unit 63 Fuser replacement 66 Cleaning the LED head 69 Installing additional memory 70 Order codes 70 Memory upgrade 71 Clearing paper...

Страница 5: ...n to supplement the main text which may help you to use and understand the product CAUTION A caution provides additional information which if ignored may result in equipment malfunction or damage WARNING A warning provides additional information which if ignored may result in a risk of personal injury ...

Страница 6: ...t requiring colour l 1200 x 600dpi dots per inch print resolution for high quality image production showing the finest detail l Single Pass Colour Digital LED technology for high speed processing of your printed pages l High speed USB 2 0 interface l Ask Oki a brand new user friendly function that gives a direct link from your printer driver screen but not always illustrated in this guide to a ded...

Страница 7: ... release 2 press 3 Status Panel Status LEDs and operator buttons 4 Front Cover release lift 5 Paper tray Standard blank paper tray Holds up to 300 sheets of 80g m paper 6 Multi purpose feeder shown closed Used for feeding heavier paper stocks envelopes and other special media Also for manual feeding of single sheets when required 7 ON OFF switch 1 3 5 6 7 2 2 4 ...

Страница 8: ... is mainly used for heavy print media When used in conjunction with the multi purpose feed tray the paper path through the printer is essentially straight This avoids bending the paper around curves in the paper path and enables feeding of up to 203g m media 8 USB interface USB cable must be of length 2m maximum for reliable Status Monitor operation 9 AC power socket 10 Rear face up 100 sheet stac...

Страница 9: ...er status is provided by the Status Monitor See Using the Status Monitor on page 35 The Status Panel incorporates 4 LEDs and 2 push button switches as follows 1 Power Ready LED green 2 Paper LED amber 3 Consumable LED amber 4 Alarm LED amber 5 ON LINE switch 6 CANCEL switch The switches enable printer operation while the LEDs display the status of the printer operation 1 2 3 4 5 6 ...

Страница 10: ...ely the switch is released except at job cancellation 5 second press Press 5 Press the switch and hold it for 5 seconds or more The operation starts 5 seconds after pressing the switch even if you hold it pressed for more than 5 seconds Status before pressing ONLINE switch CANCEL switch Press 1 Press 2 Press 5 Press 1 Press 2 Press 5 ON LINE idling mode Shifts to OFF LINE Prints Menu Map 1 Prints ...

Страница 11: ...an error may result 3 Error status you cannot continue to use the printer Intervention is required to recover from the error Fatal errors are irrecoverable and require a service call When several different status situations occur concurrently only the status with the highest priority is displayed on the LEDs Warning status combined with the highest priority normal status is displayed on the LEDs M...

Страница 12: ...justment in progress Paper Indicates paper out warning alarm manual feed request Consumable Indicates consumables life warning alarm consumables installation error Alarm Indicates paper jam cover open error LED Illumination Status Power Ready Green OFF Power OFF ON ON LINE idle Blinking 1 2S cycle OFF LINE this blinking pattern always takes place while an error is occurring Blinking 2 500mS cycle ...

Страница 13: ...r Consumable Alarm Amber OFF ON LINE ON A warning is indicated printing possible Blinking 1 2S cycle An error has occurred but printing can continue if you press the ON LINE or CANCEL switch Blinking 2 500mS cycle An error has occurred You need to replace consumables or remove jammed paper for example The printer then recovers from the error and printing becomes possible again Blinking 3 120mS cyc...

Страница 14: ...curl or other deformations They should also be of the rectangular flap type with glue that remains intact when subjected to hot roll pressure fusing used in this type of printer Window envelopes are not suitable Transparencies should be of the type designed for use in copiers and laser printers We strongly recommend Oki transparencies Order No 01074101 In particular avoid office transparencies des...

Страница 15: ... paper stacker This ensures that the paper path through the printer is almost straight The multi purpose tray can feed paper widths as small as 105mm and lengths up to 1200mm banner printing For paper lengths exceeding 356mm Legal 14in use paper stock between 90g m and 128g m and the face up rear paper stacker Use the multi purpose tray for printing on envelopes and transparencies Up to 50 sheets ...

Страница 16: ...ding order last page on top facing down FACE UP STACKER The face up stacker at the rear of the printer should be opened and the tray extension pulled out when required for use In this condition paper will exit via this path regardless of driver settings The face up stacker can hold up to 100 sheets of 80g m standard paper and can handle stocks up to 203g m Always use this stacker and the multi pur...

Страница 17: ... TRAY 1 Remove the paper tray from the printer 2 Fan the paper to be loaded at the edges 1 and in the middle 2 to ensure that all sheets are properly separated then tap the edges of the stack on a flat surface to make it flush again 3 1 2 3 ...

Страница 18: ...he size of paper being used To prevent paper jams l Do not leave space between the paper and the guides and rear stopper l Do not overfill the paper tray Capacity depends on the type of paper stock l Do not load damaged paper l Do not load paper of different sizes or types at the same time l Do not pull the paper tray out during printing l Close the paper tray gently 2 1 ...

Страница 19: ... paper weight 6 For face up printing make sure the face up rear stacker 3 is open and the paper support 4 is extended Paper is stacked in reverse order and tray capacity is approximately 100 sheets depending on paper weight 7 Always use the face up rear stacker for heavy paper card stock etc CAUTION Do not open or close the rear paper exit while printing as it may result in a paper jam 3 4 ...

Страница 20: ... with pre printed side up and top edge into the printer l Envelopes should be loaded face up with top edge to the left and short edge into the printer l Do not exceed the paper capacity of about 50 sheets or 10 envelopes Maximum stacking depth is 10mm 3 Press the tray latch button 3 inwards to release the paper platform so that the paper is lifted and gripped in place Set the correct paper size fo...

Страница 21: ...ke printer driver settings either from Windows Printers window called Printers and Faxes in Windows XP or from within a Windows application The driver settings you make from Windows are essentially default settings and will be remembered from one Windows session to the next The driver settings you make from within a Windows application are those required for a particular job In both cases you can ...

Страница 22: ...nless you wish to scale the printout to fit another size and should also be the same as the size of paper you will feed into the printer 2 You can choose the source of the paper to feed which may be Tray 1 the standard paper tray or the multi purpose feeder You can also click on the appropriate part of the screen graphic to select your preferred tray 3 The setting for paper weight should match the...

Страница 23: ... and is suitable for draft documents where print quality is less critical 2 You can print watermark text behind the main page image This is useful for marking documents as draft confidential etc 3 You can select up to 999 copies to print consecutively although you will need to top up the paper tray during such a long print run 4 Page orientation can be set to either portrait tall or landscape wide...

Страница 24: ...ptions depending on the image source for your document For example a photograph taken on a digital camera might require different colour matching from a business graphic created in a spreadsheet application Again for most general purpose use Auto is the best choice 3 Printed output may be made lighter or darker or the colours made more saturated and vibrant as required 4 Black areas may be printed...

Страница 25: ... all documents you print from Windows applications and will be remembered from one Windows session to the next GENERAL TAB 1 This area lists some of the main features of your printer 2 This button opens the same windows as described earlier for items which can be set from within application programs Changes you make here however will become the new default settings for all Windows applications 3 T...

Страница 26: ...than a short period the printer could prematurely assume that the document has finished Selecting this option would prevent that situation but printing will be completed a little later as the start is delayed 5 This is the opposite choice to the one above Printing starts as soon as possible after the document begins spooling 6 This specifies that the document should not be spooled but printed dire...

Страница 27: ...completed This allows documents to be re submitted to the printer from the spooler instead of printing again from the application program If you use this option frequently it will require large amounts of disk space on your computer 10 Specifies whether advanced features such as page order and pages per sheet are available depending on your printer For normal printing keep this option enabled If c...

Страница 28: ...mportant factors are listed below Differences between the range of colours a monitor or printer can reproduce l Neither a printer nor a monitor is capable of reproducing the full range of colours visible to the human eye Each device is restricted to a certain range of colours In addition to this a printer cannot reproduce all of the colours displayed on a monitor and vice versa l Both devices use ...

Страница 29: ...or s colour temperature influences how warm or cool the colours look There are several settings found on a typical monitor l 5000k Warmest yellowish lighting typically used in graphic art environments l 6500k Cooler approximates daylight conditions l 9300k Cool the default setting for many monitors and television sets k degrees Kelvin a measurement of temperature How your software application disp...

Страница 30: ...s Microsoft Excel or Microsoft Powerpoint PRINTING SPECIFIC COLOURS E G A COMPANY LOGO There are 2 utilities on your printer driver CD ROM that can help match specific colours Colour Correct Utility Colour Swatch Utility ADJUSTING THE BRIGHTNESS OR INTENSITY OF A PRINT If the print is too light dark you can use the Brightness control to adjust it If the colours are too intense not intense enough u...

Страница 31: ... the printer name and choose Properties 3 Click the Printing Preferences button 1 To open colour matching options from within a Windows application 1 Choose File Print from the application s menu bar 2 Click the Properties button next to the printer name SETTING THE COLOUR MATCHING OPTIONS 1 On the Colour tab select Advanced Colour 1 below for Colour Matching 1 ...

Страница 32: ...0k Perceptual setting c Monitor 9300k Optimised for printing graphics from applications such as Microsoft Office Colours are printed with emphasis on Lightness d Digital Camera Optimised for printing photographs taken with a digital camera Your results will vary depending on the subject and the conditions under which the photograph was taken e sRGB The printer will try to reproduce the sRGB colour...

Страница 33: ...w you to choose your own RGB values Simply click the Colour Swatch button 1 and choose from the options available An example of using the Colour Swatch function You wish to print a logo in a particular shade of red The steps you would follow are 1 Print a colour swatch then select the shade of red that best suits your needs 2 Take a note of the RGB value for the particular shade that you liked 3 U...

Страница 34: ...ed This is useful if you want to change how a specific colour is printed l Colours can be adjusted by changing Hue Saturation and Gamma This is useful if you wish to change the overall colour output Once these colour adjustments have been made the new settings can be selected from the printer driver Colour tab To select adjustments made with the Colour Correct Utility 1 From your application progr...

Страница 35: ...sted at the end of this chapter to set printer parameters such as paper size etc USING THE STATUS MONITOR Viewing the status of the printer and viewing or changing the printer menu settings are carried out as follows 1 Click on Start All Programs and select Okidata OKI C3100 Printer Name Status Monitor The current printer status is shown NOTE For reliable operation of the Status Monitor ensure tha...

Страница 36: ... Setup and Preferences tabs PRINTER STATE TAB This tab is visible by default on opening the Status Monitor and displays detailed information about the status of the printer PRINTER SETUP TAB Selecting this tab provides access to the Printer Settings button which when selected enables you to configure the printer settings ...

Страница 37: ...t to return to the Printer Setup Tab Administrator Settings This tab is intended to be used only by designated staff When you click on the Administrator Settings tab an alert pops up to remind you to take care as changing settings here may affect the operation of your printer The Administrator Settings tab has the settable items including access to the user menus on the left and allows you to conf...

Страница 38: ...he new setting or the Undo button to undo the change Use File Exit to return to the Printer Setup Tab NOTE You can access the printer menu settings window direct by clicking Start All Programs and selecting Okidata OKI C3100 Printer Name Printer Settings ...

Страница 39: ...ose the information displayed by the Status Monitor and how when the Status Monitor appears The default Alert view setting Pop up on alerts ensures that the Status Monitor pops up to inform you of a condition that requires your attention e g a missing or badly fitted toner cartridge ...

Страница 40: ...e following tables INFORMATION MENU This menu provides a quick method of listing various items stored within the printer PRINT MENU This menu provides adjustment of various print job related functions INFORMATION MENU Item Action Explanation PRINT MENU MAP EXECUTE Prints complete menu listing with current settings shown DEMO1 EXECUTE Prints demo page PRINT MENU Item Settings Explanation COPIES 1 9...

Страница 41: ...elects the printer s print engine speed for the type of print media in use MEDIA MENU Item Settings Explanation TRAY1 PAPERSIZE A4 A5 A6 B5 LEGAL14 LEGAL13 5 LEGAL13 LETTER EXECUTIVE CUSTOM Selects the size of paper loaded in Tray 1 For CUSTOM setting see X DIMENSION and Y DIMENSION later in this table TRAY1 MEDIATYPE PLAIN LETTERHEAD BOND RECYCLED ROUGH USERTYPE1 5 Selects the type of media loade...

Страница 42: ...he printer can adjust its internal parameters to better accommodate the selected type of media Usertype 1 5 will be displayed only when registered from the host PC MPT MEDIAWEIGHT MEDIUM 75 90g m HEAVY 91 120g m ULTRA HEAVY 121 203g m Selects the media weight to be fed from the multi purpose tray UNIT OF MEASURE MILLIMETRE INCH Selects the unit of measure for the next two items X DIMENSION 64 210 ...

Страница 43: ...ner cartridge is installed and at intervals of 100 300 and 500 drum counts If a 500 drum count interval occurs during a print job it will occur at the end of that job and will take up to 55 seconds If set to MANUAL this adjustment will only be performed when initiated by the next menu item ADJUST DENSITY EXECUTE Selecting this will perform the auto density set up immediately AJST REGISTRATION EXEC...

Страница 44: ...sing the ON LINE button When set to JOB they are cleared when the print job resumes MANUAL TIMEOUT OFF 30 SEC 60 SEC Specifies how many seconds the printer will wait for paper to be fed in manual feed mode before cancelling the job WAIT TIMEOUT OFF 5 90 300 Specifies how many seconds the printer will wait when received data pauses before forcing a page eject In PostScript Emulation mode the job wi...

Страница 45: ...e SOFT RESET command Only available on Windows 98 and Windows Me SPEED 12MBPS 480MBPS Specifies the maximum transfer speed SERIAL NUMBER ENABLE DISABLE Specifies the USB serial number to differentiate between USB devices connected to the PC If ENABLED the serial number is transmitted If DISABLED the serial number is not transmitted MEMORY MENU Item Settings Explanation RECEIVE BUFFER SIZE AUTO 0 5...

Страница 46: ...NTENANCE MENU Item Settings Explanation MENU RESET EXECUTE Resets menus to default settings SAVE MENU EXECUTE Saves current menu settings as default values At confirmation prompt press ENTER to confirm save or CANCEL to cancel POWER SAVE ENABLE DISABLE Enables or disables automatic power save mode Delay before entering this mode is set in the system configuration menu PAPER BLACK SET 2 0 2 Used fo...

Страница 47: ...PAGE COUNT The total number of prints output by the printer TRAY1 PAGE COUNT The total number of pages fed from Tray 1 MPT PAGE COUNT The total number of pages fed from the multi purpose tray COLOUR PAGE COUNT The total number of pages printed in colour MONO PAGE COUNT The total number of pages printed in monochrome K DRUM LIFE REMAINING C DRUM LIFE REMAINING M DRUM LIFE REMAINING Y DRUM LIFE REMA...

Страница 48: ... instructions to change the language that is displayed in the Status Monitor 1 Start the Status Monitor 2 Select the Printer Setup tab 3 Click on the Printer Settings button on the Printer Setup tab 4 In the System Configuration menu select the required language 5 Click on the Save button ...

Страница 49: ...is sufficient toner for 1 500 pages Conversely at 2 5 there is sufficient toner for 6 000 pages in the cartridge The printer is shipped with sufficient toner for 3 000 A4 pages in each print cartridge of which 1 500 A4 pages worth of toner is used to charge each image drum l Image drum 14 000 pages calculated on typical office usage where 30 of printing is 1 page only 50 is 3 page documents and 20...

Страница 50: ...r s performance and invalidate your warranty Specifications subject to change without notice All trademarks acknowledged Item Life Order No Toner black 3 000 A4 5 42804516 Toner cyan 3 000 A4 5 42804515 Toner magenta 3 000 A4 5 42804514 Toner yellow 3 000 A4 5 42804513 Image drum black 14 000 A4 pages 42126644 Image drum cyan 14 000 A4 pages 42126643 Image drum magenta 14 000 A4 pages 42126642 Ima...

Страница 51: ...ch may be in force concerning waste recycling If you do spill any toner powder lightly brush it off If this is not enough use a cool damp cloth to remove any residue Do not use hot water and never use solvents of any kind They will make stains permanent Switch off the printer and allow the fuser to cool for about 10 minutes before opening the cover CAUTION To avoid toner wastage and possible toner...

Страница 52: ...REPLACING CONSUMABLE ITEMS 52 1 Press the cover release and open the printer s top cover fully WARNING If the printer has been powered on the fuser may be hot This area is clearly labelled Do not touch ...

Страница 53: ...owing a If you are replacing a toner cartridge that has been supplied with your printer release lever has 3 positions pull the coloured toner release lever on the cartridge to be replaced towards the front of the printer 1 Cyan cartridge 2 Magenta cartridge 3 Yellow cartridge 4 Black cartridge 1 2 3 4 ...

Страница 54: ...ion of the arrow but stop at the central upright position 1 b If you are replacing any other toner cartridge lever has 2 positions pull the coloured toner release lever 1 on the cartridge to be replaced fully towards the front of the printer 1 1 ...

Страница 55: ...he green drum surface 6 Remove the new cartridge from its box but leave its wrapping material in place for the moment CAUTION The green image drum surface at the base of the cartridge is very delicate and light sensitive Do not touch it and do not expose it to normal room light for more than 5 minutes If the drum unit needs to be out of the printer for longer than this please wrap the cartridge in...

Страница 56: ...g material and peel off the adhesive tape from the underside of the cartridge 9 Holding the cartridge by its top centre with the coloured lever to the right lower it into the printer over the image drum unit from which the old cartridge was removed 10 Insert the left end of the cartridge into the top of the image drum unit first pushing it against the spring on the drum unit ...

Страница 57: ...gently down on the cartridge to ensure that it is firmly seated push the coloured lever 1 towards the rear of the printer This will lock the cartridge into place and release toner into the image drum unit 12 Finally close the top cover and press down firmly at both sides so that the cover latches closed 2 1 1 ...

Страница 58: ...nutes before opening the cover The printer contains four image drums cyan magenta yellow and black 1 Press the cover release and open the printer s top cover fully CAUTION Static sensitive devices handle with care WARNING If the printer has been powered on the fuser will be hot This area is clearly labelled Do not touch ...

Страница 59: ...Note the positions of the four cartridges 3 Holding it by its top centre lift the image drum complete with its toner cartridge up and out of the printer 1 Cyan cartridge 2 Magenta cartridge 3 Yellow cartridge 4 Black cartridge 1 2 3 4 ...

Страница 60: ...artridge to the right to release the left hand end as shown and withdraw the toner cartridge from the image drum cartridge Place the cartridge on a piece of paper to avoid marking your furniture CAUTION The green image drum surface at the base of the cartridge is very delicate and light sensitive Do not touch it and do not expose it to normal room light for more than 5 minutes If the drum unit nee...

Страница 61: ...ge inside the packaging material for disposal 8 Place the toner cartridge onto the new image drum cartridge as shown Push the left end in first and then lower the right end in It is not necessary to fit a new toner cartridge at this time unless the remaining toner level is very low 9 Push the coloured release lever 1 away from you to lock the toner cartridge onto the new image drum unit and releas...

Страница 62: ...plete assembly by its top centre lower it into place in the printer locating the pegs at each end into their slots in the sides of the printer cavity 11 Finally close the top cover and press down firmly at both sides so that the cover latches closed ...

Страница 63: ...uires replacement approximately every 50 000 pages Switch off the printer and allow the fuser to cool for about 10 minutes before opening the cover 1 Press the cover release and open the printer s top cover fully WARNING If the printer has been powered on the fuser will be hot This area is clearly labelled Do not touch ...

Страница 64: ...yan cartridge 2 Magenta cartridge 3 Yellow cartridge 4 Black cartridge CAUTION The green image drum surface at the base of each cartridge is very delicate and light sensitive Do not touch it and do not expose it to normal room light for more than 5 minutes If the drum unit needs to be out of the printer for longer than this please wrap the cartridge inside a black plastic bag to keep it away from ...

Страница 65: ...t the front and the drive gear towards the rear of the printer Locate the drive gear into the gear inside the printer by the rear left corner of the unit and lower the belt unit flat inside the printer 8 Turn the two fasteners 5 90 to the right until they lock This will secure the belt unit in place 9 Replace the four image drums complete with their toner cartridges into the printer in the same se...

Страница 66: ... Press the cover release and open the printer s top cover fully WARNING If the printer has recently been powered on some fuser components will be very hot Handle the fuser with extreme care holding it only by its handle which will only be mildly warm to the touch A warning label clearly indicates the area If in doubt switch the printer off and wait at least 10 minutes for the fuser to cool before ...

Страница 67: ...ts handle 1 lift the fuser straight up and out of the printer If the fuser is still warm place it on a flat surface which will not be damaged by heat 5 Remove the new fuser from its packaging and remove the transit material 6 Holding the new fuser by its handle make sure that it is the correct way round The retaining levers 2 should be fully upright and the two locating lugs 3 should be towards yo...

Страница 68: ...nto their slots in the metal partition which separates the fuser area from the image drums 8 Push the two retaining levers 2 towards the rear of the printer to lock the fuser in place 9 Finally close the top cover and press down firmly at both sides so that the cover latches closed 2 C M Y K ...

Страница 69: ...ut clearly has white lines or when text is blurred 1 Switch off the printer and open the top cover 2 Gently wipe the LED head surface with LED lens cleaner or soft tissue 3 Close the top cover CAUTION Do not use methyl alcohol or other solvents on the LED head as damage to the lens surface will occur ...

Страница 70: ...0 INSTALLING ADDITIONAL MEMORY This section explains how to install additional RAM memory into your printer as a memory upgrade ORDER CODES Use the following order codes for additional memory l 64MB RAM 01110301 l 256MB RAM 01110302 ...

Страница 71: ...ory capacity of 288MB Installation takes a few minutes and requires a medium size cross head Philips type screwdriver 1 Switch the printer off and disconnect the AC power cable 2 Press the cover release and open the printer s top cover fully 3 Lift the front cover latch and pull open the front cover WARNING If the printer has been powered on recently the fuser will be hot This area is clearly labe...

Страница 72: ...etach it from the printer Place it safely to one side 6 Carefully remove the new memory board from its wrapping Try to handle the board only by its short edges avoiding contact with any metal parts as far as possible In particular avoid touching the edge connector 7 Notice that the memory board has a small cutout in the edge connector which is closer to one end than the other 8 Identify the RAM ex...

Страница 73: ...ter 11 Gently push the board into the RAM expansion slot until it latches in and will not go any further 12 Locate the three retaining clips at the bottom of the side cover into their rectangular holes near the bottom of the printer 13 Close the top of the side cover up to the printer and refit the securing screw removed in step 4 14 Close the front cover and close the top cover pressing down firm...

Страница 74: ... Alert LED on the Status Panel together with the Status Monitor informs you of the event If printing multiple pages or copies do not assume that having cleared an obvious sheet others will not also be stopped somewhere along the path These must also be removed in order to clear the jam fully and restore normal operation 1 If a sheet is well advanced out of the top of the printer simply grip it and...

Страница 75: ... be necessary to remove the four image drums to gain access to the paper path 4 Holding it by its top centre lift the cyan image drum complete with its toner cartridge up and out of the printer 1 Cyan cartridge 2 Magenta cartridge 3 Yellow cartridge 4 Black cartridge 1 2 3 4 ...

Страница 76: ...n any part of the belt unit l To remove a sheet with its leading edge at the front of the belt 1 carefully lift the sheet from the belt and pull it forwards into the internal drum cavity and withdraw the sheet CAUTION The green image drum surface at the base of the cartridge is very delicate and light sensitive Do not touch it and do not expose it to normal room light for more than 5 minutes CAUTI...

Страница 77: ...of the sheet from the belt push the fuser pressure release lever 4 towards the front and down to release the fuser s grip on the sheet and withdraw the sheet through the drum cavity area Then allow the pressure release lever to rise again NOTE If the sheet is well advanced into the fuser only a short length is still visible do not attempt to pull it back Follow the next step to remove it from the ...

Страница 78: ...he drum cavity making sure to locate them in the correct order l Holding the complete assembly by its top centre lower it into place in the printer locating the pegs at each end into their slots in the sides of the printer cavity 1 Cyan cartridge 2 Magenta cartridge 3 Yellow cartridge 4 Black cartridge 1 2 3 4 1 2 3 4 ...

Страница 79: ...the rear exit tray 5 and check for a sheet of paper in the rear path area 6 l Pull out any sheets found in this area l If the sheet is low down in this area and difficult to remove it is probably still gripped by the fuser In this case raise the top cover reach around and press down on the fuser pressure release lever 7 11 If you are not using the rear exit tray close it once paper has been remove...

Страница 80: ...CLEARING PAPER JAMS 80 12 Lift the front cover release and pull open the front cover 13 Check inside the cover for sheets in this area and remove any that you find then close the cover ...

Страница 81: ...erly positioned against the edges of the paper stack When satisfied replace the tray 15 Finally close the top cover and press down firmly at both sides so that the cover latches closed When the jam has been cleared if Jam Recovery is set to ON in the System Configuration Menu the printer will attempt to reprint any pages lost due to paper jams ...

Страница 82: ...et Memory 32MB standard upgradable to 96MB or 288MB Paper capacity at 80g m 300 sheets in main tray 100 sheets in multi purpose tray Paper weight 64 120g m in main tray 75 203g m in multi purpose tray Paper output 250 sheets in face down top stacker 80g m 100 sheets in face up rear stacker 80g m Printer life 420 000 pages or 5 years Duty cycle 35 000 pages per month max Toner life 3 000 pages at 5...

Страница 83: ... Fuser how to replace 66 life expectancy 49 I Image drum how to replace 58 life expectancy 49 Image drums life remaining 47 L Labels recommended types 14 Language changing display and reports language 45 LED head 69 M Maintenance Cleaning LED head 69 Memory installing upgrade 71 menu functions 40 menu settings 47 Menus Colour menu 43 Information menu 40 Maintenance menu 46 Media menu 41 Memory men...

Страница 84: ... Menu 39 Print order face down stacker 19 face up stacker 19 Print settings how to save 22 Printer default settings Windows defaults 25 Printing adjusting image position 46 Priority print queue priority 26 R Resolution setting in Windows 23 S Separator page separating print jobs 27 Setting menus 37 Spooling Windows settings 26 Status Monitor 35 T Toner how to replace 51 life expectancy 49 life rem...

Страница 85: ... ku Tokyo 108 8551 Japan Tel 81 3 5445 6158 Fax 81 3 5445 6189 http www okidata co jp Oki Data Singapore Pte Ltd 78 Shenton Way 09 01 Singapore 079120 Tel 65 221 3722 Fax 65 421 1688 http www okidata com sg Oki Systems Thailand Ltd 956 Udomvidhya Building 6th Floor Rama IV Rd Bangkok 10500 Thailand Tel 662 636 2535 Fax 662 636 2536 http www okisysthai com Oki Hong Kong Limited Suite 1909 Tower3 Ch...

Страница 86: ...central house balfour road hounslow tw3 1hy united kingdom tel 44 0 20 8219 2190 Fax 44 0 20 8219 2199 C3100 07047301 Iss 03 ...

Отзывы: