OHAUS SKIPPER 6000 Скачать руководство пользователя страница 15

SKIPPER 6000 

TPLINK WIFI MODULE INSTALLATION AND CONFIGURATION 


Ref: 

30251574


13 

Set the values of SSID, Access Point MAC and region. 
 

  Wireless Name of Root AP (SSID): Type the name of the wireless network. 

  MAC Address of Root AP (BSSID): Type the value of the Access Point MAC 

address. 


It is not obligatory, just enter a valid value. 

  Region:  Select the country. 

 
Click Save, wait until the changes be applied. 


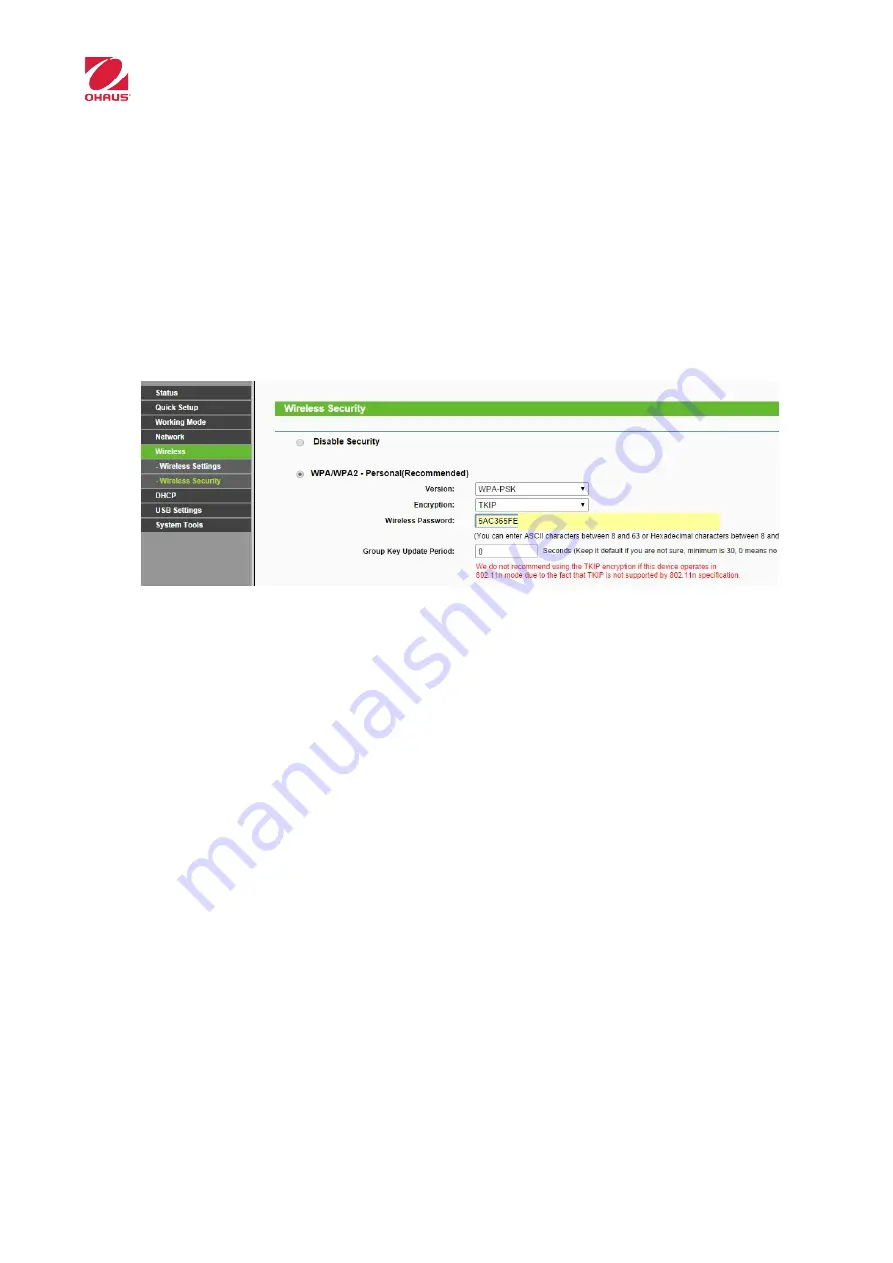
8.  The next step is configured the security, for that go to the menu “Wireless-

>Wireless Security”. 


Choose the encryption type to use and configuration of it. 
Example: 


  Version:    


WPA-PSK 

  Encryption:  


TKIP 

  Wireless Password: 

Password to use 


Click Save, wait until the changes be applied. 


9.  LAN interface configuration. The wifi module has its own IP, which does not 

necessarily have to be in the scale IP range, it is only to access to the module, to 
configure or view the status. 

 
There are three options to IP assignment: 


Static

: The IP is assigned manually. If this method is used, it can maintain a 

correlation between scale IP address and the module. Example: If the scale has 
the IP 172.23.227.150, the module can be set with the address 192.168.0.150. 
Advantage: you can always know the IP module without consulting the DHCP 
server 
Drawback: Requires configure IPs one by one. 


Dynamic:

 The IP address is assigned automatically by a DHCP server thus, to 

access to the module, you have to view your IP through the own DHCP server. 
Advantage: all modules have the same configuration. Therefore it is only 
necessary to load the configuration file. 

WIFIPASSWORD 

Содержание SKIPPER 6000

Страница 1: ...TPLINK WIFI MODULE INSTALLATION AND CONFIGURATION ON SKIPPER 6000...

Страница 2: ...SKIPPER 6000 SCALES 1 2 CONFIGURATION OF WIFI MODULE 9 2 1 INTRODUCTION 9 2 2 ASPECTS TO CONSIDER 9 2 3 MODULE DESCRIPTION 9 2 4 DEVICE MANUAL CONFIGURATION 12 2 5 MODULE CONFIGURATION THROUGH SETTING...

Страница 3: ...PPER 6000 SCALES N CODE DESCRIPTION QTY 1 4511013150 WIFI POWER BOARD 24v 5v 500 TP LINK 1 2 BCT72A WIFI MODULE RESET 1 3 BH P5256 ADAPT WIFI BLACK 1 4 TO CL81Z31006B SCREW CL81Z 3 1x6 ZINC 2 5 TO 798...

Страница 4: ...SKIPPER 6000 TPLINK WIFI MODULE INSTALLATION AND CONFIGURATION Ref 30251574 2 1 Dissasemble the plate support allen 6 tool 2 Dissasemble the housing phillips screw driver...

Страница 5: ...SKIPPER 6000 TPLINK WIFI MODULE INSTALLATION AND CONFIGURATION Ref 30251574 3 3 Assemble the reset button...

Страница 6: ...K WIFI MODULE INSTALLATION AND CONFIGURATION Ref 30251574 4 4 Assemble wifi reset board 1 and wifi module 2 to the support 3 with 2 screws 4 Connect the indicated cable 5 Push the cables to let them a...

Страница 7: ...INSTALLATION AND CONFIGURATION Ref 30251574 5 6 Assemble the module kit with 2 screws 5 Connect the indicated cable 7 Connect the ethernet cable from communication board to wifi module IMPORTANT TO C...

Страница 8: ...SKIPPER 6000 TPLINK WIFI MODULE INSTALLATION AND CONFIGURATION Ref 30251574 6 8 Connect the ethernet cable 6 to the CPU 9 Connect the ethernet cable to the wifi module...

Страница 9: ...SKIPPER 6000 TPLINK WIFI MODULE INSTALLATION AND CONFIGURATION Ref 30251574 7 10 Place the reset sticker 8 11 Assemble the housing...

Страница 10: ...SKIPPER 6000 TPLINK WIFI MODULE INSTALLATION AND CONFIGURATION Ref 30251574 8 12 Assemble the plate support Tighten the screws with torque wrench 1 2Nm...

Страница 11: ...If the module is configured for connection to an access point the scale must not be connected to the same network by cable because it will be created a network loop To communicate with the scale by ca...

Страница 12: ...st but with the difference that connects to the ISP Internet Service Provider wirelessly and not wired It has 2 RJ 45 ports and acts as a switch between these 2 ports when is configured as client Both...

Страница 13: ...CONFIGURATION Ref 30251574 11 IMPORTANT If the module is configured for being connected to an access point never connect the scale to the same network by cable because it will crete a network group L...

Страница 14: ...access to device User admin Password admin 5 The device as default is configured as Wireless Router On the Scale Client operating mode will be used To change it we have to access the menu Working Mode...

Страница 15: ...lied 9 LAN interface configuration The wifi module has its own IP which does not necessarily have to be in the scale IP range it is only to access to the module to configure or view the status There a...

Страница 16: ...IP so it can not be chosen to which module we access unless a static ARP entry is made The menu to configure LAN interface is in Network LAN Type It is possible choose between static IP or Smart IP D...

Страница 17: ...g that you must restart device to apply changes Click on the link for it Click here 11 Create a configuration file It can be generated a configuration file to apply this configuration to other modules...

Страница 18: ...nd go to address 192 168 0 254 4 Enter user and password to access to module 5 From the main menu select System Tools Backup Restore and choose the option select settings file When the file is selecte...

Страница 19: ...EE 802 11g IEEE 802 11b Antenna Type On Board WIRELESS FEATURES Frequency 2 4 2 4835GHz Signal Rate 11n Up to 150Mbps dynamic 11g Up to 54Mbps dynamic 11b Up to 11Mbps dynamic Reception Sensitivity 13...

Страница 20: ...ent Control Host List Access Schedule Rule Management Firewall Security DoS SPI Firewall IP Address Filter MAC Address Filter Domain Filter IP and MAC Address Binding Management Access Control Local M...

Страница 21: ...tion 7 Campus Drive Suite 310 Parsippany NJ 07054 USA Tel 1 973 377 9000 Fax 1 973 944 7177 With offices worldwide www ohaus com 30251574 P N 30251574 A 2015 OHAUS Corporation all rights reserved Prin...

Отзывы: